
Installation Guide
Page 6
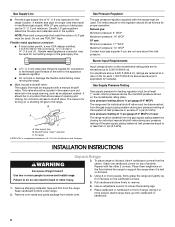
...cm) male pipe thread is laid on its back. Line pressure testing above ½ psi gauge (14" WCP) The range and its individual manual shutoff valve during any pressure testing of the gas supply piping system at test pressures equal to shutoff valve. INSTALLATION INSTRUCTIONS Unpack Range WARNING Excessive...4% for connecting range to the range. Failure to loosen the leveling legs. 7. Keep cardboard bottom under range. 2. Remove oven racks and parts package from the range. With LP gas, piping or tubing size can result in insufficient gas supply. Do not use TEFLON®† ...
...cm) male pipe thread is laid on its back. Line pressure testing above ½ psi gauge (14" WCP) The range and its individual manual shutoff valve during any pressure testing of the gas supply piping system at test pressures equal to shutoff valve. INSTALLATION INSTRUCTIONS Unpack Range WARNING Excessive...4% for connecting range to the range. Failure to loosen the leveling legs. 7. Keep cardboard bottom under range. 2. Remove oven racks and parts package from the range. With LP gas, piping or tubing size can result in insufficient gas supply. Do not use TEFLON®† ...
Installation Guide
Page 8
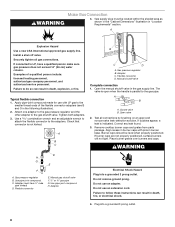
... gas supply line. Apply pipe-joint compound made for use with pins in "Location Requirements" section. Adapter C. Flexible connector D. Open the manual shutoff valve in the following illustration). 2. Closed valve B. Correct any leak found. 3. Flexible connector E. Adapter Electrical Shock Hazard Plug into ...outlet. 8 If connected to LP, have ½" male pipe thread) D. A B A. Remove cooktop burner caps and grates from parts package. Align recess in burner caps with LP gas to the gas pipe. Place burner grates over burners and caps. WARNING Make ...
... gas supply line. Apply pipe-joint compound made for use with pins in "Location Requirements" section. Adapter C. Flexible connector D. Open the manual shutoff valve in the following illustration). 2. Closed valve B. Correct any leak found. 3. Flexible connector E. Adapter Electrical Shock Hazard Plug into ...outlet. 8 If connected to LP, have ½" male pipe thread) D. A B A. Remove cooktop burner caps and grates from parts package. Align recess in burner caps with LP gas to the gas pipe. Place burner grates over burners and caps. WARNING Make ...
Installation Guide
Page 14
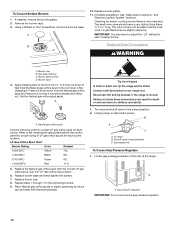
...use and keep with the correct LP gas orifice spud. Replace burner cap. 8. Failure to help hold the Natural gas orifice spud in plastic parts bag for proper cooktop burner flame is moved. B A C A. To Convert Surface Burners 1. Complete installation. Press nut driver down onto the... behind the control panel for proper sizing of LP gas orifice spuds for each cooktop burner. Repeat steps 1 through 7 for each burner. Turn manual shutoff valve to adjust the "LO" setting for the remaining burners. 9. Gas supply line To Convert Gas Pressure Regulator 1. IMPORTANT: You may...
...use and keep with the correct LP gas orifice spud. Replace burner cap. 8. Failure to help hold the Natural gas orifice spud in plastic parts bag for proper cooktop burner flame is moved. B A C A. To Convert Surface Burners 1. Complete installation. Press nut driver down onto the... behind the control panel for proper sizing of LP gas orifice spuds for each cooktop burner. Repeat steps 1 through 7 for each burner. Turn manual shutoff valve to adjust the "LO" setting for the remaining burners. 9. Gas supply line To Convert Gas Pressure Regulator 1. IMPORTANT: You may...


