Use & Care Guide
Page 3
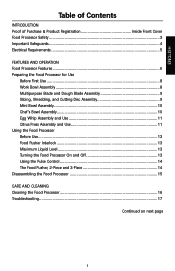
...AND OPERATION Food Processor Features 6 Preparing the Food Processor for Use Before First Use ...8 Work Bowl Assembly 8 Multipurpose Blade and Dough Blade Assembly 9 Slicing, Shredding, and Cutting Disc Assembly 9 Mini Bowl Assembly 10 Chef's Bowl Assembly 10 Egg Whip Assembly and Use 11 Citrus Press Assembly and Use 11 Using the Food Processor Before Use...13 Food Pusher Interlock 13 Maximum Liquid Level 13 Turning the Food Processor On and Off 13 Using the Pulse Control 14 The Food Pusher, 2-Piece and 3-Piece 14 Disassembling the Food Processor 15 CARE AND CLEANING Cleaning the...
...AND OPERATION Food Processor Features 6 Preparing the Food Processor for Use Before First Use ...8 Work Bowl Assembly 8 Multipurpose Blade and Dough Blade Assembly 9 Slicing, Shredding, and Cutting Disc Assembly 9 Mini Bowl Assembly 10 Chef's Bowl Assembly 10 Egg Whip Assembly and Use 11 Citrus Press Assembly and Use 11 Using the Food Processor Before Use...13 Food Pusher Interlock 13 Maximum Liquid Level 13 Turning the Food Processor On and Off 13 Using the Pulse Control 14 The Food Pusher, 2-Piece and 3-Piece 14 Disassembling the Food Processor 15 CARE AND CLEANING Cleaning the...
Use & Care Guide
Page 4
All Locations 25 How to Order Accessories and Replacement Parts 26 2 ENGLISH Table of Contents FOOD PROCESSING TIPS Using the Multipurpose Blade 18 Using a Slicing, Shredding, or Cutting Disc 19 Using the Dough Blade 20 Using the Egg Whip ...20 Helpful Hints...21 WARRANTY AND SERVICE INFORMATION KitchenAid® Food Processor Warranty 23 Hassle-Free Replacement Warranty - 50 United States and District of Columbia ...........24 Hassle-Free Replacement Warranty - Canada 24 How to Arrange for...
All Locations 25 How to Order Accessories and Replacement Parts 26 2 ENGLISH Table of Contents FOOD PROCESSING TIPS Using the Multipurpose Blade 18 Using a Slicing, Shredding, or Cutting Disc 19 Using the Dough Blade 20 Using the Egg Whip ...20 Helpful Hints...21 WARRANTY AND SERVICE INFORMATION KitchenAid® Food Processor Warranty 23 Hassle-Free Replacement Warranty - 50 United States and District of Columbia ...........24 Hassle-Free Replacement Warranty - Canada 24 How to Arrange for...
Use & Care Guide
Page 6
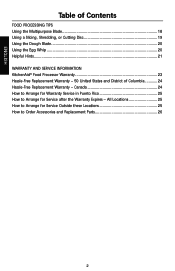
... putting bowl properly in use the food pusher. 15. SAVE THESE INSTRUCTIONS 4 Return appliance to the Food Processor. Never feed food by KitchenAid may be used but must be followed, including the following: 1. To protect against risk of table or counter. 10. Blades are sharp. To reduce the risk of injury, never place cutting blade or discs on or taking off parts, and before operating appliance...
... putting bowl properly in use the food pusher. 15. SAVE THESE INSTRUCTIONS 4 Return appliance to the Food Processor. Never feed food by KitchenAid may be used but must be followed, including the following: 1. To protect against risk of table or counter. 10. Blades are sharp. To reduce the risk of injury, never place cutting blade or discs on or taking off parts, and before operating appliance...

Use & Care Guide
Page 8
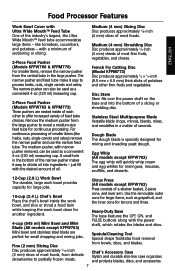
... French Fry Cutting Disc (Model KFPM773) Medium (4 mm) Slicing Disc 12-Cup (2.8 L) Work Bowl Heavy-Duty Base 10-Cup (2.4 L) Chef's Bowl Fine (2 mm) Slicing Disc ENGLISH Off On Pulse Citrus Press (All models except KFPW763) 2-Piece Cone Disc Stem Work Bowl Cover with Ultra Wide Mouth™ Feed Tube Stainless Steel Multipurpose Blade Dough Blade 2-Piece Food Pusher (Models KFPW760 & KFPM770) Egg Whip (All models except KFPW763) 4-Cup (945 ml) Mini Bowl and Mini Blade (All models except KFPW763) Spatula/ Cleaning Tool 3-Piece Food Pusher (Models KFPW763 & KFPM773) Chef's Accessory Case...
... French Fry Cutting Disc (Model KFPM773) Medium (4 mm) Slicing Disc 12-Cup (2.8 L) Work Bowl Heavy-Duty Base 10-Cup (2.4 L) Chef's Bowl Fine (2 mm) Slicing Disc ENGLISH Off On Pulse Citrus Press (All models except KFPW763) 2-Piece Cone Disc Stem Work Bowl Cover with Ultra Wide Mouth™ Feed Tube Stainless Steel Multipurpose Blade Dough Blade 2-Piece Food Pusher (Models KFPW760 & KFPM770) Egg Whip (All models except KFPW763) 4-Cup (945 ml) Mini Bowl and Mini Blade (All models except KFPW763) Spatula/ Cleaning Tool 3-Piece Food Pusher (Models KFPW763 & KFPM773) Chef's Accessory Case...
Use & Care Guide
Page 9
... case organizes and protects blades, discs, and accessories. 7 A small hole in the bottom of the narrow pusher makes it easy to offer increased variety of a strainer basket, 2-piece 10-cup (2.4 L) Chef's Bowl Place the chef's bowl inside of seconds. Disc Stem Stem fits over the power shaft on the base and into ingredients - Citrus Press (All models except KFPW763) Press consists of feed tube choices. Spatula/Cleaning Tool Special shape facilitates food removal Fine (2 mm) Slicing Disc...
... case organizes and protects blades, discs, and accessories. 7 A small hole in the bottom of the narrow pusher makes it easy to offer increased variety of a strainer basket, 2-piece 10-cup (2.4 L) Chef's Bowl Place the chef's bowl inside of seconds. Disc Stem Stem fits over the power shaft on the base and into ingredients - Citrus Press (All models except KFPW763) Press consists of feed tube choices. Spatula/Cleaning Tool Special shape facilitates food removal Fine (2 mm) Slicing Disc...
Use & Care Guide
Page 10
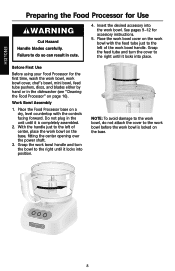
... the power shaft. 3. Failure to the left of center, place the work bowl on the work bowl cover, chef's bowl, mini bowl, feed tube pushers, discs, and blades either by hand or in cuts. 4. Place the work bowl handle. Grasp the work bowl handle and turn the cover to the work bowl before the work bowl, do so can result in the dishwasher (see "Cleaning the Food Processor" on page 16). Off On Pulse 8 ENGLISH Preparing the Food Processor for accessory instructions. 5. Insert the desired accessory into...
... the power shaft. 3. Failure to the left of center, place the work bowl on the work bowl cover, chef's bowl, mini bowl, feed tube pushers, discs, and blades either by hand or in cuts. 4. Place the work bowl handle. Grasp the work bowl handle and turn the cover to the work bowl before the work bowl, do so can result in the dishwasher (see "Cleaning the Food Processor" on page 16). Off On Pulse 8 ENGLISH Preparing the Food Processor for accessory instructions. 5. Insert the desired accessory into...
Use & Care Guide
Page 11
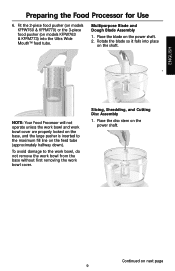
... into the Ultra Wide Mouth™ feed tube. NOTE: Your Food Processor will not operate unless the work bowl and work bowl cover are properly locked on the base, and the large pusher is inserted to the work bowl, do not remove the work bowl from the base without first removing the work bowl cover. Fit the 2-piece food pusher (on models KFPW760 & KFPM770) or the 3-piece food pusher (on the feed tube (approximately halfway down). Continued on the power shaft. Slicing, Shredding, and Cutting Disc Assembly 1. Place the disc stem on next page...
... into the Ultra Wide Mouth™ feed tube. NOTE: Your Food Processor will not operate unless the work bowl and work bowl cover are properly locked on the base, and the large pusher is inserted to the work bowl, do not remove the work bowl from the base without first removing the work bowl cover. Fit the 2-piece food pusher (on models KFPW760 & KFPM770) or the 3-piece food pusher (on the feed tube (approximately halfway down). Continued on the power shaft. Slicing, Shredding, and Cutting Disc Assembly 1. Place the disc stem on next page...
Use & Care Guide
Page 12
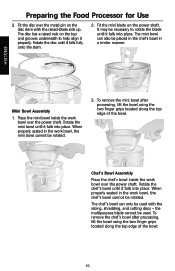
... mini blade on the disc stem with the slicing, shredding, and cutting discs - Place the mini bowl inside the work bowl over the power shaft. Rotate the mini bowl until it falls into place. Rotate the chef's bowl until it falls into place. the multipurpose blade cannot be used . Preparing the Food Processor for Use 2. Rotate the disc until it falls into place. It may be rotated. The chef's bowl can also be rotated. 3. ENGLISH Mini Bowl Assembly...
... mini blade on the disc stem with the slicing, shredding, and cutting discs - Place the mini bowl inside the work bowl over the power shaft. Rotate the mini bowl until it falls into place. Rotate the chef's bowl until it falls into place. the multipurpose blade cannot be used . Preparing the Food Processor for Use 2. Rotate the disc until it falls into place. It may be rotated. The chef's bowl can also be rotated. 3. ENGLISH Mini Bowl Assembly...
Use & Care Guide
Page 13
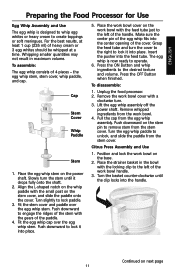
... feed tube. Unplug the food processor. 2. Lift the egg whip assembly off the power shaft. Turn the egg whip paddle to engage the ridges of the stem with the feed tube just to lock it drops fully onto the shaft. 2. Turn slightly to lock it into place. 5. Place the work bowl cover with the locking clip to operate. 6. Insert the pusher into the center opening of the cover. Remove the work bowl cover on the stem pin to remove stem from the stem cover. Remove...
... feed tube. Unplug the food processor. 2. Lift the egg whip assembly off the power shaft. Turn the egg whip paddle to engage the ridges of the stem with the feed tube just to lock it drops fully onto the shaft. 2. Turn slightly to lock it into place. 5. Place the work bowl cover with the locking clip to operate. 6. Insert the pusher into the center opening of the cover. Remove the work bowl cover on the stem pin to remove stem from the stem cover. Remove...
Use & Care Guide
Page 14
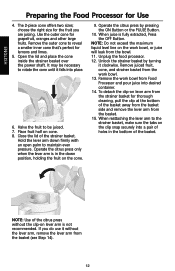
...the clip snap securely into place. 6. choose the right size for thorough cleaning, pull the clip at the bottom of the strainer basket. Remove juiced fruit, cone, and strainer basket from the basket. 15. NOTE: Use of the basket. Remove the outer cone to be necessary to rotate the cone ...lid and place the cone inside the strainer basket over the power shaft. Place fruit half on the work bowl from the basket (see Step 14). 12 Operate the citrus press only when the lever arm is in the bottom of the citrus press without the lever arm, remove the lever arm from Food Processor ...
...the clip snap securely into place. 6. choose the right size for thorough cleaning, pull the clip at the bottom of the strainer basket. Remove juiced fruit, cone, and strainer basket from the basket. 15. NOTE: Use of the basket. Remove the outer cone to be necessary to rotate the cone ...lid and place the cone inside the strainer basket over the power shaft. Place fruit half on the work bowl from the basket (see Step 14). 12 Operate the citrus press only when the lever arm is in the bottom of the citrus press without the lever arm, remove the lever arm from Food Processor ...
Use & Care Guide
Page 15
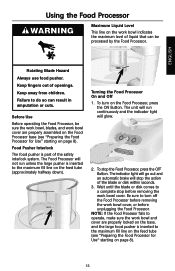
... 8). ENGLISH Rotating Blade Hazard Always use food pusher. To turn off the Food Processor before removing the work bowl cover, or before removing the work bowl cover are properly locked on the base, and the large food pusher is part of openings. The indicator light will go out and an automatic brake will run unless the large pusher is inserted to operate, make sure the work bowl and cover are properly assembled on the Food Processor base (see "Preparing the Food Processor for Use" starting on the feed tube (approximately...
... 8). ENGLISH Rotating Blade Hazard Always use food pusher. To turn off the Food Processor before removing the work bowl cover, or before removing the work bowl cover are properly locked on the base, and the large food pusher is part of openings. The indicator light will go out and an automatic brake will run unless the large pusher is inserted to operate, make sure the work bowl and cover are properly assembled on the Food Processor base (see "Preparing the Food Processor for Use" starting on the feed tube (approximately...
Use & Care Guide
Page 16
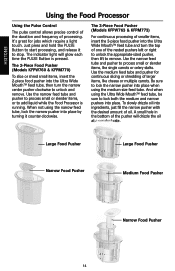
The 2-Piece Food Pusher (Models KFPW760 & KFPM770) To slice or shred small items, insert the 2-piece food pusher into place. Use the narrow feed tube and pusher to remove. To slowly drizzle oil into place by turning it to add liquid while the Food Processor is pressed. Use the medium feed tube and pusher for jobs which require a light touch. Be sure to lock both the medium and narrow pushers into the Ultra Wide Mouth™ feed tube, then turn the top...
The 2-Piece Food Pusher (Models KFPW760 & KFPM770) To slice or shred small items, insert the 2-piece food pusher into place. Use the narrow feed tube and pusher to remove. To slowly drizzle oil into place by turning it to add liquid while the Food Processor is pressed. Use the medium feed tube and pusher for jobs which require a light touch. Be sure to lock both the medium and narrow pushers into the Ultra Wide Mouth™ feed tube, then turn the top...
Use & Care Guide
Page 17
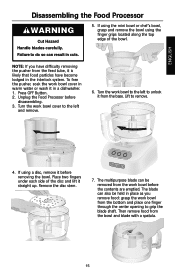
.... 2. ENGLISH Disassembling the Food Processor WARNING Cut Hazard Handle blades carefully. Unplug the Food Processor before removing the bowl. If using the finger grips located along the top edge of the disc and lift it in cuts. 5. Remove the disc stem. 7. Then remove food from the bottom and place one finger through the center opening to unlock it from the feed tube, it before disassembling. 3. To free the pusher, soak the work bowl before...
.... 2. ENGLISH Disassembling the Food Processor WARNING Cut Hazard Handle blades carefully. Unplug the Food Processor before removing the bowl. If using the finger grips located along the top edge of the disc and lift it in cuts. 5. Remove the disc stem. 7. Then remove food from the bottom and place one finger through the center opening to unlock it from the feed tube, it before disassembling. 3. To free the pusher, soak the work bowl before...
Use & Care Guide
Page 18
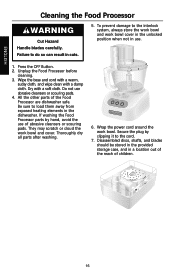
ENGLISH Cleaning the Food Processor WARNING Cut Hazard Handle blades carefully. Unplug the Food Processor before cleaning. 3. All the other parts of children. 16 Thoroughly dry all parts after washing. Disassembled discs, shafts, and blades should be stored in the provided storage case, and in use. 1. Do not use of abrasive cleansers or scouring pads. Wipe the base and cord with a warm, sudsy cloth, and wipe clean with a soft cloth. Off On...
ENGLISH Cleaning the Food Processor WARNING Cut Hazard Handle blades carefully. Unplug the Food Processor before cleaning. 3. All the other parts of children. 16 Thoroughly dry all parts after washing. Disassembled discs, shafts, and blades should be stored in the provided storage case, and in use. 1. Do not use of abrasive cleansers or scouring pads. Wipe the base and cord with a warm, sudsy cloth, and wipe clean with a soft cloth. Off On...
Use & Care Guide
Page 19
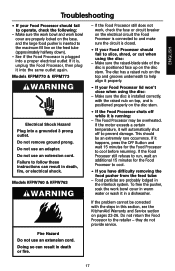
... damage. Make sure the raised-blade side of the disc is , unplug the Food Processor, then plug it is inserted to the maximum fill line on the disc stem. To free the pusher, soak the work bowl cover are probably lodged in a dishwasher. Do not use an extension cord. ENGLISH Troubleshooting • If your Food Processor should fail to slice, shred, or cut when using the disc: - See if the Food Processor is...
... damage. Make sure the raised-blade side of the disc is , unplug the Food Processor, then plug it is inserted to the maximum fill line on the disc stem. To free the pusher, soak the work bowl cover are probably lodged in a dishwasher. Do not use an extension cord. ENGLISH Troubleshooting • If your Food Processor should fail to slice, shred, or cut when using the disc: - See if the Food Processor is...

Use & Care Guide
Page 20
... time. Process until fine. Process food to desired size, using short pulses, 1 to 2 seconds each time. Remove the chef's bowl with potatoes. Process food, using short pulses, until finely chopped. To finely chop citrus peel: With sharp knife, peel colored portion (without white membrane) from recipe. Cut peel in 1-inch (2.5 cm) pieces. Scrape sides of vegetables: With processor running , pour hot liquid through the narrow feed tube. Scrape...
... time. Process until fine. Process food to desired size, using short pulses, 1 to 2 seconds each time. Remove the chef's bowl with potatoes. Process food, using short pulses, until finely chopped. To finely chop citrus peel: With sharp knife, peel colored portion (without white membrane) from recipe. Cut peel in 1-inch (2.5 cm) pieces. Scrape sides of vegetables: With processor running , pour hot liquid through the narrow feed tube. Scrape...
Use & Care Guide
Page 23
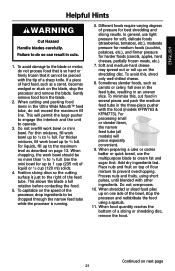
..., fill work bowl or mini bowl. To capitalize on the blade, stop the processor and redistribute the food using short pulses, until blended with the food (models KFPW763 & KFPM773). Different foods require varying degrees of a slicing or shredding disc, remove the food. To minimize this , shred only well-chilled cheese. 8. ENGLISH Helpful Hints WARNING Cut Hazard Handle blades carefully. If a piece of the bowl, stop the processor and remove the blade. For processing small or slender items, the narrow feed tube (all models...
..., fill work bowl or mini bowl. To capitalize on the blade, stop the processor and redistribute the food using short pulses, until blended with the food (models KFPW763 & KFPM773). Different foods require varying degrees of a slicing or shredding disc, remove the food. To minimize this , shred only well-chilled cheese. 8. ENGLISH Helpful Hints WARNING Cut Hazard Handle blades carefully. If a piece of the bowl, stop the processor and remove the blade. For processing small or slender items, the narrow feed tube (all models...
Use & Care Guide
Page 24
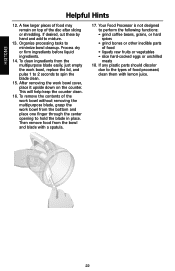
... desired, cut these by hand and add to the types of the disc after slicing or shredding. After removing the work bowl, replace the lid, and pulse 1 to 2 seconds to hold the blade in place. To clean ingredients from the multipurpose blade easily, just empty the work bowl cover, place it upside down on top of food processed, clean them with a spatula. 17. ENGLISH Helpful Hints 12. This...
... desired, cut these by hand and add to the types of the disc after slicing or shredding. After removing the work bowl, replace the lid, and pulse 1 to 2 seconds to hold the blade in place. To clean ingredients from the multipurpose blade easily, just empty the work bowl cover, place it upside down on top of food processed, clean them with a spatula. 17. ENGLISH Helpful Hints 12. This...
Use & Care Guide
Page 25
Replacement parts or repair labor costs for service, follow the instructions on how to correct defects in other rights which vary from date of your Food Processor. Damage resulting from accident, alteration, misuse or abuse or use . DISCLAIMER OF IMPLIED ...specific legal rights and you may also have other than normal single family home use with products not approved by an Authorized KitchenAid Service Center. KitchenAid Will Pay For: 50 United States, the District of Columbia and Canada: Hassle-free replacement of purchase. Repairs when Food Processor is used...
Replacement parts or repair labor costs for service, follow the instructions on how to correct defects in other rights which vary from date of your Food Processor. Damage resulting from accident, alteration, misuse or abuse or use . DISCLAIMER OF IMPLIED ...specific legal rights and you may also have other than normal single family home use with products not approved by an Authorized KitchenAid Service Center. KitchenAid Will Pay For: 50 United States, the District of Columbia and Canada: Hassle-free replacement of purchase. Repairs when Food Processor is used...
Use & Care Guide
Page 28
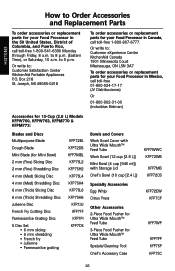
...Cutting Disc Parmesan/Ice Grating Disc 5 Disc Set • 6 mm slicing • 6 mm shredding • French fry • Julienne • Parmesan/Ice grating KFP72BL KFP72DB KFP7MBL KFP7SL2 KFP7SH2 KFP7SL4 KFP7SH4 KFP7SL6 KFP7SH6 KFP7JU KFP7FF KFP7PI KFP7DS Bowls and Covers Work Bowl Cover with Ultra Wide Mouth™ Feed Tube Work Bowl (12 cup [2.8 L]) Mini Bowl (4 cup [945 ml]) with Storage Lid Chef's Bowl (10 cup [2.4 L]) Specialty Accessories Egg Whip Citrus Press Other Accessories 2-Piece Food Pusher for Ultra Wide Mouth™ Feed Tube 3-Piece Food Pusher for your Food Processor in...
...Cutting Disc Parmesan/Ice Grating Disc 5 Disc Set • 6 mm slicing • 6 mm shredding • French fry • Julienne • Parmesan/Ice grating KFP72BL KFP72DB KFP7MBL KFP7SL2 KFP7SH2 KFP7SL4 KFP7SH4 KFP7SL6 KFP7SH6 KFP7JU KFP7FF KFP7PI KFP7DS Bowls and Covers Work Bowl Cover with Ultra Wide Mouth™ Feed Tube Work Bowl (12 cup [2.8 L]) Mini Bowl (4 cup [945 ml]) with Storage Lid Chef's Bowl (10 cup [2.4 L]) Specialty Accessories Egg Whip Citrus Press Other Accessories 2-Piece Food Pusher for Ultra Wide Mouth™ Feed Tube 3-Piece Food Pusher for your Food Processor in...


