Use & Care Guide
Page 3
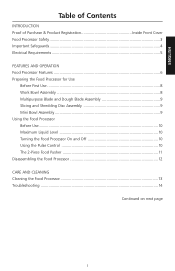
... Front Cover Food Processor Safety ...3 Important Safeguards ...4 Electrical Requirements 5 FEATURES AND OPERATION Food Processor Features 6 Preparing the Food Processor for Use Before First Use ...8 Work Bowl Assembly 8 Multipurpose Blade and Dough Blade Assembly 9 Slicing and Shredding Disc Assembly 9 Mini Bowl Assembly 9 Using the Food Processor Before Use...10 Maximum Liquid Level 10 Turning the Food Processor On and Off 10 Using the Pulse Control 10 The 2-Piece Food Pusher 11 Disassembling the Food Processor 12 CARE AND CLEANING Cleaning the Food Processor 13 Troubleshooting...
... Front Cover Food Processor Safety ...3 Important Safeguards ...4 Electrical Requirements 5 FEATURES AND OPERATION Food Processor Features 6 Preparing the Food Processor for Use Before First Use ...8 Work Bowl Assembly 8 Multipurpose Blade and Dough Blade Assembly 9 Slicing and Shredding Disc Assembly 9 Mini Bowl Assembly 9 Using the Food Processor Before Use...10 Maximum Liquid Level 10 Turning the Food Processor On and Off 10 Using the Pulse Control 10 The 2-Piece Food Pusher 11 Disassembling the Food Processor 12 CARE AND CLEANING Cleaning the Food Processor 13 Troubleshooting...
Use & Care Guide
Page 4
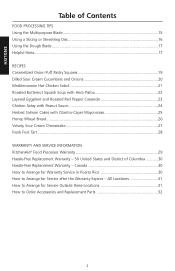
ENGLISH Table of Contents FOOD PROCESSING TIPS Using the Multipurpose Blade 15 Using a Slicing or Shredding Disc 16 Using the Dough Blade 17 Helpful Hints...17 RECIPES Caramelized Onion Puff Pastry Squares 19 Dilled Sour Cream Cucumbers and Onions 20 Mediterranean Hot Chicken Salad 21 Roasted Butternut Squash Soup with Herb Pistou 22 Layered Eggplant and Roasted Red Pepper Casserole 23 Chicken Satay with...
ENGLISH Table of Contents FOOD PROCESSING TIPS Using the Multipurpose Blade 15 Using a Slicing or Shredding Disc 16 Using the Dough Blade 17 Helpful Hints...17 RECIPES Caramelized Onion Puff Pastry Squares 19 Dilled Sour Cream Cucumbers and Onions 20 Mediterranean Hot Chicken Salad 21 Roasted Butternut Squash Soup with Herb Pistou 22 Layered Eggplant and Roasted Red Pepper Casserole 23 Chicken Satay with...
Use & Care Guide
Page 6
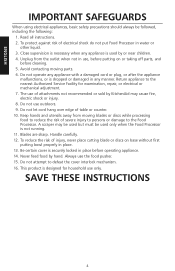
... should always be used only when the Food Processor is designed for examination, repair, or electrical or mechanical adjustment. 7. Read all instructions. 2. Do not use the food pusher. 15. Do not attempt to the nearest Authorized Service Facility for household use only. Do not operate any manner. Never feed food by or near children. 4. Always use outdoors. 9. Unplug from moving parts. 6. Handle carefully. 12. Blades are sharp. This...
... should always be used only when the Food Processor is designed for examination, repair, or electrical or mechanical adjustment. 7. Read all instructions. 2. Do not use the food pusher. 15. Do not attempt to the nearest Authorized Service Facility for household use only. Do not operate any manner. Never feed food by or near children. 4. Always use outdoors. 9. Unplug from moving parts. 6. Handle carefully. 12. Blades are sharp. This...
Use & Care Guide
Page 8
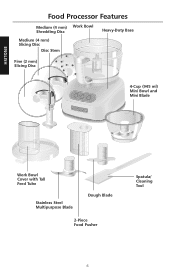
ENGLISH Food Processor Features Medium (4 mm) Work Bowl Shredding Disc Heavy-Duty Base Medium (4 mm) Slicing Disc Disc Stem Fine (2 mm) Slicing Disc Off On Pulse 4-Cup (945 ml) Mini Bowl and Mini Blade Work Bowl Cover with Tall Feed Tube Stainless Steel Multipurpose Blade Dough Blade 2-Piece Food Pusher Spatula/ Cleaning Tool 6
ENGLISH Food Processor Features Medium (4 mm) Work Bowl Shredding Disc Heavy-Duty Base Medium (4 mm) Slicing Disc Disc Stem Fine (2 mm) Slicing Disc Off On Pulse 4-Cup (945 ml) Mini Bowl and Mini Blade Work Bowl Cover with Tall Feed Tube Stainless Steel Multipurpose Blade Dough Blade 2-Piece Food Pusher Spatula/ Cleaning Tool 6
Use & Care Guide
Page 9
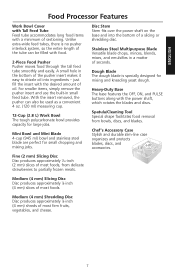
... emulsifies in small feed tube. ENGLISH Food Processor Features Work Bowl Cover with Tall Feed Tube Feed tube accommodates long food items with the power shaft, which rotates the blades and discs. For smaller items, simply remove the pusher insert and use the built-in a matter of oil. Spatula/Cleaning Tool Special shape facilitates food removal from delicate strawberries to drizzle oil into the bottom of most firm fruits, vegetables, and cheese. 7 Chef's Accessory Case Stylish and...
... emulsifies in small feed tube. ENGLISH Food Processor Features Work Bowl Cover with Tall Feed Tube Feed tube accommodates long food items with the power shaft, which rotates the blades and discs. For smaller items, simply remove the pusher insert and use the built-in a matter of oil. Spatula/Cleaning Tool Special shape facilitates food removal from delicate strawberries to drizzle oil into the bottom of most firm fruits, vegetables, and cheese. 7 Chef's Accessory Case Stylish and...
Use & Care Guide
Page 10
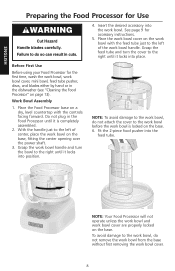
... power shaft. 3. Insert the desired accessory into the feed tube. With the handle just to the left of the work bowl cover are properly locked on page 13). Grasp the feed tube and turn the bowl to the work bowl cover, mini bowl, feed tube pusher, discs, and blades either by hand or in the Food Processor until it locks into position. Do not plug in the dishwasher (see "Cleaning the Food Processor" on the base. ENGLISH Preparing the Food Processor for accessory instructions. 5. Before First Use...
... power shaft. 3. Insert the desired accessory into the feed tube. With the handle just to the left of the work bowl cover are properly locked on page 13). Grasp the feed tube and turn the bowl to the work bowl cover, mini bowl, feed tube pusher, discs, and blades either by hand or in the Food Processor until it locks into position. Do not plug in the dishwasher (see "Cleaning the Food Processor" on the base. ENGLISH Preparing the Food Processor for accessory instructions. 5. Before First Use...
Use & Care Guide
Page 11
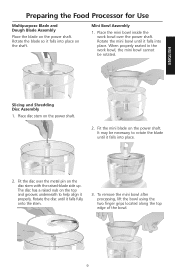
... mini blade on the power shaft. 2. Rotate the disc until it properly. Mini Bowl Assembly 1. Slicing and Shredding Disc Assembly 1. Place disc stem on the power shaft. To remove the mini bowl after processing, lift the bowl using the two finger grips located along the top edge of the bowl. 9 ENGLISH Preparing the Food Processor for Use Multipurpose Blade and Dough Blade Assembly Place the blade on the shaft. Fit the disc over the power shaft. Rotate the mini bowl until it falls into place on the power shaft...
... mini blade on the power shaft. 2. Rotate the disc until it properly. Mini Bowl Assembly 1. Slicing and Shredding Disc Assembly 1. Place disc stem on the power shaft. To remove the mini bowl after processing, lift the bowl using the two finger grips located along the top edge of the bowl. 9 ENGLISH Preparing the Food Processor for Use Multipurpose Blade and Dough Blade Assembly Place the blade on the shaft. Fit the disc over the power shaft. Rotate the mini bowl until it falls into place on the power shaft...

Use & Care Guide
Page 12
... Food Processor fails to operate, make sure the work bowl and cover are properly assembled on the Food Processor base (see "Preparing the Food Processor for Use" starting on the work bowl cover, or before removing the work bowl indicates the maximum level of the blade or disc within seconds. 3. Just press and hold the PULSE Button to start processing, and release it to do so can be sure the work bowl, blades, and work bowl cover. ENGLISH Using the Food Processor WARNING Turning the Food Processor...
... Food Processor fails to operate, make sure the work bowl and cover are properly assembled on the Food Processor base (see "Preparing the Food Processor for Use" starting on the work bowl cover, or before removing the work bowl indicates the maximum level of the blade or disc within seconds. 3. Just press and hold the PULSE Button to start processing, and release it to do so can be sure the work bowl, blades, and work bowl cover. ENGLISH Using the Food Processor WARNING Turning the Food Processor...
Use & Care Guide
Page 13
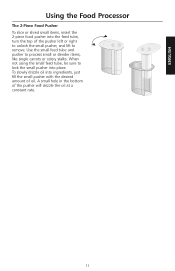
When not using the small feed tube, be sure to remove. A small hole in the bottom of oil. ENGLISH Using the Food Processor The 2-Piece Food Pusher To slice or shred small items, insert the 2-piece food pusher into the feed tube, turn the top of the pusher left or right to unlock the small pusher, and lift to lock the small pusher into ingredients, just fill the small pusher with the desired amount of the pusher will drizzle the oil at...
When not using the small feed tube, be sure to remove. A small hole in the bottom of oil. ENGLISH Using the Food Processor The 2-Piece Food Pusher To slice or shred small items, insert the 2-piece food pusher into the feed tube, turn the top of the pusher left or right to unlock the small pusher, and lift to lock the small pusher into ingredients, just fill the small pusher with the desired amount of the pusher will drizzle the oil at...
Use & Care Guide
Page 14
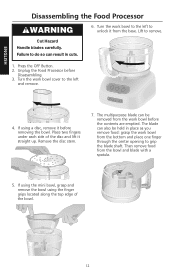
... Handle blades carefully. Press the OFF Button. 2. Lift to unlock it straight up. The multipurpose blade can result in place as you remove food: grasp the work bowl before the contents are emptied. Unplug the Food Processor before removing the bowl. ENGLISH Disassembling the Food Processor WARNING 6. Turn the work bowl cover to the left to remove. Place two fingers under each side of the bowl. 12 If using the mini bowl, grasp and remove...
... Handle blades carefully. Press the OFF Button. 2. Lift to unlock it straight up. The multipurpose blade can result in place as you remove food: grasp the work bowl before the contents are emptied. Unplug the Food Processor before removing the bowl. ENGLISH Disassembling the Food Processor WARNING 6. Turn the work bowl cover to the left to remove. Place two fingers under each side of the bowl. 12 If using the mini bowl, grasp and remove...

Use & Care Guide
Page 15
... Handle blades carefully. If washing the Food Processor parts by clipping it to the interlock system, always store the work bowl and work bowl. All the other parts of children. 13 Thoroughly dry all parts after washing. Press the OFF Button. 2. Wipe the base and cord with a warm, sudsy cloth, and wipe clean with a soft cloth. They may scratch or cloud the work bowl and cover. Disassembled discs, shafts, and blades...
... Handle blades carefully. If washing the Food Processor parts by clipping it to the interlock system, always store the work bowl and work bowl. All the other parts of children. 13 Thoroughly dry all parts after washing. Press the OFF Button. 2. Wipe the base and cord with a warm, sudsy cloth, and wipe clean with a soft cloth. They may scratch or cloud the work bowl and cover. Disassembled discs, shafts, and blades...
Use & Care Guide
Page 16
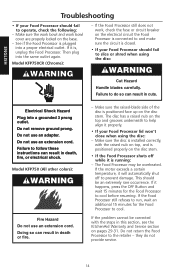
... in cuts. ENGLISH Troubleshooting • If your Food Processor lid won't close when using the disc: WARNING Cut Hazard Handle blades carefully. Electrical Shock Hazard Plug into a grounded 3 prong outlet. If the Food Processor still does not work bowl cover are properly locked on the disc stem. • If the Food Processor shuts off to do not provide service. 14 Do not return the Food Processor to cool. The disc has a raised nub...
... in cuts. ENGLISH Troubleshooting • If your Food Processor lid won't close when using the disc: WARNING Cut Hazard Handle blades carefully. Electrical Shock Hazard Plug into a grounded 3 prong outlet. If the Food Processor still does not work bowl cover are properly locked on the disc stem. • If the Food Processor shuts off to do not provide service. 14 Do not return the Food Processor to cool. The disc has a raised nub...

Use & Care Guide
Page 17
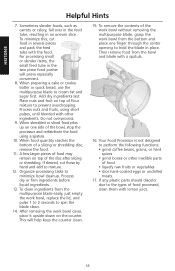
...) flour from recipe per 1⁄2 cup (120 ml) dried fruit. To make sure work bowl. Process food to desired size, using short pulses, until reaching desired texture. To finely chop citrus peel: With sharp knife, peel colored portion (without white membrane) from recipe. To chop nuts or make nut butters: Process up to 1 pound (455 g) at a time to desired size, using the shredding disc. For best results, make bread, cookie...
...) flour from recipe per 1⁄2 cup (120 ml) dried fruit. To make sure work bowl. Process food to desired size, using short pulses, until reaching desired texture. To finely chop citrus peel: With sharp knife, peel colored portion (without white membrane) from recipe. To chop nuts or make nut butters: Process up to 1 pound (455 g) at a time to desired size, using the shredding disc. For best results, make bread, cookie...

Use & Care Guide
Page 18
... use the multi-purpose blade to fit feed tube horizontally. To shred spinach and other leaves: Stack leaves. ENGLISH Food Processing Tips To grate hard cheeses, such as Parmesan and Romano: Never attempt to process cheese that cannot be added through the feed tube while the processor is running. Place in the two-piece food pusher. Re-stack slices and position vertically or horizontally in feed tube. Process, using even pressure. Process using...
... use the multi-purpose blade to fit feed tube horizontally. To shred spinach and other leaves: Stack leaves. ENGLISH Food Processing Tips To grate hard cheeses, such as Parmesan and Romano: Never attempt to process cheese that cannot be added through the feed tube while the processor is running. Place in the two-piece food pusher. Re-stack slices and position vertically or horizontally in feed tube. Process, using even pressure. Process using...

Use & Care Guide
Page 19
... on the blade, stop the processor and remove the blade. Process, using even pressure. Failure to do not process food that is just to the right of hard food, such as stir-fry meats: Cut or roll food to be very cold. Do not overfill work bowl should be pierced with the tip of the processor, drop ingredients to fit feed tube. When chopping, the work bowl or mini bowl. Different foods require...
... on the blade, stop the processor and remove the blade. Process, using even pressure. Failure to do not process food that is just to the right of hard food, such as stir-fry meats: Cut or roll food to be very cold. Do not overfill work bowl should be pierced with the tip of the processor, drop ingredients to fit feed tube. When chopping, the work bowl or mini bowl. Different foods require...
Use & Care Guide
Page 20
... bottom and place one side of the work bowl without removing the multipurpose blade, grasp the work bowl cover, place it upside down on top of flour mixture to hold the blade in several pieces and pack the feed tube with other inedible parts of a slicing or shredding disc, remove the food. 11. Your Food Processor is not designed to the types of food processed, clean them with a spatula. 16. If any plastic...
... bottom and place one side of the work bowl without removing the multipurpose blade, grasp the work bowl cover, place it upside down on top of flour mixture to hold the blade in several pieces and pack the feed tube with other inedible parts of a slicing or shredding disc, remove the food. 11. Your Food Processor is not designed to the types of food processed, clean them with a spatula. 16. If any plastic...
Use & Care Guide
Page 31
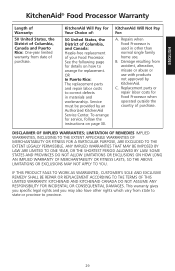
... for Food Processor when operated outside the country of purchase. C. Replacement parts or repair labor costs for service, follow the instructions on how to correct defects in other rights which vary from accident, alteration, misuse or abuse or use . ...specific legal rights and you may also have other than normal single family home use with products not approved by an Authorized KitchenAid Service Center. KitchenAid Will Pay For Your Choice of: 50 United States, the District of Columbia, and Canada: Hassle-free replacement of purchase. ENGLISH KitchenAid® Food Processor...
... for Food Processor when operated outside the country of purchase. C. Replacement parts or repair labor costs for service, follow the instructions on how to correct defects in other rights which vary from accident, alteration, misuse or abuse or use . ...specific legal rights and you may also have other than normal single family home use with products not approved by an Authorized KitchenAid Service Center. KitchenAid Will Pay For Your Choice of: 50 United States, the District of Columbia, and Canada: Hassle-free replacement of purchase. ENGLISH KitchenAid® Food Processor...

Use & Care Guide
Page 32
... receipt, credit card slip, etc.). Box numbers, please.) When you receive your replacement Food Processor, use the carton and packing materials to learn the location of a Service Center near you are unable to correct defects in Puerto Rico Your KitchenAid® Food Processor is covered by our one year limited warranty. Your replacement unit will also be covered by a one-year limited warranty...
... receipt, credit card slip, etc.). Box numbers, please.) When you receive your replacement Food Processor, use the carton and packing materials to learn the location of a Service Center near you are unable to correct defects in Puerto Rico Your KitchenAid® Food Processor is covered by our one year limited warranty. Your replacement unit will also be covered by a one-year limited warranty...
Use & Care Guide
Page 34
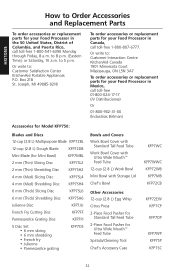
...Julienne Disc KFP7JU French Fry Cutting Disc KFP7FF Parmesan/Ice Grating Disc KFP7PI 5 Disc Set • 6 mm slicing • 6 mm shredding • French fry • Julienne • Parmesan/Ice grating KFP7DS Bowls and Covers Work Bowl Cover with Standard Tall Feed Tube Work Bowl Cover with Ultra Wide Mouth™ Feed Tube 12-cup (2.8 L) Work Bowl Mini Bowl with Storage Lid Chef's Bowl Other Accessories 12-cup (2.8 L) Egg Whip Citrus Press 2-Piece Food Pusher for Standard Tall Feed Tube 2-Piece Food Pusher for Ultra Wide Mouth™ Feed Tube Spatula/Cleaning Tool Chef's Accessory...
...Julienne Disc KFP7JU French Fry Cutting Disc KFP7FF Parmesan/Ice Grating Disc KFP7PI 5 Disc Set • 6 mm slicing • 6 mm shredding • French fry • Julienne • Parmesan/Ice grating KFP7DS Bowls and Covers Work Bowl Cover with Standard Tall Feed Tube Work Bowl Cover with Ultra Wide Mouth™ Feed Tube 12-cup (2.8 L) Work Bowl Mini Bowl with Storage Lid Chef's Bowl Other Accessories 12-cup (2.8 L) Egg Whip Citrus Press 2-Piece Food Pusher for Standard Tall Feed Tube 2-Piece Food Pusher for Ultra Wide Mouth™ Feed Tube Spatula/Cleaning Tool Chef's Accessory...

Parts List
Page 1
PARTS LIST 12−CUP FOOD PROCESSOR MODELS: KFP750WH0 (White) KFP750OB0 (Onyx Black) KFP750ER0 (Empire Red) KFP750BU0 (Cobalt Blue) KFP750CR0 (Chrome) KFP750PK0 (Pink) 4KFP750WH0 (White) 4KFP750OB0 (Onyx Black) 4KFP750ER0 (Empire Red) 4KFP750BU0 (Cobalt Blue) 4KFP750CR0 (Chrome) 4KFP750PK0 (Pink) 11−07 Litho In U.S.A. (wam) c 2007 KITCHENAID Part No. 8212046 Rev. C
PARTS LIST 12−CUP FOOD PROCESSOR MODELS: KFP750WH0 (White) KFP750OB0 (Onyx Black) KFP750ER0 (Empire Red) KFP750BU0 (Cobalt Blue) KFP750CR0 (Chrome) KFP750PK0 (Pink) 4KFP750WH0 (White) 4KFP750OB0 (Onyx Black) 4KFP750ER0 (Empire Red) 4KFP750BU0 (Cobalt Blue) 4KFP750CR0 (Chrome) 4KFP750PK0 (Pink) 11−07 Litho In U.S.A. (wam) c 2007 KITCHENAID Part No. 8212046 Rev. C


