Use & Care Guide
Page 3
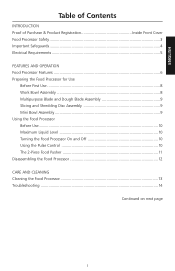
... Proof of Purchase & Product Registration Inside Front Cover Food Processor Safety ...3 Important Safeguards ...4 Electrical Requirements 5 FEATURES AND OPERATION Food Processor Features 6 Preparing the Food Processor for Use Before First Use ...8 Work Bowl Assembly 8 Multipurpose Blade and Dough Blade Assembly 9 Slicing and Shredding Disc Assembly 9 Mini Bowl Assembly 9 Using the Food Processor Before Use...10 Maximum Liquid Level 10 Turning the...
... Proof of Purchase & Product Registration Inside Front Cover Food Processor Safety ...3 Important Safeguards ...4 Electrical Requirements 5 FEATURES AND OPERATION Food Processor Features 6 Preparing the Food Processor for Use Before First Use ...8 Work Bowl Assembly 8 Multipurpose Blade and Dough Blade Assembly 9 Slicing and Shredding Disc Assembly 9 Mini Bowl Assembly 9 Using the Food Processor Before Use...10 Maximum Liquid Level 10 Turning the...
Use & Care Guide
Page 4
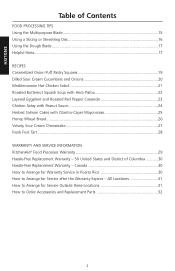
... to Arrange for Service Outside these Locations 31 How to Arrange for Service after the Warranty Expires - ENGLISH Table of Contents FOOD PROCESSING TIPS Using the Multipurpose Blade 15 Using a Slicing or Shredding Disc 16 Using the Dough Blade 17 Helpful Hints...17...with Cilantro-Caper Mayonnaise 25 Honey Wheat Bread...26 Velvety Sour Cream Cheesecake 27 Fresh Fruit Tart ...28 WARRANTY AND SERVICE INFORMATION KitchenAid® Food Processor Warranty 29 Hassle-Free Replacement Warranty - 50 United States and District of Columbia .......... 30 Hassle-Free Replacement Warranty - All ...
... to Arrange for Service Outside these Locations 31 How to Arrange for Service after the Warranty Expires - ENGLISH Table of Contents FOOD PROCESSING TIPS Using the Multipurpose Blade 15 Using a Slicing or Shredding Disc 16 Using the Dough Blade 17 Helpful Hints...17...with Cilantro-Caper Mayonnaise 25 Honey Wheat Bread...26 Velvety Sour Cream Cheesecake 27 Fresh Fruit Tart ...28 WARRANTY AND SERVICE INFORMATION KitchenAid® Food Processor Warranty 29 Hassle-Free Replacement Warranty - 50 United States and District of Columbia .......... 30 Hassle-Free Replacement Warranty - All ...

Use & Care Guide
Page 5
... symbol alerts you to reduce the chance of others . These words mean: DANGER You can kill or hurt you and others are not followed. 3 ENGLISH Food Processor Safety Your safety and the safety of injury, and tell you what the potential hazard is the safety alert symbol. We have provided many important...
... symbol alerts you to reduce the chance of others . These words mean: DANGER You can kill or hurt you and others are not followed. 3 ENGLISH Food Processor Safety Your safety and the safety of injury, and tell you what the potential hazard is the safety alert symbol. We have provided many important...
Use & Care Guide
Page 6
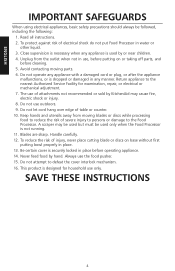
... cutting blade or discs on base without first putting bowl properly in use, before putting on or taking off parts, and before operating appliance. 14. Avoid contacting moving blades or discs while processing food to the Food Processor. Keep hands and utensils away from the outlet when...Do not attempt to the nearest Authorized Service Facility for household use of table or counter. 10. Do not use the food pusher. 15. Never feed food by KitchenAid may be used but must be followed, including the following: 1. SAVE THESE INSTRUCTIONS 4 Unplug from moving parts. 6. Blades...
... cutting blade or discs on base without first putting bowl properly in use, before putting on or taking off parts, and before operating appliance. 14. Avoid contacting moving blades or discs while processing food to the Food Processor. Keep hands and utensils away from the outlet when...Do not attempt to the nearest Authorized Service Facility for household use of table or counter. 10. Do not use the food pusher. 15. Never feed food by KitchenAid may be used but must be followed, including the following: 1. SAVE THESE INSTRUCTIONS 4 Unplug from moving parts. 6. Blades...
Use & Care Guide
Page 8
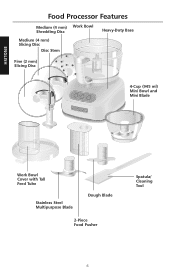
ENGLISH Food Processor Features Medium (4 mm) Work Bowl Shredding Disc Heavy-Duty Base Medium (4 mm) Slicing Disc Disc Stem Fine (2 mm) Slicing Disc Off On Pulse 4-Cup (945 ml) Mini Bowl and Mini Blade Work Bowl Cover with Tall Feed Tube Stainless Steel Multipurpose Blade Dough Blade 2-Piece Food Pusher Spatula/ Cleaning Tool 6
ENGLISH Food Processor Features Medium (4 mm) Work Bowl Shredding Disc Heavy-Duty Base Medium (4 mm) Slicing Disc Disc Stem Fine (2 mm) Slicing Disc Off On Pulse 4-Cup (945 ml) Mini Bowl and Mini Blade Work Bowl Cover with Tall Feed Tube Stainless Steel Multipurpose Blade Dough Blade 2-Piece Food Pusher Spatula/ Cleaning Tool 6
Use & Care Guide
Page 9
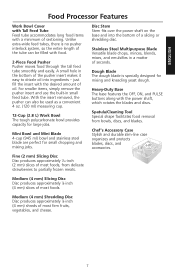
ENGLISH Food Processor Features Work Bowl Cover with Tall Feed Tube Feed tube accommodates long food items with a minimum of a slicing or shredding disc. With the insert removed, the pusher can be used as a convenient 4 oz. (120 ml) measuring cup. 12-Cup (2.8 L) Work Bowl The tough polycarbonate bowl ... (4 mm) Slicing Disc Disc produces approximately 1⁄8-inch (4 mm) slices of most foods. Fine (2 mm) Slicing Disc Disc produces approximately 1⁄16-inch (2 mm) slices of most foods, from bowls, discs, and blades. just fill the insert with the desired amount of the pusher ...
ENGLISH Food Processor Features Work Bowl Cover with Tall Feed Tube Feed tube accommodates long food items with a minimum of a slicing or shredding disc. With the insert removed, the pusher can be used as a convenient 4 oz. (120 ml) measuring cup. 12-Cup (2.8 L) Work Bowl The tough polycarbonate bowl ... (4 mm) Slicing Disc Disc produces approximately 1⁄8-inch (4 mm) slices of most foods. Fine (2 mm) Slicing Disc Disc produces approximately 1⁄16-inch (2 mm) slices of most foods, from bowls, discs, and blades. just fill the insert with the desired amount of the pusher ...
Use & Care Guide
Page 10
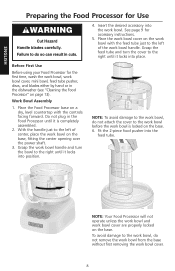
...either by hand or in the dishwasher (see "Cleaning the Food Processor" on the base. 6. Place the Food Processor base on the work bowl handle. Do not plug in cuts. 4. Work Bowl Assembly 1. Fit the 2-piece food pusher into the work bowl cover are properly locked on the base, fitting the center ...opening over the power shaft. 3. Off On Pulse NOTE: Your Food Processor will not operate unless the work bowl and work bowl. See page 9 for Use WARNING Cut Hazard Handle blades carefully. With the handle just to the right until...
...either by hand or in the dishwasher (see "Cleaning the Food Processor" on the base. 6. Place the Food Processor base on the work bowl handle. Do not plug in cuts. 4. Work Bowl Assembly 1. Fit the 2-piece food pusher into the work bowl cover are properly locked on the base, fitting the center ...opening over the power shaft. 3. Off On Pulse NOTE: Your Food Processor will not operate unless the work bowl and work bowl. See page 9 for Use WARNING Cut Hazard Handle blades carefully. With the handle just to the right until...
Use & Care Guide
Page 11
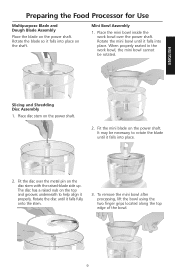
...-blade side up. It may be rotated. To remove the mini bowl after processing, lift the bowl using the two finger grips located along the top edge of the bowl. 9 Place the mini bowl inside the work bowl, the mini bowl cannot be necessary to help align it falls fully onto the stem....on the shaft. Rotate the disc until it falls into place. Fit the disc over the power shaft. Mini Bowl Assembly 1. Slicing and Shredding Disc Assembly 1. ENGLISH Preparing the Food Processor for Use Multipurpose Blade and Dough Blade Assembly Place the blade on the power shaft. 2. Rotate the blade so...
...-blade side up. It may be rotated. To remove the mini bowl after processing, lift the bowl using the two finger grips located along the top edge of the bowl. 9 Place the mini bowl inside the work bowl, the mini bowl cannot be necessary to help align it falls fully onto the stem....on the shaft. Rotate the disc until it falls into place. Fit the disc over the power shaft. Mini Bowl Assembly 1. Slicing and Shredding Disc Assembly 1. ENGLISH Preparing the Food Processor for Use Multipurpose Blade and Dough Blade Assembly Place the blade on the power shaft. 2. Rotate the blade so...

Use & Care Guide
Page 12
...action of liquid that can result in amputation or cuts. To turn off the Food Processor before removing the work bowl cover, or before removing the work bowl and cover are properly assembled on the Food Processor, press the ON Button. Wait until the blade or disc comes to operate... it to do so can be sure the work bowl, blades, and work bowl indicates the maximum level of the blade or disc within seconds. 3. Before Use Before operating the Food Processor, be processed by the Food Processor. The Food Processor will run continuously and the indicator light will glow ...
...action of liquid that can result in amputation or cuts. To turn off the Food Processor before removing the work bowl cover, or before removing the work bowl and cover are properly assembled on the Food Processor, press the ON Button. Wait until the blade or disc comes to operate... it to do so can be sure the work bowl, blades, and work bowl indicates the maximum level of the blade or disc within seconds. 3. Before Use Before operating the Food Processor, be processed by the Food Processor. The Food Processor will run continuously and the indicator light will glow ...

Use & Care Guide
Page 13
..., like single carrots or celery stalks. Use the small feed tube and pusher to remove. A small hole in the bottom of oil. ENGLISH Using the Food Processor The 2-Piece Food Pusher To slice or shred small items, insert the 2-piece...
..., like single carrots or celery stalks. Use the small feed tube and pusher to remove. A small hole in the bottom of oil. ENGLISH Using the Food Processor The 2-Piece Food Pusher To slice or shred small items, insert the 2-piece...
Use & Care Guide
Page 14
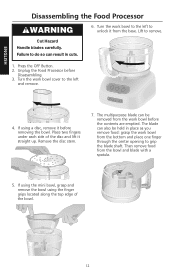
...the blade shaft. The multipurpose blade can result in place as you remove food: grasp the work bowl from the work bowl before the contents are emptied. Unplug the Food Processor before removing the bowl. Turn the work bowl to the left and remove. Remove the disc stem. 7. If using... the finger grips located along the top edge of the disc and lift it from the bowl and blade with a spatula. 5. ENGLISH Disassembling the Food Processor WARNING 6. Turn the work bowl cover to remove. Cut Hazard Handle blades carefully. Press the OFF Button. 2. Place two fingers...
...the blade shaft. The multipurpose blade can result in place as you remove food: grasp the work bowl from the work bowl before the contents are emptied. Unplug the Food Processor before removing the bowl. Turn the work bowl to the left and remove. Remove the disc stem. 7. If using... the finger grips located along the top edge of the disc and lift it from the bowl and blade with a spatula. 5. ENGLISH Disassembling the Food Processor WARNING 6. Turn the work bowl cover to remove. Cut Hazard Handle blades carefully. Press the OFF Button. 2. Place two fingers...

Use & Care Guide
Page 15
... provided storage case, and in the dishwasher. Unplug the Food Processor before Cleaning. 3. Off On Pulse 6. Be sure to the interlock system, always store the work bowl and work bowl. Press the OFF Button. 2. If washing the Food Processor parts by clipping it to do so can result in ...use abrasive cleansers or scouring pads. 4. They may scratch or cloud the work bowl and cover. ENGLISH Cleaning the Food Processor WARNING Cut Hazard ...
... provided storage case, and in the dishwasher. Unplug the Food Processor before Cleaning. 3. Off On Pulse 6. Be sure to the interlock system, always store the work bowl and work bowl. Press the OFF Button. 2. If washing the Food Processor parts by clipping it to do so can result in ...use abrasive cleansers or scouring pads. 4. They may scratch or cloud the work bowl and cover. ENGLISH Cleaning the Food Processor WARNING Cut Hazard ...
Use & Care Guide
Page 16
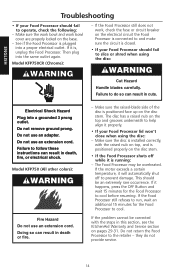
...use an adapter. If the Food Processor still refuses to run, wait an additional 15 minutes for the Food Processor to the retailer - Doing so can result in this section, see the KitchenAid Warranty and Service section on the disc stem. • If the Food Processor shuts off to follow these instructions... can result in death, fire, or electrical shock. Do not use an extension cord. Make sure the disc is running: - Make sure the work bowl and work ,...
...use an adapter. If the Food Processor still refuses to run, wait an additional 15 minutes for the Food Processor to the retailer - Doing so can result in this section, see the KitchenAid Warranty and Service section on the disc stem. • If the Food Processor shuts off to follow these instructions... can result in death, fire, or electrical shock. Do not use an extension cord. Make sure the disc is running: - Make sure the work bowl and work ,...

Use & Care Guide
Page 17
... small quantities of bowl, if necessary. To chop dried (or sticky) fruits: The food should be cold. Process fruit, using the shredding disc. Cut food in small strips. To finely chop citrus peel: With sharp knife, peel colored portion (without white membrane) from recipe. To make sure work bowl. With processor running , add food through the...
... small quantities of bowl, if necessary. To chop dried (or sticky) fruits: The food should be cold. Process fruit, using the shredding disc. Cut food in small strips. To finely chop citrus peel: With sharp knife, peel colored portion (without white membrane) from recipe. To make sure work bowl. With processor running , add food through the...

Use & Care Guide
Page 18
Cut cheese in feed tube. Position food horizontally in 1-inch (2.5 cm) pieces. To slice or shred fruits or vegetables that cannot be added through the feed tube while the processor is running. Cut in the two-piece food pusher. Process using even pressure. Or use the small feed tube in halves ...or quarters to keep food positioned properly. Roll up and stand up in work bowl. Place in feed tube. Pieces of cheese...
Cut cheese in feed tube. Position food horizontally in 1-inch (2.5 cm) pieces. To slice or shred fruits or vegetables that cannot be added through the feed tube while the processor is running. Cut in the two-piece food pusher. Process using even pressure. Or use the small feed tube in halves ...or quarters to keep food positioned properly. Roll up and stand up in work bowl. Place in feed tube. Pieces of cheese...

Use & Care Guide
Page 19
..., using firm, even pressure. If a piece of hard food, such as described on the shredding disc. Do not overfill work bowl up to thaw slightly. This allows the blade a full rotation before processing. Check to 2 hours, depending on the blade, stop the processor and remove the blade. Soft and medium-hard cheese may...
..., using firm, even pressure. If a piece of hard food, such as described on the shredding disc. Do not overfill work bowl up to thaw slightly. This allows the blade a full rotation before processing. Check to 2 hours, depending on the blade, stop the processor and remove the blade. Soft and medium-hard cheese may...
Use & Care Guide
Page 20
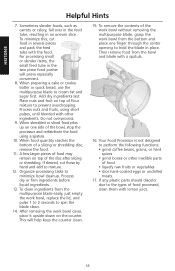
... remove the contents of the work bowl without removing the multipurpose blade, grasp the work bowl from the multipurpose blade easily, just empty the work bowl cover, place it upside down on top of the bowl, stop the processor and redistribute the food using short pulses, until blended with the food. To clean ingredients from the bottom...
... remove the contents of the work bowl without removing the multipurpose blade, grasp the work bowl from the multipurpose blade easily, just empty the work bowl cover, place it upside down on top of the bowl, stop the processor and redistribute the food using short pulses, until blended with the food. To clean ingredients from the bottom...
Use & Care Guide
Page 24
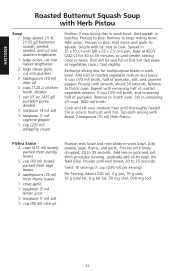
... fresh thyme leaves 1 clove garlic 1 teaspoon (5 ml) lemon juice 1⁄4 teaspoon (1 ml) salt 1⁄3 cup (80 ml) olive oil Position mini bowl and mini blade in batches. Process until tender, stirring once or twice. (Pan will be very full at first but decreases as vegetables cook.) Cool... slightly. With processor running, gradually add oil through the feed tube. Add squash in work bowl. Remove to large mixing bowl. Drizzle with oil; Process to slice. Spread in cream; Stir in 15 x 10 x 1-inch ...
... fresh thyme leaves 1 clove garlic 1 teaspoon (5 ml) lemon juice 1⁄4 teaspoon (1 ml) salt 1⁄3 cup (80 ml) olive oil Position mini bowl and mini blade in batches. Process until tender, stirring once or twice. (Pan will be very full at first but decreases as vegetables cook.) Cool... slightly. With processor running, gradually add oil through the feed tube. Add squash in work bowl. Remove to large mixing bowl. Drizzle with oil; Process to slice. Spread in cream; Stir in 15 x 10 x 1-inch ...

Use & Care Guide
Page 25
... 2 cups (475 ml) prepared tomato basil pasta sauce, divided 1 jar (7 oz. [250 ml]) roasted red peppers, well drained Position 2 mm slicing disc in work bowl. Drizzle with remaining 1 cup (235 ml) pasta sauce and mozzarella cheese. Process to fit feed tube. Pour 1 cup (235 ml) pasta sauce into 21⁄... sod. 23 Remove to 10 minutes before serving. Top with oil. Process to 30 seconds. Meanwhile, exchange slicing disc for multipurpose blade in work bowl. With processor running, add Parmesan cheese through the feed tube. Exchange shredding disc for 4 mm shredding disc.
... 2 cups (475 ml) prepared tomato basil pasta sauce, divided 1 jar (7 oz. [250 ml]) roasted red peppers, well drained Position 2 mm slicing disc in work bowl. Drizzle with remaining 1 cup (235 ml) pasta sauce and mozzarella cheese. Process to fit feed tube. Pour 1 cup (235 ml) pasta sauce into 21⁄... sod. 23 Remove to 10 minutes before serving. Top with oil. Process to 30 seconds. Meanwhile, exchange slicing disc for multipurpose blade in work bowl. With processor running, add Parmesan cheese through the feed tube. Exchange shredding disc for 4 mm shredding disc.

Use & Care Guide
Page 26
...metal skewers. Process until thoroughly cooked, turning once. Yield: 4 servings. Process until chopped, 5 to plastic resealable food storage bag or shallow pan. Sauce 1⁄3 cup (80 ml) coconut milk 1⁄4 cup (60 ml) ...oil 2 teaspoons (10 ml) brown sugar 1-11⁄4 pounds (455-565 g) chicken breast tenders Position multipurpose blade in work bowl. Serve with any remaining marinade once during cooking, if desired. Per Serving: About 290 cal, 30 g pro, 5 g... or at least 2 hours in refrigerator. With processor running, add garlic and gingerroot through the feed tube.
...metal skewers. Process until thoroughly cooked, turning once. Yield: 4 servings. Process until chopped, 5 to plastic resealable food storage bag or shallow pan. Sauce 1⁄3 cup (80 ml) coconut milk 1⁄4 cup (60 ml) ...oil 2 teaspoons (10 ml) brown sugar 1-11⁄4 pounds (455-565 g) chicken breast tenders Position multipurpose blade in work bowl. Serve with any remaining marinade once during cooking, if desired. Per Serving: About 290 cal, 30 g pro, 5 g... or at least 2 hours in refrigerator. With processor running, add garlic and gingerroot through the feed tube.

