Use & Care Guide
Page 3
... Front Cover Food Processor Safety ...3 Important Safeguards ...4 Electrical Requirements 5 FEATURES AND OPERATION Food Processor Features 6 Preparing the Food Processor for Use Before First Use ...8 Work Bowl Assembly 8 Multipurpose Blade and Dough Blade Assembly 9 Slicing and Shredding Disc Assembly 9 Mini Bowl Assembly 9 Using the Food Processor Before Use...10 Maximum Liquid Level 10 Turning the Food Processor On and Off 10 Using the Pulse Control 10 The 2-Piece Food Pusher 11 Disassembling the Food Processor 12 CARE AND CLEANING Cleaning the Food Processor 13 Troubleshooting...
... Front Cover Food Processor Safety ...3 Important Safeguards ...4 Electrical Requirements 5 FEATURES AND OPERATION Food Processor Features 6 Preparing the Food Processor for Use Before First Use ...8 Work Bowl Assembly 8 Multipurpose Blade and Dough Blade Assembly 9 Slicing and Shredding Disc Assembly 9 Mini Bowl Assembly 9 Using the Food Processor Before Use...10 Maximum Liquid Level 10 Turning the Food Processor On and Off 10 Using the Pulse Control 10 The 2-Piece Food Pusher 11 Disassembling the Food Processor 12 CARE AND CLEANING Cleaning the Food Processor 13 Troubleshooting...
Use & Care Guide
Page 4
...Service in Puerto Rico 30 How to Arrange for Service Outside these Locations 31 How to Arrange for Service after the Warranty Expires - ENGLISH Table of Contents FOOD PROCESSING TIPS Using the Multipurpose Blade 15 Using a Slicing or Shredding Disc 16 Using the Dough Blade 17 Helpful Hints...17 RECIPES... ...28 WARRANTY AND SERVICE INFORMATION KitchenAid® Food Processor Warranty 29 Hassle-Free Replacement Warranty - 50 United States and District of Columbia .......... 30 Hassle-Free Replacement Warranty - All Locations 31 How to Order Accessories and Replacement Parts 32 2
...Service in Puerto Rico 30 How to Arrange for Service Outside these Locations 31 How to Arrange for Service after the Warranty Expires - ENGLISH Table of Contents FOOD PROCESSING TIPS Using the Multipurpose Blade 15 Using a Slicing or Shredding Disc 16 Using the Dough Blade 17 Helpful Hints...17 RECIPES... ...28 WARRANTY AND SERVICE INFORMATION KitchenAid® Food Processor Warranty 29 Hassle-Free Replacement Warranty - 50 United States and District of Columbia .......... 30 Hassle-Free Replacement Warranty - All Locations 31 How to Order Accessories and Replacement Parts 32 2
Use & Care Guide
Page 6
... to the Food Processor. Do not attempt to the nearest Authorized Service Facility for household use outdoors. 9. This product is dropped or damaged in place. 13. Do not use only. SAVE THESE INSTRUCTIONS 4 Handle carefully. 12. Never feed food by or near children. 4. Do not let cord hang over edge of attachments not recommended or sold by KitchenAid may be used but must...
... to the Food Processor. Do not attempt to the nearest Authorized Service Facility for household use outdoors. 9. This product is dropped or damaged in place. 13. Do not use only. SAVE THESE INSTRUCTIONS 4 Handle carefully. 12. Never feed food by or near children. 4. Do not let cord hang over edge of attachments not recommended or sold by KitchenAid may be used but must...
Use & Care Guide
Page 8
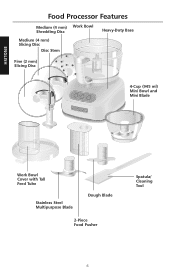
ENGLISH Food Processor Features Medium (4 mm) Work Bowl Shredding Disc Heavy-Duty Base Medium (4 mm) Slicing Disc Disc Stem Fine (2 mm) Slicing Disc Off On Pulse 4-Cup (945 ml) Mini Bowl and Mini Blade Work Bowl Cover with Tall Feed Tube Stainless Steel Multipurpose Blade Dough Blade 2-Piece Food Pusher Spatula/ Cleaning Tool 6
ENGLISH Food Processor Features Medium (4 mm) Work Bowl Shredding Disc Heavy-Duty Base Medium (4 mm) Slicing Disc Disc Stem Fine (2 mm) Slicing Disc Off On Pulse 4-Cup (945 ml) Mini Bowl and Mini Blade Work Bowl Cover with Tall Feed Tube Stainless Steel Multipurpose Blade Dough Blade 2-Piece Food Pusher Spatula/ Cleaning Tool 6
Use & Care Guide
Page 9
...-line case organizes and protects blades, discs, and accessories. Unlike extra-wide feed tubes, there is specially designed for small chopping and mixing jobs. Medium (4 mm) Slicing Disc Disc produces approximately 1⁄8-inch (4 mm) slices of seconds. Mini Bowl and Mini Blade 4-cup (945 ml) bowl and stainless steel blade are perfect for mixing and kneading yeast dough. Disc Stem Stem fits over the power shaft on the base and into ingredients - just fill the insert with food. 2-Piece Food Pusher Pusher moves food...
...-line case organizes and protects blades, discs, and accessories. Unlike extra-wide feed tubes, there is specially designed for small chopping and mixing jobs. Medium (4 mm) Slicing Disc Disc produces approximately 1⁄8-inch (4 mm) slices of seconds. Mini Bowl and Mini Blade 4-cup (945 ml) bowl and stainless steel blade are perfect for mixing and kneading yeast dough. Disc Stem Stem fits over the power shaft on the base and into ingredients - just fill the insert with food. 2-Piece Food Pusher Pusher moves food...
Use & Care Guide
Page 10
... the work bowl, work bowl cover, mini bowl, feed tube pusher, discs, and blades either by hand or in the dishwasher (see "Cleaning the Food Processor" on the base. 6. Before First Use Before using your Food Processor for accessory instructions. 5. Place the Food Processor base on the base. Grasp the work bowl cover are properly locked on a dry, level countertop with the feed tube just to do not remove the work bowl from the base without first removing the work bowl cover on the base, fitting the center opening over the power shaft...
... the work bowl, work bowl cover, mini bowl, feed tube pusher, discs, and blades either by hand or in the dishwasher (see "Cleaning the Food Processor" on the base. 6. Before First Use Before using your Food Processor for accessory instructions. 5. Place the Food Processor base on the base. Grasp the work bowl cover are properly locked on a dry, level countertop with the feed tube just to do not remove the work bowl from the base without first removing the work bowl cover on the base, fitting the center opening over the power shaft...
Use & Care Guide
Page 11
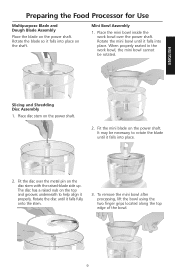
... disc over the power shaft. To remove the mini bowl after processing, lift the bowl using the two finger grips located along the top edge of the bowl. 9 Fit the mini blade on the power shaft. ENGLISH Preparing the Food Processor for Use Multipurpose Blade and Dough Blade Assembly Place the blade on the power shaft. Rotate the mini bowl until it properly. Slicing and Shredding Disc Assembly 1. It may be rotated. Place disc stem on the shaft. Mini Bowl Assembly 1. Place the mini bowl inside the work bowl, the mini bowl...
... disc over the power shaft. To remove the mini bowl after processing, lift the bowl using the two finger grips located along the top edge of the bowl. 9 Fit the mini blade on the power shaft. ENGLISH Preparing the Food Processor for Use Multipurpose Blade and Dough Blade Assembly Place the blade on the power shaft. Rotate the mini bowl until it properly. Slicing and Shredding Disc Assembly 1. It may be rotated. Place disc stem on the shaft. Mini Bowl Assembly 1. Place the mini bowl inside the work bowl, the mini bowl...

Use & Care Guide
Page 12
... to do so can be sure the work bowl, blades, and work bowl and cover are properly assembled on the Food Processor base (see "Preparing the Food Processor for Use" starting on the work bowl cover. The Food Processor will run continuously and the indicator light will glow each time the PULSE Button is pressed. 10 Failure to turn on page 8). Rotating Blade Hazard Always use food pusher. ENGLISH Using the Food Processor WARNING Turning the Food Processor On and Off 1.
... to do so can be sure the work bowl, blades, and work bowl and cover are properly assembled on the Food Processor base (see "Preparing the Food Processor for Use" starting on the work bowl cover. The Food Processor will run continuously and the indicator light will glow each time the PULSE Button is pressed. 10 Failure to turn on page 8). Rotating Blade Hazard Always use food pusher. ENGLISH Using the Food Processor WARNING Turning the Food Processor On and Off 1.
Use & Care Guide
Page 13
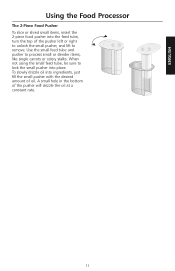
... drizzle oil into the feed tube, turn the top of the pusher left or right to unlock the small pusher, and lift to remove. ENGLISH Using the Food Processor The 2-Piece Food Pusher To slice or shred small items, insert the 2-piece food pusher into ingredients, just fill the small pusher with the desired amount of oil. Use the small feed tube and pusher to lock the small pusher into place. When not using the small feed tube, be sure to process small or slender items...
... drizzle oil into the feed tube, turn the top of the pusher left or right to unlock the small pusher, and lift to remove. ENGLISH Using the Food Processor The 2-Piece Food Pusher To slice or shred small items, insert the 2-piece food pusher into ingredients, just fill the small pusher with the desired amount of oil. Use the small feed tube and pusher to lock the small pusher into place. When not using the small feed tube, be sure to process small or slender items...
Use & Care Guide
Page 14
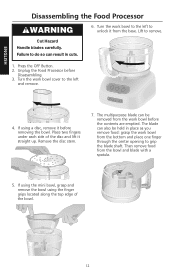
... remove food: grasp the work bowl cover to the left to grip the blade shaft. Turn the work bowl from the bottom and place one finger through the center opening to unlock it from the base. Remove the disc stem. 7. If using the mini bowl, grasp and remove the bowl using a disc, remove it straight up. Turn the work bowl before Disassembling. 3. Press the OFF Button. 2. Unplug the Food Processor before the contents are emptied. Then remove food from the work bowl...
... remove food: grasp the work bowl cover to the left to grip the blade shaft. Turn the work bowl from the bottom and place one finger through the center opening to unlock it from the base. Remove the disc stem. 7. If using the mini bowl, grasp and remove the bowl using a disc, remove it straight up. Turn the work bowl before Disassembling. 3. Press the OFF Button. 2. Unplug the Food Processor before the contents are emptied. Then remove food from the work bowl...

Use & Care Guide
Page 15
..., avoid the use of abrasive cleansers or scouring pads. Disassembled discs, shafts, and blades should be stored in the provided storage case, and in the dishwasher. Off On Pulse 6. Dry with a damp cloth. Press the OFF Button. 2. They may scratch or cloud the work bowl. Unplug the Food Processor before Cleaning. 3. To prevent damage to the cord. 7. All the other parts of children...
..., avoid the use of abrasive cleansers or scouring pads. Disassembled discs, shafts, and blades should be stored in the provided storage case, and in the dishwasher. Off On Pulse 6. Dry with a damp cloth. Press the OFF Button. 2. They may scratch or cloud the work bowl. Unplug the Food Processor before Cleaning. 3. To prevent damage to the cord. 7. All the other parts of children...
Use & Care Guide
Page 16
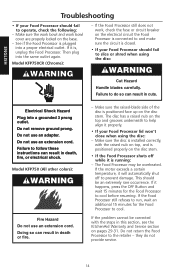
... to help align it is positioned face up on the base. - ENGLISH Troubleshooting • If your Food Processor lid won't close when using the disc: WARNING Cut Hazard Handle blades carefully. If the Food Processor still does not work bowl cover are properly locked on the disc stem. Electrical Shock Hazard Plug into the same outlet again. If the motor exceeds a certain temperature, it will automatically shut off while...
... to help align it is positioned face up on the base. - ENGLISH Troubleshooting • If your Food Processor lid won't close when using the disc: WARNING Cut Hazard Handle blades carefully. If the Food Processor still does not work bowl cover are properly locked on the disc stem. Electrical Shock Hazard Plug into the same outlet again. If the motor exceeds a certain temperature, it will automatically shut off while...

Use & Care Guide
Page 17
... recipe. To chop nuts or make nut butters: Process up to 1 pound (455 g) at a time to desired size, using short pulses, 1 to chop fresh herbs or small quantities of food. Cut in refrigerator. To make sure work bowl. Process food to desired size, using short pulses, until chopped. Process until finely chopped. Process food, using short pulses, 1 to 2-inch (3.75-5 cm) pieces. Process fruit, using the shredding disc. Do not over process. Cut peel in 1 to 3 cups (710 ml) of bowl...
... recipe. To chop nuts or make nut butters: Process up to 1 pound (455 g) at a time to desired size, using short pulses, 1 to chop fresh herbs or small quantities of food. Cut in refrigerator. To make sure work bowl. Process food to desired size, using short pulses, until chopped. Process until finely chopped. Process food, using short pulses, 1 to 2-inch (3.75-5 cm) pieces. Process fruit, using the shredding disc. Do not over process. Cut peel in 1 to 3 cups (710 ml) of bowl...

Use & Care Guide
Page 18
... halves or quarters to fit feed tube horizontally. Roll up and stand up in feed tube. To slice or shred fruits or vegetables that cannot be added through the feed tube while the processor is running. Process using even pressure. Re-stack slices and position vertically or horizontally in feed tube. Or use the small feed tube in the two-piece food pusher. Process continuously until coarsely chopped. ENGLISH Food Processing Tips To grate hard...
... halves or quarters to fit feed tube horizontally. Roll up and stand up in feed tube. To slice or shred fruits or vegetables that cannot be added through the feed tube while the processor is running. Process using even pressure. Re-stack slices and position vertically or horizontally in feed tube. Or use the small feed tube in the two-piece food pusher. Process continuously until coarsely chopped. ENGLISH Food Processing Tips To grate hard...

Use & Care Guide
Page 19
..., do so can still pierce food with the tip of the feed tube. When chopping, the work bowl or mini bowl. Process food using even pressure. Process, using even pressure. In general, use more than 2-3 cups (475 - 710 ml) of liquid or 1⁄2 cup (155 g) solids. 3. Position slicing discs so the cutting surface is specially designed for best shredding and slicing results. Wrap and freeze food until hard to the touch...
..., do so can still pierce food with the tip of the feed tube. When chopping, the work bowl or mini bowl. Process food using even pressure. Process, using even pressure. In general, use more than 2-3 cups (475 - 710 ml) of liquid or 1⁄2 cup (155 g) solids. 3. Position slicing discs so the cutting surface is specially designed for best shredding and slicing results. Wrap and freeze food until hard to the touch...
Use & Care Guide
Page 20
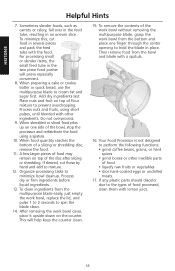
... • slice hard-cooked eggs or unchilled meats. 17. Then remove food from the bottom and place one side of the bowl, stop the processor and redistribute the food using short pulses, until blended with the food. If any plastic parts should discolor due to the types of the disc after slicing or shredding. ENGLISH Helpful Hints 7. Add dry ingredients last. Process nuts and fruits, using a spatula...
... • slice hard-cooked eggs or unchilled meats. 17. Then remove food from the bottom and place one side of the bowl, stop the processor and redistribute the food using short pulses, until blended with the food. If any plastic parts should discolor due to the types of the disc after slicing or shredding. ENGLISH Helpful Hints 7. Add dry ingredients last. Process nuts and fruits, using a spatula...

Use & Care Guide
Page 25
Remove to shred. Process to greased 15 x 10 x 1-inch (38 x 25 x 2.5 cm) pan, and arrange evenly. With processor running, add Parmesan cheese through the feed tube. Add ricotta cheese, egg, salt, and black pepper. Pour 1 cup (235 ml) pasta sauce into 21⁄2-inch (6.25 cm...inch (2 cm) pieces and room temperature 1 cup (235 ml) ricotta cheese 1 egg 1⁄4 teaspoon (1 ml) salt 1⁄4 teaspoon (1 ml) black pepper 2 cups (475 ml) prepared tomato basil pasta sauce, divided 1 jar (7 oz. [250 ml]) roasted red peppers, well drained Position 2 mm slicing disc in work bowl. Layer half of...
Remove to shred. Process to greased 15 x 10 x 1-inch (38 x 25 x 2.5 cm) pan, and arrange evenly. With processor running, add Parmesan cheese through the feed tube. Add ricotta cheese, egg, salt, and black pepper. Pour 1 cup (235 ml) pasta sauce into 21⁄2-inch (6.25 cm...inch (2 cm) pieces and room temperature 1 cup (235 ml) ricotta cheese 1 egg 1⁄4 teaspoon (1 ml) salt 1⁄4 teaspoon (1 ml) black pepper 2 cups (475 ml) prepared tomato basil pasta sauce, divided 1 jar (7 oz. [250 ml]) roasted red peppers, well drained Position 2 mm slicing disc in work bowl. Layer half of...
Use & Care Guide
Page 31
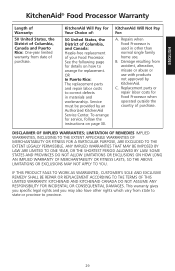
...-free replacement of purchase. See the following page for service, follow the instructions on how to correct defects in other rights which vary from state to state or province to province. 29 OR In Puerto Rico: The replacement parts and repair labor costs to arrange for Food Processor when operated outside the country of your Food Processor. Replacement parts or repair labor costs for replacement. KitchenAid Will...
...-free replacement of purchase. See the following page for service, follow the instructions on how to correct defects in other rights which vary from state to state or province to province. 29 OR In Puerto Rico: The replacement parts and repair labor costs to arrange for Food Processor when operated outside the country of your Food Processor. Replacement parts or repair labor costs for replacement. KitchenAid Will...

Use & Care Guide
Page 32
... an Authorized KitchenAid Canada Service Centre. Box numbers, please.) When you are unable to obtain satisfactory service in Puerto Rico Your KitchenAid® Food Processor is covered by our one year limited warranty. Service must be covered by a one year limited warranty. If you receive your replacement Food Processor, use the carton and packing materials to correct defects in this quality service. If your KitchenAid® Food Processor should...
... an Authorized KitchenAid Canada Service Centre. Box numbers, please.) When you are unable to obtain satisfactory service in Puerto Rico Your KitchenAid® Food Processor is covered by our one year limited warranty. Service must be covered by a one year limited warranty. If you receive your replacement Food Processor, use the carton and packing materials to correct defects in this quality service. If your KitchenAid® Food Processor should...
Use & Care Guide
Page 34
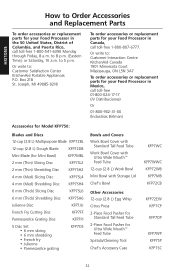
...Julienne Disc KFP7JU French Fry Cutting Disc KFP7FF Parmesan/Ice Grating Disc KFP7PI 5 Disc Set • 6 mm slicing • 6 mm shredding • French fry • Julienne • Parmesan/Ice grating KFP7DS Bowls and Covers Work Bowl Cover with Standard Tall Feed Tube Work Bowl Cover with Ultra Wide Mouth™ Feed Tube 12-cup (2.8 L) Work Bowl Mini Bowl with Storage Lid Chef's Bowl Other Accessories 12-cup (2.8 L) Egg Whip Citrus Press 2-Piece Food Pusher for Standard Tall Feed Tube 2-Piece Food Pusher for Ultra Wide Mouth™ Feed Tube Spatula/Cleaning Tool Chef's Accessory...
...Julienne Disc KFP7JU French Fry Cutting Disc KFP7FF Parmesan/Ice Grating Disc KFP7PI 5 Disc Set • 6 mm slicing • 6 mm shredding • French fry • Julienne • Parmesan/Ice grating KFP7DS Bowls and Covers Work Bowl Cover with Standard Tall Feed Tube Work Bowl Cover with Ultra Wide Mouth™ Feed Tube 12-cup (2.8 L) Work Bowl Mini Bowl with Storage Lid Chef's Bowl Other Accessories 12-cup (2.8 L) Egg Whip Citrus Press 2-Piece Food Pusher for Standard Tall Feed Tube 2-Piece Food Pusher for Ultra Wide Mouth™ Feed Tube Spatula/Cleaning Tool Chef's Accessory...


