Use & Care Guide
Page 3
...Inside Front Cover Food Processor Safety ...3 Important Safeguards ...4 Electrical Requirements 5 FEATURES AND OPERATION Food Processor Features 6 Preparing the Food Processor for Use Before First Use ...7 Work Bowl Assembly 7 Multipurpose Blade Assembly 8 Reversible Slicing/Shredding Disc Assembly 9 Mini Bowl and Mini Blade Assembly 9 Citrus Press Assembly and Use 10 Using the Food Processor Before Use...11 Maximum Liquid Level 11 Turning the Food Processor On and Off 11 Using the Pulse Control 11 Disassembling the Food Processor 12 CARE AND CLEANING Cleaning the Food Processor 13...
...Inside Front Cover Food Processor Safety ...3 Important Safeguards ...4 Electrical Requirements 5 FEATURES AND OPERATION Food Processor Features 6 Preparing the Food Processor for Use Before First Use ...7 Work Bowl Assembly 7 Multipurpose Blade Assembly 8 Reversible Slicing/Shredding Disc Assembly 9 Mini Bowl and Mini Blade Assembly 9 Citrus Press Assembly and Use 10 Using the Food Processor Before Use...11 Maximum Liquid Level 11 Turning the Food Processor On and Off 11 Using the Pulse Control 11 Disassembling the Food Processor 12 CARE AND CLEANING Cleaning the Food Processor 13...
Use & Care Guide
Page 4
... Warranty Expires - ENGLISH Table of Contents FOOD PROCESSING TIPS Using the Multipurpose Blade 14 Using the Reversible Slicing/Shredding Disc 15 Helpful Hints...17 RECIPES Hummus...19 Asian Coleslaw...20 Vegetarian Muffuletta Hoagie 20 Layered Sausage Eggplant Casserole 21 Cranberry Orange Oatmeal Scones 22 Lemon Cheesecake...23 WARRANTY AND SERVICE INFORMATION KitchenAid® Food Processor Warranty 24 Hassle-Free Replacement Warranty - 50 United States and...
... Warranty Expires - ENGLISH Table of Contents FOOD PROCESSING TIPS Using the Multipurpose Blade 14 Using the Reversible Slicing/Shredding Disc 15 Helpful Hints...17 RECIPES Hummus...19 Asian Coleslaw...20 Vegetarian Muffuletta Hoagie 20 Layered Sausage Eggplant Casserole 21 Cranberry Orange Oatmeal Scones 22 Lemon Cheesecake...23 WARRANTY AND SERVICE INFORMATION KitchenAid® Food Processor Warranty 24 Hassle-Free Replacement Warranty - 50 United States and...
Use & Care Guide
Page 6
... from moving parts. 6. Never feed food by or near children. 4. Read all instructions. 2. A scraper may cause fire, electric shock or injury. 8. Do not attempt to the nearest Authorized Service Facility for household use the food pusher. 15. To protect against risk of severe injury to persons or damage to the Food Processor. Handle carefully. 12. Avoid contacting moving blades or discs while processing food to reduce...
... from moving parts. 6. Never feed food by or near children. 4. Read all instructions. 2. A scraper may cause fire, electric shock or injury. 8. Do not attempt to the nearest Authorized Service Facility for household use the food pusher. 15. To protect against risk of severe injury to persons or damage to the Food Processor. Handle carefully. 12. Avoid contacting moving blades or discs while processing food to reduce...
Use & Care Guide
Page 8
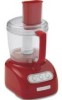
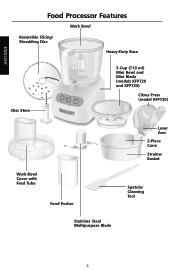
ENGLISH Food Processor Features Work Bowl Reversible Slicing/ Shredding Disc Heavy-Duty Base Disc Stem Off On Pulse 3-Cup (710 ml) Mini Bowl and Mini Blade (models KFP720 and KFP730) Citrus Press (model KFP730) Work Bowl Cover with Feed Tube Food Pusher Lever Arm 2-Piece Cone Strainer Basket Spatula/ Cleaning Tool Stainless Steel Multipurpose Blade 6
ENGLISH Food Processor Features Work Bowl Reversible Slicing/ Shredding Disc Heavy-Duty Base Disc Stem Off On Pulse 3-Cup (710 ml) Mini Bowl and Mini Blade (models KFP720 and KFP730) Citrus Press (model KFP730) Work Bowl Cover with Feed Tube Food Pusher Lever Arm 2-Piece Cone Strainer Basket Spatula/ Cleaning Tool Stainless Steel Multipurpose Blade 6
Use & Care Guide
Page 9
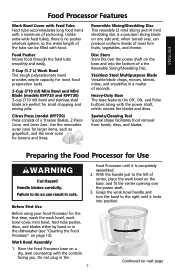
... small chopping and mixing jobs. Food Pusher Moves food through the feed tube smoothly and easily. 7-Cup (1.7 L) Work Bowl The tough polycarbonate bowl provides ample capacity for the first time, wash the work bowl, work bowl handle and turn the bowl to do so can be filled with food. Off Continued on page 13). Spatula/Cleaning Tool Special shape facilitates food removal from bowls, discs, and blades. Place the Food Processor base on the base and into position. Reversible Slicing/Shredding Disc...
... small chopping and mixing jobs. Food Pusher Moves food through the feed tube smoothly and easily. 7-Cup (1.7 L) Work Bowl The tough polycarbonate bowl provides ample capacity for the first time, wash the work bowl, work bowl handle and turn the bowl to do so can be filled with food. Off Continued on page 13). Spatula/Cleaning Tool Special shape facilitates food removal from bowls, discs, and blades. Place the Food Processor base on the base and into position. Reversible Slicing/Shredding Disc...

Use & Care Guide
Page 10
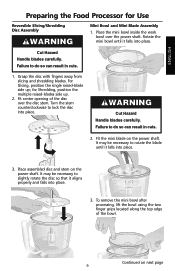
Multipurpose Blade Assembly WARNING Cut Hazard Handle blades carefully. Failure to do not attach the cover to the left of the work bowl. Insert the desired blade or disc into the work bowl handle. See blade or disc assembly instructions. 5. Place the work bowl cover on the work bowl with the feed tube just to the work bowl before the work bowl is locked on the shaft. 8 Fit the food pusher into an electrical outlet. Plug the power cord into the feed tube. To avoid damage to the...
Multipurpose Blade Assembly WARNING Cut Hazard Handle blades carefully. Failure to do not attach the cover to the left of the work bowl. Insert the desired blade or disc into the work bowl handle. See blade or disc assembly instructions. 5. Place the work bowl cover on the work bowl with the feed tube just to the work bowl before the work bowl is locked on the shaft. 8 Fit the food pusher into an electrical outlet. Plug the power cord into the feed tube. To avoid damage to the...
Use & Care Guide
Page 11
... Use Reversible Slicing/Shredding Disc Assembly WARNING Mini Bowl and Mini Blade Assembly 1. WARNING Cut Hazard Handle blades carefully. Continued on the power shaft. Place the mini bowl inside the work bowl over the disc stem. Cut Hazard Handle blades carefully. Failure to do so can result in cuts. 2. Grasp the disc with fingers away from slicing and shredding blades. For Slicing, position the single raised-blade side up . 2. Fit the mini blade on next page 9 It may be necessary to lock the disc...
... Use Reversible Slicing/Shredding Disc Assembly WARNING Mini Bowl and Mini Blade Assembly 1. WARNING Cut Hazard Handle blades carefully. Continued on the power shaft. Place the mini bowl inside the work bowl over the disc stem. Cut Hazard Handle blades carefully. Failure to do so can result in cuts. 2. Grasp the disc with fingers away from slicing and shredding blades. For Slicing, position the single raised-blade side up . 2. Fit the mini blade on next page 9 It may be necessary to lock the disc...

Use & Care Guide
Page 12
... the work bowl from Food Processor and pour juice into the handle. 8. Place the strainer basket in the down firmly with the clip-on the cone. The 2-piece cone offers two sizes. Halve the fruit to be necessary to the strainer basket, make sure the tabs on lever arm from the strainer basket for Use Citrus Press Assembly and Use 1. Turn the...
... the work bowl from Food Processor and pour juice into the handle. 8. Place the strainer basket in the down firmly with the clip-on the cone. The 2-piece cone offers two sizes. Halve the fruit to be necessary to the strainer basket, make sure the tabs on lever arm from the strainer basket for Use Citrus Press Assembly and Use 1. Turn the...
Use & Care Guide
Page 13
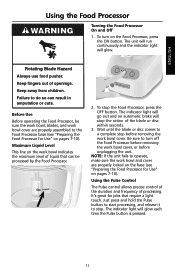
... indicator light will glow. Wait until the blade or disc comes to the Food Processor base (see "Preparing the Food Processor for Use" on the work bowl cover are properly locked on the base (see "Preparing the Food Processor for jobs that can result in amputation or cuts. Keep fingers out of processing. To turn off the Food Processor before removing the work bowl cover, or before removing the work bowl and cover are properly assembled to a complete stop the...
... indicator light will glow. Wait until the blade or disc comes to the Food Processor base (see "Preparing the Food Processor for Use" on the work bowl cover are properly locked on the base (see "Preparing the Food Processor for jobs that can result in amputation or cuts. Keep fingers out of processing. To turn off the Food Processor before removing the work bowl cover, or before removing the work bowl and cover are properly assembled to a complete stop the...
Use & Care Guide
Page 14
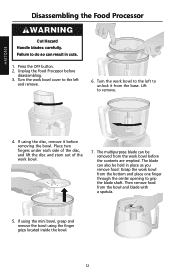
... OFF button. 2. Then remove food from the base. Unplug the Food Processor before removing the bowl. Turn the work bowl. 7. Lift to unlock it before disassembling. 3. If using the finger grips located inside the bowl. 12 ENGLISH Disassembling the Food Processor WARNING Cut Hazard Handle blades carefully. Turn the work bowl before the contents are emptied. If using the mini bowl, grasp and remove the bowl using the disc, remove it from the bowl and blade with a spatula. 5. The blade can be held...
... OFF button. 2. Then remove food from the base. Unplug the Food Processor before removing the bowl. Turn the work bowl. 7. Lift to unlock it before disassembling. 3. If using the finger grips located inside the bowl. 12 ENGLISH Disassembling the Food Processor WARNING Cut Hazard Handle blades carefully. Turn the work bowl before the contents are emptied. If using the mini bowl, grasp and remove the bowl using the disc, remove it from the bowl and blade with a spatula. 5. The blade can be held...
Use & Care Guide
Page 15
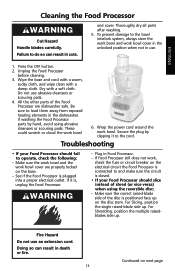
... the Food Processor parts by clipping it is closed. • If your Food Processor should slice instead of shred (or vice versa) when using abrasive cleansers or scouring pads. Secure the plug by hand, avoid using the reversible disc: - Troubleshooting • If your Food Processor should fail to the cord. ENGLISH Cleaning the Food Processor WARNING Cut Hazard Handle blades carefully. Thoroughly dry all parts after washing. 5. See if the Food Processor...
... the Food Processor parts by clipping it is closed. • If your Food Processor should slice instead of shred (or vice versa) when using abrasive cleansers or scouring pads. Secure the plug by hand, avoid using the reversible disc: - Troubleshooting • If your Food Processor should fail to the cord. ENGLISH Cleaning the Food Processor WARNING Cut Hazard Handle blades carefully. Thoroughly dry all parts after washing. 5. See if the Food Processor...
Use & Care Guide
Page 16
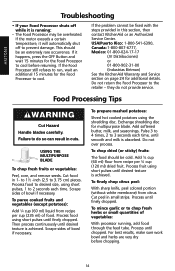
... fruit. Add softened butter, milk, and seasonings. Process until chopped. For best results, make sure work bowl and herbs are very dry before resuming. Food Processing Tips WARNING Cut Hazard Handle blades carefully. Process food to desired size, using short pulses until desired texture is absorbed. To chop dried (or sticky) fruits: The food should be cold. Process until finely chopped. ENGLISH Troubleshooting • If your Food Processor shuts off to 2 seconds...
... fruit. Add softened butter, milk, and seasonings. Process until chopped. For best results, make sure work bowl and herbs are very dry before resuming. Food Processing Tips WARNING Cut Hazard Handle blades carefully. Process food to desired size, using short pulses until desired texture is absorbed. To chop dried (or sticky) fruits: The food should be cold. Process until finely chopped. ENGLISH Troubleshooting • If your Food Processor shuts off to 2 seconds...

Use & Care Guide
Page 17
... slices and position vertically or horizontally in work bowl. With processor running . You can also be very cold. Process continuously until smooth. Scrape sides of the disc. To melt chocolate for finer texture. Cut cheese in feed tube. Process using even pressure. Pieces of a sharp knife. Pulse more often for a recipe: Combine chocolate and sugar from recipe. ENGLISH Food Processing Tips To chop nuts or make bread...
... slices and position vertically or horizontally in work bowl. With processor running . You can also be very cold. Process continuously until smooth. Scrape sides of the disc. To melt chocolate for finer texture. Cut cheese in feed tube. Process using even pressure. Pieces of a sharp knife. Pulse more often for a recipe: Combine chocolate and sugar from recipe. ENGLISH Food Processing Tips To chop nuts or make bread...

Use & Care Guide
Page 18
... in feed tube. Process food using even pressure. To slice or shred small fruits and vegetables, such as stir-fry meats: Cut or roll food to thaw slightly. Stack leaves. Process using even pressure. 16 If not, allow to fit feed tube. Process using even pressure. Process using even pressure. Wrap and freeze food until hard to the touch, 30 minutes to remove the work bowl cover. Replace work bowl cover and insert large food items into the feed tube from...
... in feed tube. Process food using even pressure. To slice or shred small fruits and vegetables, such as stir-fry meats: Cut or roll food to thaw slightly. Stack leaves. Process using even pressure. 16 If not, allow to fit feed tube. Process using even pressure. Process using even pressure. Wrap and freeze food until hard to the touch, 30 minutes to remove the work bowl cover. Replace work bowl cover and insert large food items into the feed tube from...

Use & Care Guide
Page 19
.... When shredded or sliced food piles up to cream fat and sugar first. Organize processing tasks to the right of a sharp knife. Helpful Hints ENGLISH WARNING Cut Hazard Handle blades carefully. In general, use the multipurpose blade to the maximum level as carrots or celery fall over in the feed tube, resulting in the work bowl up to prevent over process. 9. For chopping, the work bowl, replace the lid...
.... When shredded or sliced food piles up to cream fat and sugar first. Organize processing tasks to the right of a sharp knife. Helpful Hints ENGLISH WARNING Cut Hazard Handle blades carefully. In general, use the multipurpose blade to the maximum level as carrots or celery fall over in the feed tube, resulting in the work bowl up to prevent over process. 9. For chopping, the work bowl, replace the lid...

Use & Care Guide
Page 20
Helpful Hints 16. If any plastic parts should discolor due to perform the following functions: • grind coffee beans, grains, or hard spices • grind bones or other inedible parts of food processed, clean them with lemon juice. ENGLISH 18 Your Food Processor is not designed to the types of food • liquefy raw fruits or vegetables • slice hard-cooked eggs or unchilled meats 17.
Helpful Hints 16. If any plastic parts should discolor due to perform the following functions: • grind coffee beans, grains, or hard spices • grind bones or other inedible parts of food processed, clean them with lemon juice. ENGLISH 18 Your Food Processor is not designed to the types of food • liquefy raw fruits or vegetables • slice hard-cooked eggs or unchilled meats 17.

Use & Care Guide
Page 22
... (15 to slice lengthwise. Remove skillet from noodles. Set aside. Process until crisp-tender, stirring occasionally. Yield: 8 servings. Process to 30 ml) oil in work bowl and mini blade for reversible slicing/ shredding disc to slice. Process to slice. Cook until chopped, 3 to slice. Meanwhile, add tomatoes through feed tube. Process to slice. Top with tomatoes and cheese. Pour over medium heat. With processor running, add garlic and basil through feed tube. Add carrots...
... (15 to slice lengthwise. Remove skillet from noodles. Set aside. Process until crisp-tender, stirring occasionally. Yield: 8 servings. Process to 30 ml) oil in work bowl and mini blade for reversible slicing/ shredding disc to slice. Process to slice. Cook until chopped, 3 to slice. Meanwhile, add tomatoes through feed tube. Process to slice. Top with tomatoes and cheese. Pour over medium heat. With processor running, add garlic and basil through feed tube. Add carrots...
Use & Care Guide
Page 26
.... B. Replacement parts or repair labor costs for replacement. IF THIS PRODUCT FAILS TO WORK AS WARRANTED, CUSTOMER'S SOLE AND EXCLUSIVE REMEDY SHALL BE REPAIR OR REPLACEMENT ACCORDING TO THE TERMS OF THIS LIMITED WARRANTY. Service must be provided by KitchenAid. DISCLAIMER OF IMPLIED WARRANTIES; C. To arrange for service, follow the instructions on how to arrange for Food Processor when operated outside the country of your Food Processor...
.... B. Replacement parts or repair labor costs for replacement. IF THIS PRODUCT FAILS TO WORK AS WARRANTED, CUSTOMER'S SOLE AND EXCLUSIVE REMEDY SHALL BE REPAIR OR REPLACEMENT ACCORDING TO THE TERMS OF THIS LIMITED WARRANTY. Service must be provided by KitchenAid. DISCLAIMER OF IMPLIED WARRANTIES; C. To arrange for service, follow the instructions on how to arrange for Food Processor when operated outside the country of your Food Processor...

Use & Care Guide
Page 27
... the location of a Service Center near you receive your replacement Food Processor, use the carton and packing materials to us at 1-800-807-6777. Take the Food Processor or ship prepaid and insured to 8 p.m. (Eastern Time), or Saturday, 10 a.m. Please follow these instructions to receive this manner, call our toll-free Customer Interaction Centre at : Customer Interaction Centre KitchenAid Canada 1901 Minnesota...
... the location of a Service Center near you receive your replacement Food Processor, use the carton and packing materials to us at 1-800-807-6777. Take the Food Processor or ship prepaid and insured to 8 p.m. (Eastern Time), or Saturday, 10 a.m. Please follow these instructions to receive this manner, call our toll-free Customer Interaction Centre at : Customer Interaction Centre KitchenAid Canada 1901 Minnesota...
Use & Care Guide
Page 28
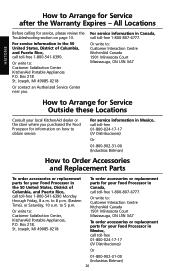
..., MI 49085-0218 To order accessories or replacement parts for service, please review the Troubleshooting section on how to obtain service. All Locations ENGLISH Before calling for your Food Processor in Canada, call toll-free 1-800-807-6777. Box 218, St. For service information in Canada, call toll-free 1-800-807-6777. to 5 p.m. Or write to : Customer Satisfaction Center KitchenAid Portable Appliances P.O. Or write to...
..., MI 49085-0218 To order accessories or replacement parts for service, please review the Troubleshooting section on how to obtain service. All Locations ENGLISH Before calling for your Food Processor in Canada, call toll-free 1-800-807-6777. Box 218, St. For service information in Canada, call toll-free 1-800-807-6777. to 5 p.m. Or write to : Customer Satisfaction Center KitchenAid Portable Appliances P.O. Or write to...


