Instruction Manual
Page 2
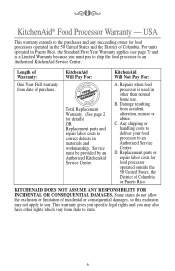
... your complete model and serial number. Please follow these instructions to us . ķ℀ĸ Total Replacement Warranty We're so confident the quality of our products meets the exacting standards of KitchenAid that, if your food processor should fail within the first year of ownership, KitchenAid will arrange to deliver an identical or comparable replacement to your door free of charge...
... your complete model and serial number. Please follow these instructions to us . ķ℀ĸ Total Replacement Warranty We're so confident the quality of our products meets the exacting standards of KitchenAid that, if your food processor should fail within the first year of ownership, KitchenAid will arrange to deliver an identical or comparable replacement to your door free of charge...
Instruction Manual
Page 3
... Card 9 How To Obtain Service 9 Food Processor Features 10 Assembling Your Food Processor 12 Egg Whip...15 Operating Your Food Processor 16 Disassembling Your Food Processor 17 Care and Cleaning 18 Food Processor Tips 19 Helpful Hints...22 Recipes ...24 Appetizers 24 Salads and Dressings 34 Soups and Sandwiches 42 Vegetables and Side Dishes 51 Main Dishes 58 Breads ...74 Desserts ...83 Optional Attachments and Accessories 93 Notes ...94 3 ķ...
... Card 9 How To Obtain Service 9 Food Processor Features 10 Assembling Your Food Processor 12 Egg Whip...15 Operating Your Food Processor 16 Disassembling Your Food Processor 17 Care and Cleaning 18 Food Processor Tips 19 Helpful Hints...22 Recipes ...24 Appetizers 24 Salads and Dressings 34 Soups and Sandwiches 42 Vegetables and Side Dishes 51 Main Dishes 58 Breads ...74 Desserts ...83 Optional Attachments and Accessories 93 Notes ...94 3 ķ...
Instruction Manual
Page 4
... authorized service facility for household use , before putting on base without first putting bowl properly in place before cleaning. 5. SAVE THESE INSTRUCTIONS 4 Read all instructions. 2. Avoid contacting moving blades or discs while processing food to reduce the risk of severe injury to persons or damage to the food processor. Blades are sharp. Always use outdoors. 9. This product is not running. 11. Unplug from moving parts. 6. The use...
... authorized service facility for household use , before putting on base without first putting bowl properly in place before cleaning. 5. SAVE THESE INSTRUCTIONS 4 Read all instructions. 2. Avoid contacting moving blades or discs while processing food to reduce the risk of severe injury to persons or damage to the food processor. Blades are sharp. Always use outdoors. 9. This product is not running. 11. Unplug from moving parts. 6. The use...
Instruction Manual
Page 6
... to an Authorized KitchenAid Service Center. Service must pay to ship the food processor to the purchaser and any succeeding owner for food processor operated outside the 50 United States, the District of Columbia. Some states do not allow the exclusion or limitation of purchase. Replacement parts or repair labor costs for food processors operated in materials and workmanship. This warranty gives you specific legal rights...
... to an Authorized KitchenAid Service Center. Service must pay to ship the food processor to the purchaser and any succeeding owner for food processor operated outside the 50 United States, the District of Columbia. Some states do not allow the exclusion or limitation of purchase. Replacement parts or repair labor costs for food processors operated in materials and workmanship. This warranty gives you specific legal rights...

Instruction Manual
Page 7
... time.) Your repaired food processor will be handled by calling 1-800-541-6390, 8 a.m. If you like, but we recommend Authorized KitchenAid Service. USA Only If the food processor is operated in this manner, contact the Customer Satisfaction Center, KitchenAid Portable Appliances, P. to obtain service locally. 7 During the warranty period, all local service must use the Standard First Year Warranty program. Call toll-free: 1-800-541...
... time.) Your repaired food processor will be handled by calling 1-800-541-6390, 8 a.m. If you like, but we recommend Authorized KitchenAid Service. USA Only If the food processor is operated in this manner, contact the Customer Satisfaction Center, KitchenAid Portable Appliances, P. to obtain service locally. 7 During the warranty period, all local service must use the Standard First Year Warranty program. Call toll-free: 1-800-541...

Instruction Manual
Page 8
...OF IN-WARRANTY SERVICE. Is the fuse in working order? Do not modify the plug in a polarized outlet only one blade is not due to the retailer as they do not provide service. If your food processor should malfunction or fail to the food processor in the circuit to operate, check the ..."How To Arrange For Service," on the attachment that draws the greatest load. DO NOT return the food processor to one of electrical shock, this plug will fit in any way. 8 ķ℀ĸ If You Need Service or Assistance KEEP A COPY OF THE SALES RECEIPT SHOWING THE DATE ...
...OF IN-WARRANTY SERVICE. Is the fuse in working order? Do not modify the plug in a polarized outlet only one blade is not due to the retailer as they do not provide service. If your food processor should malfunction or fail to the food processor in the circuit to operate, check the ..."How To Arrange For Service," on the attachment that draws the greatest load. DO NOT return the food processor to one of electrical shock, this plug will fit in any way. 8 ķ℀ĸ If You Need Service or Assistance KEEP A COPY OF THE SALES RECEIPT SHOWING THE DATE ...
Instruction Manual
Page 9
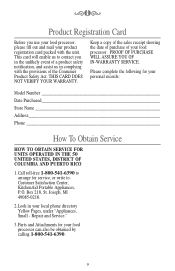
...records: Model Number Date Purchased Store Name Address Phone How To Obtain Service HOW TO OBTAIN SERVICE FOR UNITS OPERATED IN THE 50 UNITED STATES, DISTRICT OF COLUMBIA AND PUERTO RICO 1.Call toll-free 1-800-541-6390 to arrange for your food processor can...packed with the provisions of the Consumer Product Safety Act. Repair and Service." 3.Parts and Attachments for service, or write to contact you use your food processor, please fill out and mail your food processor. Box 218, St. This card will enable us to : Customer Satisfaction Center, KitchenAid Portable Appliances, P.O.
...records: Model Number Date Purchased Store Name Address Phone How To Obtain Service HOW TO OBTAIN SERVICE FOR UNITS OPERATED IN THE 50 UNITED STATES, DISTRICT OF COLUMBIA AND PUERTO RICO 1.Call toll-free 1-800-541-6390 to arrange for your food processor can...packed with the provisions of the Consumer Product Safety Act. Repair and Service." 3.Parts and Attachments for service, or write to contact you use your food processor, please fill out and mail your food processor. Box 218, St. This card will enable us to : Customer Satisfaction Center, KitchenAid Portable Appliances, P.O.
Instruction Manual
Page 10
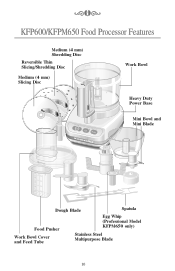
ķ℀ĸ KFP600/KFPM650 Food Processor Features Medium (4 mm) Shredding Disc Reversible Thin Slicing/Shredding Disc Medium (4 mm) Slicing Disc Work Bowl Off CAUTION: READ INSTRUCTIONS BEFORE USING On Pulse Ultra Power Electronic Control Heavy Duty Power Base Mini Bowl and Mini Blade 250 8 0.4 200 150 6 0.3 4 100 0.2 50 2 0.1 ml oz pts Dough Blade Spatula Food Pusher Work Bowl Cover and Feed Tube Egg Whip (Professional Model KFPM650 only) Stainless Steel Multipurpose Blade 10
ķ℀ĸ KFP600/KFPM650 Food Processor Features Medium (4 mm) Shredding Disc Reversible Thin Slicing/Shredding Disc Medium (4 mm) Slicing Disc Work Bowl Off CAUTION: READ INSTRUCTIONS BEFORE USING On Pulse Ultra Power Electronic Control Heavy Duty Power Base Mini Bowl and Mini Blade 250 8 0.4 200 150 6 0.3 4 100 0.2 50 2 0.1 ml oz pts Dough Blade Spatula Food Pusher Work Bowl Cover and Feed Tube Egg Whip (Professional Model KFPM650 only) Stainless Steel Multipurpose Blade 10

Instruction Manual
Page 11
Mini Bowl and Mini Blade are easy to assemble and clean. It chops, minces, blends, mixes and emulsifies in cord storage. Optional Egg Whip is a precision sharp slicing blade on one side and when turned over can shred most firm fruits, vegetables and cheeses into even uniform shreds. Medium (4 mm) Shredding Disc features larger shredding openings to read measurement markings. ķ℀ĸ KFP600/KFPM650 Food Processor Features KitchenAid quality means this...
Mini Bowl and Mini Blade are easy to assemble and clean. It chops, minces, blends, mixes and emulsifies in cord storage. Optional Egg Whip is a precision sharp slicing blade on one side and when turned over can shred most firm fruits, vegetables and cheeses into even uniform shreds. Medium (4 mm) Shredding Disc features larger shredding openings to read measurement markings. ķ℀ĸ KFP600/KFPM650 Food Processor Features KitchenAid quality means this...

Instruction Manual
Page 12
... INSTRUCTIONS BEFORE USING On Pulse Ultra Power 12 Do not plug unit in the dishwasher, see Care and Cleaning, page 18. 2. Before using your food processor for the first time, wash the work bowl, work bowl handle and turn to the left of cord from storage area beneath power base. Uncoil needed length of center. 4. Place work bowl on a dry level counter with the controls facing forward. Grasp the work bowl cover, mini bowl, feed tube pusher and blades either...
... INSTRUCTIONS BEFORE USING On Pulse Ultra Power 12 Do not plug unit in the dishwasher, see Care and Cleaning, page 18. 2. Before using your food processor for the first time, wash the work bowl, work bowl handle and turn to the left of cord from storage area beneath power base. Uncoil needed length of center. 4. Place work bowl on a dry level counter with the controls facing forward. Grasp the work bowl cover, mini bowl, feed tube pusher and blades either...
Instruction Manual
Page 13
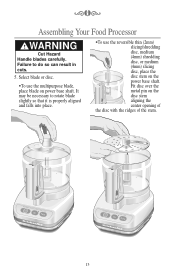
... aligned and falls into place. •To use the multipurpose blade, place blade on power base shaft. Select blade or disc. •To use the reversible thin (2mm) slicing/shredding disc, medium (4mm) shredding disc, or medium (4mm) slicing disc, place the disc stem on the disc stem aligning the center opening of the disc with the ridges of the stem. ķ℀ĸ Assembling Your Food Processor ! It may be necessary to do so...
... aligned and falls into place. •To use the multipurpose blade, place blade on power base shaft. Select blade or disc. •To use the reversible thin (2mm) slicing/shredding disc, medium (4mm) shredding disc, or medium (4mm) slicing disc, place the disc stem on the disc stem aligning the center opening of the disc with the ridges of the stem. ķ℀ĸ Assembling Your Food Processor ! It may be necessary to do so...

Instruction Manual
Page 14
... KitchenAid® Food Processor features a double interlock safety system to the work bowl cover are properly aligned and fall into place. 6. Off CAUTION: READ INSTRUCTIONS BEFORE USING On Pulse Ultra Power Electronic Control NOTE: Never try to remove the work bowl before the work bowl handle. Damage to the left of the work bowl has been positioned on the power base shaft. Place the work bowl cover on the power base. Grasp the feed tube and turn the cover to...
... KitchenAid® Food Processor features a double interlock safety system to the work bowl cover are properly aligned and fall into place. 6. Off CAUTION: READ INSTRUCTIONS BEFORE USING On Pulse Ultra Power Electronic Control NOTE: Never try to remove the work bowl before the work bowl handle. Damage to the left of the work bowl has been positioned on the power base shaft. Place the work bowl cover on the power base. Grasp the feed tube and turn the cover to...
Instruction Manual
Page 16
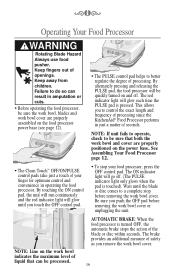
...; To stop before removing the work bowl cover or unplugging the unit. ķ℀ĸ Operating Your Food Processor ! By alternately pressing and releasing the PULSE pad, the food processor will glow each time the PULSE pad is turned OFF, the automatic brake stops the action of processing since the KitchenAid® Food Processor performs in amputation or cuts. • Before operating the food processor, be quickly turned on the power base...
...; To stop before removing the work bowl cover or unplugging the unit. ķ℀ĸ Operating Your Food Processor ! By alternately pressing and releasing the PULSE pad, the food processor will glow each time the PULSE pad is turned OFF, the automatic brake stops the action of processing since the KitchenAid® Food Processor performs in amputation or cuts. • Before operating the food processor, be quickly turned on the power base...
Instruction Manual
Page 17
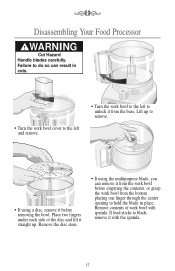
...; Turn the work bowl to the left to unlock it from the bottom placing one finger through the center opening to the left and remove. Control • If using the multipurpose blade, you can result in place. WARNING Cut Hazard Handle blades carefully. Remove the disc stem. • If using a disc, remove it straight up to blade, remove it from the work bowl from the base. If food sticks to remove. Place...
...; Turn the work bowl to the left to unlock it from the bottom placing one finger through the center opening to the left and remove. Control • If using the multipurpose blade, you can result in place. WARNING Cut Hazard Handle blades carefully. Remove the disc stem. • If using a disc, remove it straight up to blade, remove it from the work bowl from the base. If food sticks to remove. Place...
Instruction Manual
Page 18
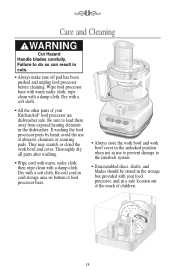
... CAUTION: READ INSTRUCTIONS BEFORE USING On Pulse Ultra Power • Always store the work bowl and work bowl and cover. They may scratch or cloud the work bowl cover in the unlocked position when not in use of children. 18 ķ℀ĸ Care and Cleaning ! Dry with your food processor, and in the storage box provided with a soft cloth. • All the other parts of your KitchenAid® food processor are dishwasher...
... CAUTION: READ INSTRUCTIONS BEFORE USING On Pulse Ultra Power • Always store the work bowl and work bowl and cover. They may scratch or cloud the work bowl cover in the unlocked position when not in use of children. 18 ķ℀ĸ Care and Cleaning ! Dry with your food processor, and in the storage box provided with a soft cloth. • All the other parts of your KitchenAid® food processor are dishwasher...
Instruction Manual
Page 19
... chopped. Process food, using short pulses, until finely chopped. Scrape sides of bowl, if necessary. Add softened butter, milk, and seasonings. Add 1⁄4 cup flour from recipe. Cut peel in 1-inch pieces. Cut in small strips. Scrape sides of nuts to desired texture, using the shredding disc. With processor running , add food through feed tube. Do not overprocess. Process until fine. For best results, make nut butters: Process up to 2-inch pieces. Process until chopped. Process food...
... chopped. Process food, using short pulses, until finely chopped. Scrape sides of bowl, if necessary. Add softened butter, milk, and seasonings. Add 1⁄4 cup flour from recipe. Cut peel in 1-inch pieces. Cut in small strips. Scrape sides of nuts to desired texture, using the shredding disc. With processor running , add food through feed tube. Do not overprocess. Process until fine. For best results, make nut butters: Process up to 2-inch pieces. Process until chopped. Process food...
Instruction Manual
Page 21
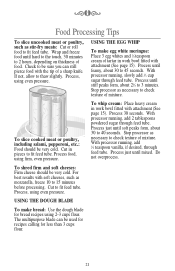
...; Food Processing Tips To slice uncooked meat or poultry, such as mozzarella, freeze 10 to 15 minutes before processing. Process food, using even pressure. To whip cream: Place heavy cream in work bowl fitted with attachment (See page 15). USING THE EGG WHIP To make bread: Use the dough blade for less than 3 cups flour. 21 With processor running , add 2 tablespoons powdered sugar through feed tube. Cut in work bowl fitted with attachment...
...; Food Processing Tips To slice uncooked meat or poultry, such as mozzarella, freeze 10 to 15 minutes before processing. Process food, using even pressure. To whip cream: Place heavy cream in work bowl fitted with attachment (See page 15). USING THE EGG WHIP To make bread: Use the dough blade for less than 3 cups flour. 21 With processor running , add 2 tablespoons powdered sugar through feed tube. Cut in work bowl fitted with attachment...
Instruction Manual
Page 22
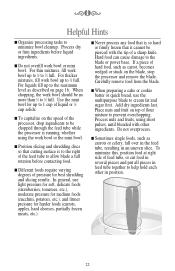
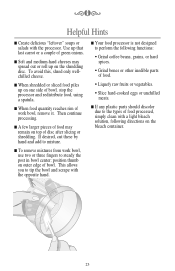
... cut food in several pieces and put all pieces in position. 22 For thicker mixtures, fill work bowl should be pierced with other in feed tube together to prevent overchopping. Place nuts and fruit on the blade, stop the processor and remove the blade. Process nuts and fruits, using the work bowl or the mini bowl. Carefully remove food from the blade. ķ℀ĸ Helpful Hints s Organize processing tasks to the blade or power base.
... cut food in several pieces and put all pieces in position. 22 For thicker mixtures, fill work bowl should be pierced with other in feed tube together to prevent overchopping. Place nuts and fruit on the blade, stop the processor and remove the blade. Process nuts and fruits, using the work bowl or the mini bowl. Carefully remove food from the blade. ķ℀ĸ Helpful Hints s Organize processing tasks to the blade or power base.
Instruction Manual
Page 23
... remove mixtures from work bowl, remove it. This allows you to mixture. s If any plastic parts should discolor due to the types of food processed, simply clean with a light bleach solution, following functions: • Grind coffee beans, grains, or hard spices. • Grind bones or other inedible parts of bowl, stop the processor and redistribute food, using a spatula. s A few larger pieces of disc after slicing or shredding. s When shredded or sliced food piles...
... remove mixtures from work bowl, remove it. This allows you to mixture. s If any plastic parts should discolor due to the types of food processed, simply clean with a light bleach solution, following functions: • Grind coffee beans, grains, or hard spices. • Grind bones or other inedible parts of bowl, stop the processor and redistribute food, using a spatula. s A few larger pieces of disc after slicing or shredding. s When shredded or sliced food piles...

Instruction Manual
Page 43
... curry powder 1/8 teaspoon black pepper 2 cups skim or low-fat milk 3 tablespoons all-purpose flour Position mini bowl and mini blade in work bowl. Exchange mini bowl and mini blade for multipurpose blade. Exchange shredding disc for 4 mm shredding disc. Add onion and celery to medium-low. Process until coarsely chopped, about 1 second each time, until coarsely chopped, about 5 seconds. Remove to saucepan. Remove to saucepan. Pour into small pieces. Add to shred. Cook for 15...
... curry powder 1/8 teaspoon black pepper 2 cups skim or low-fat milk 3 tablespoons all-purpose flour Position mini bowl and mini blade in work bowl. Exchange mini bowl and mini blade for multipurpose blade. Exchange shredding disc for 4 mm shredding disc. Add onion and celery to medium-low. Process until coarsely chopped, about 1 second each time, until coarsely chopped, about 5 seconds. Remove to saucepan. Remove to saucepan. Pour into small pieces. Add to shred. Cook for 15...


