Use & Care Guide
Page 3
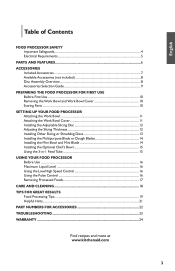
... Slicing or Shredding Discs 13 Installing the Multipurpose Blade or Dough Blades 14 Installing the Mini-Bowl and Mini-Blade 14 Installing the Optional Chef's Bowl 15 Using the 3-in-1 Feed Tube 15 USING YOUR FOOD PROCESSOR Before Use...16 Maximum Liquid Level 16 Using the Low/High Speed Control 16 Using the Pulse Control 16 Removing Processed Foods 17 CARE AND CLEANING 18 TIPS FOR GREAT RESULTS Food Processing Tips 19 Helpful Hints...21 PART NUMBERS FOR ACCESSORIES 22 TROUBLESHOOTING 23 WARRANTY...24 Find recipes...
... Slicing or Shredding Discs 13 Installing the Multipurpose Blade or Dough Blades 14 Installing the Mini-Bowl and Mini-Blade 14 Installing the Optional Chef's Bowl 15 Using the 3-in-1 Feed Tube 15 USING YOUR FOOD PROCESSOR Before Use...16 Maximum Liquid Level 16 Using the Low/High Speed Control 16 Using the Pulse Control 16 Removing Processed Foods 17 CARE AND CLEANING 18 TIPS FOR GREAT RESULTS Food Processing Tips 19 Helpful Hints...21 PART NUMBERS FOR ACCESSORIES 22 TROUBLESHOOTING 23 WARRANTY...24 Find recipes...
Use & Care Guide
Page 4
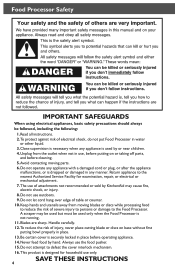
... malfunctions, or is securely locked in any appliance is used only when the Food Processor is designed for examination, repair, or electrical or mechanical adjustment. 7. Blades are sharp. Handle carefully. 12. SAVE THESE INSTRUCTIONS 4 Read all instructions. 2. Do not use the food pusher. 15. To protect against risk of injury, never place cutting blade or discs on or taking off parts, and before cleaning. 5. To reduce the...
... malfunctions, or is securely locked in any appliance is used only when the Food Processor is designed for examination, repair, or electrical or mechanical adjustment. 7. Blades are sharp. Handle carefully. 12. SAVE THESE INSTRUCTIONS 4 Read all instructions. 2. Do not use the food pusher. 15. To protect against risk of injury, never place cutting blade or discs on or taking off parts, and before cleaning. 5. To reduce the...
Use & Care Guide
Page 6
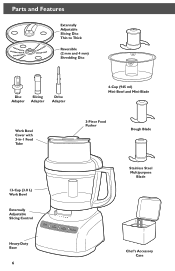
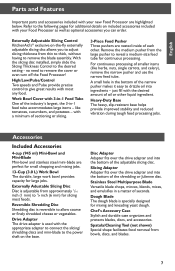
Parts and Features Externally Adjustable Slicing Disc Thin to Thick Reversible (2 mm and 4 mm) Shredding Disc Disc Slicing Adapter Adapter Drive Adapter Work Bowl Cover with 3-in-1 Feed Tube 4-Cup (945 ml) Mini-Bowl and Mini-Blade 3-Piece Food Pusher Dough Blade 13-Cup (3.0 L) Work Bowl Externally Adjustable Slicing Control Stainless Steel Multipurpose Blade Heavy-Duty Base 6 Chef's Accessory Case
Parts and Features Externally Adjustable Slicing Disc Thin to Thick Reversible (2 mm and 4 mm) Shredding Disc Disc Slicing Adapter Adapter Drive Adapter Work Bowl Cover with 3-in-1 Feed Tube 4-Cup (945 ml) Mini-Bowl and Mini-Blade 3-Piece Food Pusher Dough Blade 13-Cup (3.0 L) Work Bowl Externally Adjustable Slicing Control Stainless Steel Multipurpose Blade Heavy-Duty Base 6 Chef's Accessory Case
Use & Care Guide
Page 7
... feed tube. Slicing Adapter Adapter fits over the drive adapter and into ingredients - English Parts and Features Important parts and accessories included with your Food Processor as well as optional accessories you to adjust slicing thickness from thin to thick, without having to remove the blade assembly. Externally Adustable Slicing Disc Disc is used with the appropriate adapter to connect the slicing/ shredding discs and mini-blade to the following pages for slicing most any food. Accessories Included Accessories 4-cup (945 ml) Mini-Bowl...
... feed tube. Slicing Adapter Adapter fits over the drive adapter and into ingredients - English Parts and Features Important parts and accessories included with your Food Processor as well as optional accessories you to adjust slicing thickness from thin to thick, without having to remove the blade assembly. Externally Adustable Slicing Disc Disc is used with the appropriate adapter to connect the slicing/ shredding discs and mini-blade to the following pages for slicing most any food. Accessories Included Accessories 4-cup (945 ml) Mini-Bowl...
Use & Care Guide
Page 8
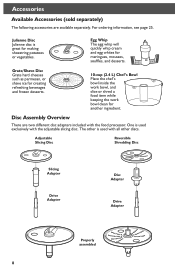
...;s, and desserts. For ordering information, see page 25. Disc Assembly Overview There are available separately. Egg Whip The egg whip will quickly whip cream and egg whites for creating refreshing beverages and frozen desserts. Grate/Shave 10-cup (2.4 L) Chef's Bowl Place the chef's bowl inside the work bowl, and slice or shred a food item while keeping the work bowl clean for making shoestring potatoes or vegetables. Julienne Disc Julienne disc is used with the food processor.
...;s, and desserts. For ordering information, see page 25. Disc Assembly Overview There are available separately. Egg Whip The egg whip will quickly whip cream and egg whites for creating refreshing beverages and frozen desserts. Grate/Shave 10-cup (2.4 L) Chef's Bowl Place the chef's bowl inside the work bowl, and slice or shred a food item while keeping the work bowl clean for making shoestring potatoes or vegetables. Julienne Disc Julienne disc is used with the food processor.
Use & Care Guide
Page 10
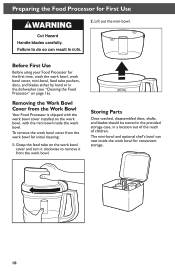
... Use Before using your Food Processor for the first time, wash the work bowl, work bowl for First Use 2. To remove the work bowl cover from the work bowl. Preparing the Food Processor for initial cleaning: 1. The mini-bowl and optional chef's bowl can nest inside the work bowl. Storing Parts Once washed, disassembled discs, shafts, and blades should be stored in the provided storage case, in the dishwasher (see "Cleaning the Food Processor" on the work bowl cover and turn it clockwise to remove it from the work bowl cover, mini-bowl, feed tube pushers, discs, and blades...
... Use Before using your Food Processor for the first time, wash the work bowl, work bowl for First Use 2. To remove the work bowl cover from the work bowl. Preparing the Food Processor for initial cleaning: 1. The mini-bowl and optional chef's bowl can nest inside the work bowl. Storing Parts Once washed, disassembled discs, shafts, and blades should be stored in the provided storage case, in the dishwasher (see "Cleaning the Food Processor" on the work bowl cover and turn it clockwise to remove it from the work bowl cover, mini-bowl, feed tube pushers, discs, and blades...
Use & Care Guide
Page 11
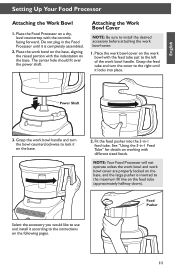
... power shaft. Power Shaft 3. NOTE: Your Food Processor will not operate unless the work bowl and work bowl handle and turn the cover to the maximum fill line on the base. Place the work bowl cover on the work bowl with the indentation on the feed tube (approximately halfway down). Grasp the work bowl cover are properly locked on the base, aligning the raised portion with the feed tube just to install the desired accessory before attaching the work bowl handle. Place the work bowl on the base...
... power shaft. Power Shaft 3. NOTE: Your Food Processor will not operate unless the work bowl and work bowl handle and turn the cover to the maximum fill line on the base. Place the work bowl cover on the work bowl with the indentation on the feed tube (approximately halfway down). Grasp the work bowl cover are properly locked on the base, aligning the raised portion with the feed tube just to install the desired accessory before attaching the work bowl handle. Place the work bowl on the base...
Use & Care Guide
Page 12
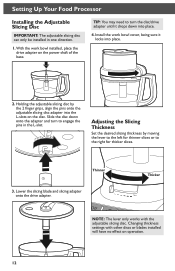
... need to turn to the right for thicker slices. Holding the adjustable slicing disc by moving the lever to the left for thinner slices or to engage the pins in one direction. 1. Thicker NOTE: The lever only works with other discs or blades installed will have no effect on the disc. Changing thickness settings with the adjustable slicing disc. Install the work bowl installed, place the drive adapter on the power shaft of the base...
... need to turn to the right for thicker slices. Holding the adjustable slicing disc by moving the lever to the left for thinner slices or to engage the pins in one direction. 1. Thicker NOTE: The lever only works with other discs or blades installed will have no effect on the disc. Changing thickness settings with the adjustable slicing disc. Install the work bowl installed, place the drive adapter on the power shaft of the base...
Use & Care Guide
Page 13
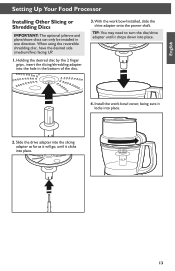
... need to turn the disc/drive adapter until it clicks into the hole in one direction. Install the work bowl installed, slide the drive adapter onto the power shaft. Slide the drive adapter into the slicing adapter as far as it will go, until it locks into place. 4. English Setting Up Your Food Processor Installing Other Slicing or Shredding Discs IMPORTANT: The optional julienne and plane/shave discs can only be installed in the bottom of the disc. 3. With the work bowl cover...
... need to turn the disc/drive adapter until it clicks into the hole in one direction. Install the work bowl installed, slide the drive adapter onto the power shaft. Slide the drive adapter into the slicing adapter as far as it will go, until it locks into place. 4. English Setting Up Your Food Processor Installing Other Slicing or Shredding Discs IMPORTANT: The optional julienne and plane/shave discs can only be installed in the bottom of the disc. 3. With the work bowl cover...
Use & Care Guide
Page 14
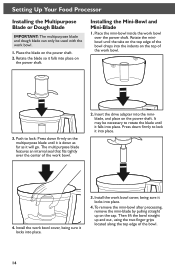
... Mini-Bowl and Mini-Blade 1. Place the mini-bowl inside the work bowl over the center of the work bowl. 3. Rotate the minibowl until the tabs on the top edge of the bowl. 14 It may be used with the work bowl. 2. Press down firmly to lock it into the miniblade, and place on the power shaft. Install the work bowl cover, being sure it locks into place. 3. To remove the mini-bowl after processing, remove the mini-blade...
... Mini-Bowl and Mini-Blade 1. Place the mini-bowl inside the work bowl over the center of the work bowl. 3. Rotate the minibowl until the tabs on the top edge of the bowl. 14 It may be used with the work bowl. 2. Press down firmly to lock it into the miniblade, and place on the power shaft. Install the work bowl cover, being sure it locks into place. 3. To remove the mini-bowl after processing, remove the mini-blade...
Use & Care Guide
Page 15
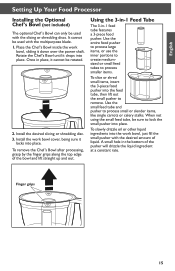
... shredding disc. 3. A small hole in -1 feed tube features a 3-piece food pusher. When not using the small feed tube, be used with the multipurpose blade. 1. Use the small feed tube and pusher to remove. English Setting Up Your Food Processor Installing the Optional Chef's Bowl (not included) The optional Chef's Bowl can only be sure to lock the small pusher into place. Place the Chef's Bowl inside the work bowl, just fill the small pusher with the slicing or shredding discs. Install the work bowl cover, being sure it drops into place. To remove the Chef's Bowl after processing...
... shredding disc. 3. A small hole in -1 feed tube features a 3-piece food pusher. When not using the small feed tube, be used with the multipurpose blade. 1. Use the small feed tube and pusher to remove. English Setting Up Your Food Processor Installing the Optional Chef's Bowl (not included) The optional Chef's Bowl can only be sure to lock the small pusher into place. Place the Chef's Bowl inside the work bowl, just fill the small pusher with the slicing or shredding discs. Install the work bowl cover, being sure it drops into place. To remove the Chef's Bowl after processing...
Use & Care Guide
Page 16
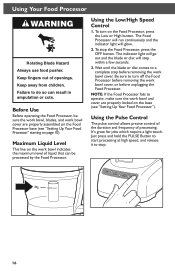
... Food Processor" starting on the Food Processor, press the Low or High button. Wait until the blade or disc comes to stop the Food Processor, press the OFF button. NOTE: If the Food Processor fails to turn on page 10). Before Use Before operating the Food Processor, be processed by the Food Processor. The Food Processor will run continuously and the indicator light will stop before unplugging the Food Processor. Be sure to operate, make sure the work bowl cover. Using Your Food Processor...
... Food Processor" starting on the Food Processor, press the Low or High button. Wait until the blade or disc comes to stop the Food Processor, press the OFF button. NOTE: If the Food Processor fails to turn on page 10). Before Use Before operating the Food Processor, be processed by the Food Processor. The Food Processor will run continuously and the indicator light will stop before unplugging the Food Processor. Be sure to operate, make sure the work bowl cover. Using Your Food Processor...
Use & Care Guide
Page 17
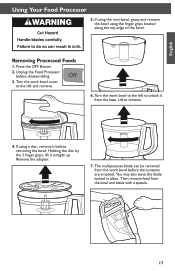
... it before removing the bowl. Remove the adapter. 7. Turn the work bowl to the left and remove. 6. Then remove food from the base. English Using Your Food Processor 5. If using the finger grips located along the top edge of the bowl. If using the mini-bowl, grasp and remove the bowl using a disc, remove it straight up. Removing Processed Foods 1. The multipurpose blade can be removed from the work bowl cover to the left to remove. 4. Press the OFF Button. 2. Turn the work bowl before disassembling. 3. Lift...
... it before removing the bowl. Remove the adapter. 7. Turn the work bowl to the left and remove. 6. Then remove food from the base. English Using Your Food Processor 5. If using the finger grips located along the top edge of the bowl. If using the mini-bowl, grasp and remove the bowl using a disc, remove it straight up. Removing Processed Foods 1. The multipurpose blade can be removed from the work bowl cover to the left to remove. 4. Press the OFF Button. 2. Turn the work bowl before disassembling. 3. Lift...
Use & Care Guide
Page 18
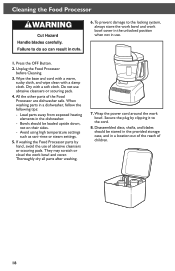
... washing the Food Processor parts by clipping it to the locking system, always store the work bowl and work bowl cover in the unlocked position when not in a location out of the reach of the Food Processor are dishwasher safe. Cleaning the Food Processor 6. Unplug the Food Processor before Cleaning. 3. They may scratch or cloud the work bowl. Disassembled discs, shafts, and blades should be stored in the provided storage case, and in use abrasive cleansers...
... washing the Food Processor parts by clipping it to the locking system, always store the work bowl and work bowl cover in the unlocked position when not in a location out of the reach of the Food Processor are dishwasher safe. Cleaning the Food Processor 6. Unplug the Food Processor before Cleaning. 3. They may scratch or cloud the work bowl. Disassembled discs, shafts, and blades should be stored in the provided storage case, and in use abrasive cleansers...
Use & Care Guide
Page 19
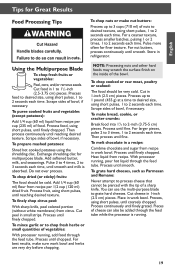
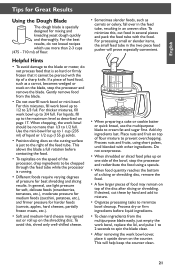
... recipe per 1/2 cup (120 ml) dried fruit. Process until reaching desired texture. Process until smooth. English Tips for Great Results Food Processing Tips To chop nuts or make nut butters: Process up to 1 pound (455 g) at a time to desired size, using short pulses, 1 to 2 seconds each time. Pulse more often for multipurpose blade. For nut butters, process continuously until smooth. Cut food in work bowl. Scrape sides of bowl...
... recipe per 1/2 cup (120 ml) dried fruit. Process until reaching desired texture. Process until smooth. English Tips for Great Results Food Processing Tips To chop nuts or make nut butters: Process up to 1 pound (455 g) at a time to desired size, using short pulses, 1 to 2 seconds each time. Pulse more often for multipurpose blade. For nut butters, process continuously until smooth. Cut food in work bowl. Scrape sides of bowl...
Use & Care Guide
Page 21
... blade clean. • After removing the work bowl up to 2/3 full. For processing small or slender items, the small feed tube in an uneven slice. For thin mixtures, fill work bowl cover, place it cannot be chopped through the feed tube while the processor is running. • Different foods require varying degrees of the feed tube. For liquids, fill up to 1/2 to the maximum level as a carrot, becomes wedged or stuck on the blade, stop...
... blade clean. • After removing the work bowl up to 2/3 full. For processing small or slender items, the small feed tube in an uneven slice. For thin mixtures, fill work bowl cover, place it cannot be chopped through the feed tube while the processor is running. • Different foods require varying degrees of the feed tube. For liquids, fill up to 1/2 to the maximum level as a carrot, becomes wedged or stuck on the blade, stop...
Use & Care Guide
Page 22
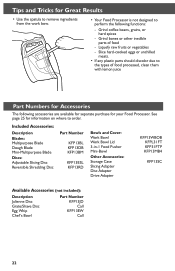
... Blade Discs: Adjustable Slicing Disc Reversible Shredding Disc Part Number KFP13BL KFP13DB KFP13BM KFP13ESL KFP13RD Bowls and Cover: Work Bowl Work Bowl Lid 3-in-1 Food Pusher Mini-Bowl Other Accessories: Storage Case Slicing Adapter Disc Adapter Drive Adapter KFP13WBOB KFPL31FT KFP31FTP KFP13MB4 KFP13SC Available Accessories (not included): Description Julienne Disc Grate/Shave Disc Egg Whip Chef's Bowl Part Number KFP13JD Call KFP13EW Call 22 Grind coffee beans, grains, or hard spices -- See page 25 for your Food Processor. Tips and Tricks for Great Results • Use...
... Blade Discs: Adjustable Slicing Disc Reversible Shredding Disc Part Number KFP13BL KFP13DB KFP13BM KFP13ESL KFP13RD Bowls and Cover: Work Bowl Work Bowl Lid 3-in-1 Food Pusher Mini-Bowl Other Accessories: Storage Case Slicing Adapter Disc Adapter Drive Adapter KFP13WBOB KFPL31FT KFP31FTP KFP13MB4 KFP13SC Available Accessories (not included): Description Julienne Disc Grate/Shave Disc Egg Whip Chef's Bowl Part Number KFP13JD Call KFP13EW Call 22 Grind coffee beans, grains, or hard spices -- See page 25 for your Food Processor. Tips and Tricks for Great Results • Use...
Use & Care Guide
Page 23
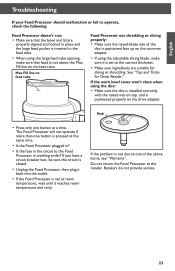
... Troubleshooting If your Food Processor should malfunction or fail to operate, check the following: Food Processor doesn't run: • Make sure that the bowl and lid are suitable for Great Results." If the work bowl cover won't close when using the disc: • Make sure the disc is installed correctly, with the raised nub on top, and is positioned properly on the common adapter. • If using the large feed tube opening, make...
... Troubleshooting If your Food Processor should malfunction or fail to operate, check the following: Food Processor doesn't run: • Make sure that the bowl and lid are suitable for Great Results." If the work bowl cover won't close when using the disc: • Make sure the disc is installed correctly, with the raised nub on top, and is positioned properly on the common adapter. • If using the large feed tube opening, make...
Use & Care Guide
Page 24
... Authorized KitchenAid Service Center. Repairs when Food Processor is used in materials and workmanship. Replacement parts or repair labor costs for Your Choice of purchase. Hassle-Free Replacement of Columbia, Puerto Rico, and Canada. IF THIS PRODUCT FAILS TO WORK AS WARRANTED, CUSTOMER'S SOLE AND EXCLUSIVE REMEDY SHALL BE REPAIR OR REPLACEMENT ACCORDING TO THE TERMS OF THIS LIMITED WARRANTY. KitchenAid Will A. C. This warranty gives you specific...
... Authorized KitchenAid Service Center. Repairs when Food Processor is used in materials and workmanship. Replacement parts or repair labor costs for Your Choice of purchase. Hassle-Free Replacement of Columbia, Puerto Rico, and Canada. IF THIS PRODUCT FAILS TO WORK AS WARRANTED, CUSTOMER'S SOLE AND EXCLUSIVE REMEDY SHALL BE REPAIR OR REPLACEMENT ACCORDING TO THE TERMS OF THIS LIMITED WARRANTY. KitchenAid Will A. C. This warranty gives you specific...

Use & Care Guide
Page 25
... write to obtain service. Please have your local KitchenAid dealer or the store where you call our toll-free Customer Interaction Centre at 1-800-541-6390 Monday through Saturday. Please follow these instructions to order accessories or replacement parts, call our toll- Joseph, MI 49085-0218 Outside the United States and Puerto Rico: Consult your original Food Processor returned to...
... write to obtain service. Please have your local KitchenAid dealer or the store where you call our toll-free Customer Interaction Centre at 1-800-541-6390 Monday through Saturday. Please follow these instructions to order accessories or replacement parts, call our toll- Joseph, MI 49085-0218 Outside the United States and Puerto Rico: Consult your original Food Processor returned to...


