Use & Care Guide
Page 3
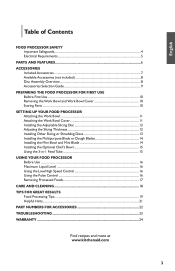
... Slicing or Shredding Discs 13 Installing the Multipurpose Blade or Dough Blades 14 Installing the Mini-Bowl and Mini-Blade 14 Installing the Optional Chef's Bowl 15 Using the 3-in-1 Feed Tube 15 USING YOUR FOOD PROCESSOR Before Use...16 Maximum Liquid Level 16 Using the Low/High Speed Control 16 Using the Pulse Control 16 Removing Processed Foods 17 CARE AND CLEANING 18 TIPS FOR GREAT RESULTS Food Processing Tips 19 Helpful Hints...21 PART NUMBERS FOR ACCESSORIES 22 TROUBLESHOOTING 23 WARRANTY...24 Find recipes...
... Slicing or Shredding Discs 13 Installing the Multipurpose Blade or Dough Blades 14 Installing the Mini-Bowl and Mini-Blade 14 Installing the Optional Chef's Bowl 15 Using the 3-in-1 Feed Tube 15 USING YOUR FOOD PROCESSOR Before Use...16 Maximum Liquid Level 16 Using the Low/High Speed Control 16 Using the Pulse Control 16 Removing Processed Foods 17 CARE AND CLEANING 18 TIPS FOR GREAT RESULTS Food Processing Tips 19 Helpful Hints...21 PART NUMBERS FOR ACCESSORIES 22 TROUBLESHOOTING 23 WARRANTY...24 Find recipes...
Use & Care Guide
Page 4
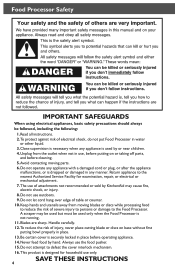
.... Be certain cover is securely locked in water or other liquid. 3. This product is designed for examination, repair, or electrical or mechanical adjustment. 7. Do not use the food pusher. 15. To protect against risk of injury, never place cutting blade or discs on base without first putting bowl properly in use, before putting on or taking off parts, and before operating appliance. 14...
.... Be certain cover is securely locked in water or other liquid. 3. This product is designed for examination, repair, or electrical or mechanical adjustment. 7. Do not use the food pusher. 15. To protect against risk of injury, never place cutting blade or discs on base without first putting bowl properly in use, before putting on or taking off parts, and before operating appliance. 14...
Use & Care Guide
Page 6
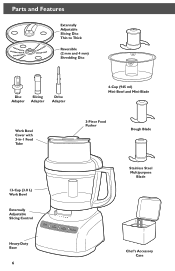
Parts and Features Externally Adjustable Slicing Disc Thin to Thick Reversible (2 mm and 4 mm) Shredding Disc Disc Slicing Adapter Adapter Drive Adapter Work Bowl Cover with 3-in-1 Feed Tube 4-Cup (945 ml) Mini-Bowl and Mini-Blade 3-Piece Food Pusher Dough Blade 13-Cup (3.0 L) Work Bowl Externally Adjustable Slicing Control Stainless Steel Multipurpose Blade Heavy-Duty Base 6 Chef's Accessory Case
Parts and Features Externally Adjustable Slicing Disc Thin to Thick Reversible (2 mm and 4 mm) Shredding Disc Disc Slicing Adapter Adapter Drive Adapter Work Bowl Cover with 3-in-1 Feed Tube 4-Cup (945 ml) Mini-Bowl and Mini-Blade 3-Piece Food Pusher Dough Blade 13-Cup (3.0 L) Work Bowl Externally Adjustable Slicing Control Stainless Steel Multipurpose Blade Heavy-Duty Base 6 Chef's Accessory Case
Use & Care Guide
Page 7
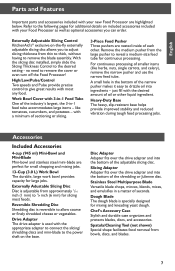
... appropriate adapter to connect the slicing/ shredding discs and mini-blade to remove the blade assembly. Spatula/Cleaning Tool (not shown) Special shape facilitates food removal from thin to thick, without having to the power shaft on -the-fly externally adjustable slicing disc allows you can order. English Parts and Features Important parts and accessories included with most foods. Work Bowl Cover with your new Food Processor are perfect for small chopping and mixing jobs. 13-Cup (3.0 L) Work Bowl The durable, large work bowl...
... appropriate adapter to connect the slicing/ shredding discs and mini-blade to remove the blade assembly. Spatula/Cleaning Tool (not shown) Special shape facilitates food removal from thin to thick, without having to the power shaft on -the-fly externally adjustable slicing disc allows you can order. English Parts and Features Important parts and accessories included with most foods. Work Bowl Cover with your new Food Processor are perfect for small chopping and mixing jobs. 13-Cup (3.0 L) Work Bowl The durable, large work bowl...
Use & Care Guide
Page 8
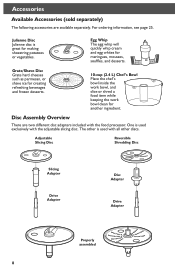
... discs. One is used with all other is used exclusively with the food processor. Adjustable Slicing Disc Reversible Shredding Disc Slicing Adapter Drive Adapter Disc Adapter Drive Adapter Properly assembled 8 Accessories Available Accessories (sold separately) The following accessories are two different disc adapters included with the adjustable slicing disc. Julienne Disc Julienne disc is great for another ingredient. Grate/Shave 10-cup (2.4 L) Chef's Bowl Place the chef's bowl inside the work bowl, and slice or shred a food item while keeping the work bowl clean...
... discs. One is used with all other is used exclusively with the food processor. Adjustable Slicing Disc Reversible Shredding Disc Slicing Adapter Drive Adapter Disc Adapter Drive Adapter Properly assembled 8 Accessories Available Accessories (sold separately) The following accessories are two different disc adapters included with the adjustable slicing disc. Julienne Disc Julienne disc is great for another ingredient. Grate/Shave 10-cup (2.4 L) Chef's Bowl Place the chef's bowl inside the work bowl, and slice or shred a food item while keeping the work bowl clean...
Use & Care Guide
Page 10
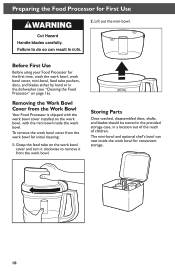
..., wash the work bowl, work bowl for First Use 2. Preparing the Food Processor for initial cleaning: 1. Removing the Work Bowl Cover from the work bowl cover, mini-bowl, feed tube pushers, discs, and blades either by hand or in a location out of the reach of children. Grasp the feed tube on page 16). Lift out the mini-bowl. The mini-bowl and optional chef's bowl can nest inside the work bowl. Storing Parts Once washed, disassembled discs, shafts, and blades should be stored in the provided storage case, in...
..., wash the work bowl, work bowl for First Use 2. Preparing the Food Processor for initial cleaning: 1. Removing the Work Bowl Cover from the work bowl cover, mini-bowl, feed tube pushers, discs, and blades either by hand or in a location out of the reach of children. Grasp the feed tube on page 16). Lift out the mini-bowl. The mini-bowl and optional chef's bowl can nest inside the work bowl. Storing Parts Once washed, disassembled discs, shafts, and blades should be stored in the provided storage case, in...
Use & Care Guide
Page 11
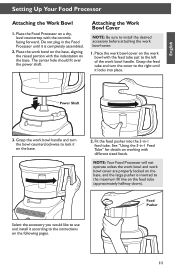
... the work bowl with different sized foods. Grasp the feed tube and turn the bowl counterclockwise to lock it is inserted to the maximum fill line on working with the feed tube just to install the desired accessory before attaching the work bowl handle and turn the cover to the instructions on the base. 2. Do not plug in -1 feed tube. Grasp the work bowl cover. 1. Food Pusher Select the accessory you would like to use and install it locks into the 3-in the Food Processor until it...
... the work bowl with different sized foods. Grasp the feed tube and turn the bowl counterclockwise to lock it is inserted to the maximum fill line on working with the feed tube just to install the desired accessory before attaching the work bowl handle and turn the cover to the instructions on the base. 2. Do not plug in -1 feed tube. Grasp the work bowl cover. 1. Food Pusher Select the accessory you would like to use and install it locks into the 3-in the Food Processor until it...
Use & Care Guide
Page 12
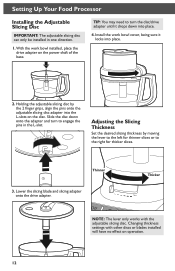
... Food Processor Installing the Adjustable Slicing Disc IMPORTANT: The adjustable slicing disc can only be installed in the L-slot. TIP: You may need to engage the pins in one direction. 1. Thicker NOTE: The lever only works with other discs or blades installed will have no effect on the power shaft of the base. With the work bowl cover, being sure it drops down onto the adapter and turn to turn the disc/drive adapter until it locks...
... Food Processor Installing the Adjustable Slicing Disc IMPORTANT: The adjustable slicing disc can only be installed in the L-slot. TIP: You may need to engage the pins in one direction. 1. Thicker NOTE: The lever only works with other discs or blades installed will have no effect on the power shaft of the base. With the work bowl cover, being sure it drops down onto the adapter and turn to turn the disc/drive adapter until it locks...
Use & Care Guide
Page 13
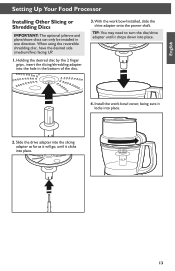
.... 1. With the work bowl cover, being sure it locks into the hole in one direction. TIP: You may need to turn the disc/drive adapter until it drops down into place. 13 Slide the drive adapter into the slicing adapter as far as it will go, until it clicks into place. 4. English Setting Up Your Food Processor Installing Other Slicing or Shredding Discs IMPORTANT: The optional julienne and plane/shave discs can only...
.... 1. With the work bowl cover, being sure it locks into the hole in one direction. TIP: You may need to turn the disc/drive adapter until it drops down into place. 13 Slide the drive adapter into the slicing adapter as far as it will go, until it clicks into place. 4. English Setting Up Your Food Processor Installing Other Slicing or Shredding Discs IMPORTANT: The optional julienne and plane/shave discs can only...
Use & Care Guide
Page 14
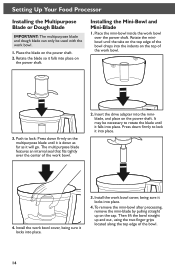
... place. 4. Place the blade on the power shaft. It may be used with the work bowl cover, being sure it locks into place. 4. Install the work bowl. 3. Then lift the bowl straight up on the top of the bowl. 14 Insert the drive adapter into place. 3. Rotate the minibowl until the tabs on the top edge of the work bowl. 2. To remove the mini-bowl after processing, remove the mini-blade by pulling straight up...
... place. 4. Place the blade on the power shaft. It may be used with the work bowl cover, being sure it locks into place. 4. Install the work bowl. 3. Then lift the bowl straight up on the top of the bowl. 14 Insert the drive adapter into place. 3. Rotate the minibowl until the tabs on the top edge of the work bowl. 2. To remove the mini-bowl after processing, remove the mini-blade by pulling straight up...
Use & Care Guide
Page 15
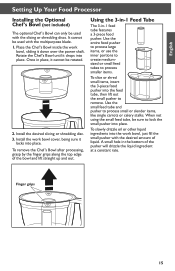
... small pusher to process smaller items. To slice or shred small items, insert the 3-piece food pusher into place. Using the 3-in-1 Feed Tube The 3-in the bottom of the bowl and lift straight up and out. Place the Chef's Bowl inside the work bowl cover, being sure it down over the power shaft. English Setting Up Your Food Processor Installing the Optional Chef's Bowl (not included) The optional Chef's Bowl can only be used with the multipurpose blade. 1. Rotate the Chef's Bowl...
... small pusher to process smaller items. To slice or shred small items, insert the 3-piece food pusher into place. Using the 3-in-1 Feed Tube The 3-in the bottom of the bowl and lift straight up and out. Place the Chef's Bowl inside the work bowl cover, being sure it down over the power shaft. English Setting Up Your Food Processor Installing the Optional Chef's Bowl (not included) The optional Chef's Bowl can only be used with the multipurpose blade. 1. Rotate the Chef's Bowl...
Use & Care Guide
Page 16
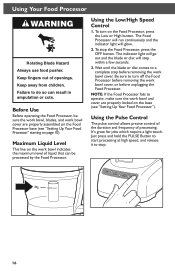
... the work bowl, blades, and work bowl cover are properly locked on the Food Processor, press the Low or High button. Maximum Liquid Level This line on the work bowl and cover are properly assembled on the Food Processor base (see "Setting Up Your Food Processor"). Be sure to stop the Food Processor, press the OFF button. Just press and hold the PULSE Button to start processing at high speed, and release it to turn...
... the work bowl, blades, and work bowl cover are properly locked on the Food Processor, press the Low or High button. Maximum Liquid Level This line on the work bowl and cover are properly assembled on the Food Processor base (see "Setting Up Your Food Processor"). Be sure to stop the Food Processor, press the OFF button. Just press and hold the PULSE Button to start processing at high speed, and release it to turn...
Use & Care Guide
Page 17
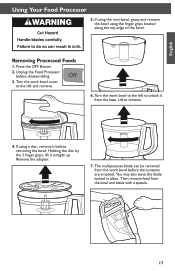
... of the bowl. Turn the work bowl cover to the left to remove. 4. Remove the adapter. 7. English Using Your Food Processor 5. Lift to unlock it from the base. The multipurpose blade can be removed from the bowl and blade with a spatula. 17 Removing Processed Foods 1. Unplug the Food Processor before the contents are emptied. You may also leave the blade locked in place. If using the mini-bowl, grasp and remove the bowl using a disc, remove it straight up. Turn the work bowl to...
... of the bowl. Turn the work bowl cover to the left to remove. 4. Remove the adapter. 7. English Using Your Food Processor 5. Lift to unlock it from the base. The multipurpose blade can be removed from the bowl and blade with a spatula. 17 Removing Processed Foods 1. Unplug the Food Processor before the contents are emptied. You may also leave the blade locked in place. If using the mini-bowl, grasp and remove the bowl using a disc, remove it straight up. Turn the work bowl to...
Use & Care Guide
Page 18
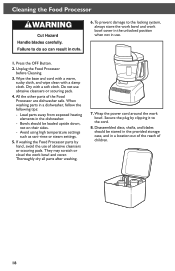
... wipe clean with a soft cloth. If washing the Food Processor parts by clipping it to the locking system, always store the work bowl and work bowl cover in the unlocked position when not in a dishwasher, follow the following tips: -- Disassembled discs, shafts, and blades should be stored in the provided storage case, and in the dishwasher. -- Do not use of the Food Processor are dishwasher safe. Wrap the power cord...
... wipe clean with a soft cloth. If washing the Food Processor parts by clipping it to the locking system, always store the work bowl and work bowl cover in the unlocked position when not in a dishwasher, follow the following tips: -- Disassembled discs, shafts, and blades should be stored in the provided storage case, and in the dishwasher. -- Do not use of the Food Processor are dishwasher safe. Wrap the power cord...
Use & Care Guide
Page 19
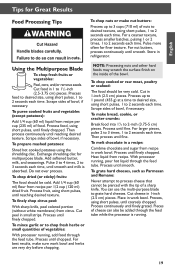
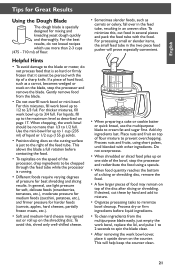
... in 1-inch (2.5 cm) pieces. Scrape sides of bowl, if necessary. Process until finely chopped. Cut cheese in refrigerator. Pieces of cheese can use the multi-purpose blade to grate hard cheeses. To melt chocolate in a recipe: Combine chocolate and sugar from recipe in 1-inch (2.5 cm) pieces. With processor running , add food through the feed tube. Process, using short pulses, until smooth. Then process continuously until coarsely chopped. To mince garlic...
... in 1-inch (2.5 cm) pieces. Scrape sides of bowl, if necessary. Process until finely chopped. Cut cheese in refrigerator. Pieces of cheese can use the multi-purpose blade to grate hard cheeses. To melt chocolate in a recipe: Combine chocolate and sugar from recipe in 1-inch (2.5 cm) pieces. With processor running , add food through the feed tube. Process, using short pulses, until smooth. Then process continuously until coarsely chopped. To mince garlic...
Use & Care Guide
Page 21
... described on top of the disc after slicing or shredding. Do not overprocess. • When shredded or sliced food piles up on one side of flour mixture to 3/4 full. Use the mini-bowl for best shredding and slicing results. This allows the blade a full rotation before liquid ingredients. • To clean ingredients from the blade. • Do not overfill work bowl, replace the lid, and pulse 1 to 2 seconds...
... described on top of the disc after slicing or shredding. Do not overprocess. • When shredded or sliced food piles up on one side of flour mixture to 3/4 full. Use the mini-bowl for best shredding and slicing results. This allows the blade a full rotation before liquid ingredients. • To clean ingredients from the blade. • Do not overfill work bowl, replace the lid, and pulse 1 to 2 seconds...
Use & Care Guide
Page 22
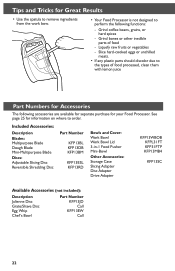
... Blade Dough Blade Mini-Multipurpose Blade Discs: Adjustable Slicing Disc Reversible Shredding Disc Part Number KFP13BL KFP13DB KFP13BM KFP13ESL KFP13RD Bowls and Cover: Work Bowl Work Bowl Lid 3-in-1 Food Pusher Mini-Bowl Other Accessories: Storage Case Slicing Adapter Disc Adapter Drive Adapter KFP13WBOB KFPL31FT KFP31FTP KFP13MB4 KFP13SC Available Accessories (not included): Description Julienne Disc Grate/Shave Disc Egg Whip Chef's Bowl Part Number KFP13JD Call KFP13EW Call 22 Grind coffee beans, grains, or hard spices -- Grind bones or other inedible parts of food processed, clean...
... Blade Dough Blade Mini-Multipurpose Blade Discs: Adjustable Slicing Disc Reversible Shredding Disc Part Number KFP13BL KFP13DB KFP13BM KFP13ESL KFP13RD Bowls and Cover: Work Bowl Work Bowl Lid 3-in-1 Food Pusher Mini-Bowl Other Accessories: Storage Case Slicing Adapter Disc Adapter Drive Adapter KFP13WBOB KFPL31FT KFP31FTP KFP13MB4 KFP13SC Available Accessories (not included): Description Julienne Disc Grate/Shave Disc Egg Whip Chef's Bowl Part Number KFP13JD Call KFP13EW Call 22 Grind coffee beans, grains, or hard spices -- Grind bones or other inedible parts of food processed, clean...
Use & Care Guide
Page 23
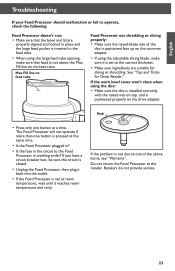
... Food Processor in the feed tube. • When using the adjustable slicing blade, make sure that food is not due to operate, check the following: Food Processor doesn't run: • Make sure that the bowl and lid are suitable for Great Results." Retailers do not provide service. 23 See "Tips and Tricks for slicing or shredding. If the problem is not above items, see "Warranty". Fill line on the drive adapter...
... Food Processor in the feed tube. • When using the adjustable slicing blade, make sure that food is not due to operate, check the following: Food Processor doesn't run: • Make sure that the bowl and lid are suitable for Great Results." Retailers do not provide service. 23 See "Tips and Tricks for slicing or shredding. If the problem is not above items, see "Warranty". Fill line on the drive adapter...
Use & Care Guide
Page 24
... you specific legal rights and you may also have other than Not Pay for: normal single family home use. Hassle-Free Replacement of your Food Processor to an Authorized Service Center. KitchenAid Will A. Any shipping or handling costs to deliver your Food Processor. LIMITATION OF REMEDIES IMPLIED WARRANTIES, INCLUDING TO THE EXTENT APPLICABLE WARRANTIES OF MERCHANTABILITY OR FITNESS FOR A PARTICULAR PURPOSE, ARE...
... you specific legal rights and you may also have other than Not Pay for: normal single family home use. Hassle-Free Replacement of your Food Processor to an Authorized Service Center. KitchenAid Will A. Any shipping or handling costs to deliver your Food Processor. LIMITATION OF REMEDIES IMPLIED WARRANTIES, INCLUDING TO THE EXTENT APPLICABLE WARRANTIES OF MERCHANTABILITY OR FITNESS FOR A PARTICULAR PURPOSE, ARE...

Use & Care Guide
Page 25
..., etc.). Please follow these instructions to : Customer Satisfaction Center, KitchenAid Portable Appliances, P.O. If you receive your replacement Food Processor, use the carton and packing materials to receive this quality service. Box 218, St. In the carton, include your Food Processor should fail within the first year of ownership, simply call our toll-free Customer Interaction Centre at : Customer eXperience Centre KitchenAid Canada 200 - 6750 Century...
..., etc.). Please follow these instructions to : Customer Satisfaction Center, KitchenAid Portable Appliances, P.O. If you receive your replacement Food Processor, use the carton and packing materials to receive this quality service. Box 218, St. In the carton, include your Food Processor should fail within the first year of ownership, simply call our toll-free Customer Interaction Centre at : Customer eXperience Centre KitchenAid Canada 200 - 6750 Century...


