Owners Manual
Page 2
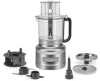
PARTS AND FEATURES 10 9 8 7 6 5 4 3 11 12 13 18 14 15 16 24 17 2 1 1 Heavy-Duty Base 2 Power Cord and Cord Storage (not shown) 3 Drive Pin 4 13-Cup (3.1 L) Work Bowl 5 Handle Hinge 6 Lid Hinge 7 Slicing Knob 8 Work Bowl Cover with 3-in-1 Feed Tube 9 Lid Latch 2 10 3-in-1 Food Pusher 11 Refrigerator Lid 12 Externally Adjustable Slicing Disc (thin to thick) 13 Reversible Fine/Medium Shredding Disc 14 Multipurpose Stainless Steel Blade 15 Dough Blade 16 Drive Adapter (Upper) 17 Drive Adapter (Lower) 18 Medium Shredding Disc
PARTS AND FEATURES 10 9 8 7 6 5 4 3 11 12 13 18 14 15 16 24 17 2 1 1 Heavy-Duty Base 2 Power Cord and Cord Storage (not shown) 3 Drive Pin 4 13-Cup (3.1 L) Work Bowl 5 Handle Hinge 6 Lid Hinge 7 Slicing Knob 8 Work Bowl Cover with 3-in-1 Feed Tube 9 Lid Latch 2 10 3-in-1 Food Pusher 11 Refrigerator Lid 12 Externally Adjustable Slicing Disc (thin to thick) 13 Reversible Fine/Medium Shredding Disc 14 Multipurpose Stainless Steel Blade 15 Dough Blade 16 Drive Adapter (Upper) 17 Drive Adapter (Lower) 18 Medium Shredding Disc

Owners Manual
Page 3
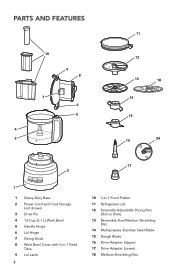
... PARTS AND FEATURES 19 20 21 13 12 15 22 23 14 24 18 17 16 19 Dicing Kit Cover 20 Dicing Blade 21 Dicing Kit Base ACCESSORY GUIDE Accessory External Adjustable Slice Storage Caddy Wide Mouth Opening 3-in-1 Feed Tube Multipurpose Blade Dough Blade Fine and Medium Shred Medium Shred Storage Lid Dicing Kit French Fry Disc KFP1319 • • 22 Dicing Kit Clean Out Tool 23 Storage Caddy 24 French Fry Disc Included with Model...
... PARTS AND FEATURES 19 20 21 13 12 15 22 23 14 24 18 17 16 19 Dicing Kit Cover 20 Dicing Blade 21 Dicing Kit Base ACCESSORY GUIDE Accessory External Adjustable Slice Storage Caddy Wide Mouth Opening 3-in-1 Feed Tube Multipurpose Blade Dough Blade Fine and Medium Shred Medium Shred Storage Lid Dicing Kit French Fry Disc KFP1319 • • 22 Dicing Kit Clean Out Tool 23 Storage Caddy 24 French Fry Disc Included with Model...
Owners Manual
Page 4
... or damaged in use, before assembling or disassembling parts and before cleaning. Do not let cord hang over edge of severe injury to persons or damage to the Food Processor. Keep hands and utensils away from the outlet when not in any appliance is used by KitchenAid may be used only when the Food Processor is not intended for use of the appliance...
... or damaged in use, before assembling or disassembling parts and before cleaning. Do not let cord hang over edge of severe injury to persons or damage to the Food Processor. Keep hands and utensils away from the outlet when not in any appliance is used by KitchenAid may be used only when the Food Processor is not intended for use of the appliance...
Owners Manual
Page 5
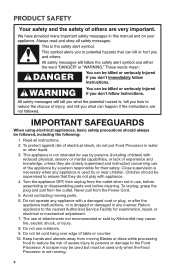
... discs on Base without first putting Bowl properly in place. 13. SAVE THESE INSTRUCTIONS This product is designed for household use Food Pusher. 15. If it still does not fit, contact a qualified electrician. Do not attempt to the Cover or Bowl. ELECTRICAL REQUIREMENTS Voltage: 120 VAC Frequency: 60 Hz NOTE: This Food Processor is equipped with a polarized plug (one Blade is securely locked...
... discs on Base without first putting Bowl properly in place. 13. SAVE THESE INSTRUCTIONS This product is designed for household use Food Pusher. 15. If it still does not fit, contact a qualified electrician. Do not attempt to the Cover or Bowl. ELECTRICAL REQUIREMENTS Voltage: 120 VAC Frequency: 60 Hz NOTE: This Food Processor is equipped with a polarized plug (one Blade is securely locked...
Owners Manual
Page 6
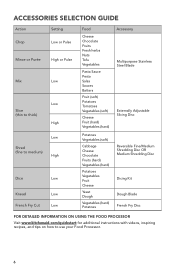
...) Potatoes Vegetables (soft) Cabbage Cheese Chocolate Fruits (hard) Vegetables (hard) Potatoes Vegetables Fruit Cheese Yeast Dough Vegetables (hard) Potatoes Accessory Multipurpose Stainless Steel Blade Externally Adjustable Slicing Disc Reversible Fine/Medium Shredding Disc OR Medium Shredding Disc Dicing Kit Dough Blade French Fry Disc FOR DETAILED INFORMATION ON USING THE FOOD PROCESSOR Visit www.kitchenaid.com/quickstart for additional instructions with videos, inspiring recipes, and tips on how to use your Food Processor. 6
...) Potatoes Vegetables (soft) Cabbage Cheese Chocolate Fruits (hard) Vegetables (hard) Potatoes Vegetables Fruit Cheese Yeast Dough Vegetables (hard) Potatoes Accessory Multipurpose Stainless Steel Blade Externally Adjustable Slicing Disc Reversible Fine/Medium Shredding Disc OR Medium Shredding Disc Dicing Kit Dough Blade French Fry Disc FOR DETAILED INFORMATION ON USING THE FOOD PROCESSOR Visit www.kitchenaid.com/quickstart for additional instructions with videos, inspiring recipes, and tips on how to use your Food Processor. 6
Owners Manual
Page 7
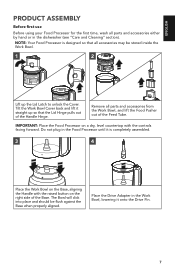
... "Care and Cleaning" section). Place the Drive Adapter in the Food Processor until it is designed so that the Lid Hinge pulls out of the Base. Do not plug in the Work Bowl, lowering it straight up so that all accessories may be flush against the Base when properly aligned. ENGLISH PRODUCT ASSEMBLY Before first use Before using your Food Processor for the first time, wash all parts...
... "Care and Cleaning" section). Place the Drive Adapter in the Food Processor until it is designed so that the Lid Hinge pulls out of the Base. Do not plug in the Work Bowl, lowering it straight up so that all accessories may be flush against the Base when properly aligned. ENGLISH PRODUCT ASSEMBLY Before first use Before using your Food Processor for the first time, wash all parts...
Owners Manual
Page 8
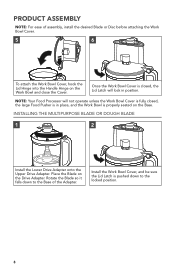
...: Your Food Processor will lock in place, and the Work Bowl is pushed down to the locked position. 8 PRODUCT ASSEMBLY NOTE: For ease of the Adapter. INSTALLING THE MULTIPURPOSE BLADE OR DOUGH BLADE 1 2 Install the Lower Drive Adapter onto the Upper Drive Adapter. Rotate the Blade so it falls down to the Base of assembly, install the desired Blade or Disc before attaching the Work Bowl Cover. 5 6 To attach the Work Bowl Cover, hook the Lid Hinge into the Handle Hinge on the Drive Adapter.
...: Your Food Processor will lock in place, and the Work Bowl is pushed down to the locked position. 8 PRODUCT ASSEMBLY NOTE: For ease of the Adapter. INSTALLING THE MULTIPURPOSE BLADE OR DOUGH BLADE 1 2 Install the Lower Drive Adapter onto the Upper Drive Adapter. Rotate the Blade so it falls down to the Base of assembly, install the desired Blade or Disc before attaching the Work Bowl Cover. 5 6 To attach the Work Bowl Cover, hook the Lid Hinge into the Handle Hinge on the Drive Adapter.
Owners Manual
Page 9
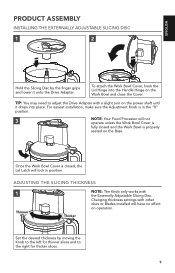
... Handle Hinge on the Base. To attach the Work Bowl Cover, hook the Lid Hinge into place. Changing thickness settings with the Externally Adjustable Slicing Disc. Once the Work Bowl Cover is properly seated on the Work Bowl and close the Cover. TIP: You may need to the right for thinner slices and to adjust the Drive Adapter with a slight turn on the power shaft until it onto the Drive Adapter. ENGLISH PRODUCT ASSEMBLY INSTALLING THE EXTERNALLY ADJUSTABLE SLICING DISC...
... Handle Hinge on the Base. To attach the Work Bowl Cover, hook the Lid Hinge into place. Changing thickness settings with the Externally Adjustable Slicing Disc. Once the Work Bowl Cover is properly seated on the Work Bowl and close the Cover. TIP: You may need to the right for thinner slices and to adjust the Drive Adapter with a slight turn on the power shaft until it onto the Drive Adapter. ENGLISH PRODUCT ASSEMBLY INSTALLING THE EXTERNALLY ADJUSTABLE SLICING DISC...
Owners Manual
Page 10
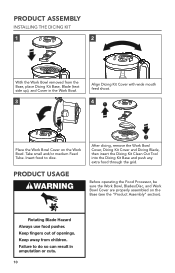
... wide mouth feed shoot. 4 1 Place the Work Bowl Cover on the Base (see the "Product Assembly" section). 10 Insert food to dice. 2 After dicing, remove the Work Bowl Cover, Dicing Kit Cover and Dicing Blade, then insert the Dicing Kit Clean Out Tool into the Dicing Kit Base and push any extra food through the grid. Take small and/or medium Feed Tube. PRODUCT USAGE Before operating the Food Processor, be sure the Work Bowl, Blades/Disc, and Work Bowl Cover are properly assembled...
... wide mouth feed shoot. 4 1 Place the Work Bowl Cover on the Base (see the "Product Assembly" section). 10 Insert food to dice. 2 After dicing, remove the Work Bowl Cover, Dicing Kit Cover and Dicing Blade, then insert the Dicing Kit Clean Out Tool into the Dicing Kit Base and push any extra food through the grid. Take small and/or medium Feed Tube. PRODUCT USAGE Before operating the Food Processor, be sure the Work Bowl, Blades/Disc, and Work Bowl Cover are properly assembled...
Owners Manual
Page 11
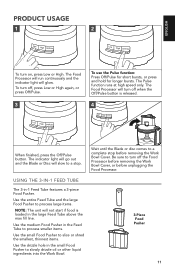
... loaded in -1 Feed Tube features a 3-piece Food Pusher. USING THE 3-IN-1 FEED TUBE The 3-in the large Feed Tube above the max fill line. To turn off the Food Processor before removing the Work Bowl Cover, or before removing the Work Bowl Cover. The Food Processor will not start if food is released. 4 When finished, press the Off/Pulse button. Be sure to a complete stop . Use the medium Food Pusher in the Feed Tube to process smaller items. Use the small Food Pusher to slice or shred the smallest...
... loaded in -1 Feed Tube features a 3-piece Food Pusher. USING THE 3-IN-1 FEED TUBE The 3-in the large Feed Tube above the max fill line. To turn off the Food Processor before removing the Work Bowl Cover, or before removing the Work Bowl Cover. The Food Processor will not start if food is released. 4 When finished, press the Off/Pulse button. Be sure to a complete stop . Use the medium Food Pusher in the Feed Tube to process smaller items. Use the small Food Pusher to slice or shred the smallest...
Owners Manual
Page 12
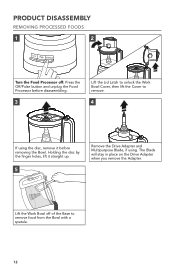
Lift the Work Bowl off : Press the Off/Pulse button and unplug the Food Processor before removing the Bowl. The Blade will stay in place on the Drive Adapter when you remove the Adapter. Holding the disc by the finger holes, lift it straight up. 5 Remove the Drive Adapter and Multipurpose Blade, if using the disc, remove it before disassembling. 3 Lift the Lid Latch to unlock the Work Bowl Cover, then lift the Cover to remove food from the Bowl with a spatula. 12 PRODUCT DISASSEMBLY REMOVING PROCESSED FOODS 1 2 Turn the Food Processor off of the Base to remove. 4 If using .
Lift the Work Bowl off : Press the Off/Pulse button and unplug the Food Processor before removing the Bowl. The Blade will stay in place on the Drive Adapter when you remove the Adapter. Holding the disc by the finger holes, lift it straight up. 5 Remove the Drive Adapter and Multipurpose Blade, if using the disc, remove it before disassembling. 3 Lift the Lid Latch to unlock the Work Bowl Cover, then lift the Cover to remove food from the Bowl with a spatula. 12 PRODUCT DISASSEMBLY REMOVING PROCESSED FOODS 1 2 Turn the Food Processor off of the Base to remove. 4 If using .
Owners Manual
Page 13
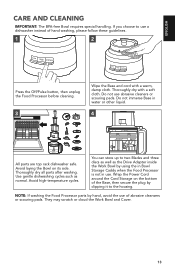
... Off/Pulse button, then unplug the Food Processor before cleaning. 3 Wipe the Base and cord with a soft cloth. Use gentle dishwashing cycles such as the Drive Adapter inside the Work Bowl by hand, avoid the use . You can store up to two Blades and three discs as well as normal. They may scratch or cloud the Work Bowl and Cover. 13 Thoroughly dry with a warm...
... Off/Pulse button, then unplug the Food Processor before cleaning. 3 Wipe the Base and cord with a soft cloth. Use gentle dishwashing cycles such as the Drive Adapter inside the Work Bowl by hand, avoid the use . You can store up to two Blades and three discs as well as normal. They may scratch or cloud the Work Bowl and Cover. 13 Thoroughly dry with a warm...
Owners Manual
Page 14
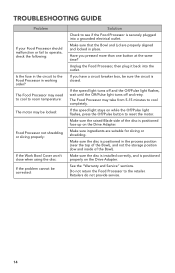
... Bowl). Make sure the disc is installed correctly, and is securely plugged into the outlet. The Food Processor may be locked: Food Processor not shredding or slicing properly: If the Work Bowl Cover won't close when using the disc: If the problem cannot be sure the circuit is positioned face up on the Drive Adapter. Make sure ingredients are properly aligned and locked in working order? Make sure the disc is positioned in the process...
... Bowl). Make sure the disc is installed correctly, and is securely plugged into the outlet. The Food Processor may be locked: Food Processor not shredding or slicing properly: If the Work Bowl Cover won't close when using the disc: If the problem cannot be sure the circuit is positioned face up on the Drive Adapter. Make sure ingredients are properly aligned and locked in working order? Make sure the disc is positioned in the process...
Owners Manual
Page 15
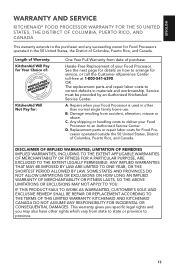
... gives you specific legal rights and you may also have other than normal single family home use. Any shipping or handling costs to deliver your Food Processor is used in other rights which vary from accident, alteration, misuse or abuse. Hassle-Free Replacement of Columbia, Puerto Rico, and Canada. DISCLAIMER OF IMPLIED WARRANTIES; ENGLISH WARRANTY AND SERVICE KITCHENAID® FOOD PROCESSOR WARRANTY...
... gives you specific legal rights and you may also have other than normal single family home use. Any shipping or handling costs to deliver your Food Processor is used in other rights which vary from accident, alteration, misuse or abuse. Hassle-Free Replacement of Columbia, Puerto Rico, and Canada. DISCLAIMER OF IMPLIED WARRANTIES; ENGLISH WARRANTY AND SERVICE KITCHENAID® FOOD PROCESSOR WARRANTY...
Owners Manual
Page 16
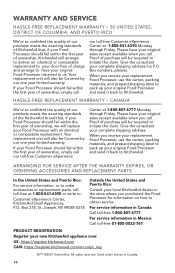
... Food Processor should fail within the first year of ownership, KitchenAid will replace your Food Processor with an identical or comparable replacement. Please have your original sales receipt available when you call our toll-free Customer eXperience Center at 1-800-541-6390 or write to: Customer eXperience Center, KitchenAid Small Appliances, P.O. Give the consultant your complete shipping address. HASSLE-FREE REPLACEMENT WARRANTY - When you receive your replacement Food Processor, use...
... Food Processor should fail within the first year of ownership, KitchenAid will replace your Food Processor with an identical or comparable replacement. Please have your original sales receipt available when you call our toll-free Customer eXperience Center at 1-800-541-6390 or write to: Customer eXperience Center, KitchenAid Small Appliances, P.O. Give the consultant your complete shipping address. HASSLE-FREE REPLACEMENT WARRANTY - When you receive your replacement Food Processor, use...


