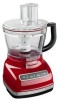
Use & Care Guide
Page 3
...Removing the Work Bowl and Work Bowl Cover 10 Storing Parts...10 SETTING UP YOUR FOOD PROCESSOR Attaching the Work Bowl 11 Attaching the Work Bowl Cover 11 Installing the Adjustable Slicing...Optional Chef's Bowl 15 Using the 3-in-1 Feed Tube 15 USING YOUR FOOD PROCESSOR Before Use...16 Maximum Liquid Level 16 Using the Low/High Speed Control 16 Using the Pulse... Control 16 Removing Processed Foods 17 CARE AND CLEANING 18 TIPS FOR GREAT RESULTS Food Processing Tips 19 Helpful Hints...21 PART NUMBERS FOR ACCESSORIES 22 TROUBLESHOOTING...
...Removing the Work Bowl and Work Bowl Cover 10 Storing Parts...10 SETTING UP YOUR FOOD PROCESSOR Attaching the Work Bowl 11 Attaching the Work Bowl Cover 11 Installing the Adjustable Slicing...Optional Chef's Bowl 15 Using the 3-in-1 Feed Tube 15 USING YOUR FOOD PROCESSOR Before Use...16 Maximum Liquid Level 16 Using the Low/High Speed Control 16 Using the Pulse... Control 16 Removing Processed Foods 17 CARE AND CLEANING 18 TIPS FOR GREAT RESULTS Food Processing Tips 19 Helpful Hints...21 PART NUMBERS FOR ACCESSORIES 22 TROUBLESHOOTING...
Use & Care Guide
Page 4
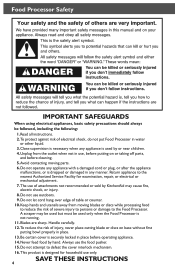
...Food Processor is not running. 11. Do not attempt to the nearest Authorized Service Facility for household use , before cleaning. 5. Blades are sharp. Always use outdoors. 9. Do not operate any manner. The use of attachments not recommended or sold by KitchenAid... the appliance malfunctions, or is designed for examination, repair, or electrical or mechanical adjustment. 7. SAVE THESE INSTRUCTIONS 4 Food Processor Safety IMPORTANT SAFEGUARDS When using electrical appliances, basic safety precautions should always be used by hand. Unplug from moving parts....
...Food Processor is not running. 11. Do not attempt to the nearest Authorized Service Facility for household use , before cleaning. 5. Blades are sharp. Always use outdoors. 9. Do not operate any manner. The use of attachments not recommended or sold by KitchenAid... the appliance malfunctions, or is designed for examination, repair, or electrical or mechanical adjustment. 7. SAVE THESE INSTRUCTIONS 4 Food Processor Safety IMPORTANT SAFEGUARDS When using electrical appliances, basic safety precautions should always be used by hand. Unplug from moving parts....
Use & Care Guide
Page 5
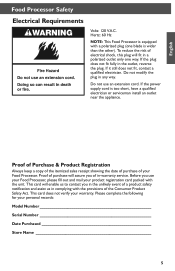
...plug in complying with the provisions of your warranty. If the power supply cord is equipped with the unit. Do not use your Food Processor, please fill out and mail your personal records: Model Number Serial Number Date Purchased Store Name 5 Proof of Purchase & Product Registration... copy of the itemized sales receipt showing the date of purchase of the Consumer Product Safety Act. Hertz: 60 Hz NOTE: This Food Processor is too short, have a qualified electrician or serviceman install an outlet near the appliance. Please complete the following for your product registration...
...plug in complying with the provisions of your warranty. If the power supply cord is equipped with the unit. Do not use your Food Processor, please fill out and mail your personal records: Model Number Serial Number Date Purchased Store Name 5 Proof of Purchase & Product Registration... copy of the itemized sales receipt showing the date of purchase of the Consumer Product Safety Act. Hertz: 60 Hz NOTE: This Food Processor is too short, have a qualified electrician or serviceman install an outlet near the appliance. Please complete the following for your product registration...
Use & Care Guide
Page 7
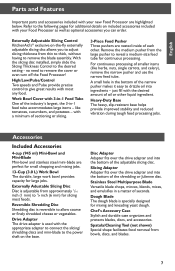
...blends, mixes, and emulsifies in a matter of the industry's largest, the 3-in -1 Feed Tube One of seconds. Externally Adjustable Slicing Control KitchenAid's® exclusive on-the-fly externally adjustable slicing disc allows you can order. Work Bowl Cover with 3-in -1 feed tube accommodates large items ... appropriate adapter to connect the slicing/ shredding discs and mini-blade to the power shaft on included accessories included with your new Food Processor are highlighted below. like herbs, nuts, single carrots, and celery), remove the narrow pusher and use the narrow feed tube....
...blends, mixes, and emulsifies in a matter of the industry's largest, the 3-in -1 Feed Tube One of seconds. Externally Adjustable Slicing Control KitchenAid's® exclusive on-the-fly externally adjustable slicing disc allows you can order. Work Bowl Cover with 3-in -1 feed tube accommodates large items ... appropriate adapter to connect the slicing/ shredding discs and mini-blade to the power shaft on included accessories included with your new Food Processor are highlighted below. like herbs, nuts, single carrots, and celery), remove the narrow pusher and use the narrow feed tube....
Use & Care Guide
Page 8
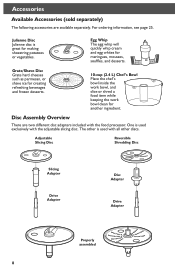
One is used with all other is used exclusively with the food processor. Grate/Shave 10-cup (2.4 L) Chef's Bowl Place the chef's bowl inside the work bowl, and slice or shred a food item while keeping the work bowl clean for meringues, mousses, soufflés, and desserts. Adjustable Slicing Disc Reversible Shredding Disc Slicing Adapter...
One is used with all other is used exclusively with the food processor. Grate/Shave 10-cup (2.4 L) Chef's Bowl Place the chef's bowl inside the work bowl, and slice or shred a food item while keeping the work bowl clean for meringues, mousses, soufflés, and desserts. Adjustable Slicing Disc Reversible Shredding Disc Slicing Adapter...
Use & Care Guide
Page 10
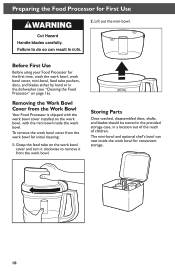
...bowl cover, mini-bowl, feed tube pushers, discs, and blades either by hand or in a location out of the reach of children. Preparing the Food Processor for the first time, wash the work bowl, work bowl. Lift out the mini-bowl. Grasp the feed tube on page 16). Storing Parts ...Once washed, disassembled discs, shafts, and blades should be stored in the provided storage case, in the dishwasher (see "Cleaning the Food Processor" on the work bowl cover and turn it clockwise to remove it from the work bowl for initial cleaning: 1. Before First Use Before using your...
...bowl cover, mini-bowl, feed tube pushers, discs, and blades either by hand or in a location out of the reach of children. Preparing the Food Processor for the first time, wash the work bowl, work bowl. Lift out the mini-bowl. Grasp the feed tube on page 16). Storing Parts ...Once washed, disassembled discs, shafts, and blades should be stored in the provided storage case, in the dishwasher (see "Cleaning the Food Processor" on the work bowl cover and turn it clockwise to remove it from the work bowl for initial cleaning: 1. Before First Use Before using your...
Use & Care Guide
Page 11
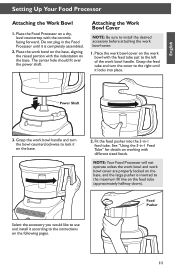
...and turn the cover to the left of the work bowl with the indentation on the following pages. 11 English Setting Up Your Food Processor Attaching the Work Bowl 1. Attaching the Work Bowl Cover NOTE: Be sure to lock it locks into the 3-in-1 feed tube. Fit the... is inserted to the instructions on the base. Place the Food Processor on the base, and the large pusher is completely assembled. 2. NOTE: Your Food Processor will not operate unless the work bowl and work bowl cover. 1. See "Using the 3-in the Food Processor until it on the base. 2. The center hole should...
...and turn the cover to the left of the work bowl with the indentation on the following pages. 11 English Setting Up Your Food Processor Attaching the Work Bowl 1. Attaching the Work Bowl Cover NOTE: Be sure to lock it locks into the 3-in-1 feed tube. Fit the... is inserted to the instructions on the base. Place the Food Processor on the base, and the large pusher is completely assembled. 2. NOTE: Your Food Processor will not operate unless the work bowl and work bowl cover. 1. See "Using the 3-in the Food Processor until it on the base. 2. The center hole should...
Use & Care Guide
Page 12
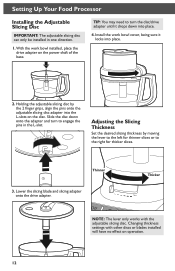
... Slicing Thickness Set the desired slicing thickness by the 2 finger grips, align the pins onto the adjustable slicing disc adapter into place. 4. Setting Up Your Food Processor Installing the Adjustable Slicing Disc IMPORTANT: The adjustable slicing disc can only be installed in the L-slot. Holding the adjustable slicing disc by moving the...
... Slicing Thickness Set the desired slicing thickness by the 2 finger grips, align the pins onto the adjustable slicing disc adapter into place. 4. Setting Up Your Food Processor Installing the Adjustable Slicing Disc IMPORTANT: The adjustable slicing disc can only be installed in the L-slot. Holding the adjustable slicing disc by moving the...
Use & Care Guide
Page 13
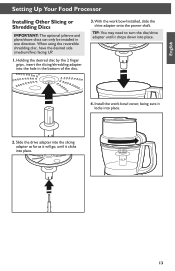
... it clicks into place. 4. TIP: You may need to turn the disc/drive adapter until it drops down into place. 13 English Setting Up Your Food Processor Installing Other Slicing or Shredding Discs IMPORTANT: The optional julienne and plane/shave discs can only be installed in the bottom of the disc. 3. Holding...
... it clicks into place. 4. TIP: You may need to turn the disc/drive adapter until it drops down into place. 13 English Setting Up Your Food Processor Installing Other Slicing or Shredding Discs IMPORTANT: The optional julienne and plane/shave discs can only be installed in the bottom of the disc. 3. Holding...
Use & Care Guide
Page 14
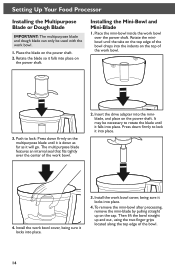
... indents on the power shaft. It may be used with the work bowl. 2. Press down firmly to lock it locks into place. 4. Setting Up Your Food Processor Installing the Multipurpose Blade or Dough Blade IMPORTANT: The multipurpose blade and dough blade can only be necessary to rotate the blade until it falls...
... indents on the power shaft. It may be used with the work bowl. 2. Press down firmly to lock it locks into place. 4. Setting Up Your Food Processor Installing the Multipurpose Blade or Dough Blade IMPORTANT: The multipurpose blade and dough blade can only be necessary to rotate the blade until it falls...
Use & Care Guide
Page 15
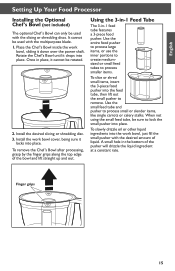
... inside the work bowl cover, being sure it drops into place. Install the work bowl, sliding it cannot be rotated. 2. English Setting Up Your Food Processor Installing the Optional Chef's Bowl (not included) The optional Chef's Bowl can only be used with the multipurpose blade. 1. Rotate the Chef's Bowl ...3-in-1 Feed Tube The 3-in the bottom of the bowl and lift straight up and out. A small hole in -1 feed tube features a 3-piece food pusher. Use the small feed tube and pusher to lock the small pusher into place. When not using the small feed tube, be used with...
... inside the work bowl cover, being sure it drops into place. Install the work bowl, sliding it cannot be rotated. 2. English Setting Up Your Food Processor Installing the Optional Chef's Bowl (not included) The optional Chef's Bowl can only be used with the multipurpose blade. 1. Rotate the Chef's Bowl ...3-in-1 Feed Tube The 3-in the bottom of the bowl and lift straight up and out. A small hole in -1 feed tube features a 3-piece food pusher. Use the small feed tube and pusher to lock the small pusher into place. When not using the small feed tube, be used with...
Use & Care Guide
Page 16
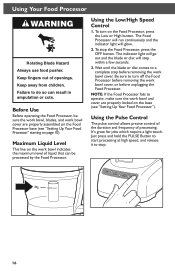
...turn on the work bowl indicates the maximum level of liquid that can result in amputation or cuts. Be sure to stop the Food Processor, press the OFF button. Using the Pulse Control The pulse control allows precise control of the duration and frequency of openings. Failure ...to operate, make sure the work bowl cover are properly locked on page 10). Before Use Before operating the Food Processor, be processed by the Food Processor. Using the Low/High Speed Control 1. The indicator light will go out and the blade or disc will glow. 2. NOTE...
...turn on the work bowl indicates the maximum level of liquid that can result in amputation or cuts. Be sure to stop the Food Processor, press the OFF button. Using the Pulse Control The pulse control allows precise control of the duration and frequency of openings. Failure ...to operate, make sure the work bowl cover are properly locked on page 10). Before Use Before operating the Food Processor, be processed by the Food Processor. Using the Low/High Speed Control 1. The indicator light will go out and the blade or disc will glow. 2. NOTE...
Use & Care Guide
Page 17
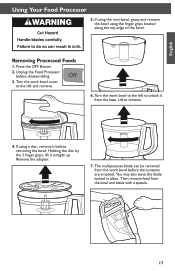
...the OFF Button. 2. The multipurpose blade can be removed from the work bowl to the left and remove. 6. Then remove food from the base. English Using Your Food Processor 5. Turn the work bowl before the contents are emptied. If using the finger grips located along the top edge of the... bowl. Removing Processed Foods 1. Turn the work bowl cover to remove. 4. Lift to the left to unlock it from the bowl ...
...the OFF Button. 2. The multipurpose blade can be removed from the work bowl to the left and remove. 6. Then remove food from the base. English Using Your Food Processor 5. Turn the work bowl before the contents are emptied. If using the finger grips located along the top edge of the... bowl. Removing Processed Foods 1. Turn the work bowl cover to remove. 4. Lift to the left to unlock it from the bowl ...
Use & Care Guide
Page 18
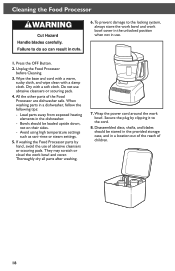
... 3. Bowls should be loaded upside down, not on their sides. -- Thoroughly dry all parts after washing. 7. Cleaning the Food Processor 6. If washing the Food Processor parts by clipping it to the locking system, always store the work bowl and work bowl cover in the unlocked position when not... in a location out of the reach of the Food Processor are dishwasher safe. Dry with a damp cloth. Load parts away from exposed heating elements in a dishwasher, follow the following tips: -- To...
... 3. Bowls should be loaded upside down, not on their sides. -- Thoroughly dry all parts after washing. 7. Cleaning the Food Processor 6. If washing the Food Processor parts by clipping it to the locking system, always store the work bowl and work bowl cover in the unlocked position when not... in a location out of the reach of the Food Processor are dishwasher safe. Dry with a damp cloth. Load parts away from exposed heating elements in a dishwasher, follow the following tips: -- To...
Use & Care Guide
Page 22
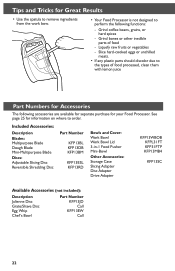
... unchilled meats. • If any plastic parts should discolor due to the types of food -- Included Accessories: Description Blades: Multipurpose Blade Dough Blade Mini-Multipurpose Blade Discs: Adjustable Slicing...'s Bowl Part Number KFP13JD Call KFP13EW Call 22 Tips and Tricks for your Food Processor. Grind coffee beans, grains, or hard spices -- Liquefy raw fruits or vegetables -- Grind bones or other... spatula to remove ingredients from the work bow. • Your Food Processor is not designed to order. See page 25 for information on where to perform the following functions: --
... unchilled meats. • If any plastic parts should discolor due to the types of food -- Included Accessories: Description Blades: Multipurpose Blade Dough Blade Mini-Multipurpose Blade Discs: Adjustable Slicing...'s Bowl Part Number KFP13JD Call KFP13EW Call 22 Tips and Tricks for your Food Processor. Grind coffee beans, grains, or hard spices -- Liquefy raw fruits or vegetables -- Grind bones or other... spatula to remove ingredients from the work bow. • Your Food Processor is not designed to order. See page 25 for information on where to perform the following functions: --
Use & Care Guide
Page 23
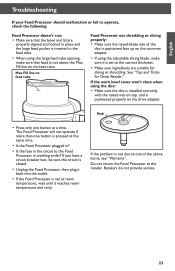
... one of the disc is positioned face up on the feed tube. English Troubleshooting If your Food Processor should malfunction or fail to operate, check the following: Food Processor doesn't run: • Make sure that food is not due to the retailer. If you have a circuit breaker box, be sure the... circuit is closed. • Unplug the Food Processor, then plug it back into the outlet. • If the Food Processor is not at room temperature, wait until it is set to the correct thickness. • Make sure ingredients ...
... one of the disc is positioned face up on the feed tube. English Troubleshooting If your Food Processor should malfunction or fail to operate, check the following: Food Processor doesn't run: • Make sure that food is not due to the retailer. If you have a circuit breaker box, be sure the... circuit is closed. • Unplug the Food Processor, then plug it back into the outlet. • If the Food Processor is not at room temperature, wait until it is set to the correct thickness. • Make sure ingredients ...
Use & Care Guide
Page 24
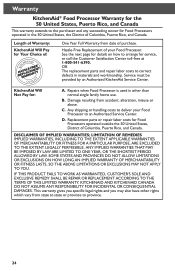
... HOW LONG AN IMPLIED WARRANTY OF MERCHANTABILITY OR FITNESS LASTS, SO THE ABOVE LIMITATIONS OR EXCLUSIONS MAY NOT APPLY TO YOU. Length of Warranty: KitchenAid Will Pay for Food Processors operated outside the 50 United States, District of Columbia, Puerto Rico, and Canada. OR The replacement parts and repair labor costs to deliver...
... HOW LONG AN IMPLIED WARRANTY OF MERCHANTABILITY OR FITNESS LASTS, SO THE ABOVE LIMITATIONS OR EXCLUSIONS MAY NOT APPLY TO YOU. Length of Warranty: KitchenAid Will Pay for Food Processors operated outside the 50 United States, District of Columbia, Puerto Rico, and Canada. OR The replacement parts and repair labor costs to deliver...

Use & Care Guide
Page 25
... confident the quality of our products meets the exacting standards of the KitchenAid® brand that , if your Food Processor should fail within the first year of ownership, KitchenAid Canada will replace your Food Processor with an identical or comparable replacement. free Customer Satisfaction Center at 1-800...Rico We're so confident the quality of our products meets the exacting standards of KitchenAid that , if your Food Processor should fail within the first year of ownership, KitchenAid will arrange to deliver an identical or comparable replacement to your door free of charge...
... confident the quality of our products meets the exacting standards of the KitchenAid® brand that , if your Food Processor should fail within the first year of ownership, KitchenAid Canada will replace your Food Processor with an identical or comparable replacement. free Customer Satisfaction Center at 1-800...Rico We're so confident the quality of our products meets the exacting standards of KitchenAid that , if your Food Processor should fail within the first year of ownership, KitchenAid will arrange to deliver an identical or comparable replacement to your door free of charge...

Warranty Information
Page 1
... parts or repair labor costs for Your Choice of: One Year Full Warranty from date of your Food Processor to an Authorized Service Center. KITCHENAID AND KITCHENAID CANADA DO NOT ASSUME ANY RESPONSIBILITY FOR INCIDENTAL OR CONSEQUENTIAL DAMAGES. See the next page for details on.... OR The replacement parts and repair labor costs to arrange for : normal single family home use. Length of Warranty: KitchenAid Will Pay for Food Processors operated outside the 50 United States, District of Columbia, Puerto Rico, and Canada. C. Any shipping or handling costs to...
... parts or repair labor costs for Your Choice of: One Year Full Warranty from date of your Food Processor to an Authorized Service Center. KITCHENAID AND KITCHENAID CANADA DO NOT ASSUME ANY RESPONSIBILITY FOR INCIDENTAL OR CONSEQUENTIAL DAMAGES. See the next page for details on.... OR The replacement parts and repair labor costs to arrange for : normal single family home use. Length of Warranty: KitchenAid Will Pay for Food Processors operated outside the 50 United States, District of Columbia, Puerto Rico, and Canada. C. Any shipping or handling costs to...

Warranty Information
Page 2
... Center at 1-800-541-6390 or write to us at 1-800-807-6777. Please have your original Food Processor returned to : Customer Satisfaction Center, KitchenAid Portable Appliances, P.O. English Warranty Hassle-Free Replacement Warranty - 50 United States and Puerto Rico We're ... of our products meets the exacting standards of KitchenAid that , if your Food Processor should fail within the first year of ownership, KitchenAid Canada will replace your Food Processor with an identical or comparable replacement. Your replacement Food Processor will be covered by our one year limited ...
... Center at 1-800-541-6390 or write to us at 1-800-807-6777. Please have your original Food Processor returned to : Customer Satisfaction Center, KitchenAid Portable Appliances, P.O. English Warranty Hassle-Free Replacement Warranty - 50 United States and Puerto Rico We're ... of our products meets the exacting standards of KitchenAid that , if your Food Processor should fail within the first year of ownership, KitchenAid Canada will replace your Food Processor with an identical or comparable replacement. Your replacement Food Processor will be covered by our one year limited ...


