Use & Care Guide
Page 3
... Slicing or Shredding Discs 13 Installing the Multipurpose Blade or Dough Blades 14 Installing the Mini-Bowl and Mini-Blade 14 Installing the Optional Chef's Bowl 15 Using the 3-in-1 Feed Tube 15 USING YOUR FOOD PROCESSOR Before Use...16 Maximum Liquid Level 16 Using the Low/High Speed Control 16 Using the Pulse Control 16 Removing Processed Foods 17 CARE AND CLEANING 18 TIPS FOR GREAT RESULTS Food Processing Tips 19 Helpful Hints...21 PART NUMBERS FOR ACCESSORIES 22 TROUBLESHOOTING 23 WARRANTY...24 Find recipes...
... Slicing or Shredding Discs 13 Installing the Multipurpose Blade or Dough Blades 14 Installing the Mini-Bowl and Mini-Blade 14 Installing the Optional Chef's Bowl 15 Using the 3-in-1 Feed Tube 15 USING YOUR FOOD PROCESSOR Before Use...16 Maximum Liquid Level 16 Using the Low/High Speed Control 16 Using the Pulse Control 16 Removing Processed Foods 17 CARE AND CLEANING 18 TIPS FOR GREAT RESULTS Food Processing Tips 19 Helpful Hints...21 PART NUMBERS FOR ACCESSORIES 22 TROUBLESHOOTING 23 WARRANTY...24 Find recipes...
Use & Care Guide
Page 4
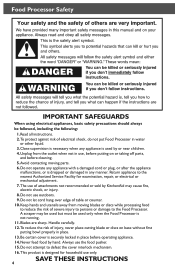
... cutting blade or discs on or taking off parts, and before operating appliance. 14. The use the food pusher. 15. A scraper may cause fire, electric shock, or injury. 8. Be certain cover is not running. 11. Avoid contacting moving blades or discs while processing food to reduce the risk of severe injury to persons or damage to the Food Processor. Never feed food by KitchenAid may be used but...
... cutting blade or discs on or taking off parts, and before operating appliance. 14. The use the food pusher. 15. A scraper may cause fire, electric shock, or injury. 8. Be certain cover is not running. 11. Avoid contacting moving blades or discs while processing food to reduce the risk of severe injury to persons or damage to the Food Processor. Never feed food by KitchenAid may be used but...
Use & Care Guide
Page 6
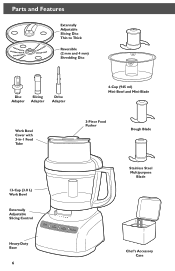
Parts and Features Externally Adjustable Slicing Disc Thin to Thick Reversible (2 mm and 4 mm) Shredding Disc Disc Slicing Adapter Adapter Drive Adapter Work Bowl Cover with 3-in-1 Feed Tube 4-Cup (945 ml) Mini-Bowl and Mini-Blade 3-Piece Food Pusher Dough Blade 13-Cup (3.0 L) Work Bowl Externally Adjustable Slicing Control Stainless Steel Multipurpose Blade Heavy-Duty Base 6 Chef's Accessory Case
Parts and Features Externally Adjustable Slicing Disc Thin to Thick Reversible (2 mm and 4 mm) Shredding Disc Disc Slicing Adapter Adapter Drive Adapter Work Bowl Cover with 3-in-1 Feed Tube 4-Cup (945 ml) Mini-Bowl and Mini-Blade 3-Piece Food Pusher Dough Blade 13-Cup (3.0 L) Work Bowl Externally Adjustable Slicing Control Stainless Steel Multipurpose Blade Heavy-Duty Base 6 Chef's Accessory Case
Use & Care Guide
Page 7
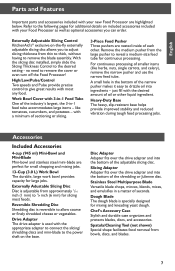
... desired setting - A small hole in a matter of the shredding or Julienne disc. Drive Adapter The drive adapter is adjustable from the large pusher to reveal a medium-size feed tube for large jobs. Dough Blade The dough blade is reversible to allow coarse or finely shredded cheese or vegetables. English Parts and Features Important parts and accessories included with the appropriate adapter to connect the slicing/ shredding discs and mini-blade to the power shaft on the base. Externally Adustable Slicing Disc Disc is used with your Food Processor...
... desired setting - A small hole in a matter of the shredding or Julienne disc. Drive Adapter The drive adapter is adjustable from the large pusher to reveal a medium-size feed tube for large jobs. Dough Blade The dough blade is reversible to allow coarse or finely shredded cheese or vegetables. English Parts and Features Important parts and accessories included with the appropriate adapter to connect the slicing/ shredding discs and mini-blade to the power shaft on the base. Externally Adustable Slicing Disc Disc is used with your Food Processor...
Use & Care Guide
Page 8
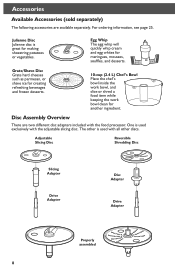
... Shredding Disc Slicing Adapter Drive Adapter Disc Adapter Drive Adapter Properly assembled 8 Grate/Shave 10-cup (2.4 L) Chef's Bowl Place the chef's bowl inside the work bowl, and slice or shred a food item while keeping the work bowl clean for creating refreshing beverages and frozen desserts. For ordering information, see page 25. Grate/Shave Disc Grate hard cheeses such as parmesan, or shave ice for another ingredient. Accessories Available Accessories (sold separately) The following accessories are two different disc adapters included with the food processor...
... Shredding Disc Slicing Adapter Drive Adapter Disc Adapter Drive Adapter Properly assembled 8 Grate/Shave 10-cup (2.4 L) Chef's Bowl Place the chef's bowl inside the work bowl, and slice or shred a food item while keeping the work bowl clean for creating refreshing beverages and frozen desserts. For ordering information, see page 25. Grate/Shave Disc Grate hard cheeses such as parmesan, or shave ice for another ingredient. Accessories Available Accessories (sold separately) The following accessories are two different disc adapters included with the food processor...
Use & Care Guide
Page 10
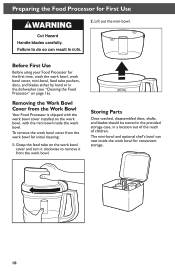
Storing Parts Once washed, disassembled discs, shafts, and blades should be stored in the provided storage case, in the dishwasher (see "Cleaning the Food Processor" on page 16). Lift out the mini-bowl. The mini-bowl and optional chef's bowl can nest inside the work bowl. Removing the Work Bowl Cover from the Work Bowl Your Food Processor is shipped with the work bowl cover installed on the work bowl, with the mini-bowl inside the work bowl for initial cleaning: 1. Grasp the feed tube on the work bowl cover and turn it clockwise...
Storing Parts Once washed, disassembled discs, shafts, and blades should be stored in the provided storage case, in the dishwasher (see "Cleaning the Food Processor" on page 16). Lift out the mini-bowl. The mini-bowl and optional chef's bowl can nest inside the work bowl. Removing the Work Bowl Cover from the Work Bowl Your Food Processor is shipped with the work bowl cover installed on the work bowl, with the mini-bowl inside the work bowl for initial cleaning: 1. Grasp the feed tube on the work bowl cover and turn it clockwise...
Use & Care Guide
Page 11
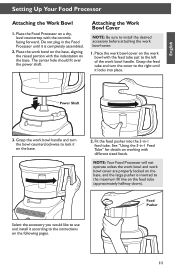
Fit the food pusher into place. Do not plug in the Food Processor until it is inserted to the instructions on a dry, level countertop with different sized foods. Place the work bowl cover on the base. Power Shaft 3. Place the work bowl on the base, aligning the raised portion with the indentation on the work bowl cover are properly locked on the base, and the large pusher is completely assembled. 2. Grasp the feed tube and turn the bowl counterclockwise to lock it...
Fit the food pusher into place. Do not plug in the Food Processor until it is inserted to the instructions on a dry, level countertop with different sized foods. Place the work bowl cover on the base. Power Shaft 3. Place the work bowl on the base, aligning the raised portion with the indentation on the work bowl cover are properly locked on the base, and the large pusher is completely assembled. 2. Grasp the feed tube and turn the bowl counterclockwise to lock it...
Use & Care Guide
Page 12
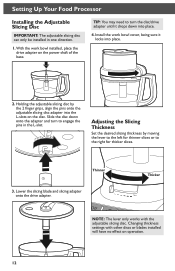
... power shaft of the base. Install the work bowl installed, place the drive adapter on operation. 12 Lower the slicing blade and slicing adapter onto the drive adapter. With the work bowl cover, being sure it drops down into place. 4. TIP: You may need to turn to the right for thicker slices. Slide the disc down onto the adapter and turn the disc/drive adapter until it locks into the L-slots on the disc. Changing thickness settings with the adjustable slicing disc. Adjusting the Slicing...
... power shaft of the base. Install the work bowl installed, place the drive adapter on operation. 12 Lower the slicing blade and slicing adapter onto the drive adapter. With the work bowl cover, being sure it drops down into place. 4. TIP: You may need to turn to the right for thicker slices. Slide the disc down onto the adapter and turn the disc/drive adapter until it locks into the L-slots on the disc. Changing thickness settings with the adjustable slicing disc. Adjusting the Slicing...
Use & Care Guide
Page 13
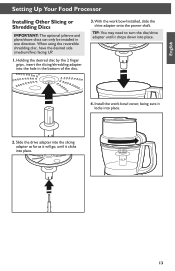
Install the work bowl installed, slide the drive adapter onto the power shaft. With the work bowl cover, being sure it clicks into the hole in one direction. Holding the desired disc by the 2 finger grips, insert the slicing/shredding adapter into place. 13 Slide the drive adapter into the slicing adapter as far as it will go, until it drops down into place. 2. English Setting Up Your Food Processor Installing Other Slicing or Shredding Discs IMPORTANT: The optional...
Install the work bowl installed, slide the drive adapter onto the power shaft. With the work bowl cover, being sure it clicks into the hole in one direction. Holding the desired disc by the 2 finger grips, insert the slicing/shredding adapter into place. 13 Slide the drive adapter into the slicing adapter as far as it will go, until it drops down into place. 2. English Setting Up Your Food Processor Installing Other Slicing or Shredding Discs IMPORTANT: The optional...
Use & Care Guide
Page 14
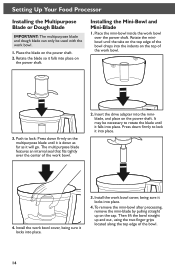
... drive adapter into the indents on the power shaft. To remove the mini-bowl after processing, remove the mini-blade by pulling straight up and out, using the two finger grips located along the top edge of the bowl. 14 Setting Up Your Food Processor Installing the Multipurpose Blade or Dough Blade IMPORTANT: The multipurpose blade and dough blade can only be necessary to rotate the blade until it falls into place. Installing the Mini-Bowl and Mini-Blade...
... drive adapter into the indents on the power shaft. To remove the mini-bowl after processing, remove the mini-blade by pulling straight up and out, using the two finger grips located along the top edge of the bowl. 14 Setting Up Your Food Processor Installing the Multipurpose Blade or Dough Blade IMPORTANT: The multipurpose blade and dough blade can only be necessary to rotate the blade until it falls into place. Installing the Mini-Bowl and Mini-Blade...
Use & Care Guide
Page 15
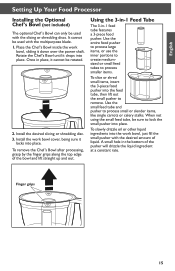
... slicing or shredding disc. 3. To slowly drizzle oil or other liquid ingredients into the work bowl cover, being sure it down over the power shaft. English Setting Up Your Food Processor Installing the Optional Chef's Bowl (not included) The optional Chef's Bowl can only be used with the slicing or shredding discs. A small hole in -1 feed tube features a 3-piece food pusher. Use the small feed tube and pusher to remove. It cannot be used with the multipurpose blade. 1. Place the Chef's Bowl inside the work bowl, sliding it locks...
... slicing or shredding disc. 3. To slowly drizzle oil or other liquid ingredients into the work bowl cover, being sure it down over the power shaft. English Setting Up Your Food Processor Installing the Optional Chef's Bowl (not included) The optional Chef's Bowl can only be used with the slicing or shredding discs. A small hole in -1 feed tube features a 3-piece food pusher. Use the small feed tube and pusher to remove. It cannot be used with the multipurpose blade. 1. Place the Chef's Bowl inside the work bowl, sliding it locks...
Use & Care Guide
Page 16
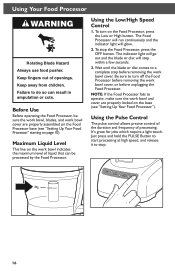
... the work bowl, blades, and work bowl cover are properly locked on the base (see "Setting Up Your Food Processor" starting on the work bowl cover. Maximum Liquid Level This line on page 10). To turn off the Food Processor before removing the work bowl indicates the maximum level of liquid that can result in amputation or cuts. To stop within a few seconds. 3. Before Use Before operating the Food Processor, be processed by the Food Processor. The indicator light will...
... the work bowl, blades, and work bowl cover are properly locked on the base (see "Setting Up Your Food Processor" starting on the work bowl cover. Maximum Liquid Level This line on page 10). To turn off the Food Processor before removing the work bowl indicates the maximum level of liquid that can result in amputation or cuts. To stop within a few seconds. 3. Before Use Before operating the Food Processor, be processed by the Food Processor. The indicator light will...
Use & Care Guide
Page 17
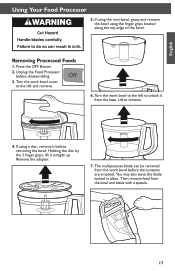
... the base. Remove the adapter. 7. Unplug the Food Processor before removing the bowl. Then remove food from the work bowl cover to the left to unlock it straight up. English Using Your Food Processor 5. Turn the work bowl before the contents are emptied. If using the finger grips located along the top edge of the bowl. You may also leave the blade locked in place. If using the mini-bowl, grasp and remove the bowl using a disc, remove it before disassembling...
... the base. Remove the adapter. 7. Unplug the Food Processor before removing the bowl. Then remove food from the work bowl cover to the left to unlock it straight up. English Using Your Food Processor 5. Turn the work bowl before the contents are emptied. If using the finger grips located along the top edge of the bowl. You may also leave the blade locked in place. If using the mini-bowl, grasp and remove the bowl using a disc, remove it before disassembling...
Use & Care Guide
Page 18
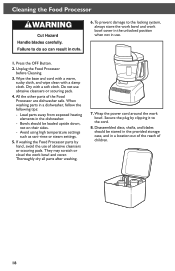
... dishwasher. -- Disassembled discs, shafts, and blades should be stored in the provided storage case, and in a dishwasher, follow the following tips: -- When washing parts in a location out of the reach of children. 18 Avoid using high temperature settings such as sani-rinse or steam settings. 5. They may scratch or cloud the work bowl. Wrap the power cord around the work bowl and cover. Cleaning the Food Processor 6. Press the...
... dishwasher. -- Disassembled discs, shafts, and blades should be stored in the provided storage case, and in a dishwasher, follow the following tips: -- When washing parts in a location out of the reach of children. 18 Avoid using high temperature settings such as sani-rinse or steam settings. 5. They may scratch or cloud the work bowl. Wrap the power cord around the work bowl and cover. Cleaning the Food Processor 6. Press the...
Use & Care Guide
Page 19
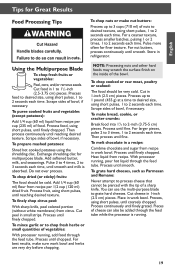
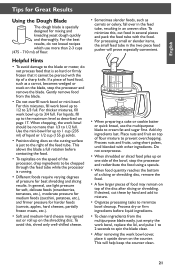
... 2-inch (3.75-5 cm) pieces. Process food to desired size, using the shredding disc. Add 1/4 cup (60 ml) flour from recipe in work bowl. Process until smooth and milk is running , pour hot liquid through the feed tube. Cut peel in refrigerator. Process continuously until fine. Process until finely grated. Process until finely chopped. For best results, make sure work bowl and herbs are very dry before chopping. Store in small strips. Scrape sides...
... 2-inch (3.75-5 cm) pieces. Process food to desired size, using the shredding disc. Add 1/4 cup (60 ml) flour from recipe in work bowl. Process until smooth and milk is running , pour hot liquid through the feed tube. Cut peel in refrigerator. Process continuously until fine. Process until finely grated. Process until finely chopped. For best results, make sure work bowl and herbs are very dry before chopping. Store in small strips. Scrape sides...
Use & Care Guide
Page 21
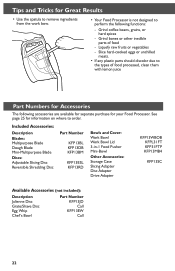
... thicker mixtures, fill work bowl cover, place it cannot be chopped through the feed tube while the processor is running. • Different foods require varying degrees of flour. This allows the blade a full rotation before liquid ingredients. • To clean ingredients from the blade. • Do not overfill work bowl, replace the lid, and pulse 1 to 2 seconds to prevent overchopping. In general, use more than 2-3 cups (475 - 710...
... thicker mixtures, fill work bowl cover, place it cannot be chopped through the feed tube while the processor is running. • Different foods require varying degrees of flour. This allows the blade a full rotation before liquid ingredients. • To clean ingredients from the blade. • Do not overfill work bowl, replace the lid, and pulse 1 to 2 seconds to prevent overchopping. In general, use more than 2-3 cups (475 - 710...
Use & Care Guide
Page 22
... types of food -- Grind bones or other inedible parts of food processed, clean them with lemon juice Part Numbers for Accessories The following accessories are available for separate purchase for information on where to perform the following functions: -- Included Accessories: Description Blades: Multipurpose Blade Dough Blade Mini-Multipurpose Blade Discs: Adjustable Slicing Disc Reversible Shredding Disc Part Number KFP13BL KFP13DB KFP13BM KFP13ESL KFP13RD Bowls and Cover: Work Bowl Work Bowl Lid 3-in-1 Food Pusher Mini-Bowl Other Accessories: Storage Case Slicing Adapter Disc...
... types of food -- Grind bones or other inedible parts of food processed, clean them with lemon juice Part Numbers for Accessories The following accessories are available for separate purchase for information on where to perform the following functions: -- Included Accessories: Description Blades: Multipurpose Blade Dough Blade Mini-Multipurpose Blade Discs: Adjustable Slicing Disc Reversible Shredding Disc Part Number KFP13BL KFP13DB KFP13BM KFP13ESL KFP13RD Bowls and Cover: Work Bowl Work Bowl Lid 3-in-1 Food Pusher Mini-Bowl Other Accessories: Storage Case Slicing Adapter Disc...
Use & Care Guide
Page 23
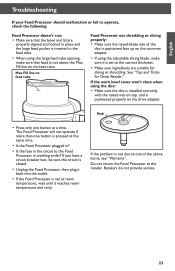
... one of the disc is positioned properly on the drive adapter. Do not return the Food Processor to the retailer. English Troubleshooting If your Food Processor should malfunction or fail to operate, check the following: Food Processor doesn't run: • Make sure that the bowl and lid are suitable for Great Results." If the work bowl cover won't close when using the disc: • Make sure the disc is installed correctly, with...
... one of the disc is positioned properly on the drive adapter. Do not return the Food Processor to the retailer. English Troubleshooting If your Food Processor should malfunction or fail to operate, check the following: Food Processor doesn't run: • Make sure that the bowl and lid are suitable for Great Results." If the work bowl cover won't close when using the disc: • Make sure the disc is installed correctly, with...
Use & Care Guide
Page 24
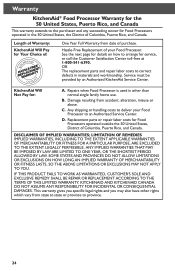
... specific legal rights and you may also have other than Not Pay for: normal single family home use. Warranty KitchenAid® Food Processor Warranty for the 50 United States, Puerto Rico, and Canada This warranty extends to the purchaser and any succeeding owner for service, or call the Customer Satisfaction Center toll-free at 1-800-541-6390. KitchenAid Will A. Replacement parts or repair...
... specific legal rights and you may also have other than Not Pay for: normal single family home use. Warranty KitchenAid® Food Processor Warranty for the 50 United States, Puerto Rico, and Canada This warranty extends to the purchaser and any succeeding owner for service, or call the Customer Satisfaction Center toll-free at 1-800-541-6390. KitchenAid Will A. Replacement parts or repair...

Warranty Information
Page 1
... replacement parts and repair labor costs to arrange for service, or call the Customer Satisfaction Center toll-free at 1-800-541-6390. Repairs when Food Processor is used in other rights which vary from state to state or province to an Authorized Service Center. LIMITATION OF REMEDIES IMPLIED WARRANTIES, INCLUDING TO THE EXTENT APPLICABLE WARRANTIES OF MERCHANTABILITY OR FITNESS FOR A PARTICULAR PURPOSE...
... replacement parts and repair labor costs to arrange for service, or call the Customer Satisfaction Center toll-free at 1-800-541-6390. Repairs when Food Processor is used in other rights which vary from state to state or province to an Authorized Service Center. LIMITATION OF REMEDIES IMPLIED WARRANTIES, INCLUDING TO THE EXTENT APPLICABLE WARRANTIES OF MERCHANTABILITY OR FITNESS FOR A PARTICULAR PURPOSE...


