
Warranty Information
Page 1
... OR FITNESS FOR A PARTICULAR PURPOSE, ARE EXCLUDED TO THE EXTENT LEGALLY PERMISSIBLE. Service must be provided by an Authorized KitchenAid Service Center. C. Length of Warranty: KitchenAid Will Pay for Food Processor operated in the 50 United States, the District of purchase. Replacement parts or repair labor costs for : normal single family home use. This warranty gives you specific legal rights and you may...
... OR FITNESS FOR A PARTICULAR PURPOSE, ARE EXCLUDED TO THE EXTENT LEGALLY PERMISSIBLE. Service must be provided by an Authorized KitchenAid Service Center. C. Length of Warranty: KitchenAid Will Pay for Food Processor operated in the 50 United States, the District of purchase. Replacement parts or repair labor costs for : normal single family home use. This warranty gives you specific legal rights and you may...
Warranty Information
Page 2
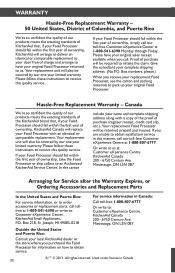
...; © 2013. Box numbers, please.) When you purchased the Food Processor for Service after the Warranty Expires, or Ordering Accessories and Replacement Parts In the United States and Puerto Rico: For service information, or to order accessories or replacement parts, call our toll-free Customer eXperience Center at : Customer eXperience Centre KitchenAid Canada 200 - 6750 Century Ave. Please follow these instructions to receive this quality service. Joseph, MI...
...; © 2013. Box numbers, please.) When you purchased the Food Processor for Service after the Warranty Expires, or Ordering Accessories and Replacement Parts In the United States and Puerto Rico: For service information, or to order accessories or replacement parts, call our toll-free Customer eXperience Center at : Customer eXperience Centre KitchenAid Canada 200 - 6750 Century Ave. Please follow these instructions to receive this quality service. Joseph, MI...
Use & Care Guide
Page 3
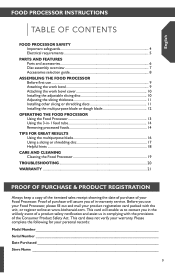
... work bowl cover 10 Installing the adjustable slicing disc 10 Adjusting the slicing thickness 11 Installing other slicing or shredding discs 11 Installing the multipurpose blade or dough blade 12 OPERATING the Food Processor Using the Food Processor 13 Using the 3-in-1 feed tube 14 Removing processed foods 14 Tips for your personal records: Model Number Serial Number Date Purchased Store Name 3 English Food Processor INSTRUCTIONS Table of Contents Food Processor SAFETY Important safeguards 4 Electrical requirements 5 PARTS AND FEATURES Parts and accessories 6 Disc assembly...
... work bowl cover 10 Installing the adjustable slicing disc 10 Adjusting the slicing thickness 11 Installing other slicing or shredding discs 11 Installing the multipurpose blade or dough blade 12 OPERATING the Food Processor Using the Food Processor 13 Using the 3-in-1 feed tube 14 Removing processed foods 14 Tips for your personal records: Model Number Serial Number Date Purchased Store Name 3 English Food Processor INSTRUCTIONS Table of Contents Food Processor SAFETY Important safeguards 4 Electrical requirements 5 PARTS AND FEATURES Parts and accessories 6 Disc assembly...
Use & Care Guide
Page 4
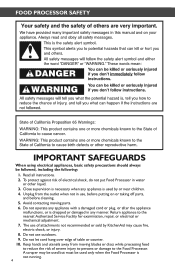
... the Food Processor. Close supervision is necessary when any appliance is dropped or damaged in any appliance with a damaged cord or plug, or after the appliance malfunctions, or is used by KitchenAid may be used but must be followed, including the following: 1. Avoid contacting moving blades or discs while processing food to the nearest Authorized Service Facility for examination, repair, or...
... the Food Processor. Close supervision is necessary when any appliance is dropped or damaged in any appliance with a damaged cord or plug, or after the appliance malfunctions, or is used by KitchenAid may be used but must be followed, including the following: 1. Avoid contacting moving blades or discs while processing food to the nearest Authorized Service Facility for examination, repair, or...
Use & Care Guide
Page 5
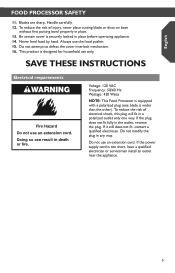
... place cutting blade or discs on base without first putting bowl properly in a polarized outlet only one blade is equipped with a polarized plug (one way. Blades are sharp. Do not attempt to defeat the cover interlock mechanism. 16. Voltage: 120 VAC Frequency: 50/60 Hz Wattage: 420 Watts NOTE: This Food Processor is wider than the other). If the power supply cord...
... place cutting blade or discs on base without first putting bowl properly in a polarized outlet only one blade is equipped with a polarized plug (one way. Blades are sharp. Do not attempt to defeat the cover interlock mechanism. 16. Voltage: 120 VAC Frequency: 50/60 Hz Wattage: 420 Watts NOTE: This Food Processor is wider than the other). If the power supply cord...
Use & Care Guide
Page 7
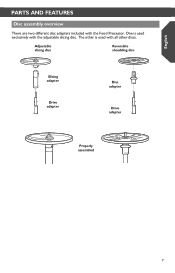
One is used exclusively with the Food Processor. Adjustable slicing disc Reversible shredding disc Slicing adapter Drive adapter Disc adapter Drive adapter Properly assembled 7 The other is used with all other discs. English Parts and features Disc assembly overview There are two different disc adapters included with the adjustable slicing disc.
One is used exclusively with the Food Processor. Adjustable slicing disc Reversible shredding disc Slicing adapter Drive adapter Disc adapter Drive adapter Properly assembled 7 The other is used with all other discs. English Parts and features Disc assembly overview There are two different disc adapters included with the adjustable slicing disc.
Use & Care Guide
Page 9
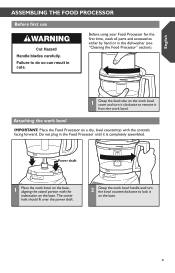
... work bowl. Before using your Food Processor for the first time, wash all parts and accessories either by hand or in the dishwasher (see "Cleaning the Food Processor" section). 1 Grasp the feed tube on the base, aligning the raised portion with the controls facing forward. Power shaft 1 Place the work bowl on the work bowl cover and turn the bowl counterclockwise to remove it from the work bowl handle and turn it clockwise to lock it is completely assembled...
... work bowl. Before using your Food Processor for the first time, wash all parts and accessories either by hand or in the dishwasher (see "Cleaning the Food Processor" section). 1 Grasp the feed tube on the base, aligning the raised portion with the controls facing forward. Power shaft 1 Place the work bowl on the work bowl cover and turn the bowl counterclockwise to remove it from the work bowl handle and turn it clockwise to lock it is completely assembled...

Use & Care Guide
Page 10
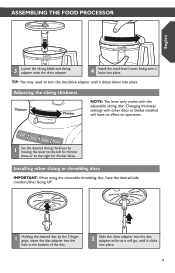
... adapter and turn the cover to the right until it locks into the 3-in one direction. 1 With the work bowl installed, place the drive adapter on the power shaft of the base. 2 Holding the adjustable slicing disc by the 2 finger grips, align the pins on the work bowl with the feed tube just to the left of the work bowl handle. NOTE: Your Food Processor will not operate unless the work bowl and work bowl cover are properly locked on the base...
... adapter and turn the cover to the right until it locks into the 3-in one direction. 1 With the work bowl installed, place the drive adapter on the power shaft of the base. 2 Holding the adjustable slicing disc by the 2 finger grips, align the pins on the work bowl with the feed tube just to the left of the work bowl handle. NOTE: Your Food Processor will not operate unless the work bowl and work bowl cover are properly locked on the base...
Use & Care Guide
Page 11
... lever to the left for thicker slices. Changing thickness settings with the adjustable slicing disc. Installing other discs or blades installed will go, until it drops down into place. TIP: You may need to the right for thinner slices or to turn the disc/drive adapter until it clicks into place. Assembling the Food Processor English 3 Lower the slicing blade and slicing adapter onto the drive adapter. 4 Install the work bowl cover, being sure it locks into place. 11
... lever to the left for thicker slices. Changing thickness settings with the adjustable slicing disc. Installing other discs or blades installed will go, until it drops down into place. TIP: You may need to the right for thinner slices or to turn the disc/drive adapter until it clicks into place. Assembling the Food Processor English 3 Lower the slicing blade and slicing adapter onto the drive adapter. 4 Install the work bowl cover, being sure it locks into place. 11

Use & Care Guide
Page 12
... it locks into place. Assembling the Food Processor 3 With the work bowl installed, slide the drive adapter onto the power shaft. 4 Install the work bowl cover, being sure it locks into place. 12 Installing the multipurpose blade or dough blade 1 Place the blade on the multipurpose blade until it will go. Rotate the blade so it falls into place. TIP: You may need to lock: Press down into place on the power shaft. 2 Push to turn the disc/drive adapter until...
... it locks into place. Assembling the Food Processor 3 With the work bowl installed, slide the drive adapter onto the power shaft. 4 Install the work bowl cover, being sure it locks into place. 12 Installing the multipurpose blade or dough blade 1 Place the blade on the multipurpose blade until it will go. Rotate the blade so it falls into place. TIP: You may need to lock: Press down into place on the power shaft. 2 Push to turn the disc/drive adapter until...

Use & Care Guide
Page 13
... PULSE Button to start processing at high speed, and release it to do so can be sure the work bowl, blades, and work bowl cover are properly locked on the Food Processor base (see "Assembling the Food Processor" section). 13 Keep away from children. The indicator light will go out and the blade or disc will glow. 2 When finished, press the OFF button. Be sure to turn on, press...
... PULSE Button to start processing at high speed, and release it to do so can be sure the work bowl, blades, and work bowl cover are properly locked on the Food Processor base (see "Assembling the Food Processor" section). 13 Keep away from children. The indicator light will go out and the blade or disc will glow. 2 When finished, press the OFF button. Be sure to turn on, press...
Use & Care Guide
Page 14
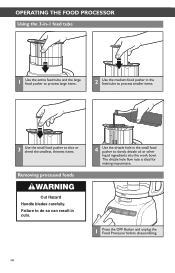
operating the Food Processor Using the 3-in-1 feed tube 1 Use the entire feed tube and the large food pusher to process large items. 2 Use the medium food pusher in the feed tube to process smaller items. 3 Use the small food pusher to slice or shred the smallest, thinnest items. Removing processed foods 4 Use the drizzle hole in the small food pusher to do so can result in cuts. 1 Press the OFF Button and unplug the Food Processor before disassembling. 14 Cut Hazard Handle blades carefully. The drizzle hole flow rate...
operating the Food Processor Using the 3-in-1 feed tube 1 Use the entire feed tube and the large food pusher to process large items. 2 Use the medium food pusher in the feed tube to process smaller items. 3 Use the small food pusher to slice or shred the smallest, thinnest items. Removing processed foods 4 Use the drizzle hole in the small food pusher to do so can result in cuts. 1 Press the OFF Button and unplug the Food Processor before disassembling. 14 Cut Hazard Handle blades carefully. The drizzle hole flow rate...
Use & Care Guide
Page 15
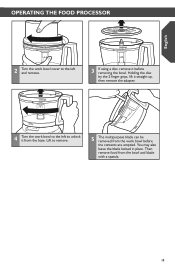
Lift to remove. 5 The multipurpose blade can be removed from the work bowl before removing the bowl. English operating the Food Processor 2 Turn the work bowl cover to the left to unlock it before the contents are emptied. You may also leave the blade locked in place. Holding the disc by the 2 finger grips, lift it straight up, then remove the adapter. 4 Turn the work bowl to the left and remove. 3 If using a disc, remove it from the bowl and blade with a spatula. 15 Then remove food from the base.
Lift to remove. 5 The multipurpose blade can be removed from the work bowl before removing the bowl. English operating the Food Processor 2 Turn the work bowl cover to the left to unlock it before the contents are emptied. You may also leave the blade locked in place. Holding the disc by the 2 finger grips, lift it straight up, then remove the adapter. 4 Turn the work bowl to the left and remove. 3 If using a disc, remove it from the bowl and blade with a spatula. 15 Then remove food from the base.

Use & Care Guide
Page 16
... potatoes): Add 1/4 cup (60 ml) liquid from recipe per cup (235 ml) of cheese can use the multi-purpose blade to process cheese that cannot be cold. Exchange shredding disc for finer texture. Pulse 3 to 4 times, 2 to desired size, using LOW. Add 1/4 cup (60 ml) flour from recipe per 1/2 cup (120 ml) dried fruit. Scrape sides of the bowl. Pieces of food. For best results, make sure work bowl. To grate...
... potatoes): Add 1/4 cup (60 ml) liquid from recipe per cup (235 ml) of cheese can use the multi-purpose blade to process cheese that cannot be cold. Exchange shredding disc for finer texture. Pulse 3 to 4 times, 2 to desired size, using LOW. Add 1/4 cup (60 ml) flour from recipe per 1/2 cup (120 ml) dried fruit. Scrape sides of the bowl. Pieces of food. For best results, make sure work bowl. To grate...

Use & Care Guide
Page 17
... be very cold. Cut to fit feed tube. English Tips for great results Using a slicing or shredding disc Rotating Blade Hazard Always use the small food pusher to fit feed tube. Keep away from children. Position in the tube and use the small feed tube in amputation or cuts. Process, using even pressure with food pusher. Or use the small feed tube in the tube and use food pusher. Position food vertically in the 3-piece food pusher. To slice uncooked meat or poultry, such as...
... be very cold. Cut to fit feed tube. English Tips for great results Using a slicing or shredding disc Rotating Blade Hazard Always use the small food pusher to fit feed tube. Keep away from children. Position in the tube and use the small feed tube in amputation or cuts. Process, using even pressure with food pusher. Or use the small feed tube in the tube and use food pusher. Position food vertically in the 3-piece food pusher. To slice uncooked meat or poultry, such as...

Use & Care Guide
Page 18
...; To clean ingredients from the blade. • Do not overfill work bowl. • Organize processing tasks to 3/4 full. For processing small or slender items, the small feed tube in an uneven slice. Process nuts and fruits, using a spatula. • When food quantity reaches the bottom of a slicing or shredding disc, remove the food. • A few larger pieces of food may spread out or roll up to the types of hard food, such as...
...; To clean ingredients from the blade. • Do not overfill work bowl. • Organize processing tasks to 3/4 full. For processing small or slender items, the small feed tube in an uneven slice. Process nuts and fruits, using a spatula. • When food quantity reaches the bottom of a slicing or shredding disc, remove the food. • A few larger pieces of food may spread out or roll up to the types of hard food, such as...
Use & Care Guide
Page 19
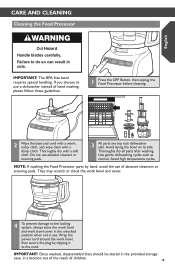
...: Once washed, disassembled discs should be stored in the provided storage case, in use a dishwasher instead of children. 19 NOTE: If washing the Food Processor parts by clipping it to do so can result in cuts. Thoroughly dry with a damp cloth. Avoid high temperature cycles. IMPORTANT: The BPA-free bowl requires special handling. English care and cleaning Cleaning the Food Processor Cut Hazard Handle blades carefully. Do not use of abrasive...
...: Once washed, disassembled discs should be stored in the provided storage case, in use a dishwasher instead of children. 19 NOTE: If washing the Food Processor parts by clipping it to do so can result in cuts. Thoroughly dry with a damp cloth. Avoid high temperature cycles. IMPORTANT: The BPA-free bowl requires special handling. English care and cleaning Cleaning the Food Processor Cut Hazard Handle blades carefully. Do not use of abrasive...
Use & Care Guide
Page 20
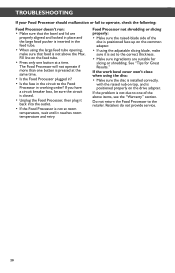
...." Food Processor not shredding or slicing properly: • Make sure the raised-blade side of the above the Max. If the work bowl cover won't close when using the disc: • Make sure the disc is installed correctly, with the raised nub on top, and is positioned properly on the common adapter. • If using the large feed tube opening, make sure it is positioned face up on the drive adapter. Troubleshooting If...
...." Food Processor not shredding or slicing properly: • Make sure the raised-blade side of the above the Max. If the work bowl cover won't close when using the disc: • Make sure the disc is installed correctly, with the raised nub on top, and is positioned properly on the common adapter. • If using the large feed tube opening, make sure it is positioned face up on the drive adapter. Troubleshooting If...
Use & Care Guide
Page 21
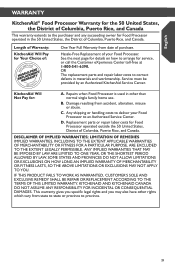
... FITNESS FOR A PARTICULAR PURPOSE, ARE EXCLUDED TO THE EXTENT LEGALLY PERMISSIBLE. IF THIS PRODUCT FAILS TO WORK AS WARRANTED, CUSTOMER'S SOLE AND EXCLUSIVE REMEDY SHALL BE REPAIR OR REPLACEMENT ACCORDING TO THE TERMS OF THIS LIMITED WARRANTY. Any shipping or handling costs to deliver your Food Processor. Replacement parts or repair labor costs for : normal single family home use. KitchenAid Will A. SOME STATES...
... FITNESS FOR A PARTICULAR PURPOSE, ARE EXCLUDED TO THE EXTENT LEGALLY PERMISSIBLE. IF THIS PRODUCT FAILS TO WORK AS WARRANTED, CUSTOMER'S SOLE AND EXCLUSIVE REMEDY SHALL BE REPAIR OR REPLACEMENT ACCORDING TO THE TERMS OF THIS LIMITED WARRANTY. Any shipping or handling costs to deliver your Food Processor. Replacement parts or repair labor costs for : normal single family home use. KitchenAid Will A. SOME STATES...

Use & Care Guide
Page 22
...-541-6390 or write to receive this quality service. Proof of purchase will be returned prepaid and insured. Box numbers, please.) When you receive your replacement Food Processor, use the carton and packing materials to : Customer eXperience Centre KitchenAid Canada 200 - 6750 Century Ave. Hassle-Free Replacement Warranty - Please follow these instructions to : Customer eXperience Center, KitchenAid Small Appliances, P.O. In the carton include your name...
...-541-6390 or write to receive this quality service. Proof of purchase will be returned prepaid and insured. Box numbers, please.) When you receive your replacement Food Processor, use the carton and packing materials to : Customer eXperience Centre KitchenAid Canada 200 - 6750 Century Ave. Hassle-Free Replacement Warranty - Please follow these instructions to : Customer eXperience Center, KitchenAid Small Appliances, P.O. In the carton include your name...


