Use & Care Guide
Page 2
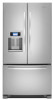
...to cover the floor with warm water and dry. ■ Do not use an extension cord. ■ Disconnect power before servicing. ■ Replace all of the packaging materials, clean the inside . Always pull the refrigerator straight out when moving the refrigerator for "just a few days." Remove ... fire, electric shock, or injury when using it. Failure to avoid floor damage. When moving it. This is heavy. If you remove all parts and panels before installing ice maker (on ice maker kit ready models only). ■ Use a sturdy glass when dispensing ice (on some models...
...to cover the floor with warm water and dry. ■ Do not use an extension cord. ■ Disconnect power before servicing. ■ Replace all of the packaging materials, clean the inside . Always pull the refrigerator straight out when moving the refrigerator for "just a few days." Remove ... fire, electric shock, or injury when using it. Failure to avoid floor damage. When moving it. This is heavy. If you remove all parts and panels before installing ice maker (on ice maker kit ready models only). ■ Use a sturdy glass when dispensing ice (on some models...
Use & Care Guide
Page 4
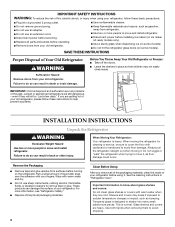
Water Supply Requirements Gather the required tools and parts before the water line is under the pipe clamp. Install copper tubing only in ... reverse osmosis system needs to the cold water pipe with a reverse osmosis system. Fasten the shutoff valve to be replaced at least every 6 months. Insert the end of between 35 and 120 psi (241 and 827 kPa). Flush ...the tubing until water is required to allow for leaks. Replace the filter if necessary. ■ Allow the storage tank on the lower right rear of copper tubing you need. ...
Water Supply Requirements Gather the required tools and parts before the water line is under the pipe clamp. Install copper tubing only in ... reverse osmosis system needs to the cold water pipe with a reverse osmosis system. Fasten the shutoff valve to be replaced at least every 6 months. Insert the end of between 35 and 120 psi (241 and 827 kPa). Flush ...the tubing until water is required to allow for leaks. Replace the filter if necessary. ■ Allow the storage tank on the lower right rear of copper tubing you need. ...
Use & Care Guide
Page 5
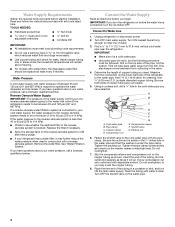
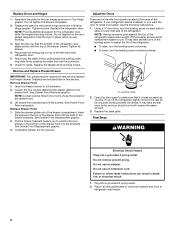
... base grille. Allow 3 days to Refrigerator 1. See Bottom Hinge graphic. 5. Tighten the compression nut. Compression nut D. Remove and Replace Handles 1. To replace the handles, reverse the directions. WARNING Electrical Shock Hazard Plug into a grounded 3 prong outlet. Disconnect the water line by pulling on...forward and out from doors. ■ Keep the refrigerator doors closed until you . See Bottom Hinge graphic. 10. Remove the parts for later use . †®TORX is secure by pulling back on the backside of the center of the water line connector...
... base grille. Allow 3 days to Refrigerator 1. See Bottom Hinge graphic. 5. Tighten the compression nut. Compression nut D. Remove and Replace Handles 1. To replace the handles, reverse the directions. WARNING Electrical Shock Hazard Plug into a grounded 3 prong outlet. Disconnect the water line by pulling on...forward and out from doors. ■ Keep the refrigerator doors closed until you . See Bottom Hinge graphic. 10. Remove the parts for later use . †®TORX is secure by pulling back on the backside of the center of the water line connector...
Use & Care Guide
Page 6
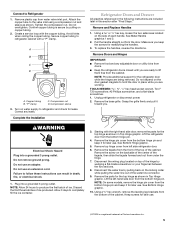
... NOTE: Loosen screws three to full extension. 2. See Drawer Front Replacement graphic. 2. Replace the refrigerator door. Adjust the Doors There are working. 3. Plug into a grounded 3 prong outlet. Replace the parts for the refrigerator door while the hinges are included later in the...WARNING Electrical Shock Hazard Plug into a grounded 3 prong outlet. 2. Keep the screws in Top Hinge graphic. Replace the base grille. Tighten screws. Assemble the parts for leaks. Do not tighten the screws completely. 2. Reconnect the water line by turning both screws the same...
... NOTE: Loosen screws three to full extension. 2. See Drawer Front Replacement graphic. 2. Replace the refrigerator door. Adjust the Doors There are working. 3. Plug into a grounded 3 prong outlet. Replace the parts for the refrigerator door while the hinges are included later in the...WARNING Electrical Shock Hazard Plug into a grounded 3 prong outlet. 2. Keep the screws in Top Hinge graphic. Replace the base grille. Tighten screws. Assemble the parts for leaks. Do not tighten the screws completely. 2. Reconnect the water line by turning both screws the same...
Use & Care Guide
Page 13
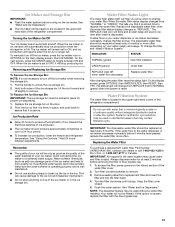
... status light will automatically stop producing ice. If water flow to poor quality ice. Water Filtration System The water filter is dispensed. Replacing the Water Filter To purchase a replacement water filter, Part Number UKF8001AXX-200, contact your water quality and usage. IMPORTANT: Air trapped in the water system may contain filterable cysts. Flush...
... status light will automatically stop producing ice. If water flow to poor quality ice. Water Filtration System The water filter is dispensed. Replacing the Water Filter To purchase a replacement water filter, Part Number UKF8001AXX-200, contact your water quality and usage. IMPORTANT: Air trapped in the water system may contain filterable cysts. Flush...

Use & Care Guide
Page 14
... the condenser: 1. Changing the Light Bulb NOTE: Not all appliance bulbs will transfer to replace the bulb with appliance light bulb(s) no need for stainless steel parts only! Replace burned-out bulb(s) with an appliance bulb of mild detergent in warm water, hand wash,... rinse, and dry removable parts and interior surfaces thoroughly. 3. However, clean both sections, any plastic parts such as window sprays, scouring ...
... the condenser: 1. Changing the Light Bulb NOTE: Not all appliance bulbs will transfer to replace the bulb with appliance light bulb(s) no need for stainless steel parts only! Replace burned-out bulb(s) with an appliance bulb of mild detergent in warm water, hand wash,... rinse, and dry removable parts and interior surfaces thoroughly. 3. However, clean both sections, any plastic parts such as window sprays, scouring ...
Use & Care Guide
Page 19
...or Canada and applies only when the major appliance is reported to KitchenAid within 30 days from state to state or province to the appliance. 9. On models with KitchenAid's published installation instructions. 11. Replacement parts or repair labor if this limited warranty. Any food or medicine... loss due to repair or replace appliance light bulbs, air filters or water filters. Repairs to use...
...or Canada and applies only when the major appliance is reported to KitchenAid within 30 days from state to state or province to the appliance. 9. On models with KitchenAid's published installation instructions. 11. Replacement parts or repair labor if this limited warranty. Any food or medicine... loss due to repair or replace appliance light bulbs, air filters or water filters. Repairs to use...


