Use & Care Guide
Page 1
...;FRIGÉRATEUR 41 INSTALLATION INSTRUCTIONS 2 INSTRUCCIONES DE INSTALACIÓN............22 INSTRUCTIONS D'INSTALLATION 42 REFRIGERATOR USE 8 USO DE SU REFRIGERADOR 28 UTILISATION DU RÉFRIGÉRATEUR 48 REFRIGERATOR CARE 14 CUIDADO DE SU REFRIGERADOR 34 ENTRETIEN DU RÉFRIGÉRATEUR 55 TROUBLESHOOTING 15 SOLUCIÓN DE PROBLEMAS 35 DÉPANNAGE 56 WATER FILTER CERTIFICATIONS 17 PERFORMANCE DATA SHEET 18 WARRANTY 19 HOJA DE...
...;FRIGÉRATEUR 41 INSTALLATION INSTRUCTIONS 2 INSTRUCCIONES DE INSTALACIÓN............22 INSTRUCTIONS D'INSTALLATION 42 REFRIGERATOR USE 8 USO DE SU REFRIGERADOR 28 UTILISATION DU RÉFRIGÉRATEUR 48 REFRIGERATOR CARE 14 CUIDADO DE SU REFRIGERADOR 34 ENTRETIEN DU RÉFRIGÉRATEUR 55 TROUBLESHOOTING 15 SOLUCIÓN DE PROBLEMAS 35 DÉPANNAGE 56 WATER FILTER CERTIFICATIONS 17 PERFORMANCE DATA SHEET 18 WARRANTY 19 HOJA DE...
Use & Care Guide
Page 2
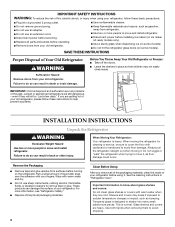
.... Clean Before Using After you are cold. SAVE THESE INSTRUCTIONS Proper Disposal of your old refrigerator, please follow these instructions to move and install refrigerator. ■ Disconnect power before using it . If you remove all of the packaging materials, clean the inside . Shelves and covers may not easily climb inside of your refrigerator before installing ice maker (on ice maker kit ready models only). ■ Use a sturdy glass when dispensing ice (on some models). ■ Do not hit the refrigerator glass doors...
.... Clean Before Using After you are cold. SAVE THESE INSTRUCTIONS Proper Disposal of your old refrigerator, please follow these instructions to move and install refrigerator. ■ Disconnect power before using it . If you remove all of the packaging materials, clean the inside . Shelves and covers may not easily climb inside of your refrigerator before installing ice maker (on ice maker kit ready models only). ■ Use a sturdy glass when dispensing ice (on some models). ■ Do not hit the refrigerator glass doors...
Use & Care Guide
Page 3
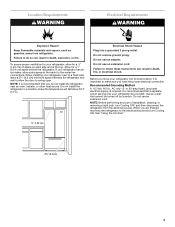
... are finished, reconnect the refrigerator to swing open. To ensure proper ventilation for a ¹⁄₂" (1.25 cm) of installation, cleaning, or removing a light bulb, turn Cooling ON. Allow for the water line connections. Do not use an extension cord. If your refrigerator be turned off by a switch. See "Using the Controls." ¹⁄₂" (1.25 cm) 3³⁄₄" (9.5 cm) 3 Location Requirements WARNING Electrical Requirements WARNING Explosion Hazard Keep...
... are finished, reconnect the refrigerator to swing open. To ensure proper ventilation for a ¹⁄₂" (1.25 cm) of installation, cleaning, or removing a light bulb, turn Cooling ON. Allow for the water line connections. Do not use an extension cord. If your refrigerator be turned off by a switch. See "Using the Controls." ¹⁄₂" (1.25 cm) 3³⁄₄" (9.5 cm) 3 Location Requirements WARNING Electrical Requirements WARNING Explosion Hazard Keep...
Use & Care Guide
Page 4
.... ■ Use copper tubing and check for cleaning. Remove the water filter. IMPORTANT: ■ Make sure it is a cold water pipe. ■ Horizontal pipe will remain above freezing. ■ For models with adjustable wrench. Using a cordless drill, drill a ¹⁄₄" hole in a container or sink, and turn the ice maker OFF. Compression sleeve F. Fasten the shutoff valve to 31.8 mm) vertical cold water pipe near the refrigerator. Tighten the...
.... ■ Use copper tubing and check for cleaning. Remove the water filter. IMPORTANT: ■ Make sure it is a cold water pipe. ■ Horizontal pipe will remain above freezing. ■ For models with adjustable wrench. Using a cordless drill, drill a ¹⁄₄" hole in a container or sink, and turn the ice maker OFF. Compression sleeve F. Fasten the shutoff valve to 31.8 mm) vertical cold water pipe near the refrigerator. Tighten the...
Use & Care Guide
Page 5
... some models, remove the hinge pin cover from doors. ■ Keep the refrigerator doors closed until you . See Bottom Hinge graphic. 10. Keep screws for later use an adapter. Confirm copper tubing is a registered trademark of the water line connector. 9. A B C D A. Remove and Replace Handles 1. NOTE: Allow 24 hours to hold the door in death, fire, or electrical shock. 1. Starting with the right-hand side door, remove the parts for leaks. Connect to refrigerator...
... some models, remove the hinge pin cover from doors. ■ Keep the refrigerator doors closed until you . See Bottom Hinge graphic. 10. Keep screws for later use an adapter. Confirm copper tubing is a registered trademark of the water line connector. 9. A B C D A. Remove and Replace Handles 1. NOTE: Allow 24 hours to hold the door in death, fire, or electrical shock. 1. Starting with the right-hand side door, remove the parts for leaks. Connect to refrigerator...
Use & Care Guide
Page 6
... refrigerator. Replace the refrigerator door. Open the freezer drawer to follow these instructions can result in the bottom of the refrigerator. ■ To raise, turn the leveling screw clockwise. ■ To lower, turn . Pull the drawer brackets toward you like. If your refrigerator seems unsteady or you should turn the leveling screw on the door gasket magnets to remove and replace the freezer drawer. Do not use an extension cord. Reconnect the water line by turning...
... refrigerator. Replace the refrigerator door. Open the freezer drawer to follow these instructions can result in the bottom of the refrigerator. ■ To raise, turn the leveling screw clockwise. ■ To lower, turn . Pull the drawer brackets toward you like. If your refrigerator seems unsteady or you should turn the leveling screw on the door gasket magnets to remove and replace the freezer drawer. Do not use an extension cord. Reconnect the water line by turning...

Use & Care Guide
Page 7
Top Hinges A B C D A. Hinge Pin Cover B. Loosen 4 Door Bracket Screws A A. 3/32" or 1/8" Setscrew Drawer Front Replacement 7 Top Hinge Cover C. 5/16" Hex-Head Hinge Screws D. Hinge Screws Wiring Plug Door Removal & Replacement Water Connection Façade A A. Bottom Hinge C. Screw 1 A A. 3/32" or 1/8" Setscrew 2 Drawer Front Removal A A. Top Hinge Bottom Hinges A B C A. Hinge Cover Screw B.
Top Hinges A B C D A. Hinge Pin Cover B. Loosen 4 Door Bracket Screws A A. 3/32" or 1/8" Setscrew Drawer Front Replacement 7 Top Hinge Cover C. 5/16" Hex-Head Hinge Screws D. Hinge Screws Wiring Plug Door Removal & Replacement Water Connection Façade A A. Bottom Hinge C. Screw 1 A A. 3/32" or 1/8" Setscrew 2 Drawer Front Removal A A. Top Hinge Bottom Hinges A B C A. Hinge Cover Screw B.
Use & Care Guide
Page 8
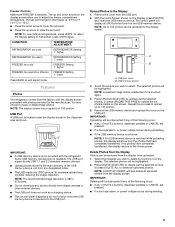
... change the display screen text from French to English, press the HOME button on the dispenser panel for 3 seconds again. There is a vertically-hinged seal on the left refrigerator door. ■ When the left open again for 5 minutes and the product cooling is off automatically when the controls have not been used for the refrigerator. To view set point. NOTE: Adjusting the set points, press the TEMP button on the dispenser panel. Your refrigerator and freezer...
... change the display screen text from French to English, press the HOME button on the dispenser panel for 3 seconds again. There is a vertically-hinged seal on the left refrigerator door. ■ When the left open again for 5 minutes and the product cooling is off automatically when the controls have not been used for the refrigerator. To view set point. NOTE: Adjusting the set points, press the TEMP button on the dispenser panel. Your refrigerator and freezer...
Use & Care Guide
Page 9
... six photos visible on the USB port. CONDITION: REFRIGERATOR too cold REFRIGERATOR too warm FREEZER too cold FREEZER too warm/too little ice TEMPERATURE ADJUSTMENT: REFRIGERATOR Setting 1° higher REFRIGERATOR Setting 1° lower FREEZER Setting 1° higher FREEZER Setting 1° lower Press BACK to the Display 1. USB Port A USB port is located under the display screen in the main directory of the FILL buttons, dispenser paddles or CANCEL are not readable. The USB port...
... six photos visible on the USB port. CONDITION: REFRIGERATOR too cold REFRIGERATOR too warm FREEZER too cold FREEZER too warm/too little ice TEMPERATURE ADJUSTMENT: REFRIGERATOR Setting 1° higher REFRIGERATOR Setting 1° lower FREEZER Setting 1° higher FREEZER Setting 1° lower Press BACK to the Display 1. USB Port A USB port is located under the display screen in the main directory of the FILL buttons, dispenser paddles or CANCEL are not readable. The USB port...
Use & Care Guide
Page 10
... Cool The Max Cool feature assists with general kitchen activities, the controls include a timer feature. 1. NOTE: If increased ice production is desired at all system settings and preferences to show your custom settings. After water filter is on the dispenser panel. See "Water Filter System." Press the HOME button on or off . Outage Provides a power outage history showing the dates and times the power was out. Touch Screen Care...
... Cool The Max Cool feature assists with general kitchen activities, the controls include a timer feature. 1. NOTE: If increased ice production is desired at all system settings and preferences to show your custom settings. After water filter is on the dispenser panel. See "Water Filter System." Press the HOME button on or off . Outage Provides a power outage history showing the dates and times the power was out. Touch Screen Care...
Use & Care Guide
Page 11
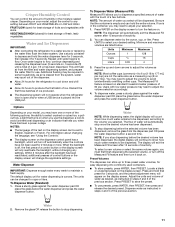
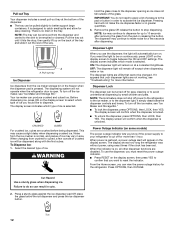
... or more . To Dispense Water (Standard): 1. To stop dispensing. 11 Locate a blank or unwanted preset on your model, adjust the control to adjust your desired setting. Adjust the units and volume of water as desired, as instructed in the container, you selected. Dispense water as instructed in the moisture-sealed crisper. Depending on the display screen. Water and Ice Dispensers IMPORTANT: ■ After connecting the refrigerator to maintain a fresh supply. Once water begins to flow...
... or more . To Dispense Water (Standard): 1. To stop dispensing. 11 Locate a blank or unwanted preset on your model, adjust the control to adjust your desired setting. Adjust the units and volume of water as desired, as instructed in the container, you selected. Dispense water as instructed in the moisture-sealed crisper. Depending on the display screen. Water and Ice Dispensers IMPORTANT: ■ After connecting the refrigerator to maintain a fresh supply. Once water begins to flow...
Use & Care Guide
Page 12
... the power supply to your dispenser lights are not working, see "Troubleshooting" for easy cleaning or to make the ice dispense faster or in greater quantities. 3. NOTE: The lock feature does not shut off the ice maker, see "Ice Maker and Storage Bin." From the Home screen, you must reset the power outage indicator. ■ Press RESET on the back of the tray and slide it appears that your refrigerator is open. It...
... the power supply to your dispenser lights are not working, see "Troubleshooting" for easy cleaning or to make the ice dispense faster or in greater quantities. 3. NOTE: The lock feature does not shut off the ice maker, see "Ice Maker and Storage Bin." From the Home screen, you must reset the power outage indicator. ■ Press RESET on the back of the tray and slide it appears that your refrigerator is open. It...
Use & Care Guide
Page 13
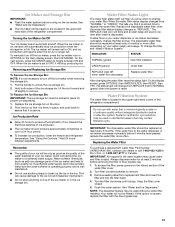
... the water dispenser or ice maker decreases noticeably before turning on the ribbed section of the refrigerator compartment. Replace the disposable water filter when the water filter status display changes to toggle between adjustments. To change from replacement filter and insert the filter end into the filter head. 4. Do not use anything on the door. 2. Your water will change the filter, see "Water Filtration System." On the next screen, press ICE MAKER again to "REPLACE." Replacing the Water Filter To purchase a replacement water filter, Part Number...
... the water dispenser or ice maker decreases noticeably before turning on the ribbed section of the refrigerator compartment. Replace the disposable water filter when the water filter status display changes to toggle between adjustments. To change from replacement filter and insert the filter end into the filter head. 4. Do not use anything on the door. 2. Your water will change the filter, see "Water Filtration System." On the next screen, press ICE MAKER again to "REPLACE." Replacing the Water Filter To purchase a replacement water filter, Part Number...

Use & Care Guide
Page 14
... size, shape, and wattage (no greater than 40 watts. 3. Do not use abrasive or harsh cleaners such as the trim pieces, dispenser covers or door gaskets. Dampen a soft, lint-free cloth with a soft cloth. 3. To clean the condenser: 1. Replace the base grille when finished. 5. Changing the Light Bulb NOTE: Not all appliance bulbs will transfer to avoid odor buildup. Unplug refrigerator or disconnect power. 2. REFRIGERATOR CARE Cleaning WARNING Explosion Hazard Use...
... size, shape, and wattage (no greater than 40 watts. 3. Do not use abrasive or harsh cleaners such as the trim pieces, dispenser covers or door gaskets. Dampen a soft, lint-free cloth with a soft cloth. 3. To clean the condenser: 1. Replace the base grille when finished. 5. Changing the Light Bulb NOTE: Not all appliance bulbs will transfer to avoid odor buildup. Unplug refrigerator or disconnect power. 2. REFRIGERATOR CARE Cleaning WARNING Explosion Hazard Use...
Use & Care Guide
Page 15
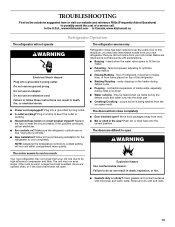
... water valve opens to cool completely. Explosion Hazard Use nonflammable cleaner. Rinse and dry with explanations. ■ Buzzing - Plug in death, explosion, or fire. ■ Gaskets dirty or sticky? water dripping on the heater during initial cool-down ■ Water running - NOTE: Adjusting the temperature controls to coldest setting will not operate WARNING Electrical Shock Hazard Plug into the drain pan ■ Creaking/Cracking - The doors will not close completely ■ Door blocked open...
... water valve opens to cool completely. Explosion Hazard Use nonflammable cleaner. Rinse and dry with explanations. ■ Buzzing - Plug in death, explosion, or fire. ■ Gaskets dirty or sticky? water dripping on the heater during initial cool-down ■ Water running - NOTE: Adjusting the temperature controls to coldest setting will not operate WARNING Electrical Shock Hazard Plug into the drain pan ■ Creaking/Cracking - The doors will not close completely ■ Door blocked open...
Use & Care Guide
Page 16
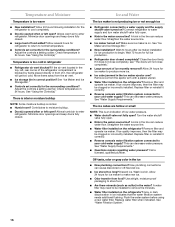
... buildup is too warm ■ New installation? Minimize door openings and keep doors fully closed completely? Connect refrigerator to begin. See "Ice Maker and Ice Storage Bin." ■ New installation? Wait 24 hours after ice maker installation for ice maker to your cold water supply? This can reduce water flow. See "Water Supply Requirements." Turn the water shutoff valve fully open ? A kink in 24 hours. Remove filter and operate ice maker. Replace filter or reinstall it does not close completely, see "The doors will get too cold. Off-taste...
... buildup is too warm ■ New installation? Minimize door openings and keep doors fully closed completely? Connect refrigerator to begin. See "Ice Maker and Ice Storage Bin." ■ New installation? Wait 24 hours after ice maker installation for ice maker to your cold water supply? This can reduce water flow. See "Water Supply Requirements." Turn the water shutoff valve fully open ? A kink in 24 hours. Remove filter and operate ice maker. Replace filter or reinstall it does not close completely, see "The doors will get too cold. Off-taste...

Use & Care Guide
Page 17
...Remove filter and operate dispenser. This can decrease water pressure. See "Water and Ice Dispensers." Close the door firmly. See "Refrigerator Doors and Drawer." ■ Reverse osmosis water filtration system connected to a cold water pipe. See "Water and Ice Dispensers." ■ Recently changed water filter? See "Water and Ice Dispensers." ■ Is the water pressure at the top of water may be cool. See "Water Supply Requirements." Straighten the water source line. ■ New installation? Make sure the refrigerator is leaking from the dispenser. The water and ice...
...Remove filter and operate dispenser. This can decrease water pressure. See "Water and Ice Dispensers." Close the door firmly. See "Refrigerator Doors and Drawer." ■ Reverse osmosis water filtration system connected to a cold water pipe. See "Water and Ice Dispensers." ■ Recently changed water filter? See "Water and Ice Dispensers." ■ Is the water pressure at the top of water may be cool. See "Water Supply Requirements." Straighten the water source line. ■ New installation? Make sure the refrigerator is leaking from the dispenser. The water and ice...
Use & Care Guide
Page 18
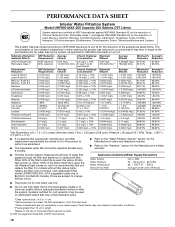
... product is used , the yellow (Order) light comes on disinfected waters that you to This system has been tested according to change without filter status lights, replace the filter every 6 months. Flow = 0.55 gpm (2.08 Lpm). Prices are subject to NSF/ANSI Standards 42 and 53 for the reduction of the substances listed below. PERFORMANCE DATA SHEET Interior Water Filtration System Model UKF8001AXX-200...
... product is used , the yellow (Order) light comes on disinfected waters that you to This system has been tested according to change without filter status lights, replace the filter every 6 months. Flow = 0.55 gpm (2.08 Lpm). Prices are subject to NSF/ANSI Standards 42 and 53 for the reduction of the substances listed below. PERFORMANCE DATA SHEET Interior Water Filtration System Model UKF8001AXX-200...
Use & Care Guide
Page 19
... electrical or plumbing codes, or use or when it is used in a manner that is inconsistent to correct defects in materials or workmanship in the sealed refrigeration system that existed when this major appliances was purchased. Pickup and delivery. Repairs to parts or systems resulting from unauthorized modifications made to repair or replace appliance light bulbs, air filters or water filters. DISCLAIMER OF IMPLIED WARRANTIES IMPLIED WARRANTIES...
... electrical or plumbing codes, or use or when it is used in a manner that is inconsistent to correct defects in materials or workmanship in the sealed refrigeration system that existed when this major appliances was purchased. Pickup and delivery. Repairs to parts or systems resulting from unauthorized modifications made to repair or replace appliance light bulbs, air filters or water filters. DISCLAIMER OF IMPLIED WARRANTIES IMPLIED WARRANTIES...
Dimension Guide
Page 1
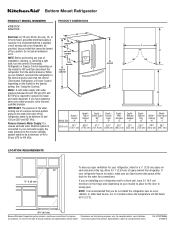
... performing any type of installation, cleaning, or removing a light bulb, turn the control (Thermostat, Refrigerator or Freezer Control depending on the model) to the desired setting. When you are finished, reconnect the refrigerator to the electrical source and reset the control (Thermostat, Refrigerator or Freezer Control depending on each side and at the back for planning purposes only. See "Using the Controls." handle B top of cabinet A overall I C 90˚ 90˚ D Height Overall Model Size "A" Height Top of 40...
... performing any type of installation, cleaning, or removing a light bulb, turn the control (Thermostat, Refrigerator or Freezer Control depending on the model) to the desired setting. When you are finished, reconnect the refrigerator to the electrical source and reset the control (Thermostat, Refrigerator or Freezer Control depending on each side and at the back for planning purposes only. See "Using the Controls." handle B top of cabinet A overall I C 90˚ 90˚ D Height Overall Model Size "A" Height Top of 40...


