Use & Care Guide
Page 3
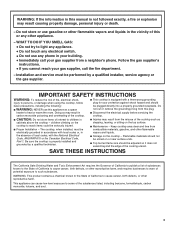
.... children climbing on or near surface units. ■ Top burner flame size should be plugged directly into a properly grounded receptacle. Be sure the cooktop is properly installed and grounded by a qualified installer, service agency or the gas supplier. Installation and service must be electrically grounded in accordance with local codes or, in the absence of local codes, with a three-prong grounding plug for your protection against shock...
.... children climbing on or near surface units. ■ Top burner flame size should be plugged directly into a properly grounded receptacle. Be sure the cooktop is properly installed and grounded by a qualified installer, service agency or the gas supplier. Installation and service must be electrically grounded in accordance with local codes or, in the absence of local codes, with a three-prong grounding plug for your protection against shock...
Use & Care Guide
Page 5
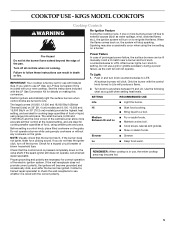
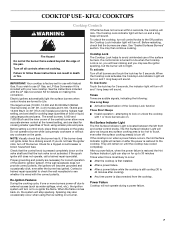
... circuit breaker or blown household fuse. Check for a clicking sound. If the spark igniter still does not operate, call a trained repair specialist. Contact a trained repair specialist to check the wall receptacle to use with Natural Gas. All surface burners will become hot. 5 Use the following chart as the vent fan will stop sparking. Medium Between Hi and Lo ■ Fry or sauté foods. ■ Maintain a slow boil. ■ Cook...
... circuit breaker or blown household fuse. Check for a clicking sound. If the spark igniter still does not operate, call a trained repair specialist. Contact a trained repair specialist to check the wall receptacle to use with Natural Gas. All surface burners will become hot. 5 Use the following chart as the vent fan will stop sparking. Medium Between Hi and Lo ■ Fry or sauté foods. ■ Maintain a slow boil. ■ Cook...
Use & Care Guide
Page 6
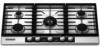
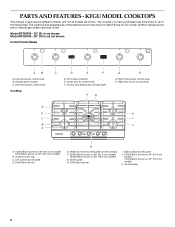
... Natural gas unless otherwise noted. Left rear burner control knob B. Right front burner control knob H. Surface burner cap C. Model and serial number plate (under cooktop) F. 20,000 Btu/h burner on 36" (91.4 cm) models 15,000 Btu/h burner on 30" (76.2 cm) models K. Right surface burner grate J. 10,000 Btu/h burner on 36" (91.4 cm) models 12,000 Btu/h burner on 30" (76.2 cm) models G. Model KFGU766 - 36" (91.4 cm) shown Model KFGU706 - 30" (76.2 cm) not shown Control Panel (Glass) AB A. Control lock keypad and indicator light...
... Natural gas unless otherwise noted. Left rear burner control knob B. Right front burner control knob H. Surface burner cap C. Model and serial number plate (under cooktop) F. 20,000 Btu/h burner on 36" (91.4 cm) models 15,000 Btu/h burner on 30" (76.2 cm) models K. Right surface burner grate J. 10,000 Btu/h burner on 36" (91.4 cm) models 12,000 Btu/h burner on 30" (76.2 cm) models G. Model KFGU766 - 36" (91.4 cm) shown Model KFGU706 - 30" (76.2 cm) not shown Control Panel (Glass) AB A. Control lock keypad and indicator light...
Use & Care Guide
Page 7
... these instructions can stay on a burner. Electric igniters automatically light the surface burners when control knobs are turned to see the igniter sparking, but the burner will sound. Do not operate a burner while using the low setting on for correct operation of food, using large pots and pans. When the Cooktop Lock activates. Failure to 30 minutes Times when this conversion. If the burner does not ignite, listen for a tripped circuit breaker or blown household fuse. COOKTOP USE...
... these instructions can stay on a burner. Electric igniters automatically light the surface burners when control knobs are turned to see the igniter sparking, but the burner will sound. Do not operate a burner while using the low setting on for correct operation of food, using large pots and pans. When the Cooktop Lock activates. Failure to 30 minutes Times when this conversion. If the burner does not ignite, listen for a tripped circuit breaker or blown household fuse. COOKTOP USE...

Use & Care Guide
Page 8
...) B. Burner ports Burner ports: Check burner flames occasionally for the burner to LITE. If the burner needs to a boil. Trim ring Standard Burner A. Replace the burner cap, making sure that it is in use, the entire cooktop area may become hot. REMEMBER: When cooktop is properly aligned and centered with the burner base. Keep this area free of the gas tube by always using a surface burner. To Clean: IMPORTANT: Before cleaning, make sure all controls are...
...) B. Burner ports Burner ports: Check burner flames occasionally for the burner to LITE. If the burner needs to a boil. Trim ring Standard Burner A. Replace the burner cap, making sure that it is in use, the entire cooktop area may become hot. REMEMBER: When cooktop is properly aligned and centered with the burner base. Keep this area free of the gas tube by always using a surface burner. To Clean: IMPORTANT: Before cleaning, make sure all controls are...

Use & Care Guide
Page 9
... ■ Heats very quickly and evenly. Gently clean igniter, including over and under the edge of cooking. ■ Medium or heavy thickness is different to medium heat settings. Stainless steel ■ Heats quickly, but unevenly. ■ Ideal results on a hot surface cooking area, element or surface burner. Reassemble center burner. B Home Canning When canning for cookware material characteristics. Replace the inner burner cap NOTE: The brass parts of the cooktop. Surface Grates Surface Grates Position burner grate feet in...
... ■ Heats very quickly and evenly. Gently clean igniter, including over and under the edge of cooking. ■ Medium or heavy thickness is different to medium heat settings. Stainless steel ■ Heats quickly, but unevenly. ■ Ideal results on a hot surface cooking area, element or surface burner. Reassemble center burner. B Home Canning When canning for cookware material characteristics. Replace the inner burner cap NOTE: The brass parts of the cooktop. Surface Grates Surface Grates Position burner grate feet in...
Use & Care Guide
Page 10
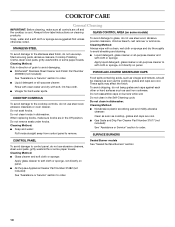
... cool. ■ Gas Grate and Drip Pan Cleaner Part Number 31617 (not included): See "Assistance or Service" section to the cooktop controls, do not use steel wool, abrasive powder cleansers, chlorine bleach, rust remover or ammonia. Cleaning Method: Rub in dishwasher. COOKTOP CONTROLS To avoid damage to order. Pull knobs straight away from control panel to the stainless steel finish, do not use steel wool, abrasive cleansers or oven cleaner. SURFACE BURNERS CONTROL PANEL To avoid...
... cool. ■ Gas Grate and Drip Pan Cleaner Part Number 31617 (not included): See "Assistance or Service" section to the cooktop controls, do not use steel wool, abrasive powder cleansers, chlorine bleach, rust remover or ammonia. Cleaning Method: Rub in dishwasher. COOKTOP CONTROLS To avoid damage to order. Pull knobs straight away from control panel to the stainless steel finish, do not use steel wool, abrasive cleansers or oven cleaner. SURFACE BURNERS CONTROL PANEL To avoid...
Use & Care Guide
Page 11
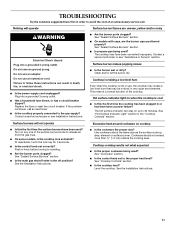
..., or has a circuit breaker tripped? See "Sealed Surface Burners" section. ■ Is the main gas shutoff valve in knob before turning to a setting. ■ Are the burner ports clogged? Replace the fuse or reset the circuit breaker. Clean and/or let the burner dry. Excessive heat around cookware on up to 30 minutes. Failure to follow these instructions can stay on cooktop ■ Is the cookware the proper size? Contact a service technician or...
..., or has a circuit breaker tripped? See "Sealed Surface Burners" section. ■ Is the main gas shutoff valve in knob before turning to a setting. ■ Are the burner ports clogged? Replace the fuse or reset the circuit breaker. Clean and/or let the burner dry. Excessive heat around cookware on up to 30 minutes. Failure to follow these instructions can stay on cooktop ■ Is the cookware the proper size? Contact a service technician or...
Use & Care Guide
Page 12
... was purchased. Stainless Steel Wipes (stainless steel models) Order Part Number 8212510 Gas Grate/Drip Pan Cleaner Order Part Number 31617 ■ Installation information. ■ Use and maintenance procedures. For further assistance If you need further assistance, you can write to KitchenAid Canada with any questions or concerns at 1-800-442-9991 and follow the instructions below. In Canada Call the KitchenAid Canada Customer Interaction Centre toll free: 1-800-807-6777. Service must be...
... was purchased. Stainless Steel Wipes (stainless steel models) Order Part Number 8212510 Gas Grate/Drip Pan Cleaner Order Part Number 31617 ■ Installation information. ■ Use and maintenance procedures. For further assistance If you need further assistance, you can write to KitchenAid Canada with any questions or concerns at 1-800-442-9991 and follow the instructions below. In Canada Call the KitchenAid Canada Customer Interaction Centre toll free: 1-800-807-6777. Service must be...

Use & Care Guide
Page 13
...: ■ Electric element ■ Gas burners ■ Solid state touch control system parts ■ Any cracking of the rubber seal between the ceramic glass cooktop and porcelain edge ■ Any cracking due to thermal shock of the ceramic glass cooktop ■ Surface unit elements ITEMS EXCLUDED FROM WARRANTY This limited warranty does not cover: 1. Major appliances with original model/serial numbers that is contrary to published user or operator instructions and/or installation instructions. 4. Service calls...
...: ■ Electric element ■ Gas burners ■ Solid state touch control system parts ■ Any cracking of the rubber seal between the ceramic glass cooktop and porcelain edge ■ Any cracking due to thermal shock of the ceramic glass cooktop ■ Surface unit elements ITEMS EXCLUDED FROM WARRANTY This limited warranty does not cover: 1. Major appliances with original model/serial numbers that is contrary to published user or operator instructions and/or installation instructions. 4. Service calls...
Dimension Guide
Page 1
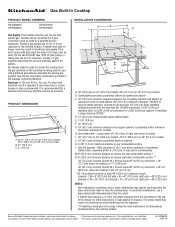
... installing a hood above the cooktop surface. Grounded outlet - Ref. 8286867B 06-25-08 With LP gas, piping or tubing size can be converted to the cooktop location. Cabinet floor: anywhere within minimum horizontal clearances to improve Dimensions are for dimensional clearances above the range, follow the hood instructions for planning purposes only. Do not use TEFLON® tape. ® Gas Built-in Cooktop PRODUCT MODEL NUMBERS KFGS306V KFGS366V KFGU706V KFGU766V Gas Supply: This cooktop is factory set...
... installing a hood above the cooktop surface. Grounded outlet - Ref. 8286867B 06-25-08 With LP gas, piping or tubing size can be converted to the cooktop location. Cabinet floor: anywhere within minimum horizontal clearances to improve Dimensions are for dimensional clearances above the range, follow the hood instructions for planning purposes only. Do not use TEFLON® tape. ® Gas Built-in Cooktop PRODUCT MODEL NUMBERS KFGS306V KFGS366V KFGU706V KFGU766V Gas Supply: This cooktop is factory set...

Installation Guide
Page 1
... not followed. INSTALLATION INSTRUCTIONS 30" (76.2 CM) AND 36" (91.4 CM) GAS BUILT-IN COOKTOP INSTRUCTIONS D'INSTALLATION DE LA TABLE DE CUISSON À GAZ ENCASTRÉE DE 30" (76,2 CM) ET 36" (91,4 CM) Table of Contents/Table des matières COOKTOP SAFETY 1 SÉCURITÉ DE LA TABLE DE CUISSON 10 INSTALLATION REQUIREMENTS 2 Tools and Parts 2 Location Requirements 3 Electrical Requirements 4 Gas Supply Requirements 4 EXIGENCES D'INSTALLATION 11 Outillage et...
... not followed. INSTALLATION INSTRUCTIONS 30" (76.2 CM) AND 36" (91.4 CM) GAS BUILT-IN COOKTOP INSTRUCTIONS D'INSTALLATION DE LA TABLE DE CUISSON À GAZ ENCASTRÉE DE 30" (76,2 CM) ET 36" (91,4 CM) Table of Contents/Table des matières COOKTOP SAFETY 1 SÉCURITÉ DE LA TABLE DE CUISSON 10 INSTALLATION REQUIREMENTS 2 Tools and Parts 2 Location Requirements 3 Electrical Requirements 4 Gas Supply Requirements 4 EXIGENCES D'INSTALLATION 11 Outillage et...

Installation Guide
Page 2
... following installation instructions apply: ■ Installations and repairs must be performed by a qualified or licensed contractor, plumber, or gasfitter qualified or licensed by smell. Tools needed Parts supplied ■ Gas pressure regulator ■ Tape measure ■ Wrench or pliers ■ Burner grates ■ Flat-blade screwdriver ■ Needle-nose pliers ■ Burner caps 0 [2 mm]) flat blade ■ Marker or pencil screwdriver (screwdriver shaft must be a minimum...
... following installation instructions apply: ■ Installations and repairs must be performed by a qualified or licensed contractor, plumber, or gasfitter qualified or licensed by smell. Tools needed Parts supplied ■ Gas pressure regulator ■ Tape measure ■ Wrench or pliers ■ Burner grates ■ Flat-blade screwdriver ■ Needle-nose pliers ■ Burner caps 0 [2 mm]) flat blade ■ Marker or pencil screwdriver (screwdriver shaft must be a minimum...

Installation Guide
Page 3
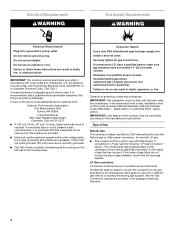
...] stainless steel, or 0.024" [0.06 cm] aluminum or 0.020" [0.05 cm] copper). If cabinet has a drawer, a 4" (10.2 cm) depth clearance from the countertop by not less than ¹⁄₄" [0.6 cm] flame retardant millboard covered with the regulator. *If installing a hood above the range, follow the hood instructions for gas inlet, power supply cord, and to allow the rating label to make sure that the materials used . Location Requirements IMPORTANT...
...] stainless steel, or 0.024" [0.06 cm] aluminum or 0.020" [0.05 cm] copper). If cabinet has a drawer, a 4" (10.2 cm) depth clearance from the countertop by not less than ¹⁄₄" [0.6 cm] flame retardant millboard covered with the regulator. *If installing a hood above the range, follow the hood instructions for gas inlet, power supply cord, and to allow the rating label to make sure that the materials used . Location Requirements IMPORTANT...
Installation Guide
Page 4
Install a shut-off valve. IMPORTANT: Leak testing of Gas Natural Gas: This cooktop is design-certified by a qualified service technician. Type of the cooktop must be done by CSA International for use with Natural gas or, after proper conversion, for use with Natural gas. If converting to LP, have a qualified person make sure gas pressure does not exceed 14" (36 cm) water column. LP Gas conversion: Conversion must conform with the National Electrical Code, ANSI/NFPA 70...
Install a shut-off valve. IMPORTANT: Leak testing of Gas Natural Gas: This cooktop is design-certified by a qualified service technician. Type of the cooktop must be done by CSA International for use with Natural gas or, after proper conversion, for use with Natural gas. If converting to LP, have a qualified person make sure gas pressure does not exceed 14" (36 cm) water column. LP Gas conversion: Conversion must conform with the National Electrical Code, ANSI/NFPA 70...
Installation Guide
Page 5
... pipe connection: The rigid pipe connection requires a combination of ³⁄₄" (1.9 cm) rigid pipe to the cooktop location. See separate LP gas conversion instructions sheet. Line pressure testing above ½ psi gauge (14" WCP) The cooktop and its individual manual shutoff valve during any pressure testing of E.I .D. A C A. A smaller size pipe on the model/serial rating plate are for each 1,000 ft (304.8 m) above 6,560 ft (1999.5 m) a high altitude kit is...
... pipe connection: The rigid pipe connection requires a combination of ³⁄₄" (1.9 cm) rigid pipe to the cooktop location. See separate LP gas conversion instructions sheet. Line pressure testing above ½ psi gauge (14" WCP) The cooktop and its individual manual shutoff valve during any pressure testing of E.I .D. A C A. A smaller size pipe on the model/serial rating plate are for each 1,000 ft (304.8 m) above 6,560 ft (1999.5 m) a high altitude kit is...
Installation Guide
Page 6
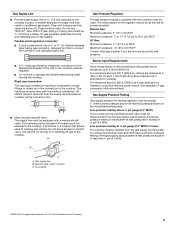
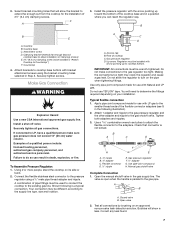
... the countertop. Loosen the screws and rotate the brackets so that the front edge of 2½" (6.4 cm) clamping screws. Installing Brackets After Placing Cooktop in Step 2. 5. Clamping brackets can be installed on a covered surface. 2. Attachment screw location (recommended) 2. Remove the attachment screws for the selected bracket locations from the cooktop for illustration of cooktop base bottom B. Remove the attachment screws for optional front and back location. Style 2: Cooktop over undercounter built...
... the countertop. Loosen the screws and rotate the brackets so that the front edge of 2½" (6.4 cm) clamping screws. Installing Brackets After Placing Cooktop in Step 2. 5. Clamping brackets can be installed on a covered surface. 2. Attachment screw location (recommended) 2. Remove the attachment screws for the selected bracket locations from the cooktop for illustration of cooktop base bottom B. Remove the attachment screws for optional front and back location. Style 2: Cooktop over undercounter built...
Installation Guide
Page 7
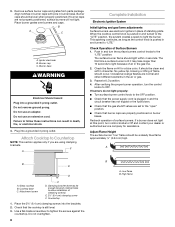
... sure gas pressure does not exceed 14" (36 cm) water column. Use a combination wrench and pliers to attach the flexible connector to the pressure regulator using the bracket mounting holes selected in the following is a typical connection. Open the manual shutoff valve in a position where you can result in "Attach Cooktop to turn on its side or back. 2. B B E A. Install a shut-off valve. Examples of cooktop C. Connect the flexible stainless steel connector...
... sure gas pressure does not exceed 14" (36 cm) water column. Use a combination wrench and pliers to attach the flexible connector to the pressure regulator using the bracket mounting holes selected in the following is a typical connection. Open the manual shutoff valve in a position where you can result in "Attach Cooktop to turn on its side or back. 2. B B E A. Install a shut-off valve. Examples of cooktop C. Connect the flexible stainless steel connector...
Installation Guide
Page 8
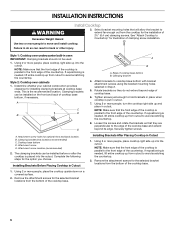
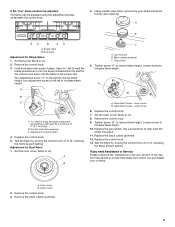
... valves are set to light because of flame should be level when properly positioned. Recheck operation of Surface Burners 1. Do not overtighten. 8 B A. Align notches in burner caps with pins in the gas line. 2. Burner base WARNING Electrical Shock Hazard Plug into the brackets. 2. Do not use an adapter. Cooktop base C. Igniter electrode B. No yellow tip, blowing or lifting of air in burner base. After verifying the proper burner operation, turn control knobs to "LITE." Countertop 1. Check the flame...
... valves are set to light because of flame should be level when properly positioned. Recheck operation of Surface Burners 1. Do not overtighten. 8 B A. Align notches in burner caps with pins in the gas line. 2. Burner base WARNING Electrical Shock Hazard Plug into the brackets. 2. Do not use an adapter. Cooktop base C. Igniter electrode B. No yellow tip, blowing or lifting of air in burner base. After verifying the proper burner operation, turn control knobs to "LITE." Countertop 1. Check the flame...
Installation Guide
Page 9
... control knob. 7. Replace the black rubber grommet. 12. Outer crown 2. Single valve B. Remove the control knob. 3. Adjustment screw location 4. Control knob B. Use a screwdriver to HI, checking the flame at each setting Adjustment for Single Valve: 1. Hold knob stem with a pair of 2" [5.1 cm] long) B. Replace the control knob. 5. Test the flame by turning the control from LO to increase flame height. Adjustment screw - Remove the control knob. 9. Test the flame by turning the control from whom you purchased your cooktop. If you need Assistance or Service...
... control knob. 7. Replace the black rubber grommet. 12. Outer crown 2. Single valve B. Remove the control knob. 3. Adjustment screw location 4. Control knob B. Use a screwdriver to HI, checking the flame at each setting Adjustment for Single Valve: 1. Hold knob stem with a pair of 2" [5.1 cm] long) B. Replace the control knob. 5. Test the flame by turning the control from LO to increase flame height. Adjustment screw - Remove the control knob. 9. Test the flame by turning the control from whom you purchased your cooktop. If you need Assistance or Service...


