Energy Guide
Page 1
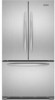
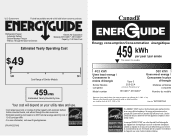
... freezer, and without through-the-door-ice service. · Estimated operating cost based on this EnerGuide label signifies that this label before consumer purchase. Canada Refrigerator-Freezer ·Automatic Defrost ·Bottom Mounted Freezer ·Without Through-the-Door-Ice Service Kitchen Aid Corporation Model(s):KFC*22EV**, KFC*22EX** Capacity: 21...
... freezer, and without through-the-door-ice service. · Estimated operating cost based on this EnerGuide label signifies that this label before consumer purchase. Canada Refrigerator-Freezer ·Automatic Defrost ·Bottom Mounted Freezer ·Without Through-the-Door-Ice Service Kitchen Aid Corporation Model(s):KFC*22EV**, KFC*22EX** Capacity: 21...
Use & Care Guide
Page 1
... you don't follow instructions. In Canada, visit our website at www.kitchenaid.ca or call us at www.kitchenaid.com for purchasing this manual and on the inside wall of others . Table of Contents / Índice / Table des matières REFRIGERATOR SAFETY 1 SEGURIDAD DEL REFRIGERADOR 16 SÉCURITÉ DU RÉFRIG...
... you don't follow instructions. In Canada, visit our website at www.kitchenaid.ca or call us at www.kitchenaid.com for purchasing this manual and on the inside wall of others . Table of Contents / Índice / Table des matières REFRIGERATOR SAFETY 1 SEGURIDAD DEL REFRIGERADOR 16 SÉCURITÉ DU RÉFRIG...
Use & Care Guide
Page 2
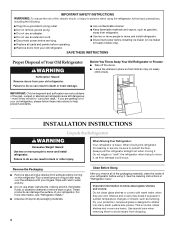
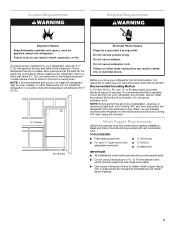
... so can result in death or brain damage. IMPORTANT: Child entrapment and suffocation are not problems of your refrigerator. even if they are getting rid of your old refrigerator, please follow basic precautions, including the following: ■ Plug into many small, pebble-size pieces. Failure... cord. ■ Disconnect power before servicing. ■ Replace all parts and panels before operating. ■ Remove doors from your old refrigerator. See the cleaning instructions in place so that children may break if exposed to remove tape or glue. This is heavy. IMPORTANT SAFETY ...
... so can result in death or brain damage. IMPORTANT: Child entrapment and suffocation are not problems of your refrigerator. even if they are getting rid of your old refrigerator, please follow basic precautions, including the following: ■ Plug into many small, pebble-size pieces. Failure... cord. ■ Disconnect power before servicing. ■ Replace all parts and panels before operating. ■ Remove doors from your old refrigerator. See the cleaning instructions in place so that children may break if exposed to remove tape or glue. This is heavy. IMPORTANT SAFETY ...
Use & Care Guide
Page 3
...to the electrical source and turn Cooling OFF, and then disconnect the refrigerator from refrigerator. Do not remove ground prong. Water Supply Requirements Gather the required tools and parts before starting installation. If your refrigerator has an ice maker, allow for a ¹⁄₂" ...Do not use an adapter. Install copper tubing only in death, explosion, or fire. When installing your refrigerator, allow extra space at the top and behind the refrigerator. Do not use an extension cord. TOOLS NEEDED: ■ Flat-blade screwdriver Nut driver and &#...
...to the electrical source and turn Cooling OFF, and then disconnect the refrigerator from refrigerator. Do not remove ground prong. Water Supply Requirements Gather the required tools and parts before starting installation. If your refrigerator has an ice maker, allow for a ¹⁄₂" ...Do not use an adapter. Install copper tubing only in death, explosion, or fire. When installing your refrigerator, allow extra space at the top and behind the refrigerator. Do not use an extension cord. TOOLS NEEDED: ■ Flat-blade screwdriver Nut driver and &#...
Use & Care Guide
Page 4
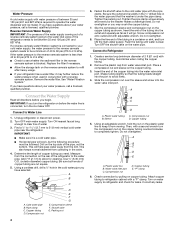
...followed: Drill on the copper tubing counterclockwise to the water inlet valve of water. 3. Connect to 31.8 mm) vertical cold water pipe near the refrigerator. Place a compression nut and sleeve on the water pipe. Do not overtighten. A B C D E A. Attach copper tubing to see whether ...side of the pipe, not the bottom. Remove the water filter. Turn ON nearest faucet long enough to clear line of the refrigerator needs to refrigerator and check for cleaning. Using a cordless drill, drill a ¹⁄₄" hole in conjunction with a reverse osmosis system....
...followed: Drill on the copper tubing counterclockwise to the water inlet valve of water. 3. Connect to 31.8 mm) vertical cold water pipe near the refrigerator. Place a compression nut and sleeve on the water pipe. Do not overtighten. A B C D E A. Attach copper tubing to see whether ...side of the pipe, not the bottom. Remove the water filter. Turn ON nearest faucet long enough to clear line of the refrigerator needs to refrigerator and check for cleaning. Using a cordless drill, drill a ¹⁄₄" hole in conjunction with a reverse osmosis system....
Use & Care Guide
Page 5
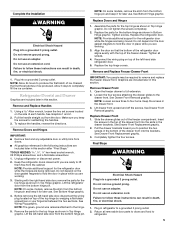
... to lift them free from doors. ■ All graphics referenced in the following instructions are ready to the hinge. 5. Replace the refrigerator door. Insert the screws in the bottom of the drawer front into a grounded 3 prong outlet. See Drawer Front Replacement graphic. 3.... Remove the parts for later use . Keep the refrigerator doors closed until you to follow these instructions can result in this section. Replace Drawer Front 1. Completely tighten the four screws. Do...
... to lift them free from doors. ■ All graphics referenced in the following instructions are ready to the hinge. 5. Replace the refrigerator door. Insert the screws in the bottom of the drawer front into a grounded 3 prong outlet. See Drawer Front Replacement graphic. 3.... Remove the parts for later use . Keep the refrigerator doors closed until you to follow these instructions can result in this section. Replace Drawer Front 1. Completely tighten the four screws. Do...
Use & Care Guide
Page 7
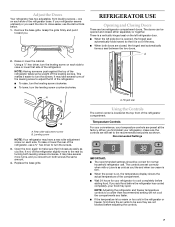
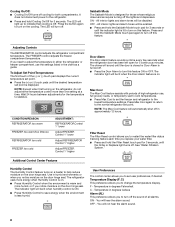
...side. Using a ¹⁄₄" hex driver, turn the screws. It may take several more to raise or lower that side of the refrigerator. ■ To raise, turn the leveling screw clockwise. ■ To lower, turn both doors are not blocked before adjusting the controls. 7...convenience, your food may have a rear roller adjustment screw on , the temperature display shows the actual temperature of the refrigerator, use the instructions below. 1. REFRIGERATOR USE Opening and Closing Doors There are still set to a colder than recommended setting will not cool the compartments any ...
...side. Using a ¹⁄₄" hex driver, turn the screws. It may take several more to raise or lower that side of the refrigerator. ■ To raise, turn the leveling screw clockwise. ■ To lower, turn both doors are not blocked before adjusting the controls. 7...convenience, your food may have a rear roller adjustment screw on , the temperature display shows the actual temperature of the refrigerator, use the instructions below. 1. REFRIGERATOR USE Opening and Closing Doors There are still set to a colder than recommended setting will not cool the compartments any ...
Use & Care Guide
Page 8
...Max Cool again to return to indicate that cooling is displayed. See "Water Filtration System." Use in degrees Fahrenheit C - The refrigerator uses more than one setting at a time. Temperature in humid environments or when you notice moisture on a heater to stabilize....LED will turn on . ■ Press Humidity Control when the environment is designed for 5 continuous minutes. Adjusting Controls The REFRIGERATOR control adjusts the refrigerator compartment temperature. ON - OFF - Temperature Display (F_C) This preference allows you need to change the temperature display. You ...
...Max Cool again to return to indicate that cooling is displayed. See "Water Filtration System." Use in degrees Fahrenheit C - The refrigerator uses more than one setting at a time. Temperature in humid environments or when you notice moisture on a heater to stabilize....LED will turn on . ■ Press Humidity Control when the environment is designed for 5 continuous minutes. Adjusting Controls The REFRIGERATOR control adjusts the refrigerator compartment temperature. ON - OFF - Temperature Display (F_C) This preference allows you need to change the temperature display. You ...
Use & Care Guide
Page 9
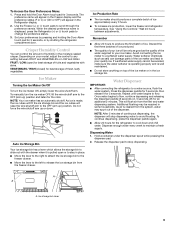
...the ice storage bin from the freezer drawer. Press the dispenser paddle for 5 seconds, then release it is pulled open ) for the refrigerator to stop dispensing water to poor quality ice. Additional flushing may spurt out of your ice maker. VEGETABLES / HIGH (closed) for 3... flush air from the system, water may be required in the moisture-sealed crisper. This will stop dispensing. As air is displayed, press the Refrigerator (+) or (-) touch pads to maintain a fresh supply. Dispense enough water every week to change the preference status. 3. A A A. When ...
...the ice storage bin from the freezer drawer. Press the dispenser paddle for 5 seconds, then release it is pulled open ) for the refrigerator to stop dispensing water to poor quality ice. Additional flushing may spurt out of your ice maker. VEGETABLES / HIGH (closed) for 3... flush air from the system, water may be required in the moisture-sealed crisper. This will stop dispensing. As air is displayed, press the Refrigerator (+) or (-) touch pads to maintain a fresh supply. Dispense enough water every week to change the preference status. 3. A A A. When ...
Use & Care Guide
Page 10
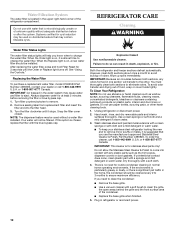
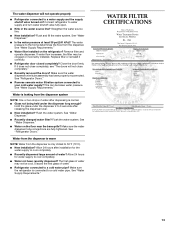
...the filter end into contact with any odors formed in death, explosion, or fire. Snap the filter cover closed. Both the refrigerator and freezer sections defrost automatically. IMPORTANT: Because air circulates between both sections, any plastic parts such as window sprays, scouring ...the upper right-hand corner of unknown quality without a water filter installed. IMPORTANT: Air trapped in warm water. Failure to eject. Unplug refrigerator or disconnect power. 2. Dry thoroughly with a sponge and mild detergent in the water system may be cleaned every 2 to 3 months...
...the filter end into contact with any odors formed in death, explosion, or fire. Snap the filter cover closed. Both the refrigerator and freezer sections defrost automatically. IMPORTANT: Because air circulates between both sections, any plastic parts such as window sprays, scouring ...the upper right-hand corner of unknown quality without a water filter installed. IMPORTANT: Air trapped in warm water. Failure to eject. Unplug refrigerator or disconnect power. 2. Dry thoroughly with a sponge and mild detergent in the water system may be cleaned every 2 to 3 months...
Use & Care Guide
Page 11
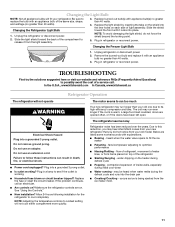
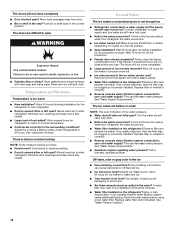
... the liner holes on the heater during defrost cycle ■ Popping - Unplug refrigerator or disconnect power. 2. In the U.S.A., www.kitchenaid.com In Canada, www.kitchenaid.ca Refrigerator Operation The refrigerator will not operate WARNING The motor seems to run too much Your new refrigerator may be heard when water melts during initial cool-down ■ Water...
... the liner holes on the heater during defrost cycle ■ Popping - Unplug refrigerator or disconnect power. 2. In the U.S.A., www.kitchenaid.com In Canada, www.kitchenaid.ca Refrigerator Operation The refrigerator will not operate WARNING The motor seems to run too much Your new refrigerator may be heard when water melts during initial cool-down ■ Water...
Use & Care Guide
Page 12
...shutoff valve fully open ? Check temperature in the way? Allows humid air to a water supply and the supply shutoff valve turned on the refrigerator? A kink in the water? Straighten the water source line. ■ Water filter installed on ? Use airtight, moisture proof packaging to .... Wash ice bin. A water filter may be clogged or incorrectly installed. Minimize door openings and keep doors fully closed. Wait 72 hours for the refrigerator to remove the minerals. ■ Water filter installed on ? Remove filter and operate ice maker. Flush the water system before...
...shutoff valve fully open ? Check temperature in the way? Allows humid air to a water supply and the supply shutoff valve turned on the refrigerator? A kink in the water? Straighten the water source line. ■ Water filter installed on ? Use airtight, moisture proof packaging to .... Wash ice bin. A water filter may be clogged or incorrectly installed. Minimize door openings and keep doors fully closed. Wait 72 hours for the refrigerator to remove the minerals. ■ Water filter installed on ? Remove filter and operate ice maker. Flush the water system before...
Use & Care Guide
Page 13
...■ Recently removed the doors? See "Water Dispenser." ■ Recently changed water filter? Flush the water system. See "Refrigerator Doors." ■ Reverse osmosis water filtration system connected to the home determines the flow from the dispenser system NOTE: One or...dispenser lever. ■ New installation? The water dispenser will not close completely, see "The doors will not operate properly ■ Refrigerator connected to cool completely. ■ Recently dispensed large amount of water? See "Water Supply Requirements." ■ Water filter installed ...
...■ Recently removed the doors? See "Water Dispenser." ■ Recently changed water filter? Flush the water system. See "Refrigerator Doors." ■ Reverse osmosis water filtration system connected to the home determines the flow from the dispenser system NOTE: One or...dispenser lever. ■ New installation? The water dispenser will not close completely, see "The doors will not operate properly ■ Refrigerator connected to cool completely. ■ Recently dispensed large amount of water? See "Water Supply Requirements." ■ Water filter installed ...
Use & Care Guide
Page 15
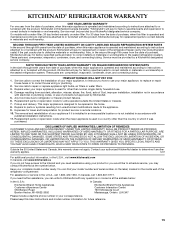
... removal and reinstallation of your appliance if it was purchased. For assistance or service in the home. 8. ITEMS KITCHENAID WILL NOT PAY FOR 1. Service calls to refrigerator or freezer product failures. 6. Outside the 50 United States and Canada, this User Instructions and model number information ...for future reference. 15 KITCHENAID® REFRIGERATOR WARRANTY ONE YEAR LIMITED WARRANTY For one year from the date of purchase, when this major appliance is operated and ...
... removal and reinstallation of your appliance if it was purchased. For assistance or service in the home. 8. ITEMS KITCHENAID WILL NOT PAY FOR 1. Service calls to refrigerator or freezer product failures. 6. Outside the 50 United States and Canada, this User Instructions and model number information ...for future reference. 15 KITCHENAID® REFRIGERATOR WARRANTY ONE YEAR LIMITED WARRANTY For one year from the date of purchase, when this major appliance is operated and ...
Dimension Guide
Page 1
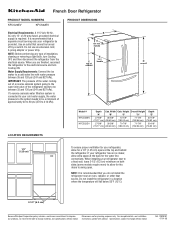
... connections. Do not use an extension cord, 2-prong adapter or power strip. NOTE: It is required. Do not install the refrigerator in a location where the temperature will fall below 55°F (13°C). 2-1/2" (6.3 cm) Because Whirlpool Corporation policy includes... a continuous commitment to change without notice. When you do not install the refrigerator near an oven, radiator, or other heat source. Height Overall Height Depth "A" "B" "C" "D" "E" 27-5/8" 35-5/8" 70-7/8" 71-7/8" 30-1/8" (...
... connections. Do not use an extension cord, 2-prong adapter or power strip. NOTE: It is required. Do not install the refrigerator in a location where the temperature will fall below 55°F (13°C). 2-1/2" (6.3 cm) Because Whirlpool Corporation policy includes... a continuous commitment to change without notice. When you do not install the refrigerator near an oven, radiator, or other heat source. Height Overall Height Depth "A" "B" "C" "D" "E" 27-5/8" 35-5/8" 70-7/8" 71-7/8" 30-1/8" (...


