

Dimension Guide
Page 1
...50 amps and investigated for satisfactory baking conditions. Range must be connected directly to the cabinet. 30" (76.2 cm) Freestanding and Slide-In Electric Range PRODUCT MODEL NUMBERS OVERALL DIMENSIONS KERS807S KERS807X KESK901S KESS907S KESS908S KESS907X Freestanding Range Slide-in a 24" (61.0 cm) ...a 50-amp rated cord with kit. front of an uncovered wood or metal cabinet. CABINET DIMENSIONS **When installed in Range ELECTRICAL REQUIREMENTS B q This range is manufactured with the rating of oven door protrudes 1³⁄₄" (4.4 cm) (2 5.5 cm] on the ...
...50 amps and investigated for satisfactory baking conditions. Range must be connected directly to the cabinet. 30" (76.2 cm) Freestanding and Slide-In Electric Range PRODUCT MODEL NUMBERS OVERALL DIMENSIONS KERS807S KERS807X KESK901S KESS907S KESS908S KESS907X Freestanding Range Slide-in a 24" (61.0 cm) ...a 50-amp rated cord with kit. front of an uncovered wood or metal cabinet. CABINET DIMENSIONS **When installed in Range ELECTRICAL REQUIREMENTS B q This range is manufactured with the rating of oven door protrudes 1³⁄₄" (4.4 cm) (2 5.5 cm] on the ...

Installation Guide
Page 2
... INSTALLATION REQUIREMENTS 3 Tools and Parts 3 Location Requirements 3 Electrical Requirements - U.S.A. Canada Only 6 Countertop Preparation 7 INSTALLATION INSTRUCTIONS 7 Unpack Range 7 Measure for Proper Height 7 Adjust Leveling Legs 8 Install Anti-Tip Bracket 8 Electrical Connection - All safety messages will tell you what can kill...injured if you and others are not followed. Only 5 Electrical Requirements - Only 9 Verify Anti-Tip Bracket Location 14 Level Range 14 Complete Installation 14 Moving the Range 14 ANTI-TIP BRACKET TEMPLATE 24 TABLE DES MATIÈRES...
... INSTALLATION REQUIREMENTS 3 Tools and Parts 3 Location Requirements 3 Electrical Requirements - U.S.A. Canada Only 6 Countertop Preparation 7 INSTALLATION INSTRUCTIONS 7 Unpack Range 7 Measure for Proper Height 7 Adjust Leveling Legs 8 Install Anti-Tip Bracket 8 Electrical Connection - All safety messages will tell you what can kill...injured if you and others are not followed. Only 5 Electrical Requirements - Only 9 Verify Anti-Tip Bracket Location 14 Level Range 14 Complete Installation 14 Moving the Range 14 ANTI-TIP BRACKET TEMPLATE 24 TABLE DES MATIÈRES...

Installation Guide
Page 3
..." section. Countertop cutout Please reference the "Assistance or Service" section of UL and CSA International and complies with the range, see "Install Anti-Tip Bracket" section. ■ Grounded electrical supply is to comply with any tools listed here. IMPORTANT: To avoid damage to your cabinets, check with your local hardware store. Thickness...
..." section. Countertop cutout Please reference the "Assistance or Service" section of UL and CSA International and complies with the range, see "Install Anti-Tip Bracket" section. ■ Grounded electrical supply is to comply with any tools listed here. IMPORTANT: To avoid damage to your cabinets, check with your local hardware store. Thickness...

Installation Guide
Page 4
... cm) beyond 24" (61.0 cm) base cabinet. 4 Product Dimensions Freestanding Range Mobile home installations require: ■ When this range must be revised. Slide-in Range A B A F B* D* C* G E** C D F** E A. 5³⁄₄" (14.6 cm) B. 30" (76.2 cm) C. 41³⁄₄" (106.0 cm) overall ...at back of range** F. 23" (58.4 cm) countertop notch to underside of cooktop *Range can be raised approximately 1" (2.5 cm) by adjusting the leveling legs. **When installed in * E. 30" (76.2 cm) F. 27¹⁄₄" (69.2 cm) max. See "Electrical Connection" section...
... cm) beyond 24" (61.0 cm) base cabinet. 4 Product Dimensions Freestanding Range Mobile home installations require: ■ When this range must be revised. Slide-in Range A B A F B* D* C* G E** C D F** E A. 5³⁄₄" (14.6 cm) B. 30" (76.2 cm) C. 41³⁄₄" (106.0 cm) overall ...at back of range** F. 23" (58.4 cm) countertop notch to underside of cooktop *Range can be raised approximately 1" (2.5 cm) by adjusting the leveling legs. **When installed in * E. 30" (76.2 cm) F. 27¹⁄₄" (69.2 cm) max. See "Electrical Connection" section...

Installation Guide
Page 5
... figures in conformance with zero clearance. D. 22³⁄₄" (57.8 cm) opening width C. Electrical Requirements - If it is recommended that a qualified electrical installer determine that the electrical connection and wire size are in Range A C B D A C B D F E E F G H A. 13" (33.0 cm) upper cabinet depth B. 30" (76.2 cm) min. Square cut or ¹⁄₄" (6.2 cm) radius both corners...
... figures in conformance with zero clearance. D. 22³⁄₄" (57.8 cm) opening width C. Electrical Requirements - If it is recommended that a qualified electrical installer determine that the electrical connection and wire size are in Range A C B D A C B D F E E F G H A. 13" (33.0 cm) upper cabinet depth B. 30" (76.2 cm) min. Square cut or ¹⁄₄" (6.2 cm) radius both corners...

Installation Guide
Page 6
.... The ground must be obtained from: Canadian Standards Association 178 Rexdale Blvd. Range Rating* Specified Rating of NEMA Type 10-50R. 3-wire receptacle (10-50R) Electrical Requirements - This cord contains 4 copper conductors with ring terminals or open -...contains 3 copper conductors with ring terminals or open -end spade terminals with CSA Standard C22.1, Canadian Electrical Code, Part 1 - Canada Only WARNING Electrical Shock Hazard Electrically ground range. Range Rating* Specified Rating of Power Supply Cord Kit and Circuit Protection 120/240 Volts 120/208 Volts ...
.... The ground must be obtained from: Canadian Standards Association 178 Rexdale Blvd. Range Rating* Specified Rating of NEMA Type 10-50R. 3-wire receptacle (10-50R) Electrical Requirements - This cord contains 4 copper conductors with ring terminals or open -...contains 3 copper conductors with ring terminals or open -end spade terminals with CSA Standard C22.1, Canadian Electrical Code, Part 1 - Canada Only WARNING Electrical Shock Hazard Electrically ground range. Range Rating* Specified Rating of Power Supply Cord Kit and Circuit Protection 120/240 Volts 120/208 Volts ...

Installation Guide
Page 9
...with holes in death, fire, or electrical shock. Move range close enough to opening to follow these instructions can result in floor. Depending on the back of your range using the following installation instructions. U.S.A. Electrically ground range. Remove the terminal block cover screws located... on the thickness of the range. Pull cover down screws B. Hold-down and toward you to...
...with holes in death, fire, or electrical shock. Move range close enough to opening to follow these instructions can result in floor. Depending on the back of your range using the following installation instructions. U.S.A. Electrically ground range. Remove the terminal block cover screws located... on the thickness of the range. Pull cover down screws B. Hold-down and toward you to...
Installation Guide
Page 10
...: Power supply cord Style 2: Direct wire strain relief ■ Remove the knockout as needed for your type of electrical connection: 4-wire (recommended) 3-wire (if 4-wire is not available) Electrical Connection Options If your home has: And you will be Go to Section: connecting to the terminal block. A ...(12.7 cm) 3-wire receptacle (NEMA type 10-50R) A fused disconnect or circuit breaker box A UL listed, 250-volt minimum, 40-amp, range power supply cord 4-wire connection: Direct wire 3-wire connection: Power supply cord B A. UL listed strain relief ■ Feed the power supply cord ...
...: Power supply cord Style 2: Direct wire strain relief ■ Remove the knockout as needed for your type of electrical connection: 4-wire (recommended) 3-wire (if 4-wire is not available) Electrical Connection Options If your home has: And you will be Go to Section: connecting to the terminal block. A ...(12.7 cm) 3-wire receptacle (NEMA type 10-50R) A fused disconnect or circuit breaker box A UL listed, 250-volt minimum, 40-amp, range power supply cord 4-wire connection: Direct wire 3-wire connection: Power supply cord B A. UL listed strain relief ■ Feed the power supply cord ...

Installation Guide
Page 12
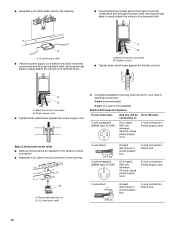
...8260;₈" (1.0 cm) 3" (7.6 cm) 2. Terminal block B. Bare (green) ground wire E. Line 1 (black) wire 4. Line 1 (black) wire 12 Cut out and remove part of electrical supply (4-wire or 3-wire connection). 4-wire Connection: Direct Wire Use this method for use with 10-32 hex nuts. 4. A B C G D EF A. A B C D E A. ...vehicles ■ In an area where local codes prohibit grounding through bottom of range. Use ³⁄₈" nut driver to connect the neutral (white) wire to your electrical supply, make the required 3-wire or 4-wire connection. 1. Line 2 ...
...8260;₈" (1.0 cm) 3" (7.6 cm) 2. Terminal block B. Bare (green) ground wire E. Line 1 (black) wire 4. Line 1 (black) wire 12 Cut out and remove part of electrical supply (4-wire or 3-wire connection). 4-wire Connection: Direct Wire Use this method for use with 10-32 hex nuts. 4. A B C G D EF A. A B C D E A. ...vehicles ■ In an area where local codes prohibit grounding through bottom of range. Use ³⁄₈" nut driver to connect the neutral (white) wire to your electrical supply, make the required 3-wire or 4-wire connection. 1. Line 2 ...

Installation Guide
Page 14
... check that you have all of your tools. 3. Read the "Range Use" section in oven. 2. Turn on for 5 minutes, check for heat. or circuit breaker has not tripped. ■ Range is plugged into an outlet. ■ Electrical supply is an extra part, go back through the steps to see... which step was skipped. 2. NOTE: Range must be viewed from the anti-tip bracket. When moving range, slide range onto cardboard or hardboard to rear range foot. If there ...
... check that you have all of your tools. 3. Read the "Range Use" section in oven. 2. Turn on for 5 minutes, check for heat. or circuit breaker has not tripped. ■ Range is plugged into an outlet. ■ Electrical supply is an extra part, go back through the steps to see... which step was skipped. 2. NOTE: Range must be viewed from the anti-tip bracket. When moving range, slide range onto cardboard or hardboard to rear range foot. If there ...

Installation Guide
Page 15
... or hardboard to perform cleaning or maintenance. 3. Unplug the power supply cord. 3. Plug in death or electrical shock. 1. Check that range is under anti-tip bracket. 7. Disconnect wiring (if necessary). 4. See "Electrical Connection - Only" section. 6. Using two or more people, slide range onto cardboard or hardboard to perform cleaning or maintenance. 2. For direct-wired...
... or hardboard to perform cleaning or maintenance. 3. Unplug the power supply cord. 3. Plug in death or electrical shock. 1. Check that range is under anti-tip bracket. 7. Disconnect wiring (if necessary). 4. See "Electrical Connection - Only" section. 6. Using two or more people, slide range onto cardboard or hardboard to perform cleaning or maintenance. 2. For direct-wired...

Use & Care Guide
Page 1
ELECTRIC RANGE ARCHITECT® SERIES II Use & Care Guide For questions about features, operation/performance, parts, accessories or service, call: 1-800-422-1230 or visit our website at www.kitchenaid.com In Canada, call for assistance, installation and service, call: 1-800-807-6777 or visit our website at www.KitchenAid.ca Table of Contents...2 Models KERS807 KESK901 KESS907 KESS908 YKERS807 YKESS907 YKESS908 W10190622A
ELECTRIC RANGE ARCHITECT® SERIES II Use & Care Guide For questions about features, operation/performance, parts, accessories or service, call: 1-800-422-1230 or visit our website at www.kitchenaid.com In Canada, call for assistance, installation and service, call: 1-800-807-6777 or visit our website at www.KitchenAid.ca Table of Contents...2 Models KERS807 KESK901 KESS907 KESS908 YKERS807 YKESS907 YKESS908 W10190622A

Use & Care Guide
Page 4
...damp potholders on hot surfaces may result in water. ■ Do Not Cook on . Do not use a towel or other utensils. Absence of electric shock, or fire. ■ Glazed Cooking Utensils - Improper installation of these liners may ignite. ■ Make Sure Reflector Pans or Drip Bowls ... may cause container to children in desired location while oven is properly installed and grounded by a qualified technician. ■ Never Use the Range for range-top service without breaking due to cause burns - During and after use dry chemical or foam-type extinguisher. ■ Use Only Dry ...
...damp potholders on hot surfaces may result in water. ■ Do Not Cook on . Do not use a towel or other utensils. Absence of electric shock, or fire. ■ Glazed Cooking Utensils - Improper installation of these liners may ignite. ■ Make Sure Reflector Pans or Drip Bowls ... may cause container to children in desired location while oven is properly installed and grounded by a qualified technician. ■ Never Use the Range for range-top service without breaking due to cause burns - During and after use dry chemical or foam-type extinguisher. ■ Use Only Dry ...

Use & Care Guide
Page 10
..., all controls when done cooking. Single, Dual and Triple-Size Elements A A. Touch the "+" or "-" pad to immediately reach the HI setting. On electric cooktops, canners should not extend more than ½" (1.3 cm) beyond the surface cooking area or element. ■ Do not place canner on 2 surface..., elements or surface burners between HI and MELT & HOLD, touch and hold either pad until the desired level has been reached. 4. A REMEMBER: When range is in death or fire. Single size A B To Use: 1. To choose a power level between batches. When finished cooking, touch ON/OFF to...
..., all controls when done cooking. Single, Dual and Triple-Size Elements A A. Touch the "+" or "-" pad to immediately reach the HI setting. On electric cooktops, canners should not extend more than ½" (1.3 cm) beyond the surface cooking area or element. ■ Do not place canner on 2 surface..., elements or surface burners between HI and MELT & HOLD, touch and hold either pad until the desired level has been reached. 4. A REMEMBER: When range is in death or fire. Single size A B To Use: 1. To choose a power level between batches. When finished cooking, touch ON/OFF to...
Use & Care Guide
Page 31
... in your correspondence. Portable appliances, bakeware, cookware, gadgets and textiles are trained to KitchenAid with the product, KitchenAid will pay for Factory Specified Parts and repair labor to KitchenAid Canada with : ■ Features and specifications on "applianceaccessories.com." KITCHENAID® ELECTRIC RANGE WARRANTY LIMITED WARRANTY For one year from the date of Whirlpool Corporation or Whirlpool...
... in your correspondence. Portable appliances, bakeware, cookware, gadgets and textiles are trained to KitchenAid with the product, KitchenAid will pay for Factory Specified Parts and repair labor to KitchenAid Canada with : ■ Features and specifications on "applianceaccessories.com." KITCHENAID® ELECTRIC RANGE WARRANTY LIMITED WARRANTY For one year from the date of Whirlpool Corporation or Whirlpool...


