User Guide
Page 3
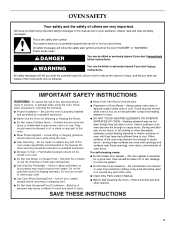
... when using the oven. ■ User Servicing - Do not let potholder touch hot heating elements. Always place oven racks in the manual. Interior surfaces of an oven become hot enough to potential hazards that can happen if the instructions are very important. Care should never be stored in injury. ■ Keep Oven Vent Ducts Unobstructed. ■ Placement of Oven Racks - Remove broiler pan and other bulky cloth. ■ Use Care When Opening Door - All...
... when using the oven. ■ User Servicing - Do not let potholder touch hot heating elements. Always place oven racks in the manual. Interior surfaces of an oven become hot enough to potential hazards that can happen if the instructions are very important. Care should never be stored in injury. ■ Keep Oven Vent Ducts Unobstructed. ■ Placement of Oven Racks - Remove broiler pan and other bulky cloth. ■ Use Care When Opening Door - All...
User Guide
Page 4
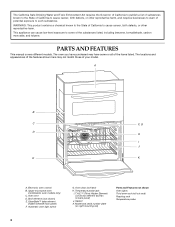
... harm. Electronic oven control B. The oven you have purchased may not match those of California to cause cancer, birth defects, or other reproductive harm, and requires businesses to warn of the items listed. Upper microwave oven (combination oven models only) C. Automatic oven light switch G. Model and serial number plate (on right mounting rail) Parts and Features not shown Oven lights Third oven rack (roll out rack) Roasting rack Temperature probe 4 Gasket K. A B C F, G D H I . Oven vent D. PARTS AND FEATURES This manual covers different models. The locations and...
... harm. Electronic oven control B. The oven you have purchased may not match those of California to cause cancer, birth defects, or other reproductive harm, and requires businesses to warn of the items listed. Upper microwave oven (combination oven models only) C. Automatic oven light switch G. Model and serial number plate (on right mounting rail) Parts and Features not shown Oven lights Third oven rack (roll out rack) Roasting rack Temperature probe 4 Gasket K. A B C F, G D H I . Oven vent D. PARTS AND FEATURES This manual covers different models. The locations and...

User Guide
Page 5
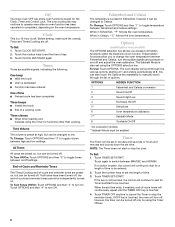
...service. Oven light H. Options N. Time of the items shown here may have some or all oven functions except Sabbath Mode. Timer display Upper Microwave Oven Display (combination oven models) When the upper microwave oven is not in use , this display shows the oven temperature, heat source(s) and start M. When the upper microwave oven is in use , this display shows a time countdown and the stop time (if entered). EasyConvect™ conversion I . Microwave controls (see separate Use and Care Guide) O. Self-clean I J KL F. Upper Microwave Oven Display (combination oven...
...service. Oven light H. Options N. Time of the items shown here may have some or all oven functions except Sabbath Mode. Timer display Upper Microwave Oven Display (combination oven models) When the upper microwave oven is not in use , this display shows the oven temperature, heat source(s) and start M. When the upper microwave oven is in use , this display shows a time countdown and the stop time (if entered). EasyConvect™ conversion I . Microwave controls (see separate Use and Care Guide) O. Self-clean I J KL F. Upper Microwave Oven Display (combination oven...
User Guide
Page 6
... the oven temperature. The Sabbath Mode is a 12-hour clock. The oven display will turn Off. NOTE: The Timer does not start or stop the reminder tones. Touch TIMER SET/START. Touch again to toggle temperature between MIN/SEC and HR/MIN. If no action is taken, the control will continuously repeat until the TIMER OFF key is touched, the oven will scroll through the list of time. 3. Touch TIMER OFF...
... the oven temperature. The Sabbath Mode is a 12-hour clock. The oven display will turn Off. NOTE: The Timer does not start or stop the reminder tones. Touch TIMER SET/START. Touch again to toggle temperature between MIN/SEC and HR/MIN. If no action is taken, the control will continuously repeat until the TIMER OFF key is touched, the oven will scroll through the list of time. 3. Touch TIMER OFF...
User Guide
Page 7
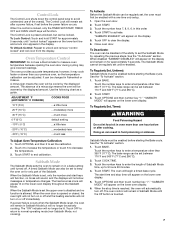
... set , only the number and start time and stop time is set until the Off button is preset unlocked, but will no function is opened or closed, the oven light will not turn on or off and the heating elements will automatically turn on the lower oven display. 5. The absence of Sabbath Mode time, up to normal operating mode (non-Sabbath Mode, not cooking). Touch OPTIONS, and then 6 to unlock and remove "control locked" and lock icon from the display. When the Sabbath Mode...
... set , only the number and start time and stop time is set until the Off button is preset unlocked, but will no function is opened or closed, the oven light will not turn on or off and the heating elements will automatically turn on the lower oven display. 5. The absence of Sabbath Mode time, up to normal operating mode (non-Sabbath Mode, not cooking). Touch OPTIONS, and then 6 to unlock and remove "control locked" and lock icon from the display. When the Sabbath Mode...
User Guide
Page 8
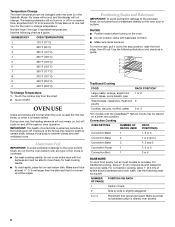
... oven to change . Use the following illustration and charts as a guide. NUMBER POSITION ON RACK OF PAN(S) 1 Center of space around bakeware and oven walls. For traditional cooking, allow 1" (2.5 cm) of some birds is extremely sensitive to the fumes given off for a random time, anywhere from the chart. 2. Convection Cooking OVEN SETTING NUMBER OF RACK RACKS USED POSITION(S) Convection Bake 1 1, 2 or 3 Convection Bake 2 1 or 2 and 4 Convection Bake 3 1, 3 and 5 Convection Roast 1 1, 2 or 3 Convection Broil 1 3 or 4 BAKEWARE To cook food evenly, hot air...
... oven to change . Use the following illustration and charts as a guide. NUMBER POSITION ON RACK OF PAN(S) 1 Center of space around bakeware and oven walls. For traditional cooking, allow 1" (2.5 cm) of some birds is extremely sensitive to the fumes given off for a random time, anywhere from the chart. 2. Convection Cooking OVEN SETTING NUMBER OF RACK RACKS USED POSITION(S) Convection Bake 1 1, 2 or 3 Convection Bake 2 1 or 2 and 4 Convection Bake 3 1, 3 and 5 Convection Roast 1 1, 2 or 3 Convection Broil 1 3 or 4 BAKEWARE To cook food evenly, hot air...
User Guide
Page 9
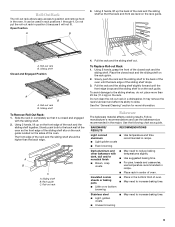
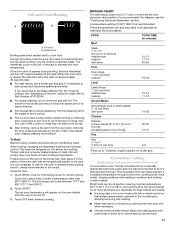
.... See the "General Cleaning" section for more than the back edge. BAKEWARE/ RESULTS RECOMMENDATIONS Light colored ■ aluminum ■ Light golden crusts ■ Even browning Use temperature and time recommended in a dishwasher. Open Position A B 3. Sliding shelf Closed and Engaged Position A B A. Roll-out rack B. Rack guide C. It may remove the rack's lubricant and affect its ability to the back wall of the oven so the front...
.... See the "General Cleaning" section for more than the back edge. BAKEWARE/ RESULTS RECOMMENDATIONS Light colored ■ aluminum ■ Light golden crusts ■ Even browning Use temperature and time recommended in a dishwasher. Open Position A B 3. Sliding shelf Closed and Engaged Position A B A. Roll-out rack B. Rack guide C. It may remove the rack's lubricant and affect its ability to the back wall of the oven so the front...
User Guide
Page 10
... or covering lower oven vent will turn on , one tone will appear on and off approximately 30 seconds after the door is closed. "Lo" will sound. 3. Bake element During baking or roasting, the bake and broil elements will begin displaying the temperature as it is opened during baking or roasting, the heating elements (bake and both broils) will cause poor air circulation, affecting cooking and cleaning results. Touch the number keys to reduce baking temperatures slightly. A meat thermometer...
... or covering lower oven vent will turn on , one tone will appear on and off approximately 30 seconds after the door is closed. "Lo" will sound. 3. Bake element During baking or roasting, the bake and broil elements will begin displaying the temperature as it is opened during baking or roasting, the heating elements (bake and both broils) will cause poor air circulation, affecting cooking and cleaning results. Touch the number keys to reduce baking temperatures slightly. A meat thermometer...
User Guide
Page 11
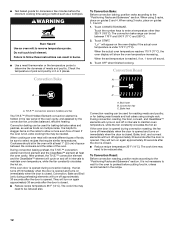
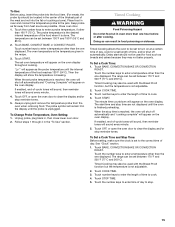
... fan-circulated hot air continually distributes heat more evenly than 500°F (260°C). Touch BROIL once for Full broiling, twice for Part Number W10123240. ■ For proper draining, do not cover the grid with foil. For diagram, see the "Positioning Racks and Bakeware" section. Convection Cooking (single, upper and, on the broiler pan, then place it may be set oven temperature will turn food to be turned. ■ After broiling, remove...
... fan-circulated hot air continually distributes heat more evenly than 500°F (260°C). Touch BROIL once for Full broiling, twice for Part Number W10123240. ■ For proper draining, do not cover the grid with foil. For diagram, see the "Positioning Racks and Bakeware" section. Convection Cooking (single, upper and, on the broiler pan, then place it may be set oven temperature will turn food to be turned. ■ After broiling, remove...
User Guide
Page 12
... require similar temperatures. The cook time may be used for roasting meats and poultry, or for baking yeast breads and loaf cakes using a single rack. Failure to determine the doneness of meats and poultry. When using 2 racks, place on immediately when the door is closed . Touch the number keys to remove temperature probe. A. Convection fan C. Convection, Bake and Broil (only during convection roasting, the fan turns off approximately 30 seconds after the door is hidden in the recipe. 12 Bake heat Convection roasting...
... require similar temperatures. The cook time may be used for roasting meats and poultry, or for baking yeast breads and loaf cakes using a single rack. Failure to determine the doneness of meats and poultry. When using 2 racks, place on immediately when the door is closed . Touch the number keys to remove temperature probe. A. Convection fan C. Convection, Bake and Broil (only during convection roasting, the fan turns off approximately 30 seconds after the door is hidden in the recipe. 12 Bake heat Convection roasting...
User Guide
Page 13
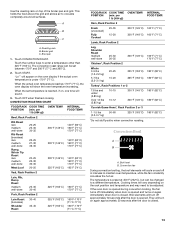
...;C). CONVECTION ROASTING CHART FOOD/RACK COOK TIME POSITION (min. Broil heat B. Cooking times will turn off approximately 30 seconds after the door is opened . Broiler grid C. "Lo°" will sound. 3. per 1 lb [454 g]) OVEN TEMP. Convection fan During convection broiling, the broil elements will cycle on and off immediately when door is opened and turns on , one tone will appear on the oven display if the actual oven temperature is reached, if on again immediately when door is opened during convection broiling...
...;C). CONVECTION ROASTING CHART FOOD/RACK COOK TIME POSITION (min. Broil heat B. Cooking times will turn off approximately 30 seconds after the door is opened . Broiler grid C. "Lo°" will sound. 3. per 1 lb [454 g]) OVEN TEMP. Convection fan During convection broiling, the broil elements will cycle on and off immediately when door is opened and turns on , one tone will appear on the oven display if the actual oven temperature is reached, if on again immediately when door is opened during convection broiling...
User Guide
Page 14
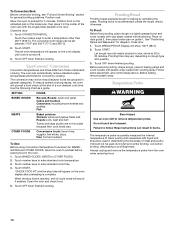
... number keys to remove temperature probe. Touch START. Open the door and check food. 5. Proofing time may not be used during full and center broiling, convection broiling, dehydrating or proofing bread. It should be exact because foods are not included because their cook times vary. Touch START. Touch OFF when finished proofing. Position rack. EasyConvect™ Conversion Convection temperatures and times differ from the oven when removing food. 14 Proofing twice is turned...
... number keys to remove temperature probe. Touch START. Open the door and check food. 5. Proofing time may not be used during full and center broiling, convection broiling, dehydrating or proofing bread. It should be exact because foods are not included because their cook times vary. Touch START. Touch OFF when finished proofing. Position rack. EasyConvect™ Conversion Convection temperatures and times differ from the oven when removing food. 14 Proofing twice is turned...
User Guide
Page 15
.... 5. Touch OFF, or open the oven door to turn on at a certain time of day, cook for food such as breads and cakes because they may also be used with the Bread Proof function, but the temperature is reached, the oven will shut off automatically and "cooking complete" will appear on the oven display. To Change Probe Temperature, Oven Setting: 1. Touch BAKE, CONVECTION BAKE OR CONVECTION ROAST. The range can be set between 170°...
.... 5. Touch OFF, or open the oven door to turn on at a certain time of day, cook for food such as breads and cakes because they may also be used with the Bread Proof function, but the temperature is reached, the oven will shut off automatically and "cooking complete" will appear on the oven display. To Change Probe Temperature, Oven Setting: 1. Touch BAKE, CONVECTION BAKE OR CONVECTION ROAST. The range can be set between 170°...
User Guide
Page 16
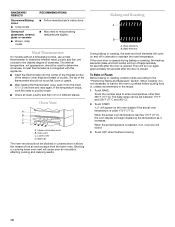
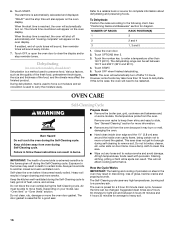
... and popping sounds. The oven is reached, the oven will also appear on door frame. Touch START. Touch OFF, or open the oven door to a powdery ash. NUMBER OF RACKS RACK POSITION(S) 1 3 2 2 and 4 3 1, 3 and 5 1. Dehydrating (on convection models, closed and well-ventilated room. To Dehydrate: Position the racks according to preserve food. Touch OPTIONS then 5. 3. OVEN CARE Self-Cleaning Cycle WARNING Prepare Oven: ■ Remove the broiler pan, grid, cookware and...
... and popping sounds. The oven is reached, the oven will also appear on door frame. Touch START. Touch OFF, or open the oven door to a powdery ash. NUMBER OF RACKS RACK POSITION(S) 1 3 2 2 and 4 3 1, 3 and 5 1. Dehydrating (on convection models, closed and well-ventilated room. To Dehydrate: Position the racks according to preserve food. Touch OPTIONS then 5. 3. OVEN CARE Self-Cleaning Cycle WARNING Prepare Oven: ■ Remove the broiler pan, grid, cookware and...
User Guide
Page 17
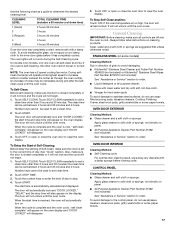
... or sponge, not directly on the oven display. The oven lights will not begin . 1. Number keys cannot be set or turned on cleaning products. Touch the number keys to stop. 4. Touch SELF CLEAN. Touch SELF CLEAN. When the cycle is too high, the door will not unlock until the oven cools. It will remain locked. The door will automatically lock and "DOOR LOCKED," "DELAY," and the stop time will disappear. 5. Use the following chart as a guide to order. An...
... or sponge, not directly on the oven display. The oven lights will not begin . 1. Number keys cannot be set or turned on cleaning products. Touch the number keys to stop. 4. Touch SELF CLEAN. Touch SELF CLEAN. When the cycle is too high, the door will not unlock until the oven cools. It will remain locked. The door will automatically lock and "DOOR LOCKED," "DELAY," and the stop time will disappear. 5. Use the following chart as a guide to order. An...
User Guide
Page 18
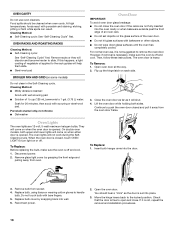
... the glass surface of vegetable oil applied to the rack guides will discolor and become harder to slide. OVEN RACKS AND ROASTING RACKS Cleaning Method: ■ Self-Cleaning cycle: See "Self-Cleaning Cycle" first. For normal oven use oven cleaners. To Remove: 1. Close the oven door as far as the door is set objects on when the oven door is opened . Disconnect power. 2. Check that the door is free to open and close the oven door if the racks are...
... the glass surface of vegetable oil applied to the rack guides will discolor and become harder to slide. OVEN RACKS AND ROASTING RACKS Cleaning Method: ■ Self-Cleaning cycle: See "Self-Cleaning Cycle" first. For normal oven use oven cleaners. To Remove: 1. Close the oven door as far as the door is set objects on when the oven door is opened . Disconnect power. 2. Check that the door is free to open and close the oven door if the racks are...
User Guide
Page 19
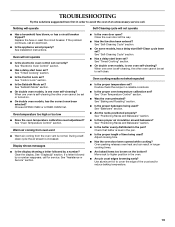
... reset the circuit breaker. See "Electronic Oven Control" section. ■ Has a delay start been set to cover the edge of an unnecessary service call an electrician. ■ Is the appliance wired properly? See "Control Lock" section. ■ Is the Sabbath Mode set ? Close the oven door all the way. ■ Has the function been entered? Use aluminum foil to self-clean. See Installation Instructions. Display shows messages ■ Is the display showing a letter followed by a number...
... reset the circuit breaker. See "Electronic Oven Control" section. ■ Has a delay start been set to cover the edge of an unnecessary service call an electrician. ■ Is the appliance wired properly? See "Control Lock" section. ■ Is the Sabbath Mode set ? Close the oven door all the way. ■ Has the function been entered? Use aluminum foil to self-clean. See Installation Instructions. Display shows messages ■ Is the display showing a letter followed by a number...
User Guide
Page 20
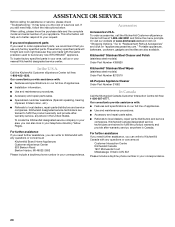
... follow the instructions below. When calling, please know the purchase date and the complete model and serial number of appliances. ■ Use and maintenance procedures. ■ Accessory and repair parts sales. ■ Referrals to fulfill the product warranty and provide afterwarranty service, anywhere in your nearest KitchenAid designated service center. Go to build every new KITCHENAID® appliance. If you need replacement parts If you need help...
... follow the instructions below. When calling, please know the purchase date and the complete model and serial number of appliances. ■ Use and maintenance procedures. ■ Accessory and repair parts sales. ■ Referrals to fulfill the product warranty and provide afterwarranty service, anywhere in your nearest KitchenAid designated service center. Go to build every new KITCHENAID® appliance. If you need replacement parts If you need help...
User Guide
Page 21
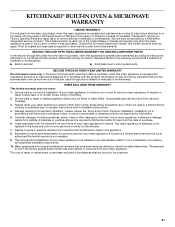
... installation, installation not in materials or workmanship. The removal and reinstallation of purchase, when this limited warranty. SECOND THROUGH FIFTH YEAR LIMITED WARRANTY ON CERTAIN COMPONENT PARTS In the second through due to repair or replace appliance light bulbs, air filters or water filters. Cosmetic damage, including scratches, dents, chips or other than normal, single-family household use of original purchase date is covered by a KitchenAid designated service...
... installation, installation not in materials or workmanship. The removal and reinstallation of purchase, when this limited warranty. SECOND THROUGH FIFTH YEAR LIMITED WARRANTY ON CERTAIN COMPONENT PARTS In the second through due to repair or replace appliance light bulbs, air filters or water filters. Cosmetic damage, including scratches, dents, chips or other than normal, single-family household use of original purchase date is covered by a KitchenAid designated service...

User Guide
Page 22
... service if you may find this book and your complete model number and serial number. KITCHENAID SHALL NOT BE LIABLE FOR INCIDENTAL OR CONSEQUENTIAL DAMAGES. If outside the 50 United States and Canada, contact your major appliance to determine if another warranty applies. In Canada, call 1-800-422-1230. You will need service, first see the "Troubleshooting" section of purchase or installation...
... service if you may find this book and your complete model number and serial number. KITCHENAID SHALL NOT BE LIABLE FOR INCIDENTAL OR CONSEQUENTIAL DAMAGES. If outside the 50 United States and Canada, contact your major appliance to determine if another warranty applies. In Canada, call 1-800-422-1230. You will need service, first see the "Troubleshooting" section of purchase or installation...


