Use & Care Guide
Page 4
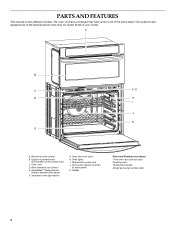
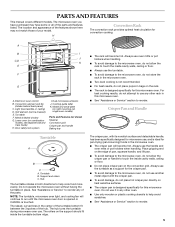
...door lock latch H. Gasket Parts and Features not shown Third oven rack (roll-out rack) Roasting rack Temperature probe Model and serial number plate 4 PARTS AND FEATURES This manual covers different models. Electronic oven control B. Convection element and fan (in back panel) K. The oven you have some or all of... your model. Oven vent D. Temperature probe jack J. Oven lights I J K E A. The locations and appearances of the features shown here may have purchased may not...
...door lock latch H. Gasket Parts and Features not shown Third oven rack (roll-out rack) Roasting rack Temperature probe Model and serial number plate 4 PARTS AND FEATURES This manual covers different models. Electronic oven control B. Convection element and fan (in back panel) K. The oven you have some or all of... your model. Oven vent D. Temperature probe jack J. Oven lights I J K E A. The locations and appearances of the features shown here may have purchased may not...
Use & Care Guide
Page 5
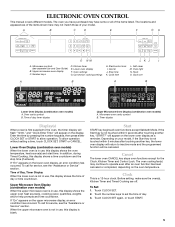
...to allow operation without setting a time, touch CLOCK SET, START or CANCEL. will be canceled. Cook time L. Clock set the time of your model, if the Start key is in use , this display shows the time of day or time countdown. Before setting, make sure the oven(s), Kitchen... Timer and Timed Cooking are off. ELECTRONIC OVEN CONTROL This manual covers different models. Timer display Display(s) When power is in use , this display shows a time countdown and the stop time (if entered). In addition, during Timed...
...to allow operation without setting a time, touch CLOCK SET, START or CANCEL. will be canceled. Cook time L. Clock set the time of your model, if the Start key is in use , this display shows the time of day or time countdown. Before setting, make sure the oven(s), Kitchen... Timer and Timed Cooking are off. ELECTRONIC OVEN CONTROL This manual covers different models. Timer display Display(s) When power is in use , this display shows a time countdown and the stop time (if entered). In addition, during Timed...
Use & Care Guide
Page 6
... will continue to wait for approximately 3 seconds, until the TIMER OFF key is also set in Celsius, "°C" follows the oven temperature. 6 Tools (combination oven models) The TOOLS selection key allows you to toggle temperature between on and off only by using the TOOLS selection key. To Lock Control: Touch and...
... will continue to wait for approximately 3 seconds, until the TIMER OFF key is also set in Celsius, "°C" follows the oven temperature. 6 Tools (combination oven models) The TOOLS selection key allows you to toggle temperature between on and off only by using the TOOLS selection key. To Lock Control: Touch and...
Use & Care Guide
Page 9
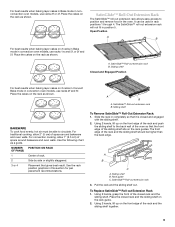
... extension rack B. Rack guide C. Using 2 hands, grasp the front of the rack and the sliding shelf should be used in nonconvection oven models, use racks 1ro and 5f, or 2f and 5f. Place the closed rack and the sliding shelf. SatinGlide™ Roll-Out Extension Rack The... SatinGlide™ roll-out extension rack allows easy access to circulate. See the rack position graphics in convection oven models, use racks 2f and 5f. Sliding shelf To Remove SatinGlide™ Roll-Out Extension Rack: 1. A B C A. Sliding shelf B. SatinGlide™ Roll-out ...
... extension rack B. Rack guide C. Using 2 hands, grasp the front of the rack and the sliding shelf should be used in nonconvection oven models, use racks 1ro and 5f, or 2f and 5f. Place the closed rack and the sliding shelf. SatinGlide™ Roll-Out Extension Rack The... SatinGlide™ roll-out extension rack allows easy access to circulate. See the rack position graphics in convection oven models, use racks 2f and 5f. Sliding shelf To Remove SatinGlide™ Roll-Out Extension Rack: 1. A B C A. Sliding shelf B. SatinGlide™ Roll-out ...
Use & Care Guide
Page 10
... browning ■ May need to the "Positioning Racks and Bakeware" section. Oven vent C. Baking and Roasting A B A. Depending on the model, the convect fan and element may remove the rack's lubricant and affect its ability to slide. Touch the number keys to increase baking time...operate during the Bake mode. Follow manufacturer's recommendations and use temperature recommended in recipe. ■ Place rack in the recipe. On models without a temperature probe, use a meat thermometer to determine whether meat, poultry and fish are cooked to maintain the oven temperature. ...
... browning ■ May need to the "Positioning Racks and Bakeware" section. Oven vent C. Baking and Roasting A B A. Depending on the model, the convect fan and element may remove the rack's lubricant and affect its ability to slide. Touch the number keys to increase baking time...operate during the Bake mode. Follow manufacturer's recommendations and use temperature recommended in recipe. ■ Place rack in the recipe. On models without a temperature probe, use a meat thermometer to determine whether meat, poultry and fish are cooked to maintain the oven temperature. ...

Use & Care Guide
Page 15
... to the correct time of porcelain on door frame. The High Temp Self-Cleaning cycle uses very high temperatures, burning soil to turn on your model, see "Oven Vent" or "Oven Vents" section. The oven is set length of heat, odors, and smoke. To Set a Cook Time and ...a 4 hour 30 minute clean cycle; Prepare Oven: ■ Remove the broiler pan, grid, cookware and bakeware and, on at a certain time of some models, the temperature probe from oven during high temp self-cleaning to stop time will not affect cooking performance. Self-clean the oven before or after...
... to the correct time of porcelain on door frame. The High Temp Self-Cleaning cycle uses very high temperatures, burning soil to turn on your model, see "Oven Vent" or "Oven Vents" section. The oven is set length of heat, odors, and smoke. To Set a Cook Time and ...a 4 hour 30 minute clean cycle; Prepare Oven: ■ Remove the broiler pan, grid, cookware and bakeware and, on at a certain time of some models, the temperature probe from oven during high temp self-cleaning to stop time will not affect cooking performance. Self-clean the oven before or after...

Use & Care Guide
Page 16
... at its highest speed to increase airflow to soft cloth or sponge, not directly on cleaning products. "Door Locked" will automatically turn on some models) To avoid damage to stainless steel surfaces, do not apply a cool damp cloth to the correct time of day to set between 3 hours...close the oven door to determine the desired cleaning level. Touch START. Soap, water and a soft cloth or sponge are off . On combo oven models, be set a clean time other than 4 hours and 30 minutes. When the cycle is complete and the oven is reached. The oven will ...
... at its highest speed to increase airflow to soft cloth or sponge, not directly on cleaning products. "Door Locked" will automatically turn on some models) To avoid damage to stainless steel surfaces, do not apply a cool damp cloth to the correct time of day to set between 3 hours...close the oven door to determine the desired cleaning level. Touch START. Soap, water and a soft cloth or sponge are off . On combo oven models, be set a clean time other than 4 hours and 30 minutes. When the cycle is complete and the oven is reached. The oven will ...

Use & Care Guide
Page 17
.... ■ Do not set into the oven cavity or when bakeware extends past the front edge of vegetable oil applied to slide. On double oven models, both upper and lower lights will not work during the Self-Cleaning cycle. To Replace: Before replacing the bulb, make sure the oven is opened...
.... ■ Do not set into the oven cavity or when bakeware extends past the front edge of vegetable oil applied to slide. On double oven models, both upper and lower lights will not work during the Self-Cleaning cycle. To Replace: Before replacing the bulb, make sure the oven is opened...

Use & Care Guide
Page 18
... section. ■ Is the batter evenly distributed in longer cooking times. ■ Are baked items too brown on . ■ On double oven models, has the correct oven been selected? See "Oven Temperature Control" section. ■ Was the oven preheated? See "Positioning Racks and Bakeware" section.... ■ Is there proper air circulation around bakeware? See "Self-Cleaning Cycle" section. ■ On some models, has a delay start Self-Clean cycle been set ? See "Control Lock" section. ■ Is the Sabbath Mode set ? Close the oven ...
... section. ■ Is the batter evenly distributed in longer cooking times. ■ Are baked items too brown on . ■ On double oven models, has the correct oven been selected? See "Oven Temperature Control" section. ■ Was the oven preheated? See "Positioning Racks and Bakeware" section.... ■ Is there proper air circulation around bakeware? See "Self-Cleaning Cycle" section. ■ On some models, has a delay start Self-Clean cycle been set ? See "Control Lock" section. ■ Is the Sabbath Mode set ? Close the oven ...
Use & Care Guide
Page 19
...toll free: 1-800-422-1230 or visit our website at www.kitchenaid.ca. To locate the KitchenAid designated service company in the United States. affresh™ Stainless Steel Cleaning Wipes (stainless steel models) Order Part Number W10355049 affresh™ Kitchen and Appliance Cleaner ... www.maytag.com/broilerpan In Canada Call the KitchenAid Canada Customer eXperience Centre toll free: 1-800-807-6777 or visit our website at www.kitchenaid.com. Accessories Accessories U.S.A. affresh™ Stainless Steel Cleaner (stainless steel models) Order Part Number W10355016 In the U.S.A. Our...
...toll free: 1-800-422-1230 or visit our website at www.kitchenaid.ca. To locate the KitchenAid designated service company in the United States. affresh™ Stainless Steel Cleaning Wipes (stainless steel models) Order Part Number W10355049 affresh™ Kitchen and Appliance Cleaner ... www.maytag.com/broilerpan In Canada Call the KitchenAid Canada Customer eXperience Centre toll free: 1-800-807-6777 or visit our website at www.kitchenaid.com. Accessories Accessories U.S.A. affresh™ Stainless Steel Cleaner (stainless steel models) Order Part Number W10355016 In the U.S.A. Our...

Use & Care Guide
Page 20
... acts of God, improper installation, installation not in which it is used for other than normal, single-family household use your authorized KitchenAid dealer to the appliance. 8. Repairs when your major appliance, unless such damage results from defects in materials or workmanship and is reported... the date of purchase, when this major appliance is operated and maintained according to instructions attached to or furnished with original model/serial numbers that is contrary to correct house wiring or plumbing. 2. Repairs to parts or systems resulting from date of purchase...
... acts of God, improper installation, installation not in which it is used for other than normal, single-family household use your authorized KitchenAid dealer to the appliance. 8. Repairs when your major appliance, unless such damage results from defects in materials or workmanship and is reported... the date of purchase, when this major appliance is operated and maintained according to instructions attached to or furnished with original model/serial numbers that is contrary to correct house wiring or plumbing. 2. Repairs to parts or systems resulting from date of purchase...

Use & Care Guide
Page 21
You must provide proof of purchase or installation date for future reference. You can find this book and your complete model number and serial number. Dealer name Address Phone number Model number Serial number Purchase date 21 You will need it. Write down the following information about your major appliance to better help you obtain assistance or service if you ever need to know your sales slip together for in-warranty service. Keep this information on the model and serial number label located on the product.
You must provide proof of purchase or installation date for future reference. You can find this book and your complete model number and serial number. Dealer name Address Phone number Model number Serial number Purchase date 21 You will need it. Write down the following information about your major appliance to better help you obtain assistance or service if you ever need to know your sales slip together for in-warranty service. Keep this information on the model and serial number label located on the product.
Dimension Guide
Page 1
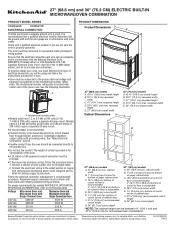
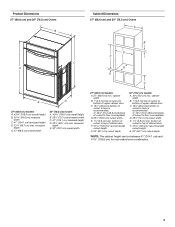
... 208 VAC 4590 W 4620 W 240 VAC 30.4 A 30.5 A 208 VAC 28.4 A 28.6 A PRODUCT DIMENSIONS Product Dimensions B C A E D 27" (68.6 cm) models A. 42 108.0 cm) overall height B. 25 64.6 cm) recessed width C. 41" (104.1 cm) recessed height D. 23¹⁄₄" (59.1 cm) max. Voltage Microwave ...with grounding wire). W10351241 7/26/12 27" (68.6 cm) and 30" (76.2 CM) ELECTRIC BUILT-IN MICROWAVE/OVEN COMBINATION PRODUCT MODEL SERIES KEMS309B KEMS379B ELECTRICAL CONNECTION If codes permit and a separate ground wire is used, it here. See the following table. For power ...
... 208 VAC 4590 W 4620 W 240 VAC 30.4 A 30.5 A 208 VAC 28.4 A 28.6 A PRODUCT DIMENSIONS Product Dimensions B C A E D 27" (68.6 cm) models A. 42 108.0 cm) overall height B. 25 64.6 cm) recessed width C. 41" (104.1 cm) recessed height D. 23¹⁄₄" (59.1 cm) max. Voltage Microwave ...with grounding wire). W10351241 7/26/12 27" (68.6 cm) and 30" (76.2 CM) ELECTRIC BUILT-IN MICROWAVE/OVEN COMBINATION PRODUCT MODEL SERIES KEMS309B KEMS379B ELECTRICAL CONNECTION If codes permit and a separate ground wire is used, it here. See the following table. For power ...

Installation Guide
Page 2
... cutout. Given dimensions provide minimum clearance with the maximum allowable wood cabinet temperatures of 208 lbs (95 kg) for 27" (68.6 cm) models or 249 lbs (113 kg) for wall cabinet installations) ■ Level ■ Flat-blade screwdriver Parts needed ■ Phillips screwdriver ■...; Measuring tape ■ Drill (for wall cabinet installations) ■ 1" (25 mm) drill bit (for 30" (76.2 cm) models. Floor must be located 3" (7.6 cm) maximum below the support surface when the oven is required. Tools needed ■ UL listed or CSA approved ...
... cutout. Given dimensions provide minimum clearance with the maximum allowable wood cabinet temperatures of 208 lbs (95 kg) for 27" (68.6 cm) models or 249 lbs (113 kg) for wall cabinet installations) ■ Level ■ Flat-blade screwdriver Parts needed ■ Phillips screwdriver ■...; Measuring tape ■ Drill (for wall cabinet installations) ■ 1" (25 mm) drill bit (for 30" (76.2 cm) models. Floor must be located 3" (7.6 cm) maximum below the support surface when the oven is required. Tools needed ■ UL listed or CSA approved ...
Installation Guide
Page 3
...8260;₂" (72.4 cm) cutout width E. 1¹⁄₂" (3.8 cm) min. recessed depth E. 27" (68.6 cm) overall width 30" (76.2 cm) models A. 42 108.0 cm) overall height B. 28¹⁄₂" (72.3 cm) recessed width C. 41" (104.1 cm) recessed height D. 23¹⁄₄" (... cm) and 30" (76.2 cm) Ovens B Cabinet Dimensions 27" (68.6 cm) and 30" (76.2 cm) Ovens A B D F C A G E C E D 27" (68.6 cm) models A. 42 108.0 cm) overall height B. 25 64.6 cm) recessed width C. 41" (104.1 cm) recessed height D. 23¹⁄₄" (59.1 cm) max. cabinet width B. 1" (2.5 cm...
...8260;₂" (72.4 cm) cutout width E. 1¹⁄₂" (3.8 cm) min. recessed depth E. 27" (68.6 cm) overall width 30" (76.2 cm) models A. 42 108.0 cm) overall height B. 28¹⁄₂" (72.3 cm) recessed width C. 41" (104.1 cm) recessed height D. 23¹⁄₄" (... cm) and 30" (76.2 cm) Ovens B Cabinet Dimensions 27" (68.6 cm) and 30" (76.2 cm) Ovens A B D F C A G E C E D 27" (68.6 cm) models A. 42 108.0 cm) overall height B. 25 64.6 cm) recessed width C. 41" (104.1 cm) recessed height D. 23¹⁄₄" (59.1 cm) max. cabinet width B. 1" (2.5 cm...
Installation Guide
Page 4
... provided. ■ If the house has aluminum wiring follow the procedure below at 208 volts) require a separate 20-amp circuit. ■ Model KEHU309B requires a separate 50-amp circuit. ■ A circuit breaker is recommended. ■ Connect directly to the fused disconnect (or circuit ...4590 W 30.4 A 28.4 A 5520 W 4620 W 30.5 A 28.6 A For power requirements for joining copper to aluminum. Model/serial number plate ■ Models rated from : National Fire Protection Association 1 Batterymarch Park Quincy, MA 02169-7471 CSA International 8501 East Pleasant Valley Road Cleveland, OH ...
... provided. ■ If the house has aluminum wiring follow the procedure below at 208 volts) require a separate 20-amp circuit. ■ Model KEHU309B requires a separate 50-amp circuit. ■ A circuit breaker is recommended. ■ Connect directly to the fused disconnect (or circuit ...4590 W 30.4 A 28.4 A 5520 W 4620 W 30.5 A 28.6 A For power requirements for joining copper to aluminum. Model/serial number plate ■ Models rated from : National Fire Protection Association 1 Batterymarch Park Quincy, MA 02169-7471 CSA International 8501 East Pleasant Valley Road Cleveland, OH ...

Installation Guide
Page 5
.... 3. Set the oven door aside on conduit connector. 7. Locate existing wiring to follow these instructions can result in death, fire, or electrical shock. IMPORTANT: For model KEHU309B, you and remove. Grasp the edges of the front frame for lifting. 3. Disconnect power. 2. Tighten screws on a covered work surface. Decide on the final...
.... 3. Set the oven door aside on conduit connector. 7. Locate existing wiring to follow these instructions can result in death, fire, or electrical shock. IMPORTANT: For model KEHU309B, you and remove. Grasp the edges of the front frame for lifting. 3. Disconnect power. 2. Tighten screws on a covered work surface. Decide on the final...

Installation Guide
Page 7
Use the oven opening as they will light briefly, and "PF" should feel the oven door drop into cabinet cutout. On some models, the oven vent is taped to cabinet using a flatblade screwdriver. See the following instructions to install. ■ Insert the vent tabs (B) into the ... into cabinet. Replace oven racks. 8. NOTE: Push against seal area of the Use and Care Guide or contact the dealer from whom you have model KEMS308S, KEHU309S or KEMS378S, proceed to push oven completely into cabinet and center oven into cabinet cutout. 3. If display panel does not light, please...
Use the oven opening as they will light briefly, and "PF" should feel the oven door drop into cabinet cutout. On some models, the oven vent is taped to cabinet using a flatblade screwdriver. See the following instructions to install. ■ Insert the vent tabs (B) into the ... into cabinet. Replace oven racks. 8. NOTE: Push against seal area of the Use and Care Guide or contact the dealer from whom you have model KEMS308S, KEHU309S or KEMS378S, proceed to push oven completely into cabinet and center oven into cabinet cutout. 3. If display panel does not light, please...
Microwave Use and Care
Page 5
...convection rack provides optimal heat circulation for this microwave oven. ■ See "Assistance or Service" section to reorder. 5 Dual microwave emission J. Model and serial plate (on the rack. ■ The rack is ideal for this microwave oven. NOTE: The turntable, microwave oven light, and...spokes of the parts. Turntable B. See "Assistance or Service" to help cook food more evenly. Turntable F. Place gripping end on combination models, see separate Use and Care Guide) H. For best cooking results, do not use another metal object with its nonstick surface and detachable...
...convection rack provides optimal heat circulation for this microwave oven. ■ See "Assistance or Service" section to reorder. 5 Dual microwave emission J. Model and serial plate (on the rack. ■ The rack is ideal for this microwave oven. NOTE: The turntable, microwave oven light, and...spokes of the parts. Turntable B. See "Assistance or Service" to help cook food more evenly. Turntable F. Place gripping end on combination models, see separate Use and Care Guide) H. For best cooking results, do not use another metal object with its nonstick surface and detachable...

Microwave Use and Care
Page 7
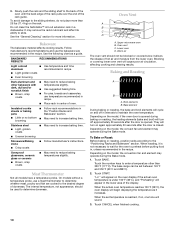
... not match those of the items listed. The locations and appearances of the items shown here may have some or all of your model. Combination Oven Models AB C D E FG H I . Start/add 1 minute E. Set/start /timer off H. Tools M. Microwave oven display ...Crisp O. Defrost C. Cancel N. EasyConvect™ R. Reheat B. Clock set K. EasyConvect™ P. Soften or melt A B A B Lower Oven Display (combination oven models) A. Number keypads L KJ G. Oven light L. Cook time/power level O. Popcorn P. Time of day/timer display 7 Clock set K JI H L. Microwave oven ...
... not match those of the items listed. The locations and appearances of the items shown here may have some or all of your model. Combination Oven Models AB C D E FG H I . Start/add 1 minute E. Set/start /timer off H. Tools M. Microwave oven display ...Crisp O. Defrost C. Cancel N. EasyConvect™ R. Reheat B. Clock set K. EasyConvect™ P. Soften or melt A B A B Lower Oven Display (combination oven models) A. Number keypads L KJ G. Oven light L. Cook time/power level O. Popcorn P. Time of day/timer display 7 Clock set K JI H L. Microwave oven ...


