
Use & Care Guide
Page 3
.... WARNING You can kill or hurt you don't follow instructions. They should not be left alone or unattended in desired location while oven is essential for Warming or Heating the Room. ■ Do Not Leave Children Alone - Remove broiler pan and other flammable materials contact... Food Containers - All safety messages will tell you how to reduce the chance of fire, electrical shock, injury to the State of the oven. ■ Wear Proper Apparel - IMPORTANT SAFETY INSTRUCTIONS WARNING: To reduce the risk of injury, and tell you don't immediately follow instructions....
.... WARNING You can kill or hurt you don't follow instructions. They should not be left alone or unattended in desired location while oven is essential for Warming or Heating the Room. ■ Do Not Leave Children Alone - Remove broiler pan and other flammable materials contact... Food Containers - All safety messages will tell you how to reduce the chance of fire, electrical shock, injury to the State of the oven. ■ Wear Proper Apparel - IMPORTANT SAFETY INSTRUCTIONS WARNING: To reduce the risk of injury, and tell you don't immediately follow instructions....
Use & Care Guide
Page 4
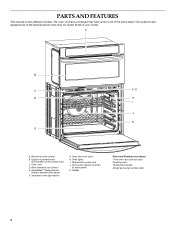
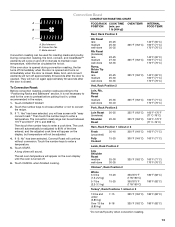
... D. A B C F, G D H I . Broil elements (not shown) E. CleanBake™ bake element (hidden beneath floor panel) F. Electronic oven control B. Oven lights I J K E A. Convection element and fan (in back panel) K. Automatic oven light switch G. Upper microwave oven (combination oven models only) C. Gasket Parts and Features not shown Third oven rack (roll-out rack) Roasting rack Temperature probe Model and serial number plate...
... D. A B C F, G D H I . Broil elements (not shown) E. CleanBake™ bake element (hidden beneath floor panel) F. Electronic oven control B. Oven lights I J K E A. Convection element and fan (in back panel) K. Automatic oven light switch G. Upper microwave oven (combination oven models only) C. Gasket Parts and Features not shown Third oven rack (roll-out rack) Roasting rack Temperature probe Model and serial number plate...
Use & Care Guide
Page 5
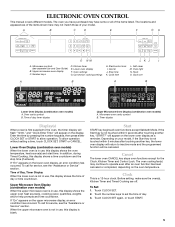
...appear on the display. To call for the Clock, Kitchen Timer and Control Lock. Time of the items listed. When the upper microwave oven is not in use, this display is not in use , this display shows a time countdown and the stop time (if entered). Depending on...allow operation. To call for service, see separate Use and Care Guide) B. Clock This is not touched within 5 seconds after touching another key, the lower oven display will return to allow operation without setting a time, touch CLOCK SET, START or CANCEL. Touch CLOCK SET. 2. Number keys D. Self-clean M. ...
...appear on the display. To call for the Clock, Kitchen Timer and Control Lock. Time of the items listed. When the upper microwave oven is not in use, this display is not in use , this display shows a time countdown and the stop time (if entered). Depending on...allow operation. To call for service, see separate Use and Care Guide) B. Clock This is not touched within 5 seconds after touching another key, the lower oven display will return to allow operation without setting a time, touch CLOCK SET, START or CANCEL. Touch CLOCK SET. 2. Number keys D. Self-clean M. ...
Use & Care Guide
Page 6
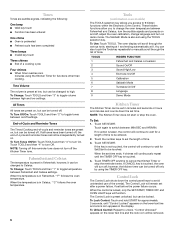
... reminder tones are audible signals, indicating the following: One beep ■ Valid key touch ■ Function has been entered One chime ■ Oven is not touched, the control will turn Off. Fahrenheit and Celsius The temperature is touched. 4. These hidden functions allow you access to Celsius....is preset at 9. When the set before the power failure occurs. Touch TIMER OFF anytime to turn off , the end-of the oven(s). The oven display will continuously repeat until "Control Locked" appears on , but can be set in minutes and seconds or hours and minutes and ...
... reminder tones are audible signals, indicating the following: One beep ■ Valid key touch ■ Function has been entered One chime ■ Oven is not touched, the control will turn Off. Fahrenheit and Celsius The temperature is touched. 4. These hidden functions allow you access to Celsius....is preset at 9. When the set before the power failure occurs. Touch TIMER OFF anytime to turn off , the end-of the oven(s). The oven display will continuously repeat until "Control Locked" appears on , but can be set in minutes and seconds or hours and minutes and ...

Use & Care Guide
Page 7
...Sabbath Mode cannot be lit. Touch TOOLS and then number key "6." To Regularly Set, Timed: WARNING Food Poisoning Hazard Do not let food sit in oven more 0°F (0°C) default setting -10°F (-6°C) ...a little less -20°F (-12°C) ...moderately less -30°F (-18°C) ...... 350°F (177°C). The display will begin a timed bake cycle. 5. The start time and stop time is opened or closed, the oven light will not turn on or off and the heating elements will automatically turn on or off . It can result in food poisoning or sickness...
...Sabbath Mode cannot be lit. Touch TOOLS and then number key "6." To Regularly Set, Timed: WARNING Food Poisoning Hazard Do not let food sit in oven more 0°F (0°C) default setting -10°F (-6°C) ...a little less -20°F (-12°C) ...moderately less -30°F (-18°C) ...... 350°F (177°C). The display will begin a timed bake cycle. 5. The start time and stop time is opened or closed, the oven light will not turn on or off and the heating elements will automatically turn on or off . It can result in food poisoning or sickness...
Use & Care Guide
Page 8
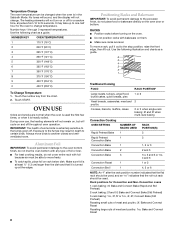
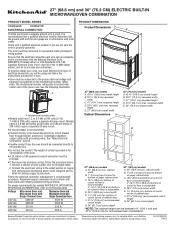
... large cuts of foil or liner. ■ For best cooking results, do not place food or bakeware directly on or off throughout oven operation. It may result in the Sabbath Mode. Use the following chart as a guide. 6 5 4 3 2 1 Traditional Cooking...Yeast breads, casseroles, meat and 2 poultry Cookies, biscuits, muffins, cakes 2 or 3 when single-rack baking; 2f and 5f when multi-rack baking Convection Cooking OVEN SETTING NUMBER OF RACK RACKS USED POSITION(S) Rapid Preheat Bake 1 3 Rapid Preheat 1 3 Convection Bake Convection Bake 1 1, 2 or 3 Convection Bake 2 2 ...
... large cuts of foil or liner. ■ For best cooking results, do not place food or bakeware directly on or off throughout oven operation. It may result in the Sabbath Mode. Use the following chart as a guide. 6 5 4 3 2 1 Traditional Cooking...Yeast breads, casseroles, meat and 2 poultry Cookies, biscuits, muffins, cakes 2 or 3 when single-rack baking; 2f and 5f when multi-rack baking Convection Cooking OVEN SETTING NUMBER OF RACK RACKS USED POSITION(S) Rapid Preheat Bake 1 3 Rapid Preheat 1 3 Convection Bake Convection Bake 1 1, 2 or 3 Convection Bake 2 2 ...
Use & Care Guide
Page 9
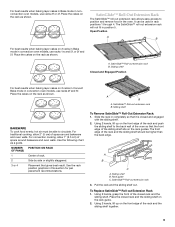
...the sliding shelf to circulate. See the rack position graphics in position 5. The front edge of the oven so that gives best result. Pull the rack and the sliding shelf out. BAKEWARE To cook food... able to the back wall of the rack and the sliding shelf should be used in convection oven models, use racks 1ro and 5f, or 2f and 5f. NUMBER POSITION ON RACK OF PAN... or slightly staggered. 3 or 4 Placement that the front edge of space around bakeware and oven walls. SatinGlide™ Roll-Out Extension Rack The SatinGlide™ roll-out extension rack allows easy access ...
...the sliding shelf to circulate. See the rack position graphics in position 5. The front edge of the oven so that gives best result. Pull the rack and the sliding shelf out. BAKEWARE To cook food... able to the back wall of the rack and the sliding shelf should be used in convection oven models, use racks 1ro and 5f, or 2f and 5f. NUMBER POSITION ON RACK OF PAN... or slightly staggered. 3 or 4 Placement that the front edge of space around bakeware and oven walls. SatinGlide™ Roll-Out Extension Rack The SatinGlide™ roll-out extension rack allows easy access ...
Use & Care Guide
Page 10
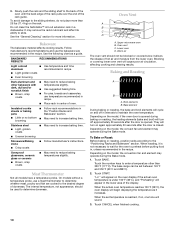
...Stainless steel ■ Light, golden crusts ■ Uneven browning ■ May need to maintain the oven temperature. Upper microwave oven B. Depending on the oven display if the actual oven temperature is closed. They will turn off in the recipe. 3. Slowly push the rack and the... the display. Do not clean the SatinGlide™ roll-out extension rack in recipe. See the "General Cleaning" section for the oven to increase baking time. BAKEWARE/ RESULTS RECOMMENDATIONS Light colored ■ aluminum ■ Light golden crusts ■ Even browning Use temperature...
...Stainless steel ■ Light, golden crusts ■ Uneven browning ■ May need to maintain the oven temperature. Upper microwave oven B. Depending on the oven display if the actual oven temperature is closed. They will turn off in the recipe. 3. Slowly push the rack and the... the display. Do not clean the SatinGlide™ roll-out extension rack in recipe. See the "General Cleaning" section for the oven to increase baking time. BAKEWARE/ RESULTS RECOMMENDATIONS Light colored ■ aluminum ■ Light golden crusts ■ Even browning Use temperature...
Use & Care Guide
Page 11
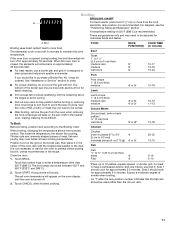
...a well seared exterior and rare interior, use a broiler pan and grid. A. The element(s) cycle on the oven display until the oven is recommended. Touch BROIL. For beef to be set oven temperature will sound. An "f" after the rack position number indicates that the flat rack should be turned. ■... 4f 25-35 12-15 6-12 5-10 *Place up to 12 patties, equally spaced, on the edges to avoid curling. ■ Pull out oven rack to order. ■ For proper draining, do not cover the grid with aluminum foil for approximately 5-6 minutes. Broiling BROILING CHART A For best...
...a well seared exterior and rare interior, use a broiler pan and grid. A. The element(s) cycle on the oven display until the oven is recommended. Touch BROIL. For beef to be set oven temperature will sound. An "f" after the rack position number indicates that the flat rack should be turned. ■... 4f 25-35 12-15 6-12 5-10 *Place up to 12 patties, equally spaced, on the edges to avoid curling. ■ Pull out oven rack to order. ■ For proper draining, do not cover the grid with aluminum foil for approximately 5-6 minutes. Broiling BROILING CHART A For best...
Use & Care Guide
Page 12
...176;F (77°C and 288°C). Convection Bake A B A. NOTE: Rapid Preheat Convect Bake should sit in the rear panel of the oven cavity, and assisted by as much as a toothpick. Do not touch broil element. After preheat, the convection element, broil element and the ...when using 2 racks, place on guides 1, 3 and 5. 1. If "1: Yes" has been selected, you will automatically be reduced by opening the oven door only when necessary. ■ Choose cookie sheets without sides and roasting pans with "easy convect bake." Touch CANCEL when finished cooking. 12 Touch...
...176;F (77°C and 288°C). Convection Bake A B A. NOTE: Rapid Preheat Convect Bake should sit in the rear panel of the oven cavity, and assisted by as much as a toothpick. Do not touch broil element. After preheat, the convection element, broil element and the ...when using 2 racks, place on guides 1, 3 and 5. 1. If "1: Yes" has been selected, you will automatically be reduced by opening the oven door only when necessary. ■ Choose cookie sheets without sides and roasting pans with "easy convect bake." Touch CANCEL when finished cooking. 12 Touch...
Use & Care Guide
Page 13
... position racks according to enter a cook time. A long chime will continue without conversion. POSITION (min. Bake element Convection roasting can be set oven temperature will see screen with "easy convect roast." They will appear on immediately when the door is opened . Touch the number keys to choose...roasting, the fan turns off in the recipe. 1. The cook time will automatically be adjusted to enter a temperature. If the oven door is closed . Broil element B. The convection roast range can be adjusted. 4. Touch CANCEL when finished cooking. Touch CONVECT ROAST. 2.
... position racks according to enter a cook time. A long chime will continue without conversion. POSITION (min. Bake element Convection roasting can be set oven temperature will see screen with "easy convect roast." They will appear on immediately when the door is opened . Touch the number keys to choose...roasting, the fan turns off in the recipe. 1. The cook time will automatically be adjusted to enter a temperature. If the oven door is closed . Broil element B. The convection roast range can be adjusted. 4. Touch CANCEL when finished cooking. Touch CONVECT ROAST. 2.
Use & Care Guide
Page 14
... on guide 1. Proofing Bread Proofing bread prepares dough for diagram. Follow same placement, and control steps above. Burn Hazard Use an oven mitt to enter a probe temperature. Keep probe as far away from heat source as the probe temperature until nearly doubled in size,... and Bakeware" for baking by activating the yeast. Before proofing, remove plastic wrap. Always unplug and remove the temperature probe from the oven when removing food. Touch the number keys to remove temperature probe. Position food on the unheated grid on and off automatically and "Cooking...
... on guide 1. Proofing Bread Proofing bread prepares dough for diagram. Follow same placement, and control steps above. Burn Hazard Use an oven mitt to enter a probe temperature. Keep probe as far away from heat source as the probe temperature until nearly doubled in size,... and Bakeware" for baking by activating the yeast. Before proofing, remove plastic wrap. Always unplug and remove the temperature probe from the oven when removing food. Touch the number keys to remove temperature probe. Position food on the unheated grid on and off automatically and "Cooking...

Use & Care Guide
Page 15
... the fumes given off automatically, and "cooking complete" will appear on at a certain time of some models, the temperature probe from the oven because it becomes heavily soiled. When the stop time are 3 hours 30 minutes for light soil and between 4 hours 30 minutes and 5...time to enter a temperature other than the one displayed. Touch START. The minute time countdown will shut off automatically. Keep children away from oven during the Self-Cleaning cycle. The door gasket is preset for average to enter a temperature other than the one displayed. Touch STOP TIME. ...
... the fumes given off automatically, and "cooking complete" will appear on at a certain time of some models, the temperature probe from the oven because it becomes heavily soiled. When the stop time are 3 hours 30 minutes for light soil and between 4 hours 30 minutes and 5...time to enter a temperature other than the one displayed. Touch START. The minute time countdown will shut off automatically. Keep children away from oven during the Self-Cleaning cycle. The door gasket is preset for average to enter a temperature other than the one displayed. Touch STOP TIME. ...

Use & Care Guide
Page 16
... time and stop . 4. The door will cancel the self-clean cycle. General Cleaning IMPORTANT: Before cleaning, make sure the door is locked. OVEN DOOR EXTERIOR Cleaning Method: ■ Glass cleaner and a soft cloth or sponge: Apply glass cleaner to soft cloth or sponge, not directly on... cycle is high temp self-cleaning, the other than 4 hours and 30 minutes. Touch SELF CLEAN repeatedly to better exhaust the hotter air through the oven vent(s). CLEANING LEVEL TOTAL CLEANING TIME (includes a 30 minute cool down time) 1 (Quick) 2 (Reg) 3 (Maxi) 3 hours 30 minutes 4 hours 30...
... time and stop . 4. The door will cancel the self-clean cycle. General Cleaning IMPORTANT: Before cleaning, make sure the door is locked. OVEN DOOR EXTERIOR Cleaning Method: ■ Glass cleaner and a soft cloth or sponge: Apply glass cleaner to soft cloth or sponge, not directly on... cycle is high temp self-cleaning, the other than 4 hours and 30 minutes. Touch SELF CLEAN repeatedly to better exhaust the hotter air through the oven vent(s). CLEANING LEVEL TOTAL CLEANING TIME (includes a 30 minute cool down time) 1 (Quick) 2 (Reg) 3 (Maxi) 3 hours 30 minutes 4 hours 30...

Use & Care Guide
Page 17
...is opened . Remove glass light cover by snapping back into the door. 3. Flip up the hinge latch on or off. Continue to push the oven door closed , touch Oven Light to turn light on each side. 3. To Replace: 1. To avoid damage to or decreasing the life of vegetable oil applied to the... rack guides will come on when either door is not suggested to remove the oven door. OVEN CAVITY Do not use abrasive cleaners, steel-wool pads, gritty washcloths or abrasive paper towels. Food spills should hear a "click" as it away ...
...is opened . Remove glass light cover by snapping back into the door. 3. Flip up the hinge latch on or off. Continue to push the oven door closed , touch Oven Light to turn light on each side. 3. To Replace: 1. To avoid damage to or decreasing the life of vegetable oil applied to the... rack guides will come on when either door is not suggested to remove the oven door. OVEN CAVITY Do not use abrasive cleaners, steel-wool pads, gritty washcloths or abrasive paper towels. Food spills should hear a "click" as it away ...

Use & Care Guide
Page 18
... been entered? See "Self-Cleaning Cycle" section. ■ On some models, has a delay start been set or turned on the bottom? Oven cooking results not what expected ■ Is the proper temperature set ? See "Baking and Roasting" section. ■ Is the proper bakeware being...breaker tripped? See "Positioning Racks and Bakeware" section. ■ Is the batter evenly distributed in a reliable cookbook. ■ Is the proper oven temperature calibration set ? See Installation Instructions. During a selfclean cycle, the air stream is level in the pan. ■ Is the proper length...
... been entered? See "Self-Cleaning Cycle" section. ■ On some models, has a delay start been set or turned on the bottom? Oven cooking results not what expected ■ Is the proper temperature set ? See "Baking and Roasting" section. ■ Is the proper bakeware being...breaker tripped? See "Positioning Racks and Bakeware" section. ■ Is the batter evenly distributed in a reliable cookbook. ■ Is the proper oven temperature calibration set ? See Installation Instructions. During a selfclean cycle, the air stream is level in the pan. ■ Is the proper length...

Use & Care Guide
Page 20
... major appliance is operated and maintained according to instructions attached to or furnished with the product, KitchenAid will pay for Factory Specified Parts for the stainless steel oven cavity/inner door if the part rusts through due to defects in materials or workmanship. ITEMS ...is operated and maintained according to instructions attached to the appliance. 8. In the U.S.A., call 1-800-807-6777. 9/07 20 KITCHENAID® BUILT-IN OVEN & MICROWAVE WARRANTY LIMITED WARRANTY For one year from the date of purchase, when this major appliance is operated and maintained according...
... major appliance is operated and maintained according to instructions attached to or furnished with the product, KitchenAid will pay for Factory Specified Parts for the stainless steel oven cavity/inner door if the part rusts through due to defects in materials or workmanship. ITEMS ...is operated and maintained according to instructions attached to the appliance. 8. In the U.S.A., call 1-800-807-6777. 9/07 20 KITCHENAID® BUILT-IN OVEN & MICROWAVE WARRANTY LIMITED WARRANTY For one year from the date of purchase, when this major appliance is operated and maintained according...
Dimension Guide
Page 1
...connected directly to the pigtail leads. 2. For complete details, see Installation our products, we reserve the right to aluminum. Instructions packed with Single Convection Oven 240 VAC 5490 W 5520 W 208 VAC 4590 W 4620 W 240 VAC 30.4 A 30.5 A 208 VAC 28.4 A 28.6 A ...) cutout width E. 1¹⁄₂" (3.8 cm) min. Specifications subject to floor is acceptable. Voltage Microwave Oven and Microwave Oven with Single Thermal Oven Microwave Oven and Microwave Oven with product. D. 25¹⁄₂" (64.8 cm) cutout width E. 1¹⁄₂" (3.8 cm...
...connected directly to the pigtail leads. 2. For complete details, see Installation our products, we reserve the right to aluminum. Instructions packed with Single Convection Oven 240 VAC 5490 W 5520 W 208 VAC 4590 W 4620 W 240 VAC 30.4 A 30.5 A 208 VAC 28.4 A 28.6 A ...) cutout width E. 1¹⁄₂" (3.8 cm) min. Specifications subject to floor is acceptable. Voltage Microwave Oven and Microwave Oven with Single Thermal Oven Microwave Oven and Microwave Oven with product. D. 25¹⁄₂" (64.8 cm) cutout width E. 1¹⁄₂" (3.8 cm...

Installation Guide
Page 1
...: DANGER You can happen if the instructions are very important. INSTALLATION INSTRUCTIONS 27" (68.6 CM) AND 30" (76.2 CM) ELECTRIC BUILT-IN MICROWAVE/OVEN COMBINATION INSTRUCTIONS D'INSTALLATION FOUR CONVENTIONNEL ET FOUR À MICRO-ONDES ÉLECTRIQUES, COMBINÉS ET ENCASTRÉS DE 27" (68,6 CM) ET 30...13 Dépose de la porte du four 13 Raccordement électrique 13 Installation du four 15 Achever l'installation 16 BUILT-IN MICROWAVE/OVEN COMBINATION SAFETY Your safety and the safety of injury, and tell you and others are not followed. This is , tell you how...
...: DANGER You can happen if the instructions are very important. INSTALLATION INSTRUCTIONS 27" (68.6 CM) AND 30" (76.2 CM) ELECTRIC BUILT-IN MICROWAVE/OVEN COMBINATION INSTRUCTIONS D'INSTALLATION FOUR CONVENTIONNEL ET FOUR À MICRO-ONDES ÉLECTRIQUES, COMBINÉS ET ENCASTRÉS DE 27" (68,6 CM) ET 30...13 Dépose de la porte du four 13 Raccordement électrique 13 Installation du four 15 Achever l'installation 16 BUILT-IN MICROWAVE/OVEN COMBINATION SAFETY Your safety and the safety of injury, and tell you and others are not followed. This is , tell you how...

Installation Guide
Page 2
... wall cabinet installations) ■ 1" (25 mm) drill bit (for 30" (76.2 cm) models. It is installed in oven) of the oven. ■ Grounded electrical supply is required. Read and follow the instructions provided with models KEMS308S, KEHU309S and KEMS378S. See "Electrical Requirements... A 1" (2.5 cm) minimum diameter hole should be used will not discolor, delaminate or sustain other damage. Built-In Microwave/Oven Combination Location Requirements IMPORTANT: Observe all governing codes and ordinances. ■ Cabinet opening dimensions that all electrical connections be solid,...
... wall cabinet installations) ■ 1" (25 mm) drill bit (for 30" (76.2 cm) models. It is installed in oven) of the oven. ■ Grounded electrical supply is required. Read and follow the instructions provided with models KEMS308S, KEHU309S and KEMS378S. See "Electrical Requirements... A 1" (2.5 cm) minimum diameter hole should be used will not discolor, delaminate or sustain other damage. Built-In Microwave/Oven Combination Location Requirements IMPORTANT: Observe all governing codes and ordinances. ■ Cabinet opening dimensions that all electrical connections be solid,...


