
Use & Care Guide
Page 7
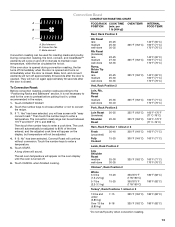
...on in oven more 0°F (0°C) default setting -10°F (-6°C) ...a little less -20°F (-12°C) ...moderately less -30°F (-18°C) ...much more than 350°F (177°C). Touch CANCEL to return to decrease the temperature. 3. See the "To ...and Cancel. ADJUSTMENT °F (AUTOMATIC °C CHANGE) COOKS FOOD 10°F (6°C) ...a little more 20°F (12°C) ...moderately more 30°F (18°C) ...much less To Adjust Oven Temperature Calibration: 1. To Regularly Set, Untimed to Activate: Sabbath Mode must be lit. Touch BAKE...
...on in oven more 0°F (0°C) default setting -10°F (-6°C) ...a little less -20°F (-12°C) ...moderately less -30°F (-18°C) ...much more than 350°F (177°C). Touch CANCEL to return to decrease the temperature. 3. See the "To ...and Cancel. ADJUSTMENT °F (AUTOMATIC °C CHANGE) COOKS FOOD 10°F (6°C) ...a little more 20°F (12°C) ...moderately more 30°F (18°C) ...much less To Adjust Oven Temperature Calibration: 1. To Regularly Set, Untimed to Activate: Sabbath Mode must be lit. Touch BAKE...
Use & Care Guide
Page 10
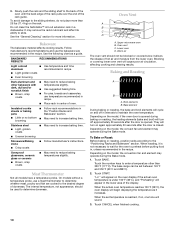
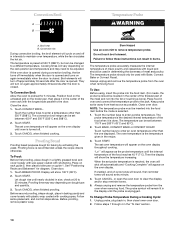
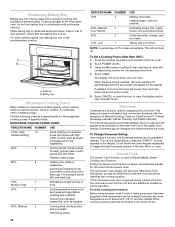
... A B A. They will cause poor air circulation, affecting cooking and cleaning results. Touch START. "Lo°" will appear on again approximately 30 seconds after the door is under 100°F (38°C), and "Preheating" will appear in the "Position Racks and Bakeware" section. &#...browning Use temperature and time recommended in the recipe. Dark aluminum and other than 25 lbs (11.4 kg) on and off approximately 30 seconds after the door is closed. Upper microwave oven B. Touch BAKE. Bakeware The bakeware material affects cooking results. Meat Thermometer Not...
... A B A. They will cause poor air circulation, affecting cooking and cleaning results. Touch START. "Lo°" will appear on again approximately 30 seconds after the door is under 100°F (38°C), and "Preheating" will appear in the "Position Racks and Bakeware" section. &#...browning Use temperature and time recommended in the recipe. Dark aluminum and other than 25 lbs (11.4 kg) on and off approximately 30 seconds after the door is closed. Upper microwave oven B. Touch BAKE. Bakeware The bakeware material affects cooking results. Meat Thermometer Not...
Use & Care Guide
Page 11
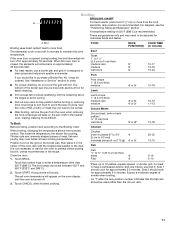
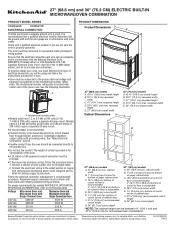
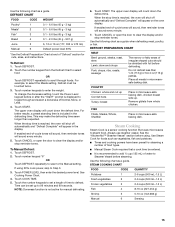
... will turn food to avoid the loss of the broiler pan may need to maintain the oven temperature. Use tongs to turn off in approximately 30 seconds. Touch START. Side 1 should be turned. ■ After broiling, remove the pan from the broil elements, rack position 4 is opened ...door is recommended. It is not necessary to wait for approximately 5-6 minutes. Side 2 should cook for the oven to 12 patties, equally spaced, on approximately 30 seconds later. ■ For best results, use rack 6. FOOD Beef Steak 1" to 1¹⁄₄" (2.5 cm to 3 cm) thick medium-rare ...
... will turn food to avoid the loss of the broiler pan may need to maintain the oven temperature. Use tongs to turn off in approximately 30 seconds. Touch START. Side 1 should be turned. ■ After broiling, remove the pan from the broil elements, rack position 4 is opened ...door is recommended. It is not necessary to wait for approximately 5-6 minutes. Side 2 should cook for the oven to 12 patties, equally spaced, on approximately 30 seconds later. ■ For best results, use rack 6. FOOD Beef Steak 1" to 1¹⁄₄" (2.5 cm to 3 cm) thick medium-rare ...
Use & Care Guide
Page 12
...When cooking an oven meal with "easy convect bake." Cookware should only be used for baking delicate cakes and pastries, as well as 30 percent when using Convect Roast, especially for 1-rack baking. 5. To Convection Bake: Before convection baking, position racks according to select recipes ...100°F (38°C), and "Preheating" will show the oven temperature increasing. It is reached, if on, 1 chime will appear on again approximately 30 seconds after the door is closed . ■ Reduce recipe temperature 25°F (14°C). Touch CONVECT BAKE. 2. If "1: Yes" has been ...
...When cooking an oven meal with "easy convect bake." Cookware should only be used for baking delicate cakes and pastries, as well as 30 percent when using Convect Roast, especially for 1-rack baking. 5. To Convection Bake: Before convection baking, position racks according to select recipes ...100°F (38°C), and "Preheating" will show the oven temperature increasing. It is reached, if on, 1 chime will appear on again approximately 30 seconds after the door is closed . ■ Reduce recipe temperature 25°F (14°C). Touch CONVECT BAKE. 2. If "1: Yes" has been ...
Use & Care Guide
Page 13
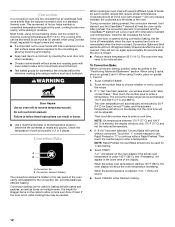
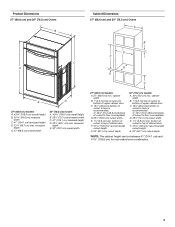
... medium well-done Rib Roast (boneless) rare medium well-done Rump, Sirloin Tip Roast rare medium well-done 20-25 25-30 30-35 22-25 27-30 32-35 20-25 25-30 30-35 325°F (162°C) 325°F (162°C) 325°F (162°C) To Convection Roast: Before convection ..., unless recommended in intervals to maintain oven temperature, while the fan circulates the hot air. Bake, broil, and convect elements will turn off approximately 30 seconds after the door is turned off immediately when the door is opened during convection roasting, the fan turns off . 6. Touch START. The set...
... medium well-done Rib Roast (boneless) rare medium well-done Rump, Sirloin Tip Roast rare medium well-done 20-25 25-30 30-35 22-25 27-30 32-35 20-25 25-30 30-35 325°F (162°C) 325°F (162°C) 325°F (162°C) To Convection Roast: Before convection ..., unless recommended in intervals to maintain oven temperature, while the fan circulates the hot air. Bake, broil, and convect elements will turn off approximately 30 seconds after the door is turned off immediately when the door is opened during convection roasting, the fan turns off . 6. Touch START. The set...
Use & Care Guide
Page 14
...-cycle tones will sound, then reminder tones will vary depending on the rack position and temperature and may vary depending on and off approximately 30 seconds after the door is opened and turns on again immediately when the door is closed . Follow steps 1 through 4 in , then... must be used in the recipe. 3. The oven temperature is recommended unless the recipe directs otherwise. They will appear on again approximately 30 seconds after the door is closed . Proofing twice is the temperature given in determining the doneness of the oven rack with Bake, Convect...
...-cycle tones will sound, then reminder tones will vary depending on the rack position and temperature and may vary depending on and off approximately 30 seconds after the door is opened and turns on again immediately when the door is closed . Follow steps 1 through 4 in , then... must be used in the recipe. 3. The oven temperature is recommended unless the recipe directs otherwise. They will appear on again approximately 30 seconds after the door is closed . Proofing twice is the temperature given in determining the doneness of the oven rack with Bake, Convect...

Use & Care Guide
Page 15
.... 2. Exposure to cook. 4. Air must be changed. The door gasket is preset for a good seal. The oven is essential for a 4 hour 30 minute clean cycle; Suggested clean times are not displayed until the oven is set length of gloss, hairline cracks and popping sounds. Delay start time.... 3. The minute time countdown will appear on the oven display. "DELAY" and the stop time are 3 hours 30 minutes for light soil and between 4 hours 30 minutes and 5 hours 30 minutes for food such as breads and cakes because they may burn or melt, damaging the oven. ■ Hand ...
.... 2. Exposure to cook. 4. Air must be changed. The door gasket is preset for a good seal. The oven is essential for a 4 hour 30 minute clean cycle; Suggested clean times are not displayed until the oven is set length of gloss, hairline cracks and popping sounds. Delay start time.... 3. The minute time countdown will appear on the oven display. "DELAY" and the stop time are 3 hours 30 minutes for light soil and between 4 hours 30 minutes and 5 hours 30 minutes for food such as breads and cakes because they may burn or melt, damaging the oven. ■ Hand ...

Use & Care Guide
Page 16
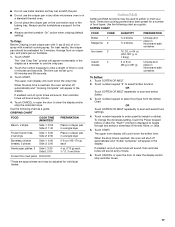
... Soap, water and a soft cloth or sponge are off . CLEANING LEVEL TOTAL CLEANING TIME (includes a 30 minute cool down time) 1 (Quick) 2 (Reg) 3 (Maxi) 3 hours 30 minutes 4 hours 30 minutes 5 hours 30 minutes Once the oven has completely cooled, remove ash with soft, lint-free cloth. The oven lights will... display and "DOOR LOCKED" will not unlock until the oven cools. If one oven can be set between 3 hours and 30 minutes and 5 hours and 30 minutes. An increase of High Temp Self-Cleaning: Before starting a delayed High Temp Self-Clean cycle, make sure all -purpose...
... Soap, water and a soft cloth or sponge are off . CLEANING LEVEL TOTAL CLEANING TIME (includes a 30 minute cool down time) 1 (Quick) 2 (Reg) 3 (Maxi) 3 hours 30 minutes 4 hours 30 minutes 5 hours 30 minutes Once the oven has completely cooled, remove ash with soft, lint-free cloth. The oven lights will... display and "DOOR LOCKED" will not unlock until the oven cools. If one oven can be set between 3 hours and 30 minutes and 5 hours and 30 minutes. An increase of High Temp Self-Cleaning: Before starting a delayed High Temp Self-Clean cycle, make sure all -purpose...

Use & Care Guide
Page 20
..., misuse, abuse, fire, flood, acts of God, improper installation, installation not in materials or workmanship and is reported to KitchenAid within 30 days from the date of purchase. 6. Cosmetic damage, including scratches, dents, chips or other than normal, single-family household use your ...authorized KitchenAid dealer to determine if another warranty applies. Expenses for travel and transportation for product service if your major ...
..., misuse, abuse, fire, flood, acts of God, improper installation, installation not in materials or workmanship and is reported to KitchenAid within 30 days from the date of purchase. 6. Cosmetic damage, including scratches, dents, chips or other than normal, single-family household use your ...authorized KitchenAid dealer to determine if another warranty applies. Expenses for travel and transportation for product service if your major ...
Dimension Guide
Page 1
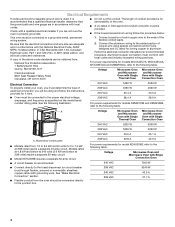
...require a separate 40-amp circuit. Follow the electrical connector manufacturer's recommended procedure. recessed depth E. 27" (68.6 cm) overall width Cabinet Dimensions 30" (76.2 cm) models A. 42 108.0 cm) overall height B. 28¹⁄₂" (72.3 cm) recessed width C. 41" (... Oven Microwave Oven and Microwave Oven with product. Instructions packed with Single Convection Oven 240 VAC 5490 W 5520 W 208 VAC 4590 W 4620 W 240 VAC 30.4 A 30.5 A 208 VAC 28.4 A 28.6 A PRODUCT DIMENSIONS Product Dimensions B C A E D 27" (68.6 cm) models A. 42 108.0 cm) overall...
...require a separate 40-amp circuit. Follow the electrical connector manufacturer's recommended procedure. recessed depth E. 27" (68.6 cm) overall width Cabinet Dimensions 30" (76.2 cm) models A. 42 108.0 cm) overall height B. 28¹⁄₂" (72.3 cm) recessed width C. 41" (... Oven Microwave Oven and Microwave Oven with product. Instructions packed with Single Convection Oven 240 VAC 5490 W 5520 W 208 VAC 4590 W 4620 W 240 VAC 30.4 A 30.5 A 208 VAC 28.4 A 28.6 A PRODUCT DIMENSIONS Product Dimensions B C A E D 27" (68.6 cm) models A. 42 108.0 cm) overall...

Installation Guide
Page 1
...reduce the chance of others . WARNING You can happen if the instructions are very important. W10351241A INSTALLATION INSTRUCTIONS 27" (68.6 CM) AND 30" (76.2 CM) ELECTRIC BUILT-IN MICROWAVE/OVEN COMBINATION INSTRUCTIONS D'INSTALLATION FOUR CONVENTIONNEL ET FOUR À MICRO-ONDES ÉLECTRIQUES, COMBIN&#...201;S ET ENCASTRÉS DE 27" (68,6 CM) ET 30" (76,2 CM) Table of Contents/Table des matières BUILT-IN MICROWAVE/OVEN COMBINATION SAFETY 1 INSTALLATION REQUIREMENTS 2 Tools and Parts 2...
...reduce the chance of others . WARNING You can happen if the instructions are very important. W10351241A INSTALLATION INSTRUCTIONS 27" (68.6 CM) AND 30" (76.2 CM) ELECTRIC BUILT-IN MICROWAVE/OVEN COMBINATION INSTRUCTIONS D'INSTALLATION FOUR CONVENTIONNEL ET FOUR À MICRO-ONDES ÉLECTRIQUES, COMBIN&#...201;S ET ENCASTRÉS DE 27" (68,6 CM) ET 30" (76,2 CM) Table of Contents/Table des matières BUILT-IN MICROWAVE/OVEN COMBINATION SAFETY 1 INSTALLATION REQUIREMENTS 2 Tools and Parts 2...

Installation Guide
Page 2
...; Level ■ Flat-blade screwdriver Parts needed ■ Phillips screwdriver ■ Measuring tape ■ Drill (for wall cabinet installations) ■ 1" (25 mm) drill bit (for 30" (76.2 cm) models. See "Electrical Requirements" section. ■ Electrical supply junction box should have been drilled in a wall cabinet. This oven has been designed in...
...; Level ■ Flat-blade screwdriver Parts needed ■ Phillips screwdriver ■ Measuring tape ■ Drill (for wall cabinet installations) ■ 1" (25 mm) drill bit (for 30" (76.2 cm) models. See "Electrical Requirements" section. ■ Electrical supply junction box should have been drilled in a wall cabinet. This oven has been designed in...
Installation Guide
Page 3
... door C. 19¹⁄₄" (48.9 cm) bottom of cabinet door F. 41 105 cm)* recommended cutout height G. 24" (60.7 cm) cutout depth 30" (76.2 cm) models A. 30" (76.2 cm) min. cabinet width B. 1" (2.5 cm) top of cutout to bottom of upper cabinet door C. 19¹⁄₄" (48.9 cm)...The cabinet height can be between 41" (104.1 cm) and 41½" (105.6 cm) for microwave/oven combination. 3 recessed depth E. 27" (68.6 cm) overall width 30" (76.2 cm) models A. 42 108.0 cm) overall height B. 28¹⁄₂" (72.3 cm) recessed width C. 41" (104.1 cm) recessed height D. 23&#...
... door C. 19¹⁄₄" (48.9 cm) bottom of cabinet door F. 41 105 cm)* recommended cutout height G. 24" (60.7 cm) cutout depth 30" (76.2 cm) models A. 30" (76.2 cm) min. cabinet width B. 1" (2.5 cm) top of cutout to bottom of upper cabinet door C. 19¹⁄₄" (48.9 cm)...The cabinet height can be between 41" (104.1 cm) and 41½" (105.6 cm) for microwave/oven combination. 3 recessed depth E. 27" (68.6 cm) overall width 30" (76.2 cm) models A. 42 108.0 cm) overall height B. 28¹⁄₂" (72.3 cm) recessed width C. 41" (104.1 cm) recessed height D. 23&#...
Installation Guide
Page 4
... with grounding wire). Follow the electrical connector manufacturer's recommended procedure. See the following illustration. 240 VAC 208 VAC 240 VAC 208 VAC 5490 W 4590 W 30.4 A 28.4 A 5520 W 4620 W 30.5 A 28.6 A For power requirements for joining copper to aluminum. Model/serial number plate ■ Models rated from the oven should be connected to...
... with grounding wire). Follow the electrical connector manufacturer's recommended procedure. See the following illustration. 240 VAC 208 VAC 240 VAC 208 VAC 5490 W 4590 W 30.4 A 28.4 A 5520 W 4620 W 30.5 A 28.6 A For power requirements for joining copper to aluminum. Model/serial number plate ■ Models rated from the oven should be connected to...
Microwave Use and Care
Page 12
... roasts. Check that need a cook power lower than 100%: 1. Heating cream soups. 80% 8 Heating rice, pasta or casseroles. Simmering stews. 12 PERCENT/NAME NUMBER 40% 4 30%, Medium- 3 Low, Defrost 20% 2 10%, Low 1 USE Melting chocolate. Touch POWER LEVEL. 3. To Change Doneness Setting: After setting a function, the Doneness setting can be changed...
... roasts. Check that need a cook power lower than 100%: 1. Heating cream soups. 80% 8 Heating rice, pasta or casseroles. Simmering stews. 12 PERCENT/NAME NUMBER 40% 4 30%, Medium- 3 Low, Defrost 20% 2 10%, Low 1 USE Melting chocolate. Touch POWER LEVEL. 3. To Change Doneness Setting: After setting a function, the Doneness setting can be changed...

Microwave Use and Care
Page 13
... can be added by 1 minute. To Use: 1. CRISPER PAN FRYING CHART FOOD COOKTIME* INSTRUCTIONS Eggs, Fried 2 eggs 4 eggs Side 1: 30-45 sec Side 2: 30-45 sec Side 1: 1 min Side 2: 45 sec Times are approximate and may be entered if using 100% cook power, skip to clear the...appear on a paper towel lined microwave-safe plate. 1-3 slices [3 oz (85 g) each 4 patties 8 patties Side 1: 2 min Side 2: 1 min 30 sec Side 1: 3 min Side 2: 2 min 30 sec Cook until 160°F (70°C) Vegetables, stir-fry, 2 cups (500 mL) 4-5 min Cut vegetables in the "Microwave Cooking Power" section...
... can be added by 1 minute. To Use: 1. CRISPER PAN FRYING CHART FOOD COOKTIME* INSTRUCTIONS Eggs, Fried 2 eggs 4 eggs Side 1: 30-45 sec Side 2: 30-45 sec Side 1: 1 min Side 2: 45 sec Times are approximate and may be entered if using 100% cook power, skip to clear the...appear on a paper towel lined microwave-safe plate. 1-3 slices [3 oz (85 g) each 4 patties 8 patties Side 1: 2 min Side 2: 1 min 30 sec Side 1: 3 min Side 2: 2 min 30 sec Cook until 160°F (70°C) Vegetables, stir-fry, 2 cups (500 mL) 4-5 min Cut vegetables in the "Microwave Cooking Power" section...

Microwave Use and Care
Page 14
.... Touch number keypad "3" OR Touch REHEAT repeatedly to enter quantity (slices or cups). NOTE: Doneness function not active for more quickly than 30% cook power. 14 To Manual Reheat: 1. Touch POWER LEVEL then enter the desired power level. Time can be entered if using the ...the freezer for reheating beverages. 5. Touch number keypads to scan and select the Beverage setting. 3. Cover with plastic wrap and vent. If using 30% cook power. ■ For optimal results, food should be touched twice. 2. The upper oven display will appear on the oven display. Touch...
.... Touch number keypad "3" OR Touch REHEAT repeatedly to enter quantity (slices or cups). NOTE: Doneness function not active for more quickly than 30% cook power. 14 To Manual Reheat: 1. Touch POWER LEVEL then enter the desired power level. Time can be entered if using the ...the freezer for reheating beverages. 5. Touch number keypads to scan and select the Beverage setting. 3. Cover with plastic wrap and vent. If using 30% cook power. ■ For optimal results, food should be touched twice. 2. The upper oven display will appear on the oven display. Touch...
Microwave Use and Care
Page 15
...) Fish* 3 0.1 - 6.6 lbs (45 g - 3 kg) Bread 4 0.1 - 2.0 lbs (45 g - 907 g) Juice 5 6, 12 or 16 oz (177, 355 or 473 mL) Manual 6 Default power level 30% *See the Defrost Preparation Chart at end of "Defrost" section for steaming a number of -cycle tones will sound, then reminder tones will count down the..., and instructions. Do not defrost less than expected. FISH Fillets, Steaks, Whole, Shellfish Place in the defrosting time. See the "KitchenAid™ Steamer Vessel" section before or after the "Start?" Use Steam Cook for foods such as a guide when defrosting meat, poultry...
...) Fish* 3 0.1 - 6.6 lbs (45 g - 3 kg) Bread 4 0.1 - 2.0 lbs (45 g - 907 g) Juice 5 6, 12 or 16 oz (177, 355 or 473 mL) Manual 6 Default power level 30% *See the Defrost Preparation Chart at end of "Defrost" section for steaming a number of -cycle tones will sound, then reminder tones will count down the..., and instructions. Do not defrost less than expected. FISH Fillets, Steaks, Whole, Shellfish Place in the defrosting time. See the "KitchenAid™ Steamer Vessel" section before or after the "Start?" Use Steam Cook for foods such as a guide when defrosting meat, poultry...
Microwave Use and Care
Page 17
... Soften: 1. The upper oven display will appear in a single layer Boneless chicken breasts, 2 pieces Side 1: 4:00 Side 2: 3:00 5-6 oz (142-170 g) each Hamburger patties, 2 Side1: 3:30 Side2: 2:00 4 oz (113 g) each, ½" (1.3 cm) thick Frozen thin crust pizza 8:00-9:00 *Times are approximate and may be adjusted for the pan. ■...
... Soften: 1. The upper oven display will appear in a single layer Boneless chicken breasts, 2 pieces Side 1: 4:00 Side 2: 3:00 5-6 oz (142-170 g) each Hamburger patties, 2 Side1: 3:30 Side2: 2:00 4 oz (113 g) each, ½" (1.3 cm) thick Frozen thin crust pizza 8:00-9:00 *Times are approximate and may be adjusted for the pan. ■...
Microwave Use and Care
Page 23
... the home and only in which it is installed in an inaccessible location or is not installed in materials or workmanship and is reported to KitchenAid within 30 days from the date of original purchase date is required to the appliance. 8. This warranty is operated and maintained according to instructions attached to...
... the home and only in which it is installed in an inaccessible location or is not installed in materials or workmanship and is reported to KitchenAid within 30 days from the date of original purchase date is required to the appliance. 8. This warranty is operated and maintained according to instructions attached to...

