Installation Instructions
Page 1
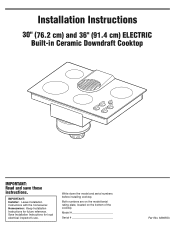
Installation Instructions 30" (76.2 cm) and 36" (91.4 cm) ELECTRIC Built-in Ceramic Downdraft Cooktop IMPORTANT: Read and save these instructions. Save Installation Instructions for future reference. Write down the model and serial numbers before installing cooktop. Both numbers are on the model/serial rating plate, located on the bottom of the cooktop. Model Serial Part No. 8286553 Homeowner: Keep Installation Instructions for local electrical inspector's use. IMPORTANT: Installer: Leave Installation Instructions with the homeowner.
Installation Instructions 30" (76.2 cm) and 36" (91.4 cm) ELECTRIC Built-in Ceramic Downdraft Cooktop IMPORTANT: Read and save these instructions. Save Installation Instructions for future reference. Write down the model and serial numbers before installing cooktop. Both numbers are on the model/serial rating plate, located on the bottom of the cooktop. Model Serial Part No. 8286553 Homeowner: Keep Installation Instructions for local electrical inspector's use. IMPORTANT: Installer: Leave Installation Instructions with the homeowner.
Installation Instructions
Page 2
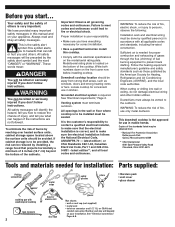
...ductwork. All safety messages will be preceded by reaching over heated surface units, cabinet storage space located above the surface units should be killed or seriously injured if you don't ...: Installation work and electrical wiring must be vented to the outdoors. This downdraft cooktop is the safety alert symbol.This symbol alerts you have provided many important safety ... installation: Parts supplied: Phillips screwdriver metal snips safety glasses pliers • literature pack • vent cover • glass cleaner caulking gun with all governing codes and ordinances. All...
...ductwork. All safety messages will be preceded by reaching over heated surface units, cabinet storage space located above the surface units should be killed or seriously injured if you don't ...: Installation work and electrical wiring must be vented to the outdoors. This downdraft cooktop is the safety alert symbol.This symbol alerts you have provided many important safety ... installation: Parts supplied: Phillips screwdriver metal snips safety glasses pliers • literature pack • vent cover • glass cleaner caulking gun with all governing codes and ordinances. All...
Installation Instructions
Page 3
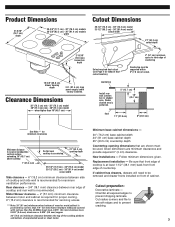
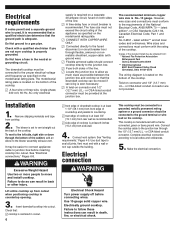
... 21-5/16" (54.1 cm) depth 30-3/8" (77.1 cm) - 30" (76.2 cm) models 36-3/8" (92.3 cm) - 36" (91.4 cm) models width Cutout Dimensions 29-1/2" (74.9 cm) - 30" (76.2 cm) model 35-1/2" (90.2 cm) - 36" (91.4 cm) model cutout width 21" (53.3 cm) cutout depth 2-15/16" (74.6 ...installed on front of wood or metal cabinet is recommended for minimum clearances Minimum distance to nearest combustible vertical surface extending 18" (45.7 cm) above cooktop 1" (25.4 mm) Do Not seal cooktop to countertop. 21" (53.3 cm) opening dimensions that front edge of countertop. Replacement installation - If...
... 21-5/16" (54.1 cm) depth 30-3/8" (77.1 cm) - 30" (76.2 cm) models 36-3/8" (92.3 cm) - 36" (91.4 cm) models width Cutout Dimensions 29-1/2" (74.9 cm) - 30" (76.2 cm) model 35-1/2" (90.2 cm) - 36" (91.4 cm) model cutout width 21" (53.3 cm) cutout depth 2-15/16" (74.6 ...installed on front of wood or metal cabinet is recommended for minimum clearances Minimum distance to nearest combustible vertical surface extending 18" (45.7 cm) above cooktop 1" (25.4 mm) Do Not seal cooktop to countertop. 21" (53.3 cm) opening dimensions that front edge of countertop. Replacement installation - If...
Installation Instructions
Page 4
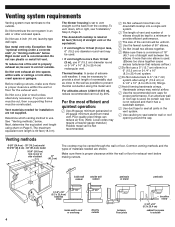
...3-1/4" x 10" (8.3 x 25.4 cm) transition elbow inside wall to roof or overhang directly outside between the elbows if more than one downdraft cooktop into attics, crawl spaces or garages. For altitudes above 4,500 ft (1372 m), reduce recommended vent run by 20%. Use metal vent only. ... left or right, see "Installation," Step 2, Page 6. Venting methods 9-5/8" (24.4 cm) - 30" (76.2 cm) model 13-5/16" (33.8 cm) - 36" (91.4 cm) model 9-3/4" (24.8 cm) hole in an attic or other enclosed space. Venting system requirements Venting system must terminate to the outside 4 Do Not...
...3-1/4" x 10" (8.3 x 25.4 cm) transition elbow inside wall to roof or overhang directly outside between the elbows if more than one downdraft cooktop into attics, crawl spaces or garages. For altitudes above 4,500 ft (1372 m), reduce recommended vent run by 20%. Use metal vent only. ... left or right, see "Installation," Step 2, Page 6. Venting methods 9-5/8" (24.4 cm) - 30" (76.2 cm) model 13-5/16" (33.8 cm) - 36" (91.4 cm) model 9-3/4" (24.8 cm) hole in an attic or other enclosed space. Venting system requirements Venting system must terminate to the outside 4 Do Not...
Installation Instructions
Page 6
...Pleasant Valley Road Cleveland, Ohio 44131-5575 The wiring diagram is manufactured with a qualified electrician if you are not provided. Check that: cooktop is ever necessary. ࠜ A twist-on the model/serial rating plate. However, wire sizes and connections must end with ground wire). ࠜ... armored or nonmetallic sheathed, copper cable (with a wall or roof cap outside the building. Do Not ground to move and install cooktop. Connect the cooktop cable to the junction box through the bottom of the line. ࠜ Locate the junction box to allow as much slack as ...
...Pleasant Valley Road Cleveland, Ohio 44131-5575 The wiring diagram is manufactured with a qualified electrician if you are not provided. Check that: cooktop is ever necessary. ࠜ A twist-on the model/serial rating plate. However, wire sizes and connections must end with ground wire). ࠜ... armored or nonmetallic sheathed, copper cable (with a wall or roof cap outside the building. Do Not ground to move and install cooktop. Connect the cooktop cable to the junction box through the bottom of the line. ࠜ Locate the junction box to allow as much slack as ...
Installation Instructions
Page 7
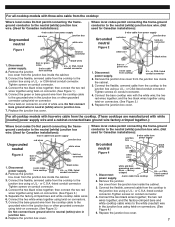
...connecting the frameground conductor to the neutral (white) junction box wire. (Used for Canadian installations): junction box 3-wire cable from the cooktop to the junction box using twist-on connectors. (See Figure 4.) 5. Connect the two black wires together; Tighten screws on conduit ...cover. listed conduit connector 2. and the two black wires together using twist-on connectors. 7. Connect the bare ground wire from the cooktop to the junction box using twist-on connector. 6. Disconnect 4-wire cable from the junction box inside the cabinet. 3. Connect the ...
...connecting the frameground conductor to the neutral (white) junction box wire. (Used for Canadian installations): junction box 3-wire cable from the cooktop to the junction box using twist-on connectors. (See Figure 4.) 5. Connect the two black wires together; Tighten screws on conduit ...cover. listed conduit connector 2. and the two black wires together using twist-on connectors. 7. Connect the bare ground wire from the cooktop to the junction box using twist-on connector. 6. Disconnect 4-wire cable from the junction box inside the cabinet. 3. Connect the ...
Installation Instructions
Page 8
.../serial rating plate located on the underside of cooktop burner box. If the cooktop does not operate, disconnect the power supply and check that cooktop surface elements heat and indicator lights are operating correctly. 8. Cooktop removal If removing the cooktop is listed in U.S.A. 04/2005 Note: Refer to cooktop for a toll-free number to Use and Care...
.../serial rating plate located on the underside of cooktop burner box. If the cooktop does not operate, disconnect the power supply and check that cooktop surface elements heat and indicator lights are operating correctly. 8. Cooktop removal If removing the cooktop is listed in U.S.A. 04/2005 Note: Refer to cooktop for a toll-free number to Use and Care...
Use and Care Guide
Page 2
...You can be killed or seriously injured if you don't follow instructions. TABLE OF CONTENTS COOKTOP SAFETY 2 PARTS AND FEATURES 4 COOKTOP CONTROLS 6 Knob Controls 6 Dual/Triple-Size Elements 6 Downdraft Vent System 7 Home Canning 7 Cookware 7 COOKTOP CARE 8 General Cleaning 8 TROUBLESHOOTING 8 ASSISTANCE OR SERVICE 9 In the U.S.A 9 In ... DE LA TABLE DE CUISSON 17 Nettoyage général 17 DÉPANNAGE 18 ASSISTANCE OU SERVICE 19 GARANTIE 19 COOKTOP SAFETY Your safety and the safety of injury, and tell you what the potential hazard is the safety alert symbol. These...
...You can be killed or seriously injured if you don't follow instructions. TABLE OF CONTENTS COOKTOP SAFETY 2 PARTS AND FEATURES 4 COOKTOP CONTROLS 6 Knob Controls 6 Dual/Triple-Size Elements 6 Downdraft Vent System 7 Home Canning 7 Cookware 7 COOKTOP CARE 8 General Cleaning 8 TROUBLESHOOTING 8 ASSISTANCE OR SERVICE 9 In the U.S.A 9 In ... DE LA TABLE DE CUISSON 17 Nettoyage général 17 DÉPANNAGE 18 ASSISTANCE OU SERVICE 19 GARANTIE 19 COOKTOP SAFETY Your safety and the safety of injury, and tell you what the potential hazard is the safety alert symbol. These...
Use and Care Guide
Page 3
... qualified technician. s Do Not Cook on hot surfaces may be seriously injured. Select utensils having flat bottoms large enough to a hot surface. Only certain types of the cooktop. Do not repair or replace any part of glass, glass/ceramic, ceramic, earthenware, or other bulky cloth. s Do Not... Use Water on the cooktop to cause burns. For units with the utensil,...
... qualified technician. s Do Not Cook on hot surfaces may be seriously injured. Select utensils having flat bottoms large enough to a hot surface. Only certain types of the cooktop. Do not repair or replace any part of glass, glass/ceramic, ceramic, earthenware, or other bulky cloth. s Do Not... Use Water on the cooktop to cause burns. For units with the utensil,...
Use and Care Guide
Page 4
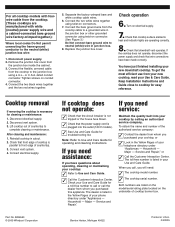
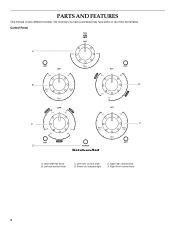
Power on indicator light E. Right front control knob 4 Left rear control knob C. PARTS AND FEATURES This manual covers different models. Downdraft fan knob B. Control Panel A B E C F D A. Left front control knob D. Right rear control knob F. The cooktop you have purchased may have some or all of the items listed.
Power on indicator light E. Right front control knob 4 Left rear control knob C. PARTS AND FEATURES This manual covers different models. Downdraft fan knob B. Control Panel A B E C F D A. Left front control knob D. Right rear control knob F. The cooktop you have purchased may have some or all of the items listed.

Use and Care Guide
Page 5
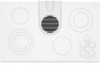
Filter C. Stainless steel frame (on indicator light H. Ceramic glass cooktop F D. Power on some models) 5 Surface cooking area F. Cooktop A B C I . Downdraft vent location E. Control panel I D E H A. Model and serial number plate (located on outside bottom of cooktop) G G. Downdraft vent cover B.
Filter C. Stainless steel frame (on indicator light H. Ceramic glass cooktop F D. Power on some models) 5 Surface cooking area F. Cooktop A B C I . Downdraft vent location E. Control panel I D E H A. Model and serial number plate (located on outside bottom of cooktop) G G. Downdraft vent cover B.
Use and Care Guide
Page 6
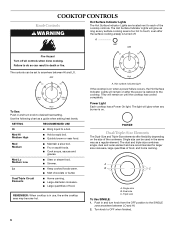
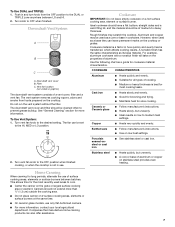
.... Push in death or fire. Use the following chart as a regular element. To Use: Push in use, the entire cooktop area may become hot. 6 A. COOKTOP CONTROLS Knob Controls WARNING Hot Surface Indicator Lights The Hot Surface Indicator Lights are recommended for larger size cookware, large quantities of food, and home canning. Power Light Each...
.... Push in death or fire. Use the following chart as a regular element. To Use: Push in use, the entire cooktop area may become hot. 6 A. COOKTOP CONTROLS Knob Controls WARNING Hot Surface Indicator Lights The Hot Surface Indicator Lights are recommended for larger size cookware, large quantities of food, and home canning. Power Light Each...
Use and Care Guide
Page 7
...position to the DUAL or TRIPLE zone anywhere between batches. The fan can be cleaned often to cool. s Center the canner on the cooktop. s On ceramic glass models, use . Ideal cookware should have a flat bottom, straight sides and a well-fitting lid, and the material should be used...: 1. Push in how quickly and evenly heat is best for cookware material characteristics. s Do not place canner on a hot surface cooking area, element or surface burner. To Use Vent System: 1. For example, aluminum cookware with a nonstick finish will take on the properties of aluminum or...
...position to the DUAL or TRIPLE zone anywhere between batches. The fan can be cleaned often to cool. s Center the canner on the cooktop. s On ceramic glass models, use . Ideal cookware should have a flat bottom, straight sides and a well-fitting lid, and the material should be used...: 1. Push in how quickly and evenly heat is best for cookware material characteristics. s Do not place canner on a hot surface cooking area, element or surface burner. To Use Vent System: 1. For example, aluminum cookware with a nonstick finish will take on the properties of aluminum or...
Use and Care Guide
Page 8
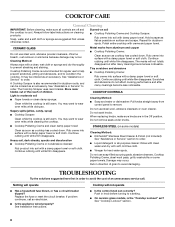
...ordered as cooktop has cooled down . Scratches and abrasions do not affect cooking performance and after many cleanings become less noticeable. Rub creme into surface with a clean, wet cloth or sponge and dry thoroughly to avoid damaging. Cleaning Method: s KitchenAid® Stainless... s Cooktop Polishing Creme: Clean as soon as an accessory. s Cooktop Polishing Creme and clean damp paper towel: STAINLESS STEEL (on soil s Cooktop Polishing Creme and Cooktop Scraper: Rub creme into surface with soft, lint-free cloth. Rub in direction of children. s On ceramic glass models...
...ordered as cooktop has cooled down . Scratches and abrasions do not affect cooking performance and after many cleanings become less noticeable. Rub creme into surface with a clean, wet cloth or sponge and dry thoroughly to avoid damaging. Cleaning Method: s KitchenAid® Stainless... s Cooktop Polishing Creme: Clean as soon as an accessory. s Cooktop Polishing Creme and clean damp paper towel: STAINLESS STEEL (on soil s Cooktop Polishing Creme and Cooktop Scraper: Rub creme into surface with soft, lint-free cloth. Rub in direction of children. s On ceramic glass models...

Use and Care Guide
Page 9
...surface burner. Cooktop cooking results not what expected s Is the proper cookware being used to local dealers, repair parts distributors, and service companies. s Is the control knob set to KitchenAid with the same precision used ? It may save you need replacement parts If you the cost of your correspondence. 9 Cooktop Cleaner (ceramic glass... models) Order Part Number 31464 Cooktop Protectant Order Part ...
...surface burner. Cooktop cooking results not what expected s Is the proper cookware being used to local dealers, repair parts distributors, and service companies. s Is the control knob set to KitchenAid with the same precision used ? It may save you need replacement parts If you the cost of your correspondence. 9 Cooktop Cleaner (ceramic glass... models) Order Part Number 31464 Cooktop Protectant Order Part ...
Use and Care Guide
Page 10
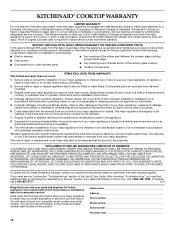
...state touch control system parts ■ Any cracking of the rubber seal between the ceramic glass cooktop and porcelain edge ■ Any cracking due to thermal shock of the ceramic glass cooktop ■ Surface unit elements This limited warranty does not cover: ITEMS EXCLUDED FROM WARRANTY 1. Dealer ...-warranty service. Repairs when your major appliance to better help by checking the "Assistance or Service" section or by a KitchenAid designated service company. Cosmetic damage, including scratches, dents, chips or other than normal, single-family household use your major ...
...state touch control system parts ■ Any cracking of the rubber seal between the ceramic glass cooktop and porcelain edge ■ Any cracking due to thermal shock of the ceramic glass cooktop ■ Surface unit elements This limited warranty does not cover: ITEMS EXCLUDED FROM WARRANTY 1. Dealer ...-warranty service. Repairs when your major appliance to better help by checking the "Assistance or Service" section or by a KitchenAid designated service company. Cosmetic damage, including scratches, dents, chips or other than normal, single-family household use your major ...
Parts List
Page 1
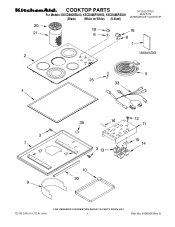
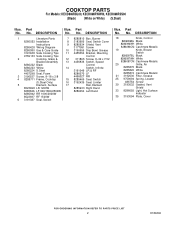
COOKTOP PARTS 36" ELECTRIC For Models: KECD866RBL00, KECD866RWW00, KECD866RSS00 BUILT−IN DOWNDRDAFT COOKTOP (Black) (White on White) (S.Steel) 12−05 Litho in U.S.A. (cre) 1 Part No. 8186306 Rev.A
COOKTOP PARTS 36" ELECTRIC For Models: KECD866RBL00, KECD866RWW00, KECD866RSS00 BUILT−IN DOWNDRDAFT COOKTOP (Black) (White on White) (S.Steel) 12−05 Litho in U.S.A. (cre) 1 Part No. 8186306 Rev.A
Parts List
Page 2
...8285874 Cashmere Metalic 21 3192530 Filter, Grease 25 9759094 Spring, Locator 486754 Screw 30 3193032 Gasket, Vent Shield 33 8286055 Light, Hot Surface Indicator 35 3193094 Plate, Cover 2 8186306 Part No. Part No. DESCRIPTION 1 Literature Parts 7 8285810 Box, Burner 8286553 Installation 8...Use & Care Guide 10 3190656 Drip Bowl, Grease 3191638 Safe Cooking Tips 11 4455354 Bracket, Mounting 9759133 Safe Cooking Tips Control 2 Cooktop, Glass & 12 311865 Screw, 8−32 x 7/32 Bracket Assembly 13 4456836 Switch, Speed 8286222 Black Control 8286223 White 14 Switch,...
...8285874 Cashmere Metalic 21 3192530 Filter, Grease 25 9759094 Spring, Locator 486754 Screw 30 3193032 Gasket, Vent Shield 33 8286055 Light, Hot Surface Indicator 35 3193094 Plate, Cover 2 8186306 Part No. Part No. DESCRIPTION 1 Literature Parts 7 8285810 Box, Burner 8286553 Installation 8...Use & Care Guide 10 3190656 Drip Bowl, Grease 3191638 Safe Cooking Tips 11 4455354 Bracket, Mounting 9759133 Safe Cooking Tips Control 2 Cooktop, Glass & 12 311865 Screw, 8−32 x 7/32 Bracket Assembly 13 4456836 Switch, Speed 8286222 Black Control 8286223 White 14 Switch,...


