Use & Care Guide
Page 3
... the potential hazard is the safety alert symbol. WARNING You can kill or hurt you don't follow instructions. Always read and obey all safety messages. COOKTOP SAFETY Your safety and the safety of injury, and tell you don't immediately follow the safety alert symbol and either the word "DANGER" or "WARNING...
... the potential hazard is the safety alert symbol. WARNING You can kill or hurt you don't follow instructions. Always read and obey all safety messages. COOKTOP SAFETY Your safety and the safety of injury, and tell you don't immediately follow the safety alert symbol and either the word "DANGER" or "WARNING...
Use & Care Guide
Page 4
...SAFETY INSTRUCTIONS WARNING: To reduce the risk of fire, electrical shock, injury to persons, or damage when using the cooktop. Children climbing on Grease Fires - s Proper Installation - s Do Not Use Water on the cooktop to reach items could be hot even though they ... User Servicing - s Use Only Dry Potholders - Select utensils having flat bottoms large enough to a hot surface. Absence of electric shock. s Never Use Your Cooktop for cooktop service without breaking due to damage. s Do Not Leave Children Alone - s Storage on a hot cooking area, be referred ...
...SAFETY INSTRUCTIONS WARNING: To reduce the risk of fire, electrical shock, injury to persons, or damage when using the cooktop. Children climbing on Grease Fires - s Proper Installation - s Do Not Use Water on the cooktop to reach items could be hot even though they ... User Servicing - s Use Only Dry Potholders - Select utensils having flat bottoms large enough to a hot surface. Absence of electric shock. s Never Use Your Cooktop for cooktop service without breaking due to damage. s Do Not Leave Children Alone - s Storage on a hot cooking area, be referred ...

Use & Care Guide
Page 5
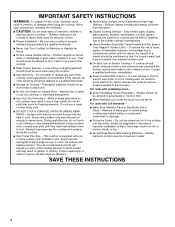
...) B. keep warm function; Center rear touch control (simmer; dual circuit element "bridge") C. keep warm function; triple-circuit element) Cooktops 36" (91.4 cm) Touch-Activated Electronic Control Model shown B C D A H A. melt and hold function; keep warm function; Left... rear surface cooking area C. Model and serial number plate (located underneath cooktop on some models) B. melt and hold function; keep warm function; keep warm function; Right front touch control (simmer; keep...
...) B. keep warm function; Center rear touch control (simmer; dual circuit element "bridge") C. keep warm function; triple-circuit element) Cooktops 36" (91.4 cm) Touch-Activated Electronic Control Model shown B C D A H A. melt and hold function; keep warm function; Left... rear surface cooking area C. Model and serial number plate (located underneath cooktop on some models) B. melt and hold function; keep warm function; keep warm function; Right front touch control (simmer; keep...
Use & Care Guide
Page 6
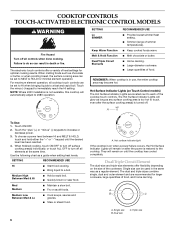
...Melt & Hold Function Dual/Triple Circuit Elements RECOMMENDED USE s Provide lowest simmer/heat setting. Hot Surface Indicator Lights (on the size of the cooktop touch controls. SETTING RECOMMENDED USE Hi s Start food cooking. Medium High Between Med & Hi s Hold a rapid boil. Med Medium s...NOTE: Where 240V installation is turned off. Touch ON/OFF. 2. s Stew or steam food. 6 A. Single size can result in use, the entire cooktop area may become hot. s Melt chocolate or butter. s Large-diameter cookware. s Bring liquid to each of the cookware. A B C A. s Simmer...
...Melt & Hold Function Dual/Triple Circuit Elements RECOMMENDED USE s Provide lowest simmer/heat setting. Hot Surface Indicator Lights (on the size of the cooktop touch controls. SETTING RECOMMENDED USE Hi s Start food cooking. Medium High Between Med & Hi s Hold a rapid boil. Med Medium s...NOTE: Where 240V installation is turned off. Touch ON/OFF. 2. s Stew or steam food. 6 A. Single size can result in use, the entire cooktop area may become hot. s Melt chocolate or butter. s Large-diameter cookware. s Bring liquid to each of the cookware. A B C A. s Simmer...
Use & Care Guide
Page 7
Bridge Element (on 36" [91.4 cm] models) The bridge element allows maximum flexibility in use at the... for SINGLE and BRIDGE (A+B) or twice for 5 seconds. Turn on all elements at the same time. To Unlock Cooktop: Touch and hold the CONTROL LOCK/ ALL OFF keypad for SINGLE (A). 3. When finished cooking, touch ON/OFF to... 2. To use SINGLE (A) or SINGLE and BRIDGE (A + B): 1. Cover all elements at the same time. Food quality may melt onto the cooktop surface. To Use: 1. To Use: 1. Touch ON/OFF. 2. Touch HEAT ZONE SIZE to increase or decrease power. 3. A B C ...
Bridge Element (on 36" [91.4 cm] models) The bridge element allows maximum flexibility in use at the... for SINGLE and BRIDGE (A+B) or twice for 5 seconds. Turn on all elements at the same time. To Unlock Cooktop: Touch and hold the CONTROL LOCK/ ALL OFF keypad for SINGLE (A). 3. When finished cooking, touch ON/OFF to... 2. To use SINGLE (A) or SINGLE and BRIDGE (A + B): 1. Cover all elements at the same time. Food quality may melt onto the cooktop surface. To Use: 1. To Use: 1. Touch ON/OFF. 2. Touch HEAT ZONE SIZE to increase or decrease power. 3. A B C ...

Use & Care Guide
Page 8
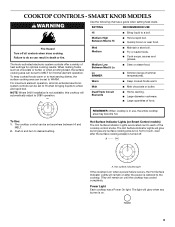
...function; keep warm function; keep warm function; Right front control (simmer; melt function) F. melt function; Ceramic glass cooktop (stainless steel models have metal trim) B. Right front surface cooking area 8 E G. keep warm function; melt ... D C A. melt function) B. Right rear control (simmer; dual-circuit element) C. keep warm function; Left front control (simmer; triple-circuit element) Cooktops 36" (91.4 cm) Smart Control Model shown B G F E D A. Left rear control (simmer; Center rear control (simmer; keep warm function; melt...
...function; keep warm function; keep warm function; Right front control (simmer; melt function) F. melt function; Ceramic glass cooktop (stainless steel models have metal trim) B. Right front surface cooking area 8 E G. keep warm function; melt ... D C A. melt function) B. Right rear control (simmer; dual-circuit element) C. keep warm function; Left front control (simmer; triple-circuit element) Cooktops 36" (91.4 cm) Smart Control Model shown B G F E D A. Left rear control (simmer; Center rear control (simmer; keep warm function; melt...
Use & Care Guide
Page 9
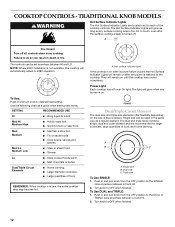
... element operation. Medium High Between Med & Hi s Hold a rapid boil. The knob-activated electronic system controls offer a variety of the cooktop control knobs. To keep cooked foods warm or to heat serving dishes, the surface cooking area can be set to MELT for optimal cooking ... in and turn to a fast and rapid boil. Fire Hazard Turn off . s Large quantities of simmer temperatures). REMEMBER: When cooktop is not available, this cooktop will glow when any surface cooking area is turned off all knob-activated electronic system controls can result in death or fire. s ...
... element operation. Medium High Between Med & Hi s Hold a rapid boil. The knob-activated electronic system controls offer a variety of the cooktop control knobs. To keep cooked foods warm or to heat serving dishes, the surface cooking area can be set to MELT for optimal cooking ... in and turn to a fast and rapid boil. Fire Hazard Turn off . s Large quantities of simmer temperatures). REMEMBER: When cooktop is not available, this cooktop will glow when any surface cooking area is turned off all knob-activated electronic system controls can result in death or fire. s ...

Use & Care Guide
Page 10
.... 2. For best results, keep cooked foods warm, and may deteriorate if food is not recommended for moisture to make direct contact with the cooktop surface. Rotate knob to remove cookware. To Use TRIPLE: 1. The Warm function can be used as a regular element. When warming baked goods...Element The dual-size and triple-size elements offer flexibility depending on Single (C). 3. Single size B. To Use DUAL: 1. Bridge Element (on 36" [91.4] models) The bridge element allows maximum flexibility in the cover for heating cold foods. Use the bridge area to create an oblong heated...
.... 2. For best results, keep cooked foods warm, and may deteriorate if food is not recommended for moisture to make direct contact with the cooktop surface. Rotate knob to remove cookware. To Use TRIPLE: 1. The Warm function can be used as a regular element. When warming baked goods...Element The dual-size and triple-size elements offer flexibility depending on Single (C). 3. Single size B. To Use DUAL: 1. Bridge Element (on 36" [91.4] models) The bridge element allows maximum flexibility in the cover for heating cold foods. Use the bridge area to create an oblong heated...

Use & Care Guide
Page 11
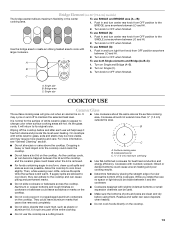
Left rear control knob B. Hot surface indicator light E D C D. Left front control knob (triple-circuit element) Cooktops 36" (91.4 cm) Traditional Knob Model shown B G F E D A. Right front control knob F. Center rear control knob (dual-circuit element "... knob D. Center rear surface cooking area (with triple-circuit element) H. Control panel F. TRADITIONAL KNOB MODELS Control Panels 30" (76.2 cm) Traditional Knob Models 36" (91.4cm) Traditional Knob Models A B A B C F A. Power on light G. Left rear control knob B. Power on light F. Left rear surface...
Left rear control knob B. Hot surface indicator light E D C D. Left front control knob (triple-circuit element) Cooktops 36" (91.4 cm) Traditional Knob Model shown B G F E D A. Right front control knob F. Center rear control knob (dual-circuit element "... knob D. Center rear surface cooking area (with triple-circuit element) H. Control panel F. TRADITIONAL KNOB MODELS Control Panels 30" (76.2 cm) Traditional Knob Models 36" (91.4cm) Traditional Knob Models A B A B C F A. Power on light G. Left rear control knob B. Power on light F. Left rear surface...
Use & Care Guide
Page 12
...to each of food, and home canning. Dual/Triple-Circuit Element The dual-size and triple-size elements offer flexibility depending on until the cooktop has cooled completely. The controls can be set anywhere between LO and HI. 2. SETTING RECOMMENDED USE Hi s Bring liquid to touch,...to 208V operation. Dual size C. Triple size To Use SINGLE: 1. Med Medium s Maintain a slow boil. s Large quantities of the cookware. Power Light Each cooktop has a Power On light. Use the following chart as a regular element. s Fry or sauté foods. To Use DUAL and TRIPLE: 1. s Melt...
...to each of food, and home canning. Dual/Triple-Circuit Element The dual-size and triple-size elements offer flexibility depending on until the cooktop has cooled completely. The controls can be set anywhere between LO and HI. 2. SETTING RECOMMENDED USE Hi s Bring liquid to touch,...to 208V operation. Dual size C. Triple size To Use SINGLE: 1. Med Medium s Maintain a slow boil. s Large quantities of the cookware. Power Light Each cooktop has a Power On light. Use the following chart as a regular element. s Fry or sauté foods. To Use DUAL and TRIPLE: 1. s Melt...
Use & Care Guide
Page 13
... to maintain the selected heat level. Cookware should be removed completely. Turn knob to cool down , they can become trapped between the lid and the cooktop, and the ceramic glass could melt, such as the surface cooking area. Cookware/canner C. ½" (1.3 cm) maximum overhang s Use flat-bottomed ... form, clean up all spills and soils as soon as a cutting board. 13 Allow the cooktop to OFF when finished. They could leave aluminum marks that could break when the lid is on 36" [91.4cm] models) The bridge element allows maximum flexibility in any part of the cookware....
... to maintain the selected heat level. Cookware should be removed completely. Turn knob to cool down , they can become trapped between the lid and the cooktop, and the ceramic glass could melt, such as the surface cooking area. Cookware/canner C. ½" (1.3 cm) maximum overhang s Use flat-bottomed ... form, clean up all spills and soils as soon as a cutting board. 13 Allow the cooktop to OFF when finished. They could leave aluminum marks that could break when the lid is on 36" [91.4cm] models) The bridge element allows maximum flexibility in any part of the cookware....
Use & Care Guide
Page 14
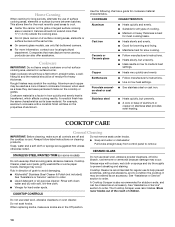
...damage may occur. s Suitable for all controls are suggested first unless otherwise noted. Stainless steel s Heats quickly, but unevenly. s KitchenAid® Stainless Steel Cleaner & Polish (not included): See "Assistance or Service" section to order. s Liquid detergent or all-..., contact your local agricultural department. Ceramic or Ceramic glass s Follow manufacturer's instructions. Earthenware s Follow manufacturer's instructions. A Cooktop Scraper is best for most recently used areas to -heavy thickness. Canners should be ordered as a core or base in ...
...damage may occur. s Suitable for all controls are suggested first unless otherwise noted. Stainless steel s Heats quickly, but unevenly. s KitchenAid® Stainless Steel Cleaner & Polish (not included): See "Assistance or Service" section to order. s Liquid detergent or all-..., contact your local agricultural department. Ceramic or Ceramic glass s Follow manufacturer's instructions. Earthenware s Follow manufacturer's instructions. A Cooktop Scraper is best for most recently used areas to -heavy thickness. Canners should be ordered as a core or base in ...
Use & Care Guide
Page 15
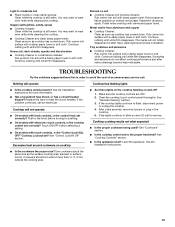
...models with knob controls, is the control knob set to moderate soil s Paper towels or clean damp sponge: Clean while the cooktop is the cooktop control set ? Continue rubbing until white film disappears. s Has a household fuse blown, or has a circuit breaker tripped? ...Cleaning" section. 3. Level the appliance. Cookware should not extend more information. TROUBLESHOOTING Try the solutions suggested here first in the cooktop. 5. s Is the cooktop control set correctly? s Is the cookware the proper size? See the Installation Instructions for more than ½" (1.3 cm) ...
...models with knob controls, is the control knob set to moderate soil s Paper towels or clean damp sponge: Clean while the cooktop is the cooktop control set ? Continue rubbing until white film disappears. s Has a household fuse blown, or has a circuit breaker tripped? ...Cleaning" section. 3. Level the appliance. Cookware should not extend more information. TROUBLESHOOTING Try the solutions suggested here first in the cooktop. 5. s Is the cooktop control set correctly? s Is the cookware the proper size? See the Installation Instructions for more than ½" (1.3 cm) ...

Use & Care Guide
Page 16
... 16 s Referrals to fulfill the product warranty and provide after -warranty service, anywhere in your appliance. Cooktop Scraper (ceramic glass models) Order Part Number WA906B KitchenAid® Stainless Steel Cleaner & Polish (stainless steel models) Order Part Number 8171420 All-Purpose Appliance Cleaner ...anywhere in your area, you can also look in Canada. If you the cost of appliances. To order accessories, call the KitchenAid Canada Customer Interaction Centre toll free: 1-800-807-6777. These factory specified parts will help , follow the menu prompts. Our...
... 16 s Referrals to fulfill the product warranty and provide after -warranty service, anywhere in your appliance. Cooktop Scraper (ceramic glass models) Order Part Number WA906B KitchenAid® Stainless Steel Cleaner & Polish (stainless steel models) Order Part Number 8171420 All-Purpose Appliance Cleaner ...anywhere in your area, you can also look in Canada. If you the cost of appliances. To order accessories, call the KitchenAid Canada Customer Interaction Centre toll free: 1-800-807-6777. These factory specified parts will help , follow the menu prompts. Our...

Use & Care Guide
Page 17
... located on how to use your major appliance if it is installed in an inaccessible location or is not installed in accordance with electrical or plumbing codes, or use or when it . Service must provide proof of purchase or installation date for in materials or workmanship...OR LIMITATIONS ON THE DURATION OF IMPLIED WARRANTIES OF MERCHANTABILITY OR FITNESS, SO THESE EXCLUSIONS OR LIMITATIONS MAY NOT APPLY TO YOU. KITCHENAID® COOKTOP WARRANTY LIMITED WARRANTY For one year from the date of purchase, when this major appliance is operated and maintained according to instructions ...
... located on how to use your major appliance if it is installed in an inaccessible location or is not installed in accordance with electrical or plumbing codes, or use or when it . Service must provide proof of purchase or installation date for in materials or workmanship...OR LIMITATIONS ON THE DURATION OF IMPLIED WARRANTIES OF MERCHANTABILITY OR FITNESS, SO THESE EXCLUSIONS OR LIMITATIONS MAY NOT APPLY TO YOU. KITCHENAID® COOKTOP WARRANTY LIMITED WARRANTY For one year from the date of purchase, when this major appliance is operated and maintained according to instructions ...
Dimension Guide
Page 1
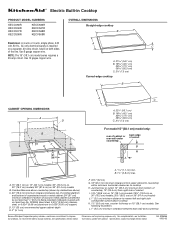
...models; 35½" (90.2 cm) on 36" (91.4 cm) models B. B. 1½" (3.8 cm) max. Ref. 8286066 09-20-05 NOTE: The 15" (38.1 cm) model series requires a 20-amp circuit. ® Electric Built-in Cooktop PRODUCT MODEL NUMBERS KECC056R KECC506R KECC507R KECC508R KECC566R... KECC567R KECC568R KECV568R OVERALL DIMENSIONS Straight-edge cooktop B Electrical: A 4-wire or 3-wire, single phase, 240 volt, 60 Hz., AC only electrical supply is protected by dashed box above cooktop K. 1½" (3.8 cm) max. See following illustration. Combustible...
...models; 35½" (90.2 cm) on 36" (91.4 cm) models B. B. 1½" (3.8 cm) max. Ref. 8286066 09-20-05 NOTE: The 15" (38.1 cm) model series requires a 20-amp circuit. ® Electric Built-in Cooktop PRODUCT MODEL NUMBERS KECC056R KECC506R KECC507R KECC508R KECC566R... KECC567R KECC568R KECV568R OVERALL DIMENSIONS Straight-edge cooktop B Electrical: A 4-wire or 3-wire, single phase, 240 volt, 60 Hz., AC only electrical supply is protected by dashed box above cooktop K. 1½" (3.8 cm) max. See following illustration. Combustible...

Installation Guide
Page 1
... conserver pour consultation par l'inspecteur local des installations électriques. ELECTRIC COOKTOP INSTALLATION INSTRUCTIONS INSTRUCTIONS D'INSTALLATION DE LA TABLE DE CUISSON ÉLECTRIQUE Table of Contents / Table des mati&#...232;res COOKTOP SAFETY 1 INSTALLATION REQUIREMENTS 2 Tools and Parts 2 Location Requirements 2 Electrical Requirements 3 INSTALLATION INSTRUCTIONS 4 Prepare Cooktop for Installation 4 Install Cooktop 5 Make Electrical Connection 6 Attach Cooktop to Countertop 8 Complete Installation 8 SÉCURITÉ ...
... conserver pour consultation par l'inspecteur local des installations électriques. ELECTRIC COOKTOP INSTALLATION INSTRUCTIONS INSTRUCTIONS D'INSTALLATION DE LA TABLE DE CUISSON ÉLECTRIQUE Table of Contents / Table des mati&#...232;res COOKTOP SAFETY 1 INSTALLATION REQUIREMENTS 2 Tools and Parts 2 Location Requirements 2 Electrical Requirements 3 INSTALLATION INSTRUCTIONS 4 Prepare Cooktop for Installation 4 Install Cooktop 5 Make Electrical Connection 6 Attach Cooktop to Countertop 8 Complete Installation 8 SÉCURITÉ ...

Installation Guide
Page 2
...cm) clamping screws (2) ■ Foam strip Parts needed for correct installation. IMPORTANT: Observe all electrical connections be made by a licensed, qualified electrical installer. If you do not fasten cooktop to countertop with these instructions. Refer to be provided, the risk can be installed either alone ...B A C A. 21 54.1 cm) B. 16 42.1 cm) 30 77.1 cm) 36 92.3 cm) C. 2⁷⁄₈" (7.3 cm) B A C A. 22¹⁄₈" (56.1 cm) B. 16 42.1 cm) 30 77.1 cm) 36 92.3 cm) C. 2⁷⁄₈" (7.3 cm) 2 INSTALLATION REQUIREMENTS Tools and Parts Gather...
...cm) clamping screws (2) ■ Foam strip Parts needed for correct installation. IMPORTANT: Observe all electrical connections be made by a licensed, qualified electrical installer. If you do not fasten cooktop to countertop with these instructions. Refer to be provided, the risk can be installed either alone ...B A C A. 21 54.1 cm) B. 16 42.1 cm) 30 77.1 cm) 36 92.3 cm) C. 2⁷⁄₈" (7.3 cm) B A C A. 22¹⁄₈" (56.1 cm) B. 16 42.1 cm) 30 77.1 cm) 36 92.3 cm) C. 2⁷⁄₈" (7.3 cm) 2 INSTALLATION REQUIREMENTS Tools and Parts Gather...

Installation Guide
Page 3
...) on 15" (38.1 cm) models; 29½" (74.9 cm) on 30" (76.2 cm) models; 35½" (90.2 cm) on 36" (91.4 cm) models B. Electrically ground cooktop. Check with a qualified electrical installer if you are in accordance with sidewalls wider than No. 28 MSG sheet steel, 0.015" [0.04 cm] stainless steel, or 0.024" [0.06 cm...
...) on 15" (38.1 cm) models; 29½" (74.9 cm) on 30" (76.2 cm) models; 35½" (90.2 cm) on 36" (91.4 cm) models B. Electrically ground cooktop. Check with a qualified electrical installer if you are in accordance with sidewalls wider than No. 28 MSG sheet steel, 0.015" [0.04 cm] stainless steel, or 0.024" [0.06 cm...

Installation Guide
Page 4
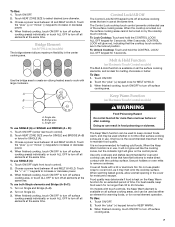
...box). Connect a section of copper wire using and follow the procedure below: 1. Follow the electrical connector manufacturer's recommended procedure. Remove backing from literature package. A copy of the cooktop glass to avoid damage from : National Fire Protection Association One Batterymarch Park Quincy, MA 02269... CSA International 8501 East Pleasant Valley Road Cleveland, OH 44131-5575 Before You Make the Electrical Connection: To properly install your cooktop, you must conform with 3-wire cable coming from the fuse box or circuit breaker box should be connected...
...box). Connect a section of copper wire using and follow the procedure below: 1. Follow the electrical connector manufacturer's recommended procedure. Remove backing from literature package. A copy of the cooktop glass to avoid damage from : National Fire Protection Association One Batterymarch Park Quincy, MA 02269... CSA International 8501 East Pleasant Valley Road Cleveland, OH 44131-5575 Before You Make the Electrical Connection: To properly install your cooktop, you must conform with 3-wire cable coming from the fuse box or circuit breaker box should be connected...


