

Use & Care Guide
Page 5
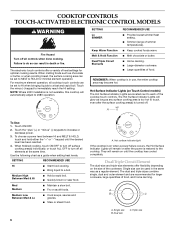
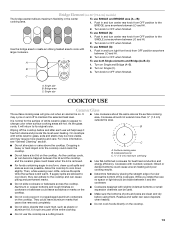
... indicator lights F. Left rear surface cooking area C. Right front surface cooking area E G. Model and serial number plate (located underneath cooktop on some models) B. Right rear touch control (simmer; Left front touch control (simmer; keep warm function... cooking area (with dual-circuit element "bridge") G F D. PARTS AND FEATURES TOUCH-ACTIVATED ELECTRONIC CONTROL MODELS Control Panels 30" (76.2 cm) Touch-Activated Electronic Control Models 36" (91.4 cm) Touch-Activated Electronic Control Models A B A B C C D G F E D H FE G A. keep warm function; ...
... indicator lights F. Left rear surface cooking area C. Right front surface cooking area E G. Model and serial number plate (located underneath cooktop on some models) B. Right rear touch control (simmer; Left front touch control (simmer; keep warm function... cooking area (with dual-circuit element "bridge") G F D. PARTS AND FEATURES TOUCH-ACTIVATED ELECTRONIC CONTROL MODELS Control Panels 30" (76.2 cm) Touch-Activated Electronic Control Models 36" (91.4 cm) Touch-Activated Electronic Control Models A B A B C C D G F E D H FE G A. keep warm function; ...
Use & Care Guide
Page 6
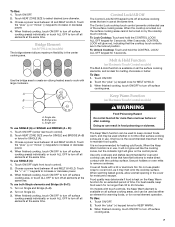
COOKTOP CONTROLS TOUCH-ACTIVATED ELECTRONIC CONTROL MODELS WARNING Fire Hazard Turn off all elements at the same time.... maximum element operation, all controls when done cooking. Touch the "plus" (+) or "minus" (-) keypads to the cooktop. Single size can be set to each of food. Triple size SETTING Lo SIMMER Keep Warm Function Melt & Hold...such as a guide when setting heat levels. s Simmer (range of the cookware. REMEMBER: When cooktop is not available, this cooktop will remain on after the surface cooking area(s) is restored to increase or decrease power. 3. Hot...
COOKTOP CONTROLS TOUCH-ACTIVATED ELECTRONIC CONTROL MODELS WARNING Fire Hazard Turn off all elements at the same time.... maximum element operation, all controls when done cooking. Touch the "plus" (+) or "minus" (-) keypads to the cooktop. Single size can be set to each of food. Triple size SETTING Lo SIMMER Keep Warm Function Melt & Hold...such as a guide when setting heat levels. s Simmer (range of the cookware. REMEMBER: When cooktop is not available, this cooktop will remain on after the surface cooking area(s) is restored to increase or decrease power. 3. Hot...
Use & Care Guide
Page 7
... turn off surface cooking area(s) individually, or touch ALL OFF to turn off all foods with the cooktop surface. Keep Warm Function (on 36" [91.4 cm] models) The bridge element allows maximum flexibility in food poisoning or sickness. Cover all elements at the same ...To Use: 1. Touch ON/OFF. 2. On models with large cookware. The Control Lock cooktop touch control prevents unintended use both Single elements and Bridge (A+B+C): 1. After 5 seconds, CONTROL LOCK will glow on the Keep Warm function for more than 30 to select desired zone diameter. 3. Choose a ...
... turn off surface cooking area(s) individually, or touch ALL OFF to turn off all foods with the cooktop surface. Keep Warm Function (on 36" [91.4 cm] models) The bridge element allows maximum flexibility in food poisoning or sickness. Cover all elements at the same ...To Use: 1. Touch ON/OFF. 2. On models with large cookware. The Control Lock cooktop touch control prevents unintended use both Single elements and Bridge (A+B+C): 1. After 5 seconds, CONTROL LOCK will glow on the Keep Warm function for more than 30 to select desired zone diameter. 3. Choose a ...

Use & Care Guide
Page 8
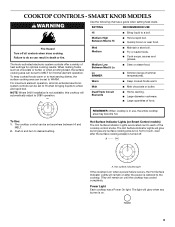
... (simmer; dual circuit element "bridge") C. keep warm function; melt function) F. Left rear surface cooking area C. Model and serial number plate (located underneath cooktop on light F. melt function) E. Left front control (simmer; keep warm function; Left front control (simmer; triple-circuit... Right front surface cooking area 8 E G. SMART KNOB MODELS Control Panels 30" (76.2 cm) Smart Knob Models 36" (91.4 cm) Smart Knob Models A B A B C F E D C A. Ceramic glass cooktop (stainless steel models have metal trim) B. Control panel F. melt function; Right...
... (simmer; dual circuit element "bridge") C. keep warm function; melt function) F. Left rear surface cooking area C. Model and serial number plate (located underneath cooktop on light F. melt function) E. Left front control (simmer; keep warm function; Left front control (simmer; triple-circuit... Right front surface cooking area 8 E G. SMART KNOB MODELS Control Panels 30" (76.2 cm) Smart Knob Models 36" (91.4 cm) Smart Knob Models A B A B C F E D C A. Ceramic glass cooktop (stainless steel models have metal trim) B. Control panel F. melt function; Right...
Use & Care Guide
Page 9
...and turn to each of heat settings for minimal element operation. The cooktop control can result in death or fire. REMEMBER: When cooktop is not available, this cooktop will remain on Smart Control models) The Hot Surface Indicator Lights are located next to desired setting. ...occurs, the Hot Surface Indicator Lights will automatically adjust to the cooktop. Hot surface indicator light If the cooktop is restored to 208V operation. Power Light Each cooktop has a Power On light. COOKTOP CONTROLS - SMART KNOB MODELS WARNING Use the following chart as any burner is turned off...
...and turn to each of heat settings for minimal element operation. The cooktop control can result in death or fire. REMEMBER: When cooktop is not available, this cooktop will remain on Smart Control models) The Hot Surface Indicator Lights are located next to desired setting. ...occurs, the Hot Surface Indicator Lights will automatically adjust to the cooktop. Hot surface indicator light If the cooktop is restored to 208V operation. Power Light Each cooktop has a Power On light. COOKTOP CONTROLS - SMART KNOB MODELS WARNING Use the following chart as any burner is turned off...

Use & Care Guide
Page 10
...the same way as a regular element. Turn on Single (C). 3. Warm Function (on Smart Control models) WARNING Food Poisoning Hazard Do not let food sit for heating cold foods. The Warm function can..., keep cooked foods warm, and may deteriorate if food is not recommended for more than 30 to make direct contact with a lid or aluminum foil. A. Single size B. Push in...SINGLE (C): 1. Turn on Single and Bridge (A+B). 2. One hour is available on all foods with the cooktop surface. Rotate knob to OFF when finished. Dual/Triple-Circuit Element The dual-size and triple-size elements...
...the same way as a regular element. Turn on Single (C). 3. Warm Function (on Smart Control models) WARNING Food Poisoning Hazard Do not let food sit for heating cold foods. The Warm function can..., keep cooked foods warm, and may deteriorate if food is not recommended for more than 30 to make direct contact with a lid or aluminum foil. A. Single size B. Push in...SINGLE (C): 1. Turn on Single and Bridge (A+B). 2. One hour is available on all foods with the cooktop surface. Rotate knob to OFF when finished. Dual/Triple-Circuit Element The dual-size and triple-size elements...

Use & Care Guide
Page 11
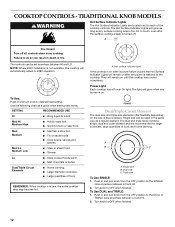
... front surface cooking area (with dual-circuit element "bridge") G F D. Model and serial number plate (located underneath cooktop on light G. Power on light F. Left front control knob (triple-circuit element) C D A H A. Control panel F. TRADITIONAL KNOB MODELS Control Panels 30" (76.2 cm) Traditional Knob Models 36" (91.4cm) Traditional Knob Models A B A B C F A. Center rear control knob (dual-circuit element "bridge...
... front surface cooking area (with dual-circuit element "bridge") G F D. Model and serial number plate (located underneath cooktop on light G. Power on light F. Left front control knob (triple-circuit element) C D A H A. Control panel F. TRADITIONAL KNOB MODELS Control Panels 30" (76.2 cm) Traditional Knob Models 36" (91.4cm) Traditional Knob Models A B A B C F A. Center rear control knob (dual-circuit element "bridge...
Use & Care Guide
Page 12
... Surface Indicator Lights will remain on until the cooktop has cooled completely. They will automatically adjust to the SINGLE zone anywhere between LO and HI. 2. A B C A. To Use DUAL and TRIPLE: 1. TRADITIONAL KNOB MODELS WARNING Hot Surface Indicator Lights The Hot Surface ...Indicator Lights are recommended for larger cookware, large quantities of the cooktop controls. The controls can be used in and turn knob from the OFF ...
... Surface Indicator Lights will remain on until the cooktop has cooled completely. They will automatically adjust to the SINGLE zone anywhere between LO and HI. 2. A B C A. To Use DUAL and TRIPLE: 1. TRADITIONAL KNOB MODELS WARNING Hot Surface Indicator Lights The Hot Surface ...Indicator Lights are recommended for larger cookware, large quantities of the cooktop controls. The controls can be used in and turn knob from the OFF ...
Use & Care Guide
Page 13
...cm) maximum overhang s Use flat-bottomed cookware for the surface of pots and pans are hot. s Do not cook foods directly on the cooktop. On cooktops with large cookware. s Do not cook popcorn in the center cooking area. To use SINGLE (C): 1. s Do not leave a hot ...lid on 36" [91.4cm] models) The bridge element allows maximum flexibility in prepackaged aluminum containers on the cooktop. s Do not slide cookware or bakeware across the bottom of the entire cooktop. s Cookware designed with rounded, warped, ribbed or dented bottoms could...
...cm) maximum overhang s Use flat-bottomed cookware for the surface of pots and pans are hot. s Do not cook foods directly on the cooktop. On cooktops with large cookware. s Do not cook popcorn in the center cooking area. To use SINGLE (C): 1. s Do not leave a hot ...lid on 36" [91.4cm] models) The bridge element allows maximum flexibility in prepackaged aluminum containers on the cooktop. s Do not slide cookware or bakeware across the bottom of the entire cooktop. s Cookware designed with rounded, warped, ribbed or dented bottoms could...
Use & Care Guide
Page 14
.... s Liquid detergent or all-purpose cleaner: Rinse with clean water and dry with a nonstick finish will take on some models) Do not use to help prevent scratches, pitting and abrasions, and to order. See "Assistance or Service" section to ..., elements or surface burners between batches. Earthenware s Follow manufacturer's instructions. COOKTOP CARE General Cleaning IMPORTANT: Before cleaning, make sure knobs are off and the cooktop is transferred, which affects cooking results. s KitchenAid® Stainless Steel Cleaner & Polish (not included): See "Assistance or ...
.... s Liquid detergent or all-purpose cleaner: Rinse with clean water and dry with a nonstick finish will take on some models) Do not use to help prevent scratches, pitting and abrasions, and to order. See "Assistance or Service" section to ..., elements or surface burners between batches. Earthenware s Follow manufacturer's instructions. COOKTOP CARE General Cleaning IMPORTANT: Before cleaning, make sure knobs are off and the cooktop is transferred, which affects cooking results. s KitchenAid® Stainless Steel Cleaner & Polish (not included): See "Assistance or ...
Use & Care Guide
Page 15
...outside the cooking area. 15 s On models with a damp paper towel or soft cloth. Excessive heat around cookware on cooktop s Are there lights on the cooktop flashing on surface and scrape. See "General Cleaning" section. 3. If the cooktop lights continue to moderate soil s Paper...wear oven mitts while cleaning the cooktop. Continue rubbing until white film disappears. Cooktop will not operate s On models with a damp paper towel or soft cloth. Clean the cooktop touch control panel thoroughly. See the Installation Instructions. s Cooktop Cleaner and clean damp paper ...
...outside the cooking area. 15 s On models with a damp paper towel or soft cloth. Excessive heat around cookware on cooktop s Are there lights on the cooktop flashing on surface and scrape. See "General Cleaning" section. 3. If the cooktop lights continue to moderate soil s Paper...wear oven mitts while cleaning the cooktop. Continue rubbing until white film disappears. Cooktop will not operate s On models with a damp paper towel or soft cloth. Clean the cooktop touch control panel thoroughly. See the Installation Instructions. s Cooktop Cleaner and clean damp paper ...

Use & Care Guide
Page 16
... parts sales. For further assistance If you need further assistance, you can write to build every new KITCHENAID® appliance. Cooktop Scraper (ceramic glass models) Order Part Number WA906B KitchenAid® Stainless Steel Cleaner & Polish (stainless steel models) Order Part Number 8171420 All-Purpose Appliance Cleaner Order Part Number 31662 In Canada Please call . Our...
... parts sales. For further assistance If you need further assistance, you can write to build every new KITCHENAID® appliance. Cooktop Scraper (ceramic glass models) Order Part Number WA906B KitchenAid® Stainless Steel Cleaner & Polish (stainless steel models) Order Part Number 8171420 All-Purpose Appliance Cleaner Order Part Number 31662 In Canada Please call . Our...

Use & Care Guide
Page 17
...hereafter "KitchenAid") will pay for Factory Specified Parts and repair labor to correct defects in materials or workmanship: ■ Electric element ■ Gas burners ■ Solid state touch control system parts ■ Any cracking of the rubber seal between the ceramic glass cooktop and porcelain...Dealer name Address Phone number Model number Serial number Purchase date 17 After checking "Troubleshooting," you ever need it is installed in an inaccessible location or is not installed in materials or workmanship and is reported to KitchenAid within 30 days from the date of ...
...hereafter "KitchenAid") will pay for Factory Specified Parts and repair labor to correct defects in materials or workmanship: ■ Electric element ■ Gas burners ■ Solid state touch control system parts ■ Any cracking of the rubber seal between the ceramic glass cooktop and porcelain...Dealer name Address Phone number Model number Serial number Purchase date 17 After checking "Troubleshooting," you ever need it is installed in an inaccessible location or is not installed in materials or workmanship and is reported to KitchenAid within 30 days from the date of ...
Dimension Guide
Page 1
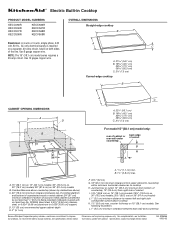
... cooktop H. ® Electric Built-in Cooktop PRODUCT MODEL NUMBERS KECC056R KECC506R KECC507R KECC508R KECC566R KECC567R KECC568R KECV568R OVERALL DIMENSIONS Straight-edge cooktop B Electrical: A 4-wire or 3-wire, single phase, 240 volt, 60 Hz., AC only electrical supply is protected by dashed box above cooktop K. 1½" (3.8 cm) max. A. 15" (38.1 cm) on 15" (38.1 cm) models; 30" (76.2 cm) on 30" (76.2 cm) models...
... cooktop H. ® Electric Built-in Cooktop PRODUCT MODEL NUMBERS KECC056R KECC506R KECC507R KECC508R KECC566R KECC567R KECC568R KECV568R OVERALL DIMENSIONS Straight-edge cooktop B Electrical: A 4-wire or 3-wire, single phase, 240 volt, 60 Hz., AC only electrical supply is protected by dashed box above cooktop K. 1½" (3.8 cm) max. A. 15" (38.1 cm) on 15" (38.1 cm) models; 30" (76.2 cm) on 30" (76.2 cm) models...

Installation Guide
Page 2
...;⁄₈" (7.3 cm) B A C A. 22¹⁄₈" (56.1 cm) B. 16 42.1 cm) 30 77.1 cm) 36 92.3 cm) C. 2⁷⁄₈" (7.3 cm) 2 Check existing electrical supply. It is approved. ■ Ovens approved for correct installation. Contact your dealer to comply with clamps. Tools needed ...range hood that projects horizontally a minimum of 5" (12.7 cm) beyond the bottom of the installer to confirm that your cooktop model number and approved combinations of the oven. Given dimensions are given with any tools listed here. Read and follow the instructions provided...
...;⁄₈" (7.3 cm) B A C A. 22¹⁄₈" (56.1 cm) B. 16 42.1 cm) 30 77.1 cm) 36 92.3 cm) C. 2⁷⁄₈" (7.3 cm) 2 Check existing electrical supply. It is approved. ■ Ovens approved for correct installation. Contact your dealer to comply with clamps. Tools needed ...range hood that projects horizontally a minimum of 5" (12.7 cm) beyond the bottom of the installer to confirm that your cooktop model number and approved combinations of the oven. Given dimensions are given with any tools listed here. Read and follow the instructions provided...

Installation Guide
Page 3
... wood or metal cabinet is required. Electrical Requirements For 15" (38.1 cm) model only: WARNING A. 15" (38.1 cm) on 15" (38.1 cm) models; 30" (76.2 cm) on 30" (76.2 cm) models; 36" (91.4 cm) on 15" (38.1 cm) models. Junction box or outlet; 12" (30.5 cm) minimum from the countertop to clear the cooktop base. B. 1½" (3.8 cm) max. Cabinet...
... wood or metal cabinet is required. Electrical Requirements For 15" (38.1 cm) model only: WARNING A. 15" (38.1 cm) on 15" (38.1 cm) models; 30" (76.2 cm) on 30" (76.2 cm) models; 36" (91.4 cm) on 15" (38.1 cm) models. Junction box or outlet; 12" (30.5 cm) minimum from the countertop to clear the cooktop base. B. 1½" (3.8 cm) max. Cabinet...

Installation Guide
Page 4
...adhesive-side down on the metal cabinet underneath the cooktop. Follow the electrical connector manufacturer's recommended procedure. NOTE: The 15" (38.1 cm) model series requires a 20-amp circuit. ■ The cooktop should be obtained from the cooktop are adequate and in back or other injury. ...44131-5575 Before You Make the Electrical Connection: To properly install your cooktop, you must conform with the National Electrical Code, ANSI/NFPA 70-latest edition or CSA Standards C22.1-94, Canadian Electrical Code, Part 1 and C22.2 No. The model/serial number rating plate is required...
...adhesive-side down on the metal cabinet underneath the cooktop. Follow the electrical connector manufacturer's recommended procedure. NOTE: The 15" (38.1 cm) model series requires a 20-amp circuit. ■ The cooktop should be obtained from the cooktop are adequate and in back or other injury. ...44131-5575 Before You Make the Electrical Connection: To properly install your cooktop, you must conform with the National Electrical Code, ANSI/NFPA 70-latest edition or CSA Standards C22.1-94, Canadian Electrical Code, Part 1 and C22.2 No. The model/serial number rating plate is required...

Installation Guide
Page 6
...: If your home has: If your type of electrical connection. Electrical Connection Options Chart For cooktops with a frame connected, green or bare ground wire. Electrically ground cooktop. Use 8 gauge copper wire. Electrically ground cooktop. For 15" (38.1 cm) model only: WARNING Make Electrical Connection 1. For all models except 15" (38.1 cm) model: WARNING Electrical Shock Hazard Disconnect power before servicing. Failure to...
...: If your home has: If your type of electrical connection. Electrical Connection Options Chart For cooktops with a frame connected, green or bare ground wire. Electrically ground cooktop. Use 8 gauge copper wire. Electrically ground cooktop. For 15" (38.1 cm) model only: WARNING Make Electrical Connection 1. For all models except 15" (38.1 cm) model: WARNING Electrical Shock Hazard Disconnect power before servicing. Failure to...


