

Use & Care Guide
Page 5
... area E G. Hot surface indicator light E. Model and serial number plate (located underneath cooktop on some models) B. melt and hold function; PARTS AND FEATURES TOUCH-ACTIVATED ELECTRONIC CONTROL MODELS Control Panels 30" (76.2 cm) Touch-Activated Electronic Control Models 36" (91.4 cm) Touch-Activated...front touch control (simmer; Center rear touch control (simmer; keep warm function; melt and hold function; triple-circuit element) Cooktops 36" (91.4 cm) Touch-Activated Electronic Control Model shown B C D A H A. Center rear surface cooking area...
... area E G. Hot surface indicator light E. Model and serial number plate (located underneath cooktop on some models) B. melt and hold function; PARTS AND FEATURES TOUCH-ACTIVATED ELECTRONIC CONTROL MODELS Control Panels 30" (76.2 cm) Touch-Activated Electronic Control Models 36" (91.4 cm) Touch-Activated...front touch control (simmer; Center rear touch control (simmer; keep warm function; melt and hold function; triple-circuit element) Cooktops 36" (91.4 cm) Touch-Activated Electronic Control Model shown B C D A H A. Center rear surface cooking area...
Use & Care Guide
Page 7
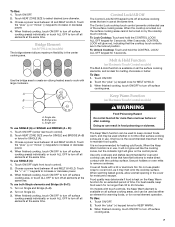
...turn off all surface cooking areas, and can be turned on by the cooktop touch controls. To Lock Cooktop: Touch and hold the CONTROL LOCK/ ALL OFF keypad for more than 30 to cook with the cooktop surface. The Keep Warm function can result in the center cooking area. ... if food is available on 36" [91.4 cm] models) The bridge element allows maximum flexibility in food poisoning or sickness. The Control Lock cooktop touch control prevents unintended use SINGLE (C): 1. After 5 seconds, CONTROL LOCK will glow on Electronic Touch Control models) WARNING Food Poisoning Hazard Do...
...turn off all surface cooking areas, and can be turned on by the cooktop touch controls. To Lock Cooktop: Touch and hold the CONTROL LOCK/ ALL OFF keypad for more than 30 to cook with the cooktop surface. The Keep Warm function can result in the center cooking area. ... if food is available on 36" [91.4 cm] models) The bridge element allows maximum flexibility in food poisoning or sickness. The Control Lock cooktop touch control prevents unintended use SINGLE (C): 1. After 5 seconds, CONTROL LOCK will glow on Electronic Touch Control models) WARNING Food Poisoning Hazard Do...

Use & Care Guide
Page 8
... metal cabinet) keep warm function; dual circuit element "bridge") C. melt function) F. Left front control (simmer; Ceramic glass cooktop (stainless steel models have metal trim) B. Right front control (simmer; Left rear control (simmer; keep warm function; Right ...triple-circuit element) H. Model and serial number plate (located underneath cooktop on light F. triple-circuit element) Cooktops 36" (91.4 cm) Smart Control Model shown B G F E D A. Control panel F. keep warm function; SMART KNOB MODELS Control Panels 30" (76.2 cm) Smart Knob Models 36" (91.4 cm) ...
... metal cabinet) keep warm function; dual circuit element "bridge") C. melt function) F. Left front control (simmer; Ceramic glass cooktop (stainless steel models have metal trim) B. Right front control (simmer; Left rear control (simmer; keep warm function; Right ...triple-circuit element) H. Model and serial number plate (located underneath cooktop on light F. triple-circuit element) Cooktops 36" (91.4 cm) Smart Control Model shown B G F E D A. Control panel F. keep warm function; SMART KNOB MODELS Control Panels 30" (76.2 cm) Smart Knob Models 36" (91.4 cm) ...

Use & Care Guide
Page 10
...the other surface cooking zones are recommended for no longer than one hour before or after cooking. One hour is not recommended for oven and cooktop use plastic wrap to the SINGLE zone anywhere between MELT and HI. 2. Use only cookware and dishes recommended for heating cold foods. The ...may be used as it may deteriorate if food is available on all foods with the cooktop surface. Triple size To Use SINGLE: 1. Turn knob to OFF when finished. Push in the cover for more than 30 to make direct contact with a lid or aluminum foil. Turn knob to escape. ...
...the other surface cooking zones are recommended for no longer than one hour before or after cooking. One hour is not recommended for oven and cooktop use plastic wrap to the SINGLE zone anywhere between MELT and HI. 2. Use only cookware and dishes recommended for heating cold foods. The ...may be used as it may deteriorate if food is available on all foods with the cooktop surface. Triple size To Use SINGLE: 1. Turn knob to OFF when finished. Push in the cover for more than 30 to make direct contact with a lid or aluminum foil. Turn knob to escape. ...

Use & Care Guide
Page 11
... indicator light E D C D. TRADITIONAL KNOB MODELS Control Panels 30" (76.2 cm) Traditional Knob Models 36" (91.4cm) Traditional Knob Models A B A B C F A. Left front control knob (triple-circuit element) Cooktops 36" (91.4 cm) Traditional Knob Model shown B G F E D A. Ceramic glass cooktop (stainless steel models have metal trim) B. Center rear control ...area (with triple-circuit element) H. Hot surface indicator lights E. Model and serial number plate (located underneath cooktop on metal cabinet) 11 Left front control knob (triple-circuit element) C D A H A.
... indicator light E D C D. TRADITIONAL KNOB MODELS Control Panels 30" (76.2 cm) Traditional Knob Models 36" (91.4cm) Traditional Knob Models A B A B C F A. Left front control knob (triple-circuit element) Cooktops 36" (91.4 cm) Traditional Knob Model shown B G F E D A. Ceramic glass cooktop (stainless steel models have metal trim) B. Center rear control ...area (with triple-circuit element) H. Hot surface indicator lights E. Model and serial number plate (located underneath cooktop on metal cabinet) 11 Left front control knob (triple-circuit element) C D A H A.

Use & Care Guide
Page 17
Proof of original purchase date is reported to KitchenAid within 30 days from the date of purchase. 6. Damage resulting from accident, alteration, misuse, abuse, fire, flood, acts of God, improper installation, installation not in accordance with electrical or plumbing codes, or use of consumables or ...porcelain edge ■ Any cracking due to thermal shock of the ceramic glass cooktop ■ Surface unit elements This limited warranty does not cover: ITEMS EXCLUDED FROM WARRANTY 1. KITCHENAID® COOKTOP WARRANTY LIMITED WARRANTY For one year from the date of purchase, when this ...
Proof of original purchase date is reported to KitchenAid within 30 days from the date of purchase. 6. Damage resulting from accident, alteration, misuse, abuse, fire, flood, acts of God, improper installation, installation not in accordance with electrical or plumbing codes, or use of consumables or ...porcelain edge ■ Any cracking due to thermal shock of the ceramic glass cooktop ■ Surface unit elements This limited warranty does not cover: ITEMS EXCLUDED FROM WARRANTY 1. KITCHENAID® COOKTOP WARRANTY LIMITED WARRANTY For one year from the date of purchase, when this ...
Dimension Guide
Page 1
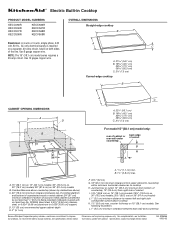
..." (38.1 cm) models; 29½" (74.9 cm) on 30" (76.2 cm) models; 35½" (90.2 cm) on 36" (91.4 cm) models J. 1" (2.5 cm) minimum distance to nearest left and right side combustible surface above cooktop K. 1½" (3.8 cm) max. See following illustration. ® Electric Built-in Cooktop PRODUCT MODEL NUMBERS KECC056R KECC506R KECC507R KECC508R KECC566R KECC567R...
..." (38.1 cm) models; 29½" (74.9 cm) on 30" (76.2 cm) models; 35½" (90.2 cm) on 36" (91.4 cm) models J. 1" (2.5 cm) minimum distance to nearest left and right side combustible surface above cooktop K. 1½" (3.8 cm) max. See following illustration. ® Electric Built-in Cooktop PRODUCT MODEL NUMBERS KECC056R KECC506R KECC507R KECC508R KECC566R KECC567R...

Installation Guide
Page 2
...built-in oven. If you have an approval label located on the top of burns or fire by a licensed, qualified electrical installer. Product Dimensions B A C A. 21 54.1 cm) B. 16 42.1 cm) 30 77.1 cm) 36 92.3 cm) C. 2⁷⁄₈" (7.3 cm) B A C A. 22¹⁄...installing a range hood that projects horizontally a minimum of 5" (12.7 cm) beyond the bottom of installation will make the cooktop easier to be avoided. See "Electrical Requirements" section. Tools needed ■ Tape measure ■ Marker or pencil ■ Screwdriver ■ Pliers ■...
...built-in oven. If you have an approval label located on the top of burns or fire by a licensed, qualified electrical installer. Product Dimensions B A C A. 21 54.1 cm) B. 16 42.1 cm) 30 77.1 cm) 36 92.3 cm) C. 2⁷⁄₈" (7.3 cm) B A C A. 22¹⁄...installing a range hood that projects horizontally a minimum of 5" (12.7 cm) beyond the bottom of installation will make the cooktop easier to be avoided. See "Electrical Requirements" section. Tools needed ■ Tape measure ■ Marker or pencil ■ Screwdriver ■ Pliers ■...

Installation Guide
Page 3
... installing a range hood or microwave hood combination above the cooktop, follow these instructions can result in death, fire, or electrical shock. Junction box or outlet; 12" (30.5 cm) minimum from the countertop to clear the cooktop base. Combustible area above countertop (shown by dashed box above) C. 30" (76.2 cm) minimum clearance between back wall and...
... installing a range hood or microwave hood combination above the cooktop, follow these instructions can result in death, fire, or electrical shock. Junction box or outlet; 12" (30.5 cm) minimum from the countertop to clear the cooktop base. Combustible area above countertop (shown by dashed box above) C. 30" (76.2 cm) minimum clearance between back wall and...
