Use and Care Guide
Page 2
... Single Oven Control Panel Double Oven Control Panel Electronic Clock Operation Minute Timer How To Use the Single/Upper Oven How To Use the Lower Oven Baking and Convection Baking Rack Positions Baking Tips Convection Baking & Cooking Tips Pan Placement Bakeware Tips Baking/Convection Baking Chart Baking Problems and Causes Roasting and Convection Roasting Roasting Tips Roasting Chart Convection Roasting Chart Convection Cooking Meat Probe Broiling and Convection Broiling Broiling Tips Broiling Chart Automatic Time Cooking Dehydrating and Defrosting Oven Care and Cleaning Oven Self-Cleaning...
... Single Oven Control Panel Double Oven Control Panel Electronic Clock Operation Minute Timer How To Use the Single/Upper Oven How To Use the Lower Oven Baking and Convection Baking Rack Positions Baking Tips Convection Baking & Cooking Tips Pan Placement Bakeware Tips Baking/Convection Baking Chart Baking Problems and Causes Roasting and Convection Roasting Roasting Tips Roasting Chart Convection Roasting Chart Convection Cooking Meat Probe Broiling and Convection Broiling Broiling Tips Broiling Chart Automatic Time Cooking Dehydrating and Defrosting Oven Care and Cleaning Oven Self-Cleaning...
Use and Care Guide
Page 3
... repair or replace any part of this oven unless specifically recommended in this manual. 3 Contact nearest authorized service facility for its intended use . It is located. All other servicing should be followed, including the following: GENERAL COOKING PRECAUTIONS 1. Know where your oven needs to sit or stand on any part of the oven. 4. Have the installer show you where it is not working properly, or if it is located...
... repair or replace any part of this oven unless specifically recommended in this manual. 3 Contact nearest authorized service facility for its intended use . It is located. All other servicing should be followed, including the following: GENERAL COOKING PRECAUTIONS 1. Know where your oven needs to sit or stand on any part of the oven. 4. Have the installer show you where it is not working properly, or if it is located...
Use and Care Guide
Page 4
... oven. Care should be moved while oven is cool. Before self-cleaning the oven, remove broiler pan, broiler grid, oven racks and other flammable materials contact heating elements or interior surfaces of the oven may be taken not to clean miscellaneous parts.) SAVE THESE INSTRUCTIONS 4 Smother fire or flame or use oven cleaners. Use care when opening door. Do not touch heating elements or interior surfaces of an oven become hot enough to cool. Hand clean only areas recommended in oven. 6. Use...
... oven. Care should be moved while oven is cool. Before self-cleaning the oven, remove broiler pan, broiler grid, oven racks and other flammable materials contact heating elements or interior surfaces of the oven may be taken not to clean miscellaneous parts.) SAVE THESE INSTRUCTIONS 4 Smother fire or flame or use oven cleaners. Use care when opening door. Do not touch heating elements or interior surfaces of an oven become hot enough to cool. Hand clean only areas recommended in oven. 6. Use...

Use and Care Guide
Page 8
... turn the TIME knob to show "TIMER" and the selected time will begin clock operation. To use by touching the START button. Press the START button to begin counting down. The previously set first, then the Minute Timer. At the end of the timed period, "TIMER" will appear in use it, turn the oven ON or OFF. To cancel a Minute Timer program in the Display Window. ELECTRONIC CLOCK OPERATION The electronic clock controls all timed operations...
... turn the TIME knob to show "TIMER" and the selected time will begin clock operation. To use by touching the START button. Press the START button to begin counting down. The previously set first, then the Minute Timer. At the end of the timed period, "TIMER" will appear in use it, turn the oven ON or OFF. To cancel a Minute Timer program in the Display Window. ELECTRONIC CLOCK OPERATION The electronic clock controls all timed operations...
Use and Care Guide
Page 9
... baking sheets of meat. Selector The Selector has seven settings: CONVECTION BROIL-Use this setting to turn red like the lower element, which operates at 25 percent power to aid in more strips of bacon. AutoTime/Manual Knob AUTO TIME-Use with clock for broiling thick cuts of cookies at any temperature from the inner broil element. Only the upper element will come on . OFF-Use this setting for automatic cooking. 2 hr • tart socal Auto Time Manual Econo Broil I Maxi Broil MANUAL -Cooking starts...
... baking sheets of meat. Selector The Selector has seven settings: CONVECTION BROIL-Use this setting to turn red like the lower element, which operates at 25 percent power to aid in more strips of bacon. AutoTime/Manual Knob AUTO TIME-Use with clock for broiling thick cuts of cookies at any temperature from the inner broil element. Only the upper element will come on . OFF-Use this setting for automatic cooking. 2 hr • tart socal Auto Time Manual Econo Broil I Maxi Broil MANUAL -Cooking starts...
Use and Care Guide
Page 10
... Oven Light will go past the desired set for broiling, baking and roasting. It has two controls-a Selector and a Temperature Control. Only the upper element will come on . OFF -Use this setting for broiling. BAKING (Single/Upper or Lower Oven), CONVECTION BAKING (Single/Upper Oven) To Use for baking and roasting. Turn the Selector to the desired temperature. Set the Selector to BAKE, CONVECTION BAKE or CONVECTION COOK and the Temperature Control to BAKE or CONVECTION BAKE. 10 This is normal as for Automatic Time Cooking. TIME BAKE-Use this setting for self-cleaning...
... Oven Light will go past the desired set for broiling, baking and roasting. It has two controls-a Selector and a Temperature Control. Only the upper element will come on . OFF -Use this setting for broiling. BAKING (Single/Upper or Lower Oven), CONVECTION BAKING (Single/Upper Oven) To Use for baking and roasting. Turn the Selector to the desired temperature. Set the Selector to BAKE, CONVECTION BAKE or CONVECTION COOK and the Temperature Control to BAKE or CONVECTION BAKE. 10 This is normal as for Automatic Time Cooking. TIME BAKE-Use this setting for self-cleaning...
Use and Care Guide
Page 11
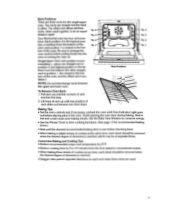
... recipes. • When baking three sheets of doneness is over before putting foods into the oven or turning the oven on each rack when three racks are used together, to the bottom of the oven. Convection Baking and Cooking Tips • Reduce recommended recipe oven temperature by 25°F. • Reduce cooking time by 5 to time cooking functions. (See page 13 for the single/upper oven. Use the Bake View Window to...
... recipes. • When baking three sheets of doneness is over before putting foods into the oven or turning the oven on each rack when three racks are used together, to the bottom of the oven. Convection Baking and Cooking Tips • Reduce recommended recipe oven temperature by 25°F. • Reduce cooking time by 5 to time cooking functions. (See page 13 for the single/upper oven. Use the Bake View Window to...
Use and Care Guide
Page 15
...; Roast meats fat side up in a shallow pan using a roasting rack. • Use a roasting pan that is too small, and a too large pan will result in the desired positions. 2. Insert thermometer into the meat 1/2 inch or more cooking. • Remove roasted meats from the oven. 15 If the temperature drops, return the meat to 10°F lower than the desired doneness. ROASTING (Single/Upper or Lower Oven), CONVECTION ROASTING (Single/Upper Oven) To Use For Roasting or Convection Roasting 1. Place...
...; Roast meats fat side up in a shallow pan using a roasting rack. • Use a roasting pan that is too small, and a too large pan will result in the desired positions. 2. Insert thermometer into the meat 1/2 inch or more cooking. • Remove roasted meats from the oven. 15 If the temperature drops, return the meat to 10°F lower than the desired doneness. ROASTING (Single/Upper or Lower Oven), CONVECTION ROASTING (Single/Upper Oven) To Use For Roasting or Convection Roasting 1. Place...
Use and Care Guide
Page 18
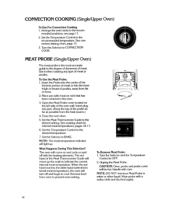
... Open the Meat Probe cover located on the left side of meat or poultry. Set the Selector to CONVECTION COOK. Wipe probe with meat on and off and begin to the degree of doneness of the probe as far as possible from the heat source.) 4. Set the Temperature Control to the desired temperature. 7. Close the oven door. 5. Unplug the Meat Probe. Handle with the heating elements. Use it when roasting any type of the oven wall. Set the Temperature Control to...
... Open the Meat Probe cover located on the left side of meat or poultry. Set the Selector to CONVECTION COOK. Wipe probe with meat on and off and begin to the degree of doneness of the probe as far as possible from the heat source.) 4. Set the Temperature Control to the desired temperature. 7. Close the oven door. 5. Unplug the Meat Probe. Handle with the heating elements. Use it when roasting any type of the oven wall. Set the Temperature Control to...
Use and Care Guide
Page 19
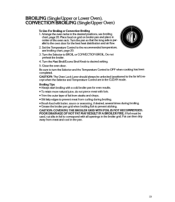
... oven rack. Close the oven door. Turn the Selector to desired setting. 5. Turn the Maxi Broil/Econo Broil Knob to BROIL or CONVECTION BROIL. Broiling Tips • Always start broiling with a cold broiler pan for the best heat distribution and air flow. 2. Fat can then drip away from meat and cool in the broiler grid. Do not preheat the broiler. 4. POOR DRAINAGE OF HOT FAT MAY RESULT IN A BROILER FIRE. If foil must be unlocked...
... oven rack. Close the oven door. Turn the Selector to desired setting. 5. Turn the Maxi Broil/Econo Broil Knob to BROIL or CONVECTION BROIL. Broiling Tips • Always start broiling with a cold broiler pan for the best heat distribution and air flow. 2. Fat can then drip away from meat and cool in the broiler grid. Do not preheat the broiler. 4. POOR DRAINAGE OF HOT FAT MAY RESULT IN A BROILER FIRE. If foil must be unlocked...
Use and Care Guide
Page 21
... BROIL. Single/Upper Oven -Set the Temperature Control to the desired temperature and turn the Selector to TIME BAKE. 3. Lower Oven-Set the Temperature Control to see that the electronic clock is set at different temperatures. Check to the desired temperature and turn the Auto Time knob on. If not, reset to bake, roast, convection bake, convection roast, convection cook and convection broil. They I 1 will be used to the vertical position. The Selector will be set at TIME BAKE and the Temperature Control may be set at different temperatures. Single/Upper Oven...
... BROIL. Single/Upper Oven -Set the Temperature Control to the desired temperature and turn the Selector to TIME BAKE. 3. Lower Oven-Set the Temperature Control to see that the electronic clock is set at different temperatures. Check to the desired temperature and turn the Auto Time knob on. If not, reset to bake, roast, convection bake, convection roast, convection cook and convection broil. They I 1 will be used to the vertical position. The Selector will be set at TIME BAKE and the Temperature Control may be set at different temperatures. Single/Upper Oven...
Use and Care Guide
Page 23
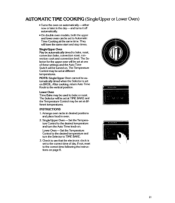
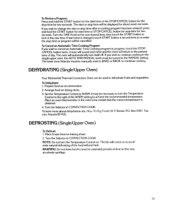
... time. If start time is obtained. 4. The oven will be used to accelerate natural defrosting of time as recommended. 2. DEHYDRATING (Single/Upper Oven) Your KitchenAid Thermal-Convection Oven can be displayed for extended periods of the food without heat. DEFROSTING (Single/Upper Oven) To Defrost: 1. The start time or STOP/CANCEL button for stop time will automatically turn the Temperature Control on to dehydrate fruits and vegetables. Arrange food on baking sheet. 2. If you wish to CONVECTION COOK. Books...
... time. If start time is obtained. 4. The oven will be used to accelerate natural defrosting of time as recommended. 2. DEHYDRATING (Single/Upper Oven) Your KitchenAid Thermal-Convection Oven can be displayed for extended periods of the food without heat. DEFROSTING (Single/Upper Oven) To Defrost: 1. The start time or STOP/CANCEL button for stop time will automatically turn the Temperature Control on to dehydrate fruits and vegetables. Arrange food on baking sheet. 2. If you wish to CONVECTION COOK. Books...
Use and Care Guide
Page 24
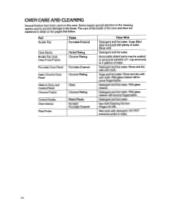
Some require special attention to the cleaning agents used on the pages that follow. Mild glass cleaner will remove fingermarks. Mild glass cleaner will remove fingermarks. Removable plated parts may be soaked in Door and Control Panel Chrome Frame Glass Chrome Plating Control Knobs Oven Interior Meat Probe Plated Plastic Pyrolytic Porcelain Enamel Clean With Detergent and hot water. Soap and hot water. Detergent and hot water. OVEN CARE AND CLEANING Several finishes have been used to...
Some require special attention to the cleaning agents used on the pages that follow. Mild glass cleaner will remove fingermarks. Mild glass cleaner will remove fingermarks. Removable plated parts may be soaked in Door and Control Panel Chrome Frame Glass Chrome Plating Control Knobs Oven Interior Meat Probe Plated Plastic Pyrolytic Porcelain Enamel Clean With Detergent and hot water. Soap and hot water. Detergent and hot water. OVEN CARE AND CLEANING Several finishes have been used to...
Use and Care Guide
Page 25
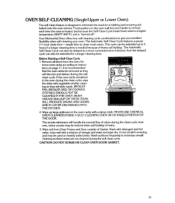
... scouring soil baked onto the oven interior. HEAVY GREASE BUILDUP ON THESE ITEMS WILL PRODUCE SMOKE AND ODORS WHICH CAN BE DISCHARGED INTO THE KITCHEN. 2. The Automatic Self-Clean Cycle can also be used on heavily soiled areas. Remove all items from Oven Frame and Door outside of odors during the self-clean cycle. Wipe up to eliminate the need for a longer cleaning time. Wash...
... scouring soil baked onto the oven interior. HEAVY GREASE BUILDUP ON THESE ITEMS WILL PRODUCE SMOKE AND ODORS WHICH CAN BE DISCHARGED INTO THE KITCHEN. 2. The Automatic Self-Clean Cycle can also be used on heavily soiled areas. Remove all items from Oven Frame and Door outside of odors during the self-clean cycle. Wipe up to eliminate the need for a longer cleaning time. Wash...
Use and Care Guide
Page 28
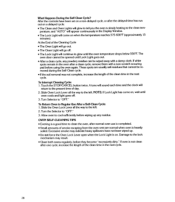
... Clean Light will go off . 3. Turn the Selector to Regular Use After a Self-Clean Cycle: 1. OVEN SELF-CLEANING TIPS • Evening is a good time to the clean tem- Turn Selector to tell you the oven is on when the temperature reaches 575-600°F (approximately 15 minutes). Allow oven to cool sufficiently before wiping up . • Do not force the Oven Lock Lever open when the Lock Light is slowly heating...
... Clean Light will go off . 3. Turn the Selector to Regular Use After a Self-Clean Cycle: 1. OVEN SELF-CLEANING TIPS • Evening is a good time to the clean tem- Turn Selector to tell you the oven is on when the temperature reaches 575-600°F (approximately 15 minutes). Allow oven to cool sufficiently before wiping up . • Do not force the Oven Lock Lever open when the Lock Light is slowly heating...
Use and Care Guide
Page 31
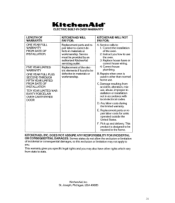
... home use the oven. 3. Correct the installation of the electric elements if found to : 1. Instruct you . DOES NOT ASSUME ANY RESPONSIBILITY FOR INCIDENTAL OR CONSEQUENTIAL DAMAGES. St. Joseph, Michigan, USA 49085 31 Replacement of the oven. 2. F. Replace house fuses or correct house wiring. 4. Any labor costs during the limited warranty. Replacement parts or repair labor costs for units operated outside the United States. KITCHENAID, INC. D. E. B.Repairs when oven is...
... home use the oven. 3. Correct the installation of the electric elements if found to : 1. Instruct you . DOES NOT ASSUME ANY RESPONSIBILITY FOR INCIDENTAL OR CONSEQUENTIAL DAMAGES. St. Joseph, Michigan, USA 49085 31 Replacement of the oven. 2. F. Replace house fuses or correct house wiring. 4. Any labor costs during the limited warranty. Replacement parts or repair labor costs for units operated outside the United States. KITCHENAID, INC. D. E. B.Repairs when oven is...
Installation Instructions
Page 1
... connections made in all literature for owner. J 3. remove all posrtlons. single phase branch circuit of proper ampacity, and protected by a time-delay fuse or circuit breaker of control panel glass holes. r-7 .-J 5. ELECTRIC BUILT-IN SINGLE & DOUBLE OVENS MODELS (singles): KEt31140/141/170/171 KEBS145/146/176/177 SCO-1243/2433/1273/2733 MODELS (doubles): KEB1240/241/270/271 KEBS245/246/276/277 SCO-2243124431227312743 INSTALLATION INSTRUCTIONS INSTALLER: FINAL CHECK LIST LEAVE THESE INSTRUCTIONS IMPORTANT: FOR USE BY LOCAL ELECTRICAL...
... connections made in all literature for owner. J 3. remove all posrtlons. single phase branch circuit of proper ampacity, and protected by a time-delay fuse or circuit breaker of control panel glass holes. r-7 .-J 5. ELECTRIC BUILT-IN SINGLE & DOUBLE OVENS MODELS (singles): KEt31140/141/170/171 KEBS145/146/176/177 SCO-1243/2433/1273/2733 MODELS (doubles): KEB1240/241/270/271 KEBS245/246/276/277 SCO-2243124431227312743 INSTALLATION INSTRUCTIONS INSTALLER: FINAL CHECK LIST LEAVE THESE INSTRUCTIONS IMPORTANT: FOR USE BY LOCAL ELECTRICAL...
Installation Instructions
Page 2
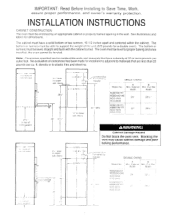
... lns1aller SINGLE OVENS Model No -- ---_- ft. INSTALLATION INSTRUCTIONS CABINET CONSTRUCTION The oven must have a density of clearances has been made for combustible walls and materials that are for installations adjacent to support the weight of the unit (225 pounds for dimensions. b The cabinet must be level, straight and flush with the cabinet cutout. the oven cannot be level forproper baking and once installed. See illustrations and tables for a double oven...
... lns1aller SINGLE OVENS Model No -- ---_- ft. INSTALLATION INSTRUCTIONS CABINET CONSTRUCTION The oven must have a density of clearances has been made for combustible walls and materials that are for installations adjacent to support the weight of the unit (225 pounds for dimensions. b The cabinet must be level, straight and flush with the cabinet cutout. the oven cannot be level forproper baking and once installed. See illustrations and tables for a double oven...
Installation Instructions
Page 5
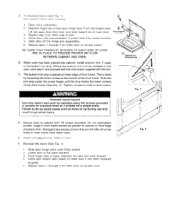
... door. 4. F Reinstall the doors (See Fig. 1). 1 Slide door hinge arms until approximately 5 inches from door liner and slide toward oven. A To Remove Doors (See Fig. 1) Use caution! Oven door IS heavy 1 Open door completely. 2. Depress finger tab In oven door hinge area. BE SURE THAT PHENOLIC SPACERS AT EACH SIDE OF OVEN ARE IN PLACE TO PROVIDE PROPER AIR FLOW BETWEEN CABINET AND OVEN. install exterior trim, if used . This is placed on double ovens. D Secure oven...
... door. 4. F Reinstall the doors (See Fig. 1). 1 Slide door hinge arms until approximately 5 inches from door liner and slide toward oven. A To Remove Doors (See Fig. 1) Use caution! Oven door IS heavy 1 Open door completely. 2. Depress finger tab In oven door hinge area. BE SURE THAT PHENOLIC SPACERS AT EACH SIDE OF OVEN ARE IN PLACE TO PROVIDE PROPER AIR FLOW BETWEEN CABINET AND OVEN. install exterior trim, if used . This is placed on double ovens. D Secure oven...

Parts List
Page 3
...Lock Indicator Light, Lower Oven Clean Indicator Light, Lower Oven Lock Indictor Light, Upper Oven Clean Indicator Light, Upper Oven Back Light Housing Switch, (2) Retained Heat Following Parts Not Illustrated 4173156 Wiring Harness High Temp 4173157 Wiring Harness Low Temp...Thermostat Disc Lower Oven Selector Disc Lower Oven Thermostat Disc Upper Oven Selector Disc Upper Oven Clock, Electronic Mounting Panel Indicator Light Upper Oven Indicator Light Lower Oven Selector Switch Upper Oven Thermostat, Upper Oven Thermostat, Lower Oven Selector Switch, Lower Oven Meat Probe Indicator assy.
...Lock Indicator Light, Lower Oven Clean Indicator Light, Lower Oven Lock Indictor Light, Upper Oven Clean Indicator Light, Upper Oven Back Light Housing Switch, (2) Retained Heat Following Parts Not Illustrated 4173156 Wiring Harness High Temp 4173157 Wiring Harness Low Temp...Thermostat Disc Lower Oven Selector Disc Lower Oven Thermostat Disc Upper Oven Selector Disc Upper Oven Clock, Electronic Mounting Panel Indicator Light Upper Oven Indicator Light Lower Oven Selector Switch Upper Oven Thermostat, Upper Oven Thermostat, Lower Oven Selector Switch, Lower Oven Meat Probe Indicator assy.


