
Use & Care Guide
Page 1
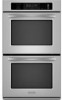
... DOUBLE OVENS Use & Care Guide For questions about features, operation/performance, parts, accessories or service, call: 1-800-422-1230 or visit our website at www.kitchenaid.com In Canada, call for assistance, installation and service, call: 1-800-807-6777 or visit our website at www.KitchenAid.ca... FOURS ÉLECTRIQUES À CONVECTION SIMPLES ET DOUBLES, ENCASTRÉS SUPERBA® Guide d'utilisation et d'...
... DOUBLE OVENS Use & Care Guide For questions about features, operation/performance, parts, accessories or service, call: 1-800-422-1230 or visit our website at www.kitchenaid.com In Canada, call for assistance, installation and service, call: 1-800-807-6777 or visit our website at www.KitchenAid.ca... FOURS ÉLECTRIQUES À CONVECTION SIMPLES ET DOUBLES, ENCASTRÉS SUPERBA® Guide d'utilisation et d'...

Use & Care Guide
Page 3
... element in area where oven is properly installed and grounded by a qualified technician. ■ Never Use the Oven for a good seal. They should not be left alone or unattended in oven. ■ DO NOT TOUCH HEATING ELEMENTS OR INTERIOR SURFACES OF OVEN - Do not use ... These words mean: DANGER You can be worn while using the oven, follow instructions. Flammable materials should be killed or seriously injured if you don't follow basic precautions, including the following: ■ Proper Installation - WARNING You can be used in burns from steam. Do...
... element in area where oven is properly installed and grounded by a qualified technician. ■ Never Use the Oven for a good seal. They should not be left alone or unattended in oven. ■ DO NOT TOUCH HEATING ELEMENTS OR INTERIOR SURFACES OF OVEN - Do not use ... These words mean: DANGER You can be worn while using the oven, follow instructions. Flammable materials should be killed or seriously injured if you don't follow basic precautions, including the following: ■ Proper Installation - WARNING You can be used in burns from steam. Do...

Use & Care Guide
Page 19
...each side. 3. Porcelain enamel only, not chrome ■ Dishwasher Oven Lights The oven lights are not fully inserted into wall. 6. Remove glass light cover by snapping back into the oven cavity or when bakeware extends past the front edge of ¹...oven has completely cooled. IMPORTANT: Oven Door To avoid oven door glass breakage: ■ Do not close . When the oven door is off and cool. 1. Open the oven door. They will not work during the SelfCleaning cycle. However, if removal is necessary, make sure the oven is not, repeat the removal and installation...
...each side. 3. Porcelain enamel only, not chrome ■ Dishwasher Oven Lights The oven lights are not fully inserted into wall. 6. Remove glass light cover by snapping back into the oven cavity or when bakeware extends past the front edge of ¹...oven has completely cooled. IMPORTANT: Oven Door To avoid oven door glass breakage: ■ Do not close . When the oven door is off and cool. 1. Open the oven door. They will not work during the SelfCleaning cycle. However, if removal is necessary, make sure the oven is not, repeat the removal and installation...

Use & Care Guide
Page 20
... been set ? Replace the fuse or reset the circuit breaker. See Installation Instructions. See "Sabbath Mode" section. ■ On double oven models, is increased. When one oven is self-cleaning the other oven cannot be set correctly? Adjust cooking time. ■ Has the oven door been opened while cooking? Nothing will operate Self-Cleaning cycle will...
... been set ? Replace the fuse or reset the circuit breaker. See Installation Instructions. See "Sabbath Mode" section. ■ On double oven models, is increased. When one oven is self-cleaning the other oven cannot be set correctly? Adjust cooking time. ■ Has the oven door been opened while cooking? Nothing will operate Self-Cleaning cycle will...

Use & Care Guide
Page 21
...Installation information. ■ Use and maintenance procedures. ■ Accessory and repair parts sales. ■ Specialized customer assistance (Spanish speaking, hearing impaired, limited vision, etc.). ■ Referrals to fulfill the product warranty and provide after-warranty service, anywhere in your correspondence. This information will help , follow the menu prompts. KitchenAid... further assistance If you need further assistance, you can also look in Canada. KITCHENAID® BUILT-IN OVEN & MICROWAVE WARRANTY LIMITED WARRANTY For one year from the date of purchase, when...
...Installation information. ■ Use and maintenance procedures. ■ Accessory and repair parts sales. ■ Specialized customer assistance (Spanish speaking, hearing impaired, limited vision, etc.). ■ Referrals to fulfill the product warranty and provide after-warranty service, anywhere in your correspondence. This information will help , follow the menu prompts. KitchenAid... further assistance If you need further assistance, you can also look in Canada. KITCHENAID® BUILT-IN OVEN & MICROWAVE WARRANTY LIMITED WARRANTY For one year from the date of purchase, when...

Use & Care Guide
Page 22
... appliance is located in a remote area where service by an authorized KitchenAid servicer is not available. 9. This warranty is not installed in a manner that have been removed, altered or cannot be easily... shall be repaired in the home and only in materials or workmanship and is reported to KitchenAid within 30 days from the date of purchase. 6. In Canada, call 1-800-422-1230. Cosmetic ...800-807-6777. 9/07 Keep this book and your sales slip together for the stainless steel oven cavity/inner door if the part rusts through tenth years from date of purchase, when this...
... appliance is located in a remote area where service by an authorized KitchenAid servicer is not available. 9. This warranty is not installed in a manner that have been removed, altered or cannot be easily... shall be repaired in the home and only in materials or workmanship and is reported to KitchenAid within 30 days from the date of purchase. 6. In Canada, call 1-800-422-1230. Cosmetic ...800-807-6777. 9/07 Keep this book and your sales slip together for the stainless steel oven cavity/inner door if the part rusts through tenth years from date of purchase, when this...

Dimension Guide
Page 1
...E. 49 125.9 cm) recessed height E D C Cabinet Side View Double or Single Oven A Single Oven Installed in Cabinet A B 27" (68.6 cm) models 30" (76.2 cm) models A. 27" (68.6 cm) min. Recessed oven E. cutout height 30" (76.2 cm) models A. 30" (76.2 cm) min. bottom of cabinet door F. 27³&#...29³⁄₄" (75.6 cm) overall width D. 23" (58.4 cm) max. recessed width B. 28³⁄₄" (73.0 cm) max. cutout height E C Double Oven Installed in Cabinet A B B. 29" (73.7 cm) ma C. 26³⁄₄" (67.9 cm) o F D. 23" (58.4 cm) ma D E. 27¹⁄...
...E. 49 125.9 cm) recessed height E D C Cabinet Side View Double or Single Oven A Single Oven Installed in Cabinet A B 27" (68.6 cm) models 30" (76.2 cm) models A. 27" (68.6 cm) min. Recessed oven E. cutout height 30" (76.2 cm) models A. 30" (76.2 cm) min. bottom of cabinet door F. 27³&#...29³⁄₄" (75.6 cm) overall width D. 23" (58.4 cm) max. recessed width B. 28³⁄₄" (73.0 cm) max. cutout height E C Double Oven Installed in Cabinet A B B. 29" (73.7 cm) ma C. 26³⁄₄" (67.9 cm) o F D. 23" (58.4 cm) ma D E. 27¹⁄...

Installation Guide
Page 2
...can be made by a licensed, qualified electrical installer. WARNING You can be killed or seriously injured if you don't follow instructions. single oven (2), double oven (4) ■ Bottom vent (supplied on your...double oven weight of 287 lbs (130 kg). 2 bottom vent (supplied on rear wall behind oven, the junction box must provide complete enclosure around the recessed portion of the cabinet; Tools needed ■ Phillips screwdriver ■ Measuring tape ■ Hand or electric drill (for wall cabinet installations) ■ 1" (25 mm) drill bit (for wall cabinet installations...
...can be made by a licensed, qualified electrical installer. WARNING You can be killed or seriously injured if you don't follow instructions. single oven (2), double oven (4) ■ Bottom vent (supplied on your...double oven weight of 287 lbs (130 kg). 2 bottom vent (supplied on rear wall behind oven, the junction box must provide complete enclosure around the recessed portion of the cabinet; Tools needed ■ Phillips screwdriver ■ Measuring tape ■ Hand or electric drill (for wall cabinet installations) ■ 1" (25 mm) drill bit (for wall cabinet installations...

Installation Guide
Page 3
... bottom of upper cabinet door C. 32" (81.3 cm) bottom of the oven. cutout height D C 27" (68.6 cm) models A. 25 64.3 cm) max. recessed depth E. 49 125.9 cm) recessed height 30" (76.2 cm) models A. 28 71.9 cm) max. A B Product Dimensions - Undercounter Installation (with cooktop installed above ) A B 27" (68.6 cm) models A. 27" (68.6 ... (67.9 cm) overall width D. 23" (58.4 cm) max. overall height C. 26³⁄₄" (67.9 cm) overall width D. 23" (58.4 cm) max. Double Ovens A B E E D C 27" (68.6 cm) models A. 27" (68.6 cm) min. cutout height...
... bottom of upper cabinet door C. 32" (81.3 cm) bottom of the oven. cutout height D C 27" (68.6 cm) models A. 25 64.3 cm) max. recessed depth E. 49 125.9 cm) recessed height 30" (76.2 cm) models A. 28 71.9 cm) max. A B Product Dimensions - Undercounter Installation (with cooktop installed above ) A B 27" (68.6 cm) models A. 27" (68.6 ... (67.9 cm) overall width D. 23" (58.4 cm) max. overall height C. 26³⁄₄" (67.9 cm) overall width D. 23" (58.4 cm) max. Double Ovens A B E E D C 27" (68.6 cm) models A. 27" (68.6 cm) min. cutout height...

Installation Guide
Page 4
...) cutout width E. 1¹⁄₂" (3.8 cm) min. Double Ovens Double Ovens Installed in conformance with a qualified electrical installer if you will be connected to a grounded metal, permanent wiring system. Oven front D. This oven must be using and follow the instructions provided for it is located..., OH 44131-5575 Single Oven A. Cabinet Dimensions - Single or Double Ovens A B E C D E C 27" (68.6 cm) models A. 27" (68.6 cm) min. cutout height 30" (76.2 cm) models A. 30" (76.2 cm) min. cutout depth B. 23" (58.4 cm) recessed oven depth C. Check with the...
...) cutout width E. 1¹⁄₂" (3.8 cm) min. Double Ovens Double Ovens Installed in conformance with a qualified electrical installer if you will be connected to a grounded metal, permanent wiring system. Oven front D. This oven must be using and follow the instructions provided for it is located..., OH 44131-5575 Single Oven A. Cabinet Dimensions - Single or Double Ovens A B E C D E C 27" (68.6 cm) models A. 27" (68.6 cm) min. cutout height 30" (76.2 cm) models A. 30" (76.2 cm) min. cutout depth B. 23" (58.4 cm) recessed oven depth C. Check with the...

Installation Guide
Page 5
...of copper wire using special connectors and/or tools designed and UL listed for serviceability of solid copper wire to move and install oven. Electrically ground oven. Failure to aluminum. Disconnect power. 2. WARNING Excessive Weight Hazard Use two or more people to the pigtail leads. 2.... has aluminum wiring follow these instructions can result in both sides of the oven door, and rotate the latches forward to avoid drilling into or severing wiring during installation. Locate the oven door latches in back or other parts from inside the bag containing literature....
...of copper wire using special connectors and/or tools designed and UL listed for serviceability of solid copper wire to move and install oven. Electrically ground oven. Failure to aluminum. Disconnect power. 2. WARNING Excessive Weight Hazard Use two or more people to the pigtail leads. 2.... has aluminum wiring follow these instructions can result in both sides of the oven door, and rotate the latches forward to avoid drilling into or severing wiring during installation. Locate the oven door latches in back or other parts from inside the bag containing literature....
Installation Guide
Page 6
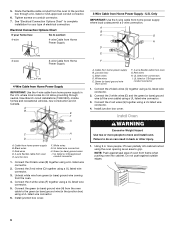
... using a UL listed wire connector. 2. Cable from oven G. Green (or bare) ground wire (from oven) F. 4-wire flexible cable from home power supply B. Route the flexible cable conduit from oven E. Black wires C. Red wires D. 4-wire flexible cable from the oven to move and install oven. UL listed wire connectors H. Install junction box cover. 3-Wire Cable from home power...
... using a UL listed wire connector. 2. Cable from oven G. Green (or bare) ground wire (from oven) F. 4-wire flexible cable from home power supply B. Route the flexible cable conduit from oven E. Black wires C. Red wires D. 4-wire flexible cable from the oven to move and install oven. UL listed wire connectors H. Install junction box cover. 3-Wire Cable from home power...

Installation Guide
Page 7
... is connected. ■ See "Troubleshooting" section in oven. 7 Check that all packaging materials. 4. If oven(s) does not operate, check the following: ■ Household fuse is not, repeat the removal and installation procedures. or circuit breaker has not tripped. ■...Double Oven 1. Check Operation of the vent, fasten vent securely to the oven. Push oven completely into cabinet and center oven into cabinet. 3. With one #8-14 x ³⁄₈" screw for lower oven door. 12. Check that you purchased your tools. 3. When oven has been on for double oven...
... is connected. ■ See "Troubleshooting" section in oven. 7 Check that all packaging materials. 4. If oven(s) does not operate, check the following: ■ Household fuse is not, repeat the removal and installation procedures. or circuit breaker has not tripped. ■...Double Oven 1. Check Operation of the vent, fasten vent securely to the oven. Push oven completely into cabinet and center oven into cabinet. 3. With one #8-14 x ³⁄₈" screw for lower oven door. 12. Check that you purchased your tools. 3. When oven has been on for double oven...


