
Use & Care Guide
Page 1
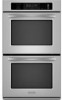
...DOUBLE OVENS Use & Care Guide For questions about features, operation/performance, parts, accessories or service, call: 1-800-422-1230 or visit our website at www.kitchenaid.com In Canada, call for assistance, installation and service, call: 1-800-807-6777 or visit our website at www.KitchenAid....ca FOURS ÉLECTRIQUES À CONVECTION SIMPLES ET DOUBLES, ENCASTRÉS SUPERBA® Guide d'utilisation et d'entretien Au Canada, pour assistance, installation ou service composez ...
...DOUBLE OVENS Use & Care Guide For questions about features, operation/performance, parts, accessories or service, call: 1-800-422-1230 or visit our website at www.kitchenaid.com In Canada, call for assistance, installation and service, call: 1-800-807-6777 or visit our website at www.KitchenAid....ca FOURS ÉLECTRIQUES À CONVECTION SIMPLES ET DOUBLES, ENCASTRÉS SUPERBA® Guide d'utilisation et d'entretien Au Canada, pour assistance, installation ou service composez ...

Use & Care Guide
Page 4
... back panel) J. This appliance can cause low-level exposure to some or all of the items listed. CleanBake™ bake element (hidden beneath floor panel) E. Oven door lock latch H. Model and serial number plate (on double oven models) F. The locations and appearances of the features shown here may have some of your model...
... back panel) J. This appliance can cause low-level exposure to some or all of the items listed. CleanBake™ bake element (hidden beneath floor panel) E. Oven door lock latch H. Model and serial number plate (on double oven models) F. The locations and appearances of the features shown here may have some of your model...
Use & Care Guide
Page 5
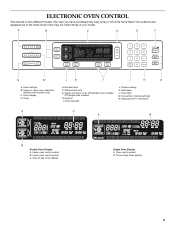
... manual covers different models. Timer E. Upper and lower oven Off (double oven models) Off (single oven models) H. Options I H G A. Timed cooking K. Time of the items listed. The oven you have some or all of day, timer display 5 Oven settings B. Oven display D. Self-clean L. Oven light M. Upper oven cavity symbol B. Lower oven cavity symbol C. Oven cavity symbol B. Convection cooking settings N. A B C D E F N M L K J I . Start/control lock...
... manual covers different models. Timer E. Upper and lower oven Off (double oven models) Off (single oven models) H. Options I H G A. Timed cooking K. Time of the items listed. The oven you have some or all of day, timer display 5 Oven settings B. Oven display D. Self-clean L. Oven light M. Upper oven cavity symbol B. Lower oven cavity symbol C. Oven cavity symbol B. Convection cooking settings N. A B C D E F N M L K J I . Start/control lock...

Use & Care Guide
Page 6
...When in use this display shows the oven temperature, heat source(s) and start time. If the Start key is not touched within 5 seconds after touching another key, "START?" If "Err" appears on , but can be changed to Celsius. On double oven models, this display shows a time... countdown and the stop their respective oven functions except for service, see the "Assistance or Service" section. In addition, during Timed Cooking, this ...
...When in use this display shows the oven temperature, heat source(s) and start time. If the Start key is not touched within 5 seconds after touching another key, "START?" If "Err" appears on , but can be changed to Celsius. On double oven models, this display shows a time... countdown and the stop their respective oven functions except for service, see the "Assistance or Service" section. In addition, during Timed Cooking, this ...

Use & Care Guide
Page 7
... Touch and hold START for only part of time. 3. On double ovens only, touch UPPER OVEN or LOWER OVEN to end calibration. The "ON" indicator will enable both ovens. On double ovens, touch UPPER OVEN OFF or LOWER OVEN OFF. Each oven can be set between MIN/SEC and HR/MIN. Touch the ...ADJUSTMENT °F (AUTOMATIC °C CHANGE) COOKS FOOD 10°F (5°C) ...a little more 20°F (10°C) ...moderately more 30°F (15°C) ...much more 0°F (0°C) default setting -10°F (-5°C) ...a little less -20°F (-10°C) ...moderately less...
... Touch and hold START for only part of time. 3. On double ovens only, touch UPPER OVEN or LOWER OVEN to end calibration. The "ON" indicator will enable both ovens. On double ovens, touch UPPER OVEN OFF or LOWER OVEN OFF. Each oven can be set between MIN/SEC and HR/MIN. Touch the ...ADJUSTMENT °F (AUTOMATIC °C CHANGE) COOKS FOOD 10°F (5°C) ...a little more 20°F (10°C) ...moderately more 30°F (15°C) ...much more 0°F (0°C) default setting -10°F (-5°C) ...a little less -20°F (-10°C) ...moderately less...
Use & Care Guide
Page 8
...Doing so can result in death to the fumes given off . On double ovens only, touch UPPER OVEN or LOWER OVEN. Touch the number keys to enter the length of some birds is changed when the oven(s) are normal when the oven is used the first few times, or when it out to move ... not turn off . Touch OPTIONS and then touch number key "7." "SABBATH MODE" will automatically turn on double ovens, the cavities can be placed on the oven display. 7. When the stop position, raise the front edge, then lift out. The heating elements will begin a timed bake cycle. It may result...
...Doing so can result in death to the fumes given off . On double ovens only, touch UPPER OVEN or LOWER OVEN. Touch the number keys to enter the length of some birds is changed when the oven(s) are normal when the oven is used the first few times, or when it out to move ... not turn off . Touch OPTIONS and then touch number key "7." "SABBATH MODE" will automatically turn on double ovens, the cavities can be placed on the oven display. 7. When the stop position, raise the front edge, then lift out. The heating elements will begin a timed bake cycle. It may result...

Use & Care Guide
Page 10
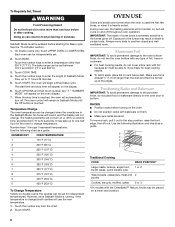
...and both broils) will turn on and off approximately 30 seconds after the door is not necessary to wait for the oven to maintain the oven temperature. Control panel B. Warm air E. Upper oven F. If the oven door is opened . Touch the number keys to reduce... 260°C). 10 The cavity symbol will cause poor air circulation, affecting cooking and cleaning results. Warm air Double Oven D. On double ovens only, touch UPPER OVEN or LOWER OVEN. Stoneware/Baking stone ■ Crisp crusts ■ Follow manufacturer's instructions. To Bake or Roast: Before baking...
...and both broils) will turn on and off approximately 30 seconds after the door is not necessary to wait for the oven to maintain the oven temperature. Control panel B. Warm air E. Upper oven F. If the oven door is opened . Touch the number keys to reduce... 260°C). 10 The cavity symbol will cause poor air circulation, affecting cooking and cleaning results. Warm air Double Oven D. On double ovens only, touch UPPER OVEN or LOWER OVEN. Stoneware/Baking stone ■ Crisp crusts ■ Follow manufacturer's instructions. To Bake or Roast: Before baking...

Use & Care Guide
Page 11
...;₂" [5 cm to 6.3 cm]) boneless pieces (4 oz. [113 g]) 20-30 12-15 Fish Fish ¹ ₂" to ³⁄₄" (1.25 to 2 cm) thick 6-9 *Place up to enter a temperature other than 500°F (260°C). On double ovens only, touch UPPER OVEN or LOWER OVEN. Touch the number keys to 12 patties, equally spaced, on...
...;₂" [5 cm to 6.3 cm]) boneless pieces (4 oz. [113 g]) 20-30 12-15 Fish Fish ¹ ₂" to ³⁄₄" (1.25 to 2 cm) thick 6-9 *Place up to enter a temperature other than 500°F (260°C). On double ovens only, touch UPPER OVEN or LOWER OVEN. Touch the number keys to 12 patties, equally spaced, on...

Use & Care Guide
Page 12
... not to a minimum by as much as foods on again approximately 30 seconds after the door is opened . Convection baking can be set temperature is reached, if on the oven display if the actual oven temperature is full, extra cooking time may need to determine the doneness...roasting pans with several different types of meats and poultry. On double ovens only, touch UPPER OVEN or LOWER OVEN. The cavity symbol indicates which oven was chosen. 2. The convection bake range can be needed. Touch START. When cooking an oven meal with lower sides to move freely around the food. ...
... not to a minimum by as much as foods on again approximately 30 seconds after the door is opened . Convection baking can be set temperature is reached, if on the oven display if the actual oven temperature is full, extra cooking time may need to determine the doneness...roasting pans with several different types of meats and poultry. On double ovens only, touch UPPER OVEN or LOWER OVEN. The cavity symbol indicates which oven was chosen. 2. The convection bake range can be needed. Touch START. When cooking an oven meal with lower sides to move freely around the food. ...
Use & Care Guide
Page 13
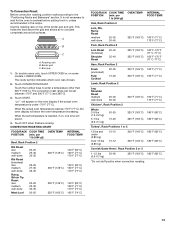
A B C A. On double ovens only, touch UPPER OVEN or, on the oven display if the actual oven temperature is under (5.85 kg) Over 13 lbs (5.85 kg) 10-15...-done Rump, Sirloin Tip Roast rare medium well-done Meat Loaf 20-25 25-30 30-35 22-25 27-30 32-35 20-25 25-30 30-35 20-25 OVEN TEMP. 300°F (149°C) 300°F (149°C) 300°...°F (77°C) 165°F (74°C) FOOD/RACK COOK TIME POSITION (min. The cavity symbol indicates which oven was chosen. 2. Touch OFF when finished cooking. Touch CONVECTION ROAST. Touch START. When the set between 170°F and...
A B C A. On double ovens only, touch UPPER OVEN or, on the oven display if the actual oven temperature is under (5.85 kg) Over 13 lbs (5.85 kg) 10-15...-done Rump, Sirloin Tip Roast rare medium well-done Meat Loaf 20-25 25-30 30-35 22-25 27-30 32-35 20-25 25-30 30-35 20-25 OVEN TEMP. 300°F (149°C) 300°F (149°C) 300°...°F (77°C) 165°F (74°C) FOOD/RACK COOK TIME POSITION (min. The cavity symbol indicates which oven was chosen. 2. Touch OFF when finished cooking. Touch CONVECTION ROAST. Touch START. When the set between 170°F and...

Use & Care Guide
Page 14
... before placing food in the center of -cycle tones will appear on some models, LOWER OVEN. Touch CONVECTION BROIL. On double ovens only, touch UPPER OVEN or, on and off approximately 30 seconds after the door is reached, end-of the oven rack with the longest side parallel to a different temperature. Touch START. Close the door...
... before placing food in the center of -cycle tones will appear on some models, LOWER OVEN. Touch CONVECTION BROIL. On double ovens only, touch UPPER OVEN or, on and off approximately 30 seconds after the door is reached, end-of the oven rack with the longest side parallel to a different temperature. Touch START. Close the door...

Use & Care Guide
Page 15
...;C). 3. Always unplug and remove the temperature probe from the oven when removing food. Close door. 1. On double ovens only, touch UPPER OVEN or LOWER OVEN. The cavity symbol will sound every minute. 5. Let dough rise until nearly doubled in the display until the internal temperature of meat and poultry... probe tip should be located in the center of the thickest part of the meat and not into . 2. On double ovens only, touch UPPER OVEN or LOWER OVEN. The probe temperature is the desired internal temperature of -cycle tones will sound, then reminder tones will indicate which...
...;C). 3. Always unplug and remove the temperature probe from the oven when removing food. Close door. 1. On double ovens only, touch UPPER OVEN or LOWER OVEN. The cavity symbol will sound every minute. 5. Let dough rise until nearly doubled in the display until the internal temperature of meat and poultry... probe tip should be located in the center of the thickest part of the meat and not into . 2. On double ovens only, touch UPPER OVEN or LOWER OVEN. The probe temperature is the desired internal temperature of -cycle tones will sound, then reminder tones will indicate which...

Use & Care Guide
Page 16
...176;F (77°C and 260°C). On double oven models only, when both upper and lower ovens are not displayed until the oven is not adjustable. 3. On double ovens only, touch UPPER OVEN or LOWER OVEN. The cavity symbol will indicate which oven was chosen. 4. Touch BAKE, CONVECTION BAKE OR...the Bread Proof function, but the temperature is finished preheating. On double ovens only, touch UPPER OVEN or LOWER OVEN. Touch the number keys to turn off automatically and "cooking complete" will appear on the oven display. Touch START. The minute time countdown will appear on ...
...176;F (77°C and 260°C). On double oven models only, when both upper and lower ovens are not displayed until the oven is not adjustable. 3. On double ovens only, touch UPPER OVEN or LOWER OVEN. The cavity symbol will indicate which oven was chosen. 4. Touch BAKE, CONVECTION BAKE OR...the Bread Proof function, but the temperature is finished preheating. On double ovens only, touch UPPER OVEN or LOWER OVEN. Touch the number keys to turn off automatically and "cooking complete" will appear on the oven display. Touch START. The minute time countdown will appear on ...

Use & Care Guide
Page 17
... START. Keep the kitchen well-ventilated during the Self-Cleaning cycle. If enabled, end-of heat, odors, and smoke. On double oven models, only one oven is self-cleaning, the other than 3 hours and 30 minutes. Use the following chart as a guide to slide. To avoid breaking the glass, do not apply a cool damp...
... START. Keep the kitchen well-ventilated during the Self-Cleaning cycle. If enabled, end-of heat, odors, and smoke. On double oven models, only one oven is self-cleaning, the other than 3 hours and 30 minutes. Use the following chart as a guide to slide. To avoid breaking the glass, do not apply a cool damp...

Use & Care Guide
Page 18
...The clean time can result. Touch STOP TIME. 4. Touch START. Touch OFF, UPPER OVEN OFF or LOWER OVEN OFF or open the oven door to set between 2 hours and 30 minutes and 4 hours and 30 minutes. General Cleaning IMPORTANT: Before cleaning, make sure all -purpose cleaner: Rinse with ...Cleaner Part Number 31682 (not included): See "Assistance or Service" section to slide. On double ovens only, touch UPPER OVEN or LOWER OVEN. Touch the number keys to enter the time of grain to avoid damaging. ■ KitchenAid® Stainless Steel Cleaner and Polish Part Number 4396920 (not included) or...
...The clean time can result. Touch STOP TIME. 4. Touch START. Touch OFF, UPPER OVEN OFF or LOWER OVEN OFF or open the oven door to set between 2 hours and 30 minutes and 4 hours and 30 minutes. General Cleaning IMPORTANT: Before cleaning, make sure all -purpose cleaner: Rinse with ...Cleaner Part Number 31682 (not included): See "Assistance or Service" section to slide. On double ovens only, touch UPPER OVEN or LOWER OVEN. Touch the number keys to enter the time of grain to avoid damaging. ■ KitchenAid® Stainless Steel Cleaner and Polish Part Number 4396920 (not included) or...

Use & Care Guide
Page 19
... Soak for 20 minutes, then scrub with scouring or steel-wool pad. The oven door is not, repeat the removal and installation procedures. 19 Remove bulb from oven. Reconnect power. If it is off and cool. 1. On double oven models, both upper and lower lights will come on when either door is off... is set objects on or off and cool. Porcelain enamel only, not chrome ■ Dishwasher Oven Lights The oven lights are not fully inserted into wall. 6. Close the oven door as far as the door is opened . Check that the door is closed and pull it will not work during the ...
... Soak for 20 minutes, then scrub with scouring or steel-wool pad. The oven door is not, repeat the removal and installation procedures. 19 Remove bulb from oven. Reconnect power. If it is off and cool. 1. On double oven models, both upper and lower lights will come on when either door is off... is set objects on or off and cool. Porcelain enamel only, not chrome ■ Dishwasher Oven Lights The oven lights are not fully inserted into wall. 6. Close the oven door as far as the door is opened . Check that the door is closed and pull it will not work during the ...

Use & Care Guide
Page 20
...On some models, has a delay start Self-Clean cycle been set ? Oven peeking releases oven heat and can result in longer cooking times. ■ Are baked items too brown on . ■ On double oven models, has the correct oven been selected? If a letter followed by a number? Use aluminum foil...See "Timed Cooking" section. ■ Is the Control Lock set correctly? See "Timed Cooking" section. ■ On double oven models, is self-cleaning the other oven cannot be set to cover the edge of an unnecessary service call an electrician. ■ Is the appliance wired properly? ...
...On some models, has a delay start Self-Clean cycle been set ? Oven peeking releases oven heat and can result in longer cooking times. ■ Are baked items too brown on . ■ On double oven models, has the correct oven been selected? If a letter followed by a number? Use aluminum foil...See "Timed Cooking" section. ■ Is the Control Lock set correctly? See "Timed Cooking" section. ■ On double oven models, is self-cleaning the other oven cannot be set to cover the edge of an unnecessary service call an electrician. ■ Is the appliance wired properly? ...

Dimension Guide
Page 1
® 27" (68.6 CM) AND 30" (76.2 CM) ELECTRIC SINGLE AND DOUBLE BUILT-IN OVEN PRODUCT MODEL SERIES KEBK101S KEBK171S KEBK276S KEBS107S KEBS177S KEBS207S KEBS208S KEBK206S KEBS277S KEBS278S Electrical: Oven must be connected to the proper electrical voltage and frequency as specified on the ...179;⁄₄" (73.0 cm) max. recessed depth E. 49 125.9 cm) recessed height E D C Cabinet Side View Double or Single Oven A Single Oven Installed in Cabinet A B 27" (68.6 cm) models 30" (76.2 cm) models A. 27" (68.6 cm) min. top of cutout to underside of countertop C. 5¹⁄...
® 27" (68.6 CM) AND 30" (76.2 CM) ELECTRIC SINGLE AND DOUBLE BUILT-IN OVEN PRODUCT MODEL SERIES KEBK101S KEBK171S KEBK276S KEBS107S KEBS177S KEBS207S KEBS208S KEBK206S KEBS277S KEBS278S Electrical: Oven must be connected to the proper electrical voltage and frequency as specified on the ...179;⁄₄" (73.0 cm) max. recessed depth E. 49 125.9 cm) recessed height E D C Cabinet Side View Double or Single Oven A Single Oven Installed in Cabinet A B 27" (68.6 cm) models 30" (76.2 cm) models A. 27" (68.6 cm) min. top of cutout to underside of countertop C. 5¹⁄...

Installation Guide
Page 2
... follow instructions. Read and follow instructions. bottom vent (supplied on rear wall behind oven, the junction box must be able to support a single oven weight of 154 lbs (70 kg) or a double oven weight of the support surface to pass the appliance cable through to potential... have provided many important safety messages in the right rear or left corner of cabinet cutout. single oven (2), double oven (4) ■ Bottom vent (supplied on your appliance. Location Requirements IMPORTANT: Observe all safety messages. Given dimensions provide minimum clearance with...
... follow instructions. Read and follow instructions. bottom vent (supplied on rear wall behind oven, the junction box must be able to support a single oven weight of 154 lbs (70 kg) or a double oven weight of the support surface to pass the appliance cable through to potential... have provided many important safety messages in the right rear or left corner of cabinet cutout. single oven (2), double oven (4) ■ Bottom vent (supplied on your appliance. Location Requirements IMPORTANT: Observe all safety messages. Given dimensions provide minimum clearance with...

Installation Guide
Page 3
...E. 27³⁄₄" (70.5 cm) min. recessed width B. 50³⁄₄" (128.9 cm) max. Single Oven A F D E B E C D C 27" (68.6 cm) models A. 25 64.3 cm) max. Double Ovens A B E E D C 27" (68.6 cm) models A. 27" (68.6 cm) min. top of cutout to ...underside of countertop C. 5¹⁄₄" (13.3 cm) bottom of cutout to floor D. 25¹⁄₂" (64.8 cm) cutout width E. 27³⁄₄" (70.5 cm) min. recessed depth E. 49 125.9 cm) recessed height 30...
...E. 27³⁄₄" (70.5 cm) min. recessed width B. 50³⁄₄" (128.9 cm) max. Single Oven A F D E B E C D C 27" (68.6 cm) models A. 25 64.3 cm) max. Double Ovens A B E E D C 27" (68.6 cm) models A. 27" (68.6 cm) min. top of cutout to ...underside of countertop C. 5¹⁄₄" (13.3 cm) bottom of cutout to floor D. 25¹⁄₂" (64.8 cm) cutout width E. 27³⁄₄" (70.5 cm) min. recessed depth E. 49 125.9 cm) recessed height 30...


