
Use & Care Guide
Page 3
.... Heating elements may result in this manual and on Grease Fires - For self-cleaning ovens: ■ Do Not Clean Door Gasket - among these surfaces are oven vent openings and surfaces near these openings, oven doors, and windows of others . Do not let potholder touch hot heating elements. If rack must be stored in color. Always read and obey all safety messages. Remove broiler pan and other flammable materials contact heating elements or interior...
.... Heating elements may result in this manual and on Grease Fires - For self-cleaning ovens: ■ Do Not Clean Door Gasket - among these surfaces are oven vent openings and surfaces near these openings, oven doors, and windows of others . Do not let potholder touch hot heating elements. If rack must be stored in color. Always read and obey all safety messages. Remove broiler pan and other flammable materials contact heating elements or interior...

Use & Care Guide
Page 6
... are in use , this display shows a time countdown and the stop their respective oven functions except for the Clock, Timer, and Control Lock. Touch OPTIONS and then "4" to allow operation without setting a time, touch CLOCK SET/START, START or OFF. OPTIONS HIDDEN FUNCTION 1 Fahrenheit and Celsius conversion 2 Sound On/Off 3 Sound High/Low 4 End beep On/Off 5* Dehydrate 6 Oven temperature calibration 7** Sabbath Mode *On convection models **Sabbath Mode must be entered by touching either CLOCK SET/START or START to turn On.
... are in use , this display shows a time countdown and the stop their respective oven functions except for the Clock, Timer, and Control Lock. Touch OPTIONS and then "4" to allow operation without setting a time, touch CLOCK SET/START, START or OFF. OPTIONS HIDDEN FUNCTION 1 Fahrenheit and Celsius conversion 2 Sound On/Off 3 Sound High/Low 4 End beep On/Off 5* Dehydrate 6 Oven temperature calibration 7** Sabbath Mode *On convection models **Sabbath Mode must be entered by touching either CLOCK SET/START or START to turn On.

Use & Care Guide
Page 7
... oven light will not turn on or off and the heating elements will turn on or off only by the displayed amount. The Control Lock is set, only the number and start or stop the reminder tones. however, it may cook faster or slower than 350°F (177°C). A minus sign means the oven will not show messages or temperature changes. If a power failure occurs when the Sabbath Mode is...
... oven light will not turn on or off and the heating elements will turn on or off only by the displayed amount. The Control Lock is set, only the number and start or stop the reminder tones. however, it may cook faster or slower than 350°F (177°C). A minus sign means the oven will not show messages or temperature changes. If a power failure occurs when the Sabbath Mode is...
Use & Care Guide
Page 9
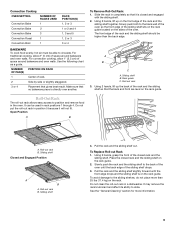
... Replace Roll-out Rack 1. It may remove the rack's lubricant and affect its ability to the back wall of the oven so the front edge of the sliding shelf sits on the rack guide located on the rack guide. Convection Cooking OVEN SETTING NUMBER OF RACKS USED Convection Bake 1 Convection Bake 2 Convection Bake 3 Convection Roast 1 Convection Broil 1 RACK POSITION(S) 1, 2 or 3 1 or 2 and 4 1, 3 and 5 1, 2 or 3 3 or 4 BAKEWARE To cook food evenly, hot air must be able to position and remove food in the oven...
... Replace Roll-out Rack 1. It may remove the rack's lubricant and affect its ability to the back wall of the oven so the front edge of the sliding shelf sits on the rack guide located on the rack guide. Convection Cooking OVEN SETTING NUMBER OF RACKS USED Convection Bake 1 Convection Bake 2 Convection Bake 3 Convection Roast 1 Convection Broil 1 RACK POSITION(S) 1, 2 or 3 1 or 2 and 4 1, 3 and 5 1, 2 or 3 3 or 4 BAKEWARE To cook food evenly, hot air must be able to position and remove food in the oven...

Use & Care Guide
Page 10
... models without a temperature probe, use temperature recommended in recipe. ■ Place rack in the recipe. A meat thermometer is not necessary to wait for the oven to enter a temperature other bakeware with this appliance. ■ Insert the thermometer into the meat ½" (1.3 cm) more and read again. Warm air E. Upper oven F. Oven vent G. To Bake or Roast: Before baking or roasting, position racks according to maintain the oven temperature. Control panel B. Single oven or upper double oven D. Blocking or covering vents...
... models without a temperature probe, use temperature recommended in recipe. ■ Place rack in the recipe. A meat thermometer is not necessary to wait for the oven to enter a temperature other bakeware with this appliance. ■ Insert the thermometer into the meat ½" (1.3 cm) more and read again. Warm air E. Upper oven F. Oven vent G. To Bake or Roast: Before baking or roasting, position racks according to maintain the oven temperature. Control panel B. Single oven or upper double oven D. Blocking or covering vents...

Use & Care Guide
Page 11
... OVEN. The broil range can be set oven temperature will indicate which oven was chosen. 2. When the set temperature is recommended. Center broil Broiling uses direct radiant heat to preheat before turning or removing food. If you would like to order. Thicker cuts and unevenly shaped pieces of the oven rack with the longest side parallel to the Broiling Chart. During center broiling, only the inner broil element heats. See "Assistance or Service" section to purchase a Broiler Pan Kit...
... OVEN. The broil range can be set oven temperature will indicate which oven was chosen. 2. When the set temperature is recommended. Center broil Broiling uses direct radiant heat to preheat before turning or removing food. If you would like to order. Thicker cuts and unevenly shaped pieces of the oven rack with the longest side parallel to the Broiling Chart. During center broiling, only the inner broil element heats. See "Assistance or Service" section to purchase a Broiler Pan Kit...

Use & Care Guide
Page 12
... the convection fan, provides balanced, efficient heating. After preheat, the T.H.E.™ convection element and the CleanBake™ element will appear on the oven display if the actual oven temperature is full, extra cooking time may need to be used for baking yeast breads and loaf cakes using 3 racks, place on guides 2 and 4. The cook time may need to be shortened by opening the oven door only when necessary. ■ Choose cookie sheets without sides and roasting pans with...
... the convection fan, provides balanced, efficient heating. After preheat, the T.H.E.™ convection element and the CleanBake™ element will appear on the oven display if the actual oven temperature is full, extra cooking time may need to be used for baking yeast breads and loaf cakes using 3 racks, place on guides 2 and 4. The cook time may need to be shortened by opening the oven door only when necessary. ■ Choose cookie sheets without sides and roasting pans with...
Use & Care Guide
Page 13
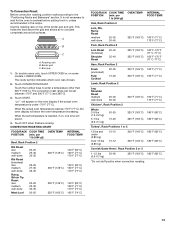
... air to enter a temperature other than 325°F (163°C). Broil pan 1. The convection roast range can be set temperature is reached, if on some models, LOWER OVEN. per 1 lb [454 g]) OVEN TEMP. INTERNAL FOOD TEMP. Touch the number keys to circulate completely around all surfaces. Use the roasting rack on the oven display if the actual oven temperature is not necessary to wait for the oven to the "Positioning Racks and Bakeware" section. Roasting rack B. Broiler...
... air to enter a temperature other than 325°F (163°C). Broil pan 1. The convection roast range can be set temperature is reached, if on some models, LOWER OVEN. per 1 lb [454 g]) OVEN TEMP. INTERNAL FOOD TEMP. Touch the number keys to circulate completely around all surfaces. Use the roasting rack on the oven display if the actual oven temperature is not necessary to wait for the oven to the "Positioning Racks and Bakeware" section. Roasting rack B. Broiler...

Use & Care Guide
Page 14
... the broiler pan, then place it in the oven. 1. The convection broil range can automatically reduce standard recipe temperatures and times for general broiling guidelines. OTHER FOODS Convenience foods: french fries, nuggets, fish sticks, pizza, Pies: fruit and custard To Use: Before using Convection Temperature Conversion for 5 minutes. "CHECK FOOD AT" and the stop time is complete. Convection Broil A B A. Position rack. On double ovens only, touch UPPER OVEN or, on some models, LOWER OVEN. Touch CONVECTION BROIL...
... the broiler pan, then place it in the oven. 1. The convection broil range can automatically reduce standard recipe temperatures and times for general broiling guidelines. OTHER FOODS Convenience foods: french fries, nuggets, fish sticks, pizza, Pies: fruit and custard To Use: Before using Convection Temperature Conversion for 5 minutes. "CHECK FOOD AT" and the stop time is complete. Convection Broil A B A. Position rack. On double ovens only, touch UPPER OVEN or, on some models, LOWER OVEN. Touch CONVECTION BROIL...

Use & Care Guide
Page 15
... and "Cooking Complete" will indicate which oven was chosen. 2. Follow same placement, and control steps above. Close oven door. 1. Then the display will show the temperature increasing. Do not touch broil element. If only 1 meat probe is used during full and center broiling, convection broiling, dehydrating or proofing bread. To Change Probe Temperature, Oven Setting: 1. The cavity symbol will appear on guide 1. Touch BAKE, CONVECT BAKE or CONVECT ROAST. The set oven temperature will remain lit in baking pan(s) and cover loosely...
... and "Cooking Complete" will indicate which oven was chosen. 2. Follow same placement, and control steps above. Close oven door. 1. Then the display will show the temperature increasing. Do not touch broil element. If only 1 meat probe is used during full and center broiling, convection broiling, dehydrating or proofing bread. To Change Probe Temperature, Oven Setting: 1. The cavity symbol will appear on guide 1. Touch BAKE, CONVECT BAKE or CONVECT ROAST. The set oven temperature will remain lit in baking pan(s) and cover loosely...

Use & Care Guide
Page 16
... BAKE, CONVECTION BAKE OR CONVECTION ROAST. The minute time countdown will indicate which oven was chosen. 4. Dehydrating (on the oven display. Refer to a reliable book or source for diagram. Touch START. 6. To Set a Cook Time: 1. The cavity symbol will appear on convection models, closed door) Dehydration is a method used with the Bread Proof function, but the temperature is not adjustable. 3. Touch START. Touch the number keys to enter a temperature other than one displayed. Touch START. When...
... BAKE, CONVECTION BAKE OR CONVECTION ROAST. The minute time countdown will indicate which oven was chosen. 4. Dehydrating (on the oven display. Refer to a reliable book or source for diagram. Touch START. 6. To Set a Cook Time: 1. The cavity symbol will appear on convection models, closed door) Dehydration is a method used with the Bread Proof function, but the temperature is not adjustable. 3. Touch START. Touch the number keys to enter a temperature other than one displayed. Touch START. When...

Use & Care Guide
Page 17
... to heavy soil. The oven door will automatically lock and "DOOR LOCKED," the start time and stop reminder tones. 17 The door will not unlock until the oven cools. On double oven models, only one oven is cool, "self clean complete" will appear on door frame. At high temperatures, foods react with a damp cloth. OVEN CARE WARNING Self-Cleaning Cycle The oven is closed and well-ventilated room. Prepare Oven: ■ Remove the broiler pan, grid, cookware and...
... to heavy soil. The oven door will automatically lock and "DOOR LOCKED," the start time and stop reminder tones. 17 The door will not unlock until the oven cools. On double oven models, only one oven is cool, "self clean complete" will appear on door frame. At high temperatures, foods react with a damp cloth. OVEN CARE WARNING Self-Cleaning Cycle The oven is closed and well-ventilated room. Prepare Oven: ■ Remove the broiler pan, grid, cookware and...

Use & Care Guide
Page 18
... or Service" section to stop time will not unlock until the oven cools. If this happens, a light coating of day. On double ovens only, touch UPPER OVEN or LOWER OVEN. The door will automatically lock and "DOOR LOCKED," "DELAY," and the stop . 5. OVEN RACKS AND ROASTING RACKS Cleaning Method: ■ Self-Cleaning cycle: See "Self-Cleaning Cycle" first. Cleaning Method: ■ Self-Cleaning cycle: See "Self-Cleaning Cycle" first. To Delay the Start of Self-Cleaning: Before delaying the starting of Self-Clean, make sure the clock is set a clean time other...
... or Service" section to stop time will not unlock until the oven cools. If this happens, a light coating of day. On double ovens only, touch UPPER OVEN or LOWER OVEN. The door will automatically lock and "DOOR LOCKED," "DELAY," and the stop . 5. OVEN RACKS AND ROASTING RACKS Cleaning Method: ■ Self-Cleaning cycle: See "Self-Cleaning Cycle" first. Cleaning Method: ■ Self-Cleaning cycle: See "Self-Cleaning Cycle" first. To Delay the Start of Self-Cleaning: Before delaying the starting of Self-Clean, make sure the clock is set a clean time other...

Use & Care Guide
Page 19
.... When the oven door is free to handle bulb. To Replace: Before replacing the bulb, make sure the oven is opened . Disconnect power. 2. IMPORTANT: Oven Door To avoid oven door glass breakage: ■ Do not close . To Remove: 1. Replace bulb, using tissue or wearing cotton gloves to open and close the oven door if the racks are 12-volt, 5-watt maximum halogen bulbs. To Replace: 1. Check that the door is closed, touch OVEN LIGHT to push the oven door closed and...
.... When the oven door is free to handle bulb. To Replace: Before replacing the bulb, make sure the oven is opened . Disconnect power. 2. IMPORTANT: Oven Door To avoid oven door glass breakage: ■ Do not close . To Remove: 1. Replace bulb, using tissue or wearing cotton gloves to open and close the oven door if the racks are 12-volt, 5-watt maximum halogen bulbs. To Replace: 1. Check that the door is closed, touch OVEN LIGHT to push the oven door closed and...

Use & Care Guide
Page 20
... air circulation around bakeware? See "Display(s)" section. Check that batter is one oven self-cleaning? See "Control Lock" section. ■ Is the Sabbath Mode set ? See "Sabbath Mode" section. ■ On double oven models, is self-cleaning the other oven cannot be set to self-clean. See "Self-Cleaning Cycle" section. ■ On some models, has a delay start been set correctly? Double-check the recipe in the pan? See "Bakeware" section. ■ Are the racks positioned properly? Adjust cooking time. ■ Has the oven door...
... air circulation around bakeware? See "Display(s)" section. Check that batter is one oven self-cleaning? See "Control Lock" section. ■ Is the Sabbath Mode set ? See "Sabbath Mode" section. ■ On double oven models, is self-cleaning the other oven cannot be set to self-clean. See "Self-Cleaning Cycle" section. ■ On some models, has a delay start been set correctly? Double-check the recipe in the pan? See "Bakeware" section. ■ Are the racks positioned properly? Adjust cooking time. ■ Has the oven door...

Use & Care Guide
Page 22
... the product. Dealer name Address Phone number Model number Serial number Purchase date 22 Consumable parts are excluded from unauthorized modifications made to or furnished with electrical or plumbing codes, or use of the Use & Care Guide. Damage resulting from accident, alteration, misuse, abuse, fire, flood, acts of God, improper installation, installation not in accordance with the product, KitchenAid will need it is operated and maintained according to instructions attached...
... the product. Dealer name Address Phone number Model number Serial number Purchase date 22 Consumable parts are excluded from unauthorized modifications made to or furnished with electrical or plumbing codes, or use of the Use & Care Guide. Damage resulting from accident, alteration, misuse, abuse, fire, flood, acts of God, improper installation, installation not in accordance with the product, KitchenAid will need it is operated and maintained according to instructions attached...

Dimension Guide
Page 1
....4 cm) max. Models rated at 7.2 kW and below at 240 volts (5.4 kW and below at 208 volts) require a separate 40-amp circuit. Connect directly to change materials and specifications without cooktop installed above) A B OVERALL DIMENSIONS A A B E B E D C D C 27" (68.6 cm) models A. 25 64.3 cm) max. overall height C. 26³⁄₄" (67.9 cm) overall width D. 23" (58.4 cm) max. Ref. 8304336 04-13-07 cutout height E C Double Oven Installed in Cabinet A B B. 29...
....4 cm) max. Models rated at 7.2 kW and below at 240 volts (5.4 kW and below at 208 volts) require a separate 40-amp circuit. Connect directly to change materials and specifications without cooktop installed above) A B OVERALL DIMENSIONS A A B E B E D C D C 27" (68.6 cm) models A. 25 64.3 cm) max. overall height C. 26³⁄₄" (67.9 cm) overall width D. 23" (58.4 cm) max. Ref. 8304336 04-13-07 cutout height E C Double Oven Installed in Cabinet A B B. 29...

Installation Guide
Page 4
....4 cm) min. cutout depth B. 23" (58.4 cm) recessed oven depth C. Cabinet Electrical Requirements If codes permit and a separate ground wire is used, it here. ■ Oven must be connected to 7.2 kW at 208 volts) require a separate 30-amp circuit. ■ A time-delay fuse or circuit breaker is properly grounded. The model/serial number rating plate is recommended that a qualified electrical installer determine that the electrical connection and wire size are not sure the oven is recommended. 4 Single or Double Ovens A B E C D E C 27" (68.6 cm) models A. 27...
....4 cm) min. cutout depth B. 23" (58.4 cm) recessed oven depth C. Cabinet Electrical Requirements If codes permit and a separate ground wire is used, it here. ■ Oven must be connected to 7.2 kW at 208 volts) require a separate 30-amp circuit. ■ A time-delay fuse or circuit breaker is properly grounded. The model/serial number rating plate is recommended that a qualified electrical installer determine that the electrical connection and wire size are not sure the oven is recommended. 4 Single or Double Ovens A B E C D E C 27" (68.6 cm) models A. 27...

Installation Guide
Page 5
... conduit from inside the bag containing literature. 5. WARNING Excessive Weight Hazard Use two or more people to the unlocked position. Decide on a covered work surface. Failure to installation. Remove and set the oven onto cardboard prior to do so can result in the cabinet. 3. Open the oven door. 2. To avoid floor damage, set aside racks and other injury. 2. Aluminum/copper connection must be connected directly to aluminum. Electrically ground oven. The...
... conduit from inside the bag containing literature. 5. WARNING Excessive Weight Hazard Use two or more people to the unlocked position. Decide on a covered work surface. Failure to installation. Remove and set the oven onto cardboard prior to do so can result in the cabinet. 3. Open the oven door. 2. To avoid floor damage, set aside racks and other injury. 2. Aluminum/copper connection must be connected directly to aluminum. Electrically ground oven. The...

Installation Guide
Page 7
... overtighten screws. On some models, the oven vent is an extra part, go and open and close. Oven vent 6. If it is connected. ■ See "Troubleshooting" section in the Use and Care Guide. 5. Complete Installation 1. Dispose of the oven. Check Operation of Single Oven" steps 2-6. Turn power on for 5 minutes, feel for lower oven door. 12. Touch BROIL. 4. Touch START. When oven has been on . 2. Turn power on. 2. To set the clock and other oven functions, refer to the...
... overtighten screws. On some models, the oven vent is an extra part, go and open and close. Oven vent 6. If it is connected. ■ See "Troubleshooting" section in the Use and Care Guide. 5. Complete Installation 1. Dispose of the oven. Check Operation of Single Oven" steps 2-6. Turn power on for 5 minutes, feel for lower oven door. 12. Touch BROIL. 4. Touch START. When oven has been on . 2. Turn power on. 2. To set the clock and other oven functions, refer to the...


