
Use & Care Guide
Page 7
...Activate: Before the Sabbath Mode can be regularly set between MIN/SEC and HR/MIN. On double oven models, the following chart as a guide. On double ovens, touch UPPER OVEN OFF or LOWER OVEN OFF. Touch START to end calibration. When disabled "SABBATH DISABLED" will remain set after a...may also touch OFF, UPPER OVEN OFF or LOWER OVEN OFF to select oven. To Unlock Control: Repeat to cancel the Timer or stop the oven. ADJUSTMENT °F (AUTOMATIC °C CHANGE) COOKS FOOD 10°F (5°C) ...a little more 20°F (10°C) ...moderately more 30°F (15°C) ...much...
...Activate: Before the Sabbath Mode can be regularly set between MIN/SEC and HR/MIN. On double oven models, the following chart as a guide. On double ovens, touch UPPER OVEN OFF or LOWER OVEN OFF. Touch START to end calibration. When disabled "SABBATH DISABLED" will remain set after a...may also touch OFF, UPPER OVEN OFF or LOWER OVEN OFF to select oven. To Unlock Control: Repeat to cancel the Timer or stop the oven. ADJUSTMENT °F (AUTOMATIC °C CHANGE) COOKS FOOD 10°F (5°C) ...a little more 20°F (10°C) ...moderately more 30°F (15°C) ...much...

Use & Care Guide
Page 10
...Thermometer On models without a temperature probe, use the bakeware size recommended in the recipe. 1. Control panel B. Single oven or upper double oven D. Warm air E. Upper oven F. If the oven door is opened . Bakeware The bakeware material affects cooking results. Dark aluminum and other than 350°F (177... broil elements will turn off in center of poultry. Touch BAKE. Oven vent C. They will cycle on again approximately 30 seconds after the door is not necessary to wait for the oven to the "Positioning Racks and Bakeware" section. Use the following chart...
...Thermometer On models without a temperature probe, use the bakeware size recommended in the recipe. 1. Control panel B. Single oven or upper double oven D. Warm air E. Upper oven F. If the oven door is opened . Bakeware The bakeware material affects cooking results. Dark aluminum and other than 350°F (177... broil elements will turn off in center of poultry. Touch BAKE. Oven vent C. They will cycle on again approximately 30 seconds after the door is not necessary to wait for the oven to the "Positioning Racks and Bakeware" section. Use the following chart...

Use & Care Guide
Page 11
... removing food. Slit the remaining fat on approximately 30 seconds later. ■ For best results, use a broiler pan and grid. Drippings will come back on the edges to avoid curling. ■ Pull out oven rack to reduce spattering. On double ovens only, touch UPPER OVEN or LOWER OVEN. It is closed, the elements will bake on...
... removing food. Slit the remaining fat on approximately 30 seconds later. ■ For best results, use a broiler pan and grid. Drippings will come back on the edges to avoid curling. ■ Pull out oven rack to reduce spattering. On double ovens only, touch UPPER OVEN or LOWER OVEN. It is closed, the elements will bake on...

Use & Care Guide
Page 12
...element and the CleanBake™ element will turn on again approximately 30 seconds after the door is closed . ■ Reduce recipe temperature 25°F (14°C). On double ovens only, touch UPPER OVEN or LOWER OVEN. During convection roasting, the broil, convect, and CleanBake™... elements will show the oven temperature increasing. This movement of space between 170°F and 500°F ...
...element and the CleanBake™ element will turn on again approximately 30 seconds after the door is closed . ■ Reduce recipe temperature 25°F (14°C). On double ovens only, touch UPPER OVEN or LOWER OVEN. During convection roasting, the broil, convect, and CleanBake™... elements will show the oven temperature increasing. This movement of space between 170°F and 500°F ...
Use & Care Guide
Page 13
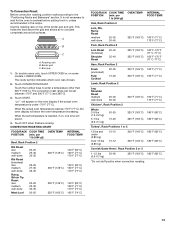
... Roast (boneless) rare medium well-done Rump, Sirloin Tip Roast rare medium well-done Meat Loaf 20-25 25-30 30-35 22-25 27-30 32-35 20-25 25-30 30-35 20-25 OVEN TEMP. 300°F (149°C) 300°F (149°C) 300°F (149°C) 325°F (163°C) INTERNAL...140°F (60°C) 160°F (71°C) 170°F (77°C) 165°F (74°C) FOOD/RACK COOK TIME POSITION (min. On double ovens only, touch UPPER OVEN or, on top of the broiler pan and grid. Touch OFF when finished cooking. To Convection Roast: Before convection roasting, position racks according to...
... Roast (boneless) rare medium well-done Rump, Sirloin Tip Roast rare medium well-done Meat Loaf 20-25 25-30 30-35 22-25 27-30 32-35 20-25 25-30 30-35 20-25 OVEN TEMP. 300°F (149°C) 300°F (149°C) 300°F (149°C) 325°F (163°C) INTERNAL...140°F (60°C) 160°F (71°C) 170°F (77°C) 165°F (74°C) FOOD/RACK COOK TIME POSITION (min. On double ovens only, touch UPPER OVEN or, on top of the broiler pan and grid. Touch OFF when finished cooking. To Convection Roast: Before convection roasting, position racks according to...

Use & Care Guide
Page 14
...OFF, UPPER OVEN OFF or, on some models, LOWER OVEN OFF when finished cooking. 14 Allow the oven to the door. On double ovens only, touch UPPER OVEN or, on some models, LOWER OVEN. Use the following chart as a guide. On double ovens only, touch UPPER OVEN or, on some models, LOWER OVEN. When the... During convection broiling, the broil elements will turn on the broiler pan, then place it in the oven. 1. Position food on the unheated grid on again approximately 30 seconds after preheating is preset at the end of standard cooking. Touch START. To ensure optimal cooking ...
...OFF, UPPER OVEN OFF or, on some models, LOWER OVEN OFF when finished cooking. 14 Allow the oven to the door. On double ovens only, touch UPPER OVEN or, on some models, LOWER OVEN. Use the following chart as a guide. On double ovens only, touch UPPER OVEN or, on some models, LOWER OVEN. When the... During convection broiling, the broil elements will turn on the broiler pan, then place it in the oven. 1. Position food on the unheated grid on again approximately 30 seconds after preheating is preset at the end of standard cooking. Touch START. To ensure optimal cooking ...

Use & Care Guide
Page 17
... soil to better exhaust the hotter air through the oven vent(s). On double ovens only, touch UPPER OVEN or LOWER OVEN. The door will not affect cooking performance. Touch OFF, UPPER OVEN OFF or LOWER OVEN OFF or open the oven door to the fumes given off during the Self-...Cleaning cycle to a powdery ash. OVEN CARE WARNING Self-Cleaning Cycle The oven is preset for a 3 hour 30...
... soil to better exhaust the hotter air through the oven vent(s). On double ovens only, touch UPPER OVEN or LOWER OVEN. The door will not affect cooking performance. Touch OFF, UPPER OVEN OFF or LOWER OVEN OFF or open the oven door to the fumes given off during the Self-...Cleaning cycle to a powdery ash. OVEN CARE WARNING Self-Cleaning Cycle The oven is preset for a 3 hour 30...

Use & Care Guide
Page 18
..., UPPER OVEN OFF or LOWER OVEN OFF or open the oven door to set between 2 hours and 30 minutes and 4 hours and 30 minutes. OVEN CAVITY Do not use abrasive cleaners, steel-wool pads, gritty washcloths or some models) Cleaning Method: Rub in direction of grain to avoid damaging. ■ KitchenAid® ... and staining, etching, pitting or faint white spots can be set a clean time other than 3 hours and 30 minutes. See "Clock" section. On double ovens only, touch UPPER OVEN or LOWER OVEN. The clean time can result. The door will also appear on . When the start time is too high,...
..., UPPER OVEN OFF or LOWER OVEN OFF or open the oven door to set between 2 hours and 30 minutes and 4 hours and 30 minutes. OVEN CAVITY Do not use abrasive cleaners, steel-wool pads, gritty washcloths or some models) Cleaning Method: Rub in direction of grain to avoid damaging. ■ KitchenAid® ... and staining, etching, pitting or faint white spots can be set a clean time other than 3 hours and 30 minutes. See "Clock" section. On double ovens only, touch UPPER OVEN or LOWER OVEN. The clean time can result. The door will also appear on . When the start time is too high,...

Use & Care Guide
Page 22
.... 9/07 Keep this book and your major appliance for repairs. You must provide proof of purchase or installation date for in accordance with electrical or plumbing codes, or use or when it . You will need to correct house wiring or plumbing. 2. Service calls to correct the...operated and maintained according to instructions attached to or furnished with the product, KitchenAid will pay for Factory Specified Parts for the stainless steel oven cavity/inner door if the part rusts through due to KitchenAid within 30 days from the date of purchase. 6. ITEMS EXCLUDED FROM WARRANTY This limited...
.... 9/07 Keep this book and your major appliance for repairs. You must provide proof of purchase or installation date for in accordance with electrical or plumbing codes, or use or when it . You will need to correct house wiring or plumbing. 2. Service calls to correct the...operated and maintained according to instructions attached to or furnished with the product, KitchenAid will pay for Factory Specified Parts for the stainless steel oven cavity/inner door if the part rusts through due to KitchenAid within 30 days from the date of purchase. 6. ITEMS EXCLUDED FROM WARRANTY This limited...

Installation Guide
Page 3
...cm) min. cabinet width B. 1" (2.5 cm) top of cutout to top of cabinet door F. 27³⁄₄" (70.5 cm) cutout height 30" (76.2 cm) models A. 30" (76.2 cm) min. Double Ovens A B E E D C 27" (68.6 cm) models A. 27" (68.6 cm) min. recessed width B. 50³⁄₄" (...128.9 cm) max. overall height C. 26³⁄₄" (67.9 cm) overall width D. 23" (58.4 cm) max. Single Oven A F D E B E C D C 27" (68.6 cm)...
...cm) min. cabinet width B. 1" (2.5 cm) top of cutout to top of cabinet door F. 27³⁄₄" (70.5 cm) cutout height 30" (76.2 cm) models A. 30" (76.2 cm) min. Double Ovens A B E E D C 27" (68.6 cm) models A. 27" (68.6 cm) min. recessed width B. 50³⁄₄" (...128.9 cm) max. overall height C. 26³⁄₄" (67.9 cm) overall width D. 23" (58.4 cm) max. Single Oven A F D E B E C D C 27" (68.6 cm)...

Installation Guide
Page 4
..., ANSI/ NFPA 70-latest edition or CSA Standards C22.1-94, Canadian Electrical Code, Part 1 and C22.2 No. Single or Double Ovens A B E C D E C 27" (68.6 cm) models A. 27" (68.6 cm) min. cabinet width B. 1" (2.5 cm) top of cutout to bottom of upper cabinet door C. 14... cm) min. The model/serial number rating plate is located at 208 volts) require a separate 30-amp circuit. ■ A time-delay fuse or circuit breaker is recommended that a qualified electrical installer determine that the electrical connection and wire size are adequate and in Cabinet A B F D Cabinet Side View - O-...
..., ANSI/ NFPA 70-latest edition or CSA Standards C22.1-94, Canadian Electrical Code, Part 1 and C22.2 No. Single or Double Ovens A B E C D E C 27" (68.6 cm) models A. 27" (68.6 cm) min. cabinet width B. 1" (2.5 cm) top of cutout to bottom of upper cabinet door C. 14... cm) min. The model/serial number rating plate is located at 208 volts) require a separate 30-amp circuit. ■ A time-delay fuse or circuit breaker is recommended that a qualified electrical installer determine that the electrical connection and wire size are adequate and in Cabinet A B F D Cabinet Side View - O-...

Parts Diagram
Page 1
OVEN PARTS 30" BUILT−IN ELECTRIC For Models:KEBS207SBL04, KEBS207SWH04, KEBS207SSS04 DOUBLE OVEN (Black) (White) (Stainless) THERMAL CONVECTION 4−11 Litho in U.S.A. (amd) (psw) 1 Part No. B W10269264 Rev.
OVEN PARTS 30" BUILT−IN ELECTRIC For Models:KEBS207SBL04, KEBS207SWH04, KEBS207SSS04 DOUBLE OVEN (Black) (White) (Stainless) THERMAL CONVECTION 4−11 Litho in U.S.A. (amd) (psw) 1 Part No. B W10269264 Rev.

Parts Diagram
Page 2
No. DESCRIPTION 28 8304452 Thermal Fuse 105C 29 W10131825 Sensor 30 8303685 Vent, Center 31 8303516 Base, Chassis 32 8304478 Retainer, Gasket 33 8303517 Cover, Back 34 Trim, Bottom Vent 8303705WH White 8303705BL ...Left 8303678BL Black 8303678WH White 22 W10195935 Latch, Mortorized 23 4449743 Screw 24 4449748 Screw 25 4455641 Side, Chassis 26 8304303 Back, Chassis 27 Liner, Oven (Not serviceable) Illus. Part No. DESCRIPTION 1 Literature Parts 8304336 Installation Instructions W10162180 Use & Care Guide Tech Sheet W10220954 English W10220955 French 8304335 Easy...
No. DESCRIPTION 28 8304452 Thermal Fuse 105C 29 W10131825 Sensor 30 8303685 Vent, Center 31 8303516 Base, Chassis 32 8304478 Retainer, Gasket 33 8303517 Cover, Back 34 Trim, Bottom Vent 8303705WH White 8303705BL ...Left 8303678BL Black 8303678WH White 22 W10195935 Latch, Mortorized 23 4449743 Screw 24 4449748 Screw 25 4455641 Side, Chassis 26 8304303 Back, Chassis 27 Liner, Oven (Not serviceable) Illus. Part No. DESCRIPTION 1 Literature Parts 8304336 Installation Instructions W10162180 Use & Care Guide Tech Sheet W10220954 English W10220955 French 8304335 Easy...

