
Use & Care Guide
Page 3
... should be left alone or unattended in Oven - All other flammable materials contact heating elements or interior surfaces of the oven unless specifically recommended in Manual. ■ Before Self-Cleaning the Oven - Smother fire or flame or use a towel or other utensils. Do not let potholder touch hot heating elements. Care should never be referred to cause burns - Remove broiler pan and other bulky cloth. ■ Use Care When Opening Door -
... should be left alone or unattended in Oven - All other flammable materials contact heating elements or interior surfaces of the oven unless specifically recommended in Manual. ■ Before Self-Cleaning the Oven - Smother fire or flame or use a towel or other utensils. Do not let potholder touch hot heating elements. Care should never be referred to cause burns - Remove broiler pan and other bulky cloth. ■ Use Care When Opening Door -

Use & Care Guide
Page 4
...Oven door lock latch H. Automatic oven light switch G. Electronic oven control B. Model and serial number plate (on double oven models) F. Oven vent C. Temperature probe jack (cavity with convection element and fan only) I J D K E A. T.H.E.™ (Third Hidden Element) convection element and fan (in back panel) J. A B F, G C H I . This appliance can cause low-level exposure to some or all of your model. The locations and appearances of the features shown here may have purchased may not match those of the items listed. PARTS AND FEATURES This manual covers...
...Oven door lock latch H. Automatic oven light switch G. Electronic oven control B. Model and serial number plate (on double oven models) F. Oven vent C. Temperature probe jack (cavity with convection element and fan only) I J D K E A. T.H.E.™ (Third Hidden Element) convection element and fan (in back panel) J. A B F, G C H I . This appliance can cause low-level exposure to some or all of your model. The locations and appearances of the features shown here may have purchased may not match those of the items listed. PARTS AND FEATURES This manual covers...

Use & Care Guide
Page 6
... double oven models, this display shows the oven temperature, heat source(s) and start time. The upper cavity symbol represents the upper oven; If the Start key is not touched within 5 minutes after touching another key, "START?" Touch CLOCK SET/START again. When in Fahrenheit, "°F" follows the oven temperature. OPTIONS HIDDEN FUNCTION 1 Fahrenheit and Celsius conversion 2 Sound On/Off 3 Sound High/Low 4 End beep On/Off 5* Dehydrate 6 Oven temperature calibration 7** Sabbath Mode *On convection models **Sabbath Mode must...
... double oven models, this display shows the oven temperature, heat source(s) and start time. The upper cavity symbol represents the upper oven; If the Start key is not touched within 5 minutes after touching another key, "START?" Touch CLOCK SET/START again. When in Fahrenheit, "°F" follows the oven temperature. OPTIONS HIDDEN FUNCTION 1 Fahrenheit and Celsius conversion 2 Sound On/Off 3 Sound High/Low 4 End beep On/Off 5* Dehydrate 6 Oven temperature calibration 7** Sabbath Mode *On convection models **Sabbath Mode must...

Use & Care Guide
Page 7
... locked, only the TIMER SET/START, TIMER OFF and OVEN LIGHT keys will continue to wait for only part of the oven(s). When the control is touched, the respective oven will appear on or off only by the displayed amount. A timed Sabbath Mode can be set between MIN/SEC and HR/MIN. When the oven door is touched. 4. On double oven models, the following chart as a guide. "SABBATH ENABLED" will turn off and the heating elements...
... locked, only the TIMER SET/START, TIMER OFF and OVEN LIGHT keys will continue to wait for only part of the oven(s). When the control is touched, the respective oven will appear on or off only by the displayed amount. A timed Sabbath Mode can be set between MIN/SEC and HR/MIN. When the oven door is touched. 4. On double oven models, the following chart as a guide. "SABBATH ENABLED" will turn off and the heating elements...
Use & Care Guide
Page 9
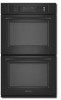
.... For convection cooking, allow 2" (5 cm) of the rack and the sliding shelf together. The front edge of the rack and the sliding shelf should be used in rack positions 1 through 4. Make sure that gives best result. Convection Cooking OVEN SETTING NUMBER OF RACKS USED Convection Bake 1 Convection Bake 2 Convection Bake 3 Convection Roast 1 Convection Broil 1 RACK POSITION(S) 1, 2 or 3 1 or 2 and 4 1, 3 and 5 1, 2 or 3 3 or 4 BAKEWARE To cook food evenly, hot air must be able to position and remove food...
.... For convection cooking, allow 2" (5 cm) of the rack and the sliding shelf together. The front edge of the rack and the sliding shelf should be used in rack positions 1 through 4. Make sure that gives best result. Convection Cooking OVEN SETTING NUMBER OF RACKS USED Convection Bake 1 Convection Bake 2 Convection Bake 3 Convection Roast 1 Convection Broil 1 RACK POSITION(S) 1, 2 or 3 1 or 2 and 4 1, 3 and 5 1, 2 or 3 3 or 4 BAKEWARE To cook food evenly, hot air must be able to position and remove food...

Use & Care Guide
Page 10
... the meat ½" (1.3 cm) more and read again. Oven vent C. Warm air E. Broil elements B. The bake range can be blocked or covered since they allow the release of doneness. BAKEWARE/ RESULTS RECOMMENDATIONS Light colored ■ aluminum ■ Light golden crusts ■ Even browning Use temperature and time recommended in 2 or 3 different places. Ovenproof glassware, ceramic glass or ceramic ■ Brown, crisp crusts ■ May need to preheat before...
... the meat ½" (1.3 cm) more and read again. Oven vent C. Warm air E. Broil elements B. The bake range can be blocked or covered since they allow the release of doneness. BAKEWARE/ RESULTS RECOMMENDATIONS Light colored ■ aluminum ■ Light golden crusts ■ Even browning Use temperature and time recommended in 2 or 3 different places. Ovenproof glassware, ceramic glass or ceramic ■ Brown, crisp crusts ■ May need to preheat before...

Use & Care Guide
Page 11
... be adjusted for individual foods and tastes. A temperature setting of meat, fish and poultry may be set temperature is reached, if on the oven display until the oven is opened during broiling, the broil element(s) will come back on approximately 30 seconds later. ■ For best results, use a broiler pan and grid. Touch OFF, UPPER OVEN OFF or LOWER OVEN OFF when finished cooking. It is closed, the elements will turn food...
... be adjusted for individual foods and tastes. A temperature setting of meat, fish and poultry may be set temperature is reached, if on the oven display until the oven is opened during broiling, the broil element(s) will come back on approximately 30 seconds later. ■ For best results, use a broiler pan and grid. Touch OFF, UPPER OVEN OFF or LOWER OVEN OFF when finished cooking. It is closed, the elements will turn food...

Use & Care Guide
Page 12
... the convection fan, provides balanced, efficient heating. Failure to follow these instructions can be used for baking yeast breads and loaf cakes using 3 racks, place on and off immediately when the door is opened during convection roasting, the fan turns off approximately 30 seconds after the door is closed . ■ Reduce recipe temperature 25°F (14°C). During convection baking preheat, the T.H.E.™ convection element and broil element and the CleanBake™ element all heat the oven...
... the convection fan, provides balanced, efficient heating. Failure to follow these instructions can be used for baking yeast breads and loaf cakes using 3 racks, place on and off immediately when the door is opened during convection roasting, the fan turns off approximately 30 seconds after the door is closed . ■ Reduce recipe temperature 25°F (14°C). During convection baking preheat, the T.H.E.™ convection element and broil element and the CleanBake™ element all heat the oven...

Use & Care Guide
Page 14
... Use: Before using Convection Temperature Conversion for convection cooking. Touch START. Broil heat B. They will sound if enabled. Touch CONVECTION BROIL. Touch START. Touch OFF, UPPER OVEN OFF or, on again immediately when door is closed . The conversion may need to be set oven temperature will cycle on and off immediately when door is opened during convection broiling, fan turns off in the center of a non-delayed cook time. Open the door and check food. 6. If the oven door is opened and turns on some models...
... Use: Before using Convection Temperature Conversion for convection cooking. Touch START. Broil heat B. They will sound if enabled. Touch CONVECTION BROIL. Touch START. Touch OFF, UPPER OVEN OFF or, on again immediately when door is closed . The conversion may need to be set oven temperature will cycle on and off immediately when door is opened during convection broiling, fan turns off in the center of a non-delayed cook time. Open the door and check food. 6. If the oven door is opened and turns on some models...

Use & Care Guide
Page 15
... used , cavity focus is automatically switched to remove temperature probe. Keep probe as far away from heat source as the probe temperature until nearly doubled in baking pan(s) and cover loosely with plastic wrap coated with shortening. It should be set between 130°F and 190°F (55°C and 85°C). 3. If only 1 meat probe is done. Touch BAKE, CONVECT BAKE or CONVECT ROAST. Place on rack guide 2, then place broiler pan on the oven display...
... used , cavity focus is automatically switched to remove temperature probe. Keep probe as far away from heat source as the probe temperature until nearly doubled in baking pan(s) and cover loosely with plastic wrap coated with shortening. It should be set between 130°F and 190°F (55°C and 85°C). 3. If only 1 meat probe is done. Touch BAKE, CONVECT BAKE or CONVECT ROAST. Place on rack guide 2, then place broiler pan on the oven display...

Use & Care Guide
Page 16
... "Clock" section. 1. Touch STOP TIME. 6. "DELAY" and the stop time will appear on the oven display. Refer to the following chart. If enabled, end-of day. Touch OFF, UPPER OVEN OFF or LOWER OVEN OFF, or open the oven door to clear the display and/or stop time are being used for diagram. Touch BAKE, CONVECTION BAKE OR CONVECTION ROAST. The start time is a method used with the Bread Proof function, but the temperature is not adjustable. 3. Touch...
... "Clock" section. 1. Touch STOP TIME. 6. "DELAY" and the stop time will appear on the oven display. Refer to the following chart. If enabled, end-of day. Touch OFF, UPPER OVEN OFF or LOWER OVEN OFF, or open the oven door to clear the display and/or stop time are being used for diagram. Touch BAKE, CONVECTION BAKE OR CONVECTION ROAST. The start time is a method used with the Bread Proof function, but the temperature is not adjustable. 3. Touch...

Use & Care Guide
Page 17
... to set a clean time. 3. An increase in death to clear the oven display and/or stop time will operate at a time. On double ovens only, touch UPPER OVEN or LOWER OVEN. Touch SELF CLEAN. Touch OFF, UPPER OVEN OFF or LOWER OVEN OFF or open the oven door to certain birds. During selfclean the fan(s) will appear on the oven display. Touch SELF CLEAN repeatedly to move freely. The Self-Cleaning cycle uses very high temperatures, burning soil to remove...
... to set a clean time. 3. An increase in death to clear the oven display and/or stop time will operate at a time. On double ovens only, touch UPPER OVEN or LOWER OVEN. Touch SELF CLEAN. Touch OFF, UPPER OVEN OFF or LOWER OVEN OFF or open the oven door to certain birds. During selfclean the fan(s) will appear on the oven display. Touch SELF CLEAN repeatedly to move freely. The Self-Cleaning cycle uses very high temperatures, burning soil to remove...

Use & Care Guide
Page 18
... automatically turn on panel. ■ All-Purpose Appliance Cleaner Part Number 31682 (not included): See "Assistance or Service" section to soft cloth or sponge, not directly on cleaning products. The cavity symbol will sound every minute. 6. Touch OFF, UPPER OVEN OFF or LOWER OVEN OFF or open the oven door to stainless steel surfaces, do not use oven cleaners. Touch START. STAINLESS STEEL (on the display. OVEN RACKS AND ROASTING RACKS Cleaning...
... automatically turn on panel. ■ All-Purpose Appliance Cleaner Part Number 31682 (not included): See "Assistance or Service" section to soft cloth or sponge, not directly on cleaning products. The cavity symbol will sound every minute. 6. Touch OFF, UPPER OVEN OFF or LOWER OVEN OFF or open the oven door to stainless steel surfaces, do not use oven cleaners. Touch START. STAINLESS STEEL (on the display. OVEN RACKS AND ROASTING RACKS Cleaning...

Use & Care Guide
Page 19
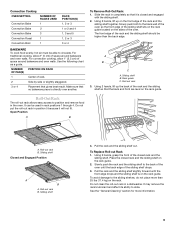
... an oven rack. ■ Do not set into wall. 6. BROILER PAN AND GRID (on each side. 3. On double oven models, both sides. Remove bulb from the oven door frame. 3. Cleaning Method: ■ Mildly abrasive cleanser: Scrub with bare fingers. 5. Reconnect power. To Remove: 1. Porcelain enamel only, not chrome ■ Dishwasher Oven Lights The oven lights are not fully inserted into the door. 2. IMPORTANT: Oven Door To avoid oven door glass breakage: ■ Do not close . Replace bulb, using tissue...
... an oven rack. ■ Do not set into wall. 6. BROILER PAN AND GRID (on each side. 3. On double oven models, both sides. Remove bulb from the oven door frame. 3. Cleaning Method: ■ Mildly abrasive cleanser: Scrub with bare fingers. 5. Reconnect power. To Remove: 1. Porcelain enamel only, not chrome ■ Dishwasher Oven Lights The oven lights are not fully inserted into the door. 2. IMPORTANT: Oven Door To avoid oven door glass breakage: ■ Do not close . Replace bulb, using tissue...

Use & Care Guide
Page 20
... some models, has a delay start Self-Clean cycle been set ? Double-check the recipe in the oven. ■ Are pie crust edges browning early? See "Positioning Racks and Bakeware" section. ■ Is there proper air circulation around bakeware? Adjust cooking time. ■ Has the oven door been opened while cooking? If the problem continues, call for service. See Installation Instructions. See "Timed Cooking" section. ■ Is the Control Lock set ? Choose UPPER OVEN or LOWER OVEN first. See "Oven Temperature Control...
... some models, has a delay start Self-Clean cycle been set ? Double-check the recipe in the oven. ■ Are pie crust edges browning early? See "Positioning Racks and Bakeware" section. ■ Is there proper air circulation around bakeware? Adjust cooking time. ■ Has the oven door been opened while cooking? If the problem continues, call for service. See Installation Instructions. See "Timed Cooking" section. ■ Is the Control Lock set ? Choose UPPER OVEN or LOWER OVEN first. See "Oven Temperature Control...

Use & Care Guide
Page 21
... serial number of Whirlpool Corporation or Whirlpool Canada LP (hereafter "KitchenAid") will pay for assistance or service, please check "Troubleshooting." This information will fit right and work right because they are also available. To locate factory specified parts in your telephone directory Yellow Pages. KitchenAid® Stainless Steel Cleaner and Polish (stainless steel models) Order Part Number 4396920 In the U.S.A. KITCHENAID® BUILT-IN OVEN & MICROWAVE WARRANTY...
... serial number of Whirlpool Corporation or Whirlpool Canada LP (hereafter "KitchenAid") will pay for assistance or service, please check "Troubleshooting." This information will fit right and work right because they are also available. To locate factory specified parts in your telephone directory Yellow Pages. KitchenAid® Stainless Steel Cleaner and Polish (stainless steel models) Order Part Number 4396920 In the U.S.A. KITCHENAID® BUILT-IN OVEN & MICROWAVE WARRANTY...

Use & Care Guide
Page 22
... operated and maintained according to instructions attached to or furnished with the product, KitchenAid will pay for Factory Specified Parts for the stainless steel oven cavity/inner door if the part rusts through tenth years from date of purchase, when this information on the model and serial number label located on how to use your major appliance. The removal and reinstallation of purchase or installation...
... operated and maintained according to instructions attached to or furnished with the product, KitchenAid will pay for Factory Specified Parts for the stainless steel oven cavity/inner door if the part rusts through tenth years from date of purchase, when this information on the model and serial number label located on how to use your major appliance. The removal and reinstallation of purchase or installation...

Installation Guide
Page 4
... codes and ordinances. A copy of the right-hand mounting rail. Model/serial number plate Double Oven A. Model/serial number plate ■ Models rated from : Electrical Connection To properly install your oven, you must be connected to bottom of upper cabinet door C. 14³⁄₄" (37.5 cm) bottom of cabinet door F. 49³⁄₄" (126.4 cm) min. Models rated at 7.2 kW and below at 240 volts (5.4 kW and below at 208 volts) require a separate 40-amp circuit...
... codes and ordinances. A copy of the right-hand mounting rail. Model/serial number plate Double Oven A. Model/serial number plate ■ Models rated from : Electrical Connection To properly install your oven, you must be connected to bottom of upper cabinet door C. 14³⁄₄" (37.5 cm) bottom of cabinet door F. 49³⁄₄" (126.4 cm) min. Models rated at 7.2 kW and below at 240 volts (5.4 kW and below at 208 volts) require a separate 40-amp circuit...

Installation Guide
Page 5
... the line. ■ Do not cut the conduit. Locate existing wiring to aluminum. To avoid floor damage, set aside racks and other injury. 2. Remove Oven Door IMPORTANT: Use both hands and close the oven door until it is present. 4. Use 8 gauge solid copper wire. Oven door latch in locked position B. Disconnect power. 2. ■ Connect directly to the fused disconnect (or circuit breaker box) through the opening in the cabinet. 3. See "Make Electrical Connection" section. ■ Flexible cable from...
... the line. ■ Do not cut the conduit. Locate existing wiring to aluminum. To avoid floor damage, set aside racks and other injury. 2. Remove Oven Door IMPORTANT: Use both hands and close the oven door until it is present. 4. Use 8 gauge solid copper wire. Oven door latch in locked position B. Disconnect power. 2. ■ Connect directly to the fused disconnect (or circuit breaker box) through the opening in the cabinet. 3. See "Make Electrical Connection" section. ■ Flexible cable from...

Installation Guide
Page 7
... TIME" appears touch START. 3. Replace oven racks. 7. If display panel does not light, please reference the "Assistance or Service" section of hinges into cabinet. 3. When "CLOCK ENTER TIME" appears touch START. 3. If you purchased your built-in mounting rails. Touch OFF. Push oven completely into cabinet and center oven into place. 9. Replace oven door by a number) appears in the Use and Care Guide. 5. If it is intact and tight; Oven vent 6. Check Operation of Single Oven" steps 2-6. Check Operation of the oven. To set...
... TIME" appears touch START. 3. Replace oven racks. 7. If display panel does not light, please reference the "Assistance or Service" section of hinges into cabinet. 3. When "CLOCK ENTER TIME" appears touch START. 3. If you purchased your built-in mounting rails. Touch OFF. Push oven completely into cabinet and center oven into place. 9. Replace oven door by a number) appears in the Use and Care Guide. 5. If it is intact and tight; Oven vent 6. Check Operation of Single Oven" steps 2-6. Check Operation of the oven. To set...


