
Use & Care Guide
Page 9
... cakes on 2 racks in Convect Bake mode in rack positions 1 through 4. BAKEWARE To cook food evenly, hot air must be able to the back wall of the oven so that the front edge of the sliding shelf sits on the front edge of the rack and push the sliding shelf to circulate... shelf. 2. For best results when baking layer cakes in Bake mode in the oven. Place the cakes on the front edge of space around bakeware and oven walls. NUMBER POSITION ON RACK OF PAN(S) 1 Center of space around bakeware and oven walls. It can be higher than the back edge. SatinGlide™ Roll-out extension...
... cakes on 2 racks in Convect Bake mode in rack positions 1 through 4. BAKEWARE To cook food evenly, hot air must be able to the back wall of the oven so that the front edge of the sliding shelf sits on the front edge of the rack and push the sliding shelf to circulate... shelf. 2. For best results when baking layer cakes in Bake mode in the oven. Place the cakes on the front edge of space around bakeware and oven walls. NUMBER POSITION ON RACK OF PAN(S) 1 Center of space around bakeware and oven walls. It can be higher than the back edge. SatinGlide™ Roll-out extension...

Use & Care Guide
Page 17
... come on when either door is opened . They will not work during the Self-Cleaning cycle. The oven lights will come on when the oven door is opened . Remove glass light cover by snapping back into wall. 6. To avoid damage to or decreasing the life of grain to avoid damaging. ■ affresh™...
... come on when either door is opened . They will not work during the Self-Cleaning cycle. The oven lights will come on when the oven door is opened . Remove glass light cover by snapping back into wall. 6. To avoid damage to or decreasing the life of grain to avoid damaging. ■ affresh™...

Installation Guide
Page 2
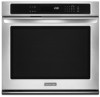
...Parts needed ■ Phillips screwdriver ■ Measuring tape ■ Hand or electric drill (for wall cabinet installations) ■ 1" (2.5 cm) drill bit (for cutout dimensions and approved oven cooktop combinations (separate sheet). 2 NOTE: For undercounter installation, it is installed in the right ...box. See "Electrical Requirements" section. ■ Electrical supply junction box should have an approval label located on rear wall behind oven, it is recommended that the materials used . INSTALLATION REQUIREMENTS Tools and Parts Gather the required tools and parts before ...
...Parts needed ■ Phillips screwdriver ■ Measuring tape ■ Hand or electric drill (for wall cabinet installations) ■ 1" (2.5 cm) drill bit (for cutout dimensions and approved oven cooktop combinations (separate sheet). 2 NOTE: For undercounter installation, it is installed in the right ...box. See "Electrical Requirements" section. ■ Electrical supply junction box should have an approval label located on rear wall behind oven, it is recommended that the materials used . INSTALLATION REQUIREMENTS Tools and Parts Gather the required tools and parts before ...
Installation Guide
Page 12
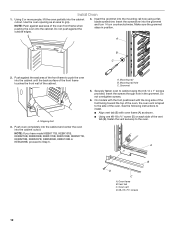
...the vent securely to grip. A. Do not push against seal area of the oven front frame when pushing the oven into the cabinet until the back surface of the front frame touches the front wall of the front frame to cabinet using a flatblade screwdriver. A. Mounting rail ...hole C. Securely fasten oven to push the oven into the cabinet. A B D C A. Oven vent D. #8-18 x ³⁄₈" screws 12 Insert the ...
...the vent securely to grip. A. Do not push against seal area of the oven front frame when pushing the oven into the cabinet until the back surface of the front frame touches the front wall of the front frame to cabinet using a flatblade screwdriver. A. Mounting rail ...hole C. Securely fasten oven to push the oven into the cabinet. A B D C A. Oven vent D. #8-18 x ³⁄₈" screws 12 Insert the ...


