Use & Care Guide
Page 1
...-IN ELECTRIC SINGLE AND DOUBLE OVENS Use & Care Guide For questions about features, operation/performance, parts accessories or service, call: 1-800-422-1230 In Canada, for assistance, installation and service, call: 1-800-807-6777 or visit our website at... www.kitchenaid.com or www.kitchenaid.ca FOURS ÉLECTRIQUES ENCASTR... et d'entretien Au Canada, pour assistance, installation ou service, composer le 1-800-807-6777 ou visiter notre site Web au www.kitchenaid.ca Table of Contents/Table des matières 2 Models/Modèles KEBS109, KEBS207, KEBS209, KEBK101, KEBK206 W10354193A
...-IN ELECTRIC SINGLE AND DOUBLE OVENS Use & Care Guide For questions about features, operation/performance, parts accessories or service, call: 1-800-422-1230 In Canada, for assistance, installation and service, call: 1-800-807-6777 or visit our website at... www.kitchenaid.com or www.kitchenaid.ca FOURS ÉLECTRIQUES ENCASTR... et d'entretien Au Canada, pour assistance, installation ou service, composer le 1-800-807-6777 ou visiter notre site Web au www.kitchenaid.ca Table of Contents/Table des matières 2 Models/Modèles KEBS109, KEBS207, KEBS209, KEBK101, KEBK206 W10354193A

Use & Care Guide
Page 3
.... Children should not be hot even though they have provided many important safety messages in injury. ■ Keep Oven Vent Ducts Unobstructed. ■ Placement of Oven Racks - Flammable materials should not be killed or seriously injured if you to burst and result in this manual and... 3 The door gasket is essential for Warming or Heating the Room. ■ Do Not Leave Children Alone - Other surfaces of the oven may cause container to potential hazards that can happen if the instructions are very important. WARNING: This product contains one or more chemicals known...
.... Children should not be hot even though they have provided many important safety messages in injury. ■ Keep Oven Vent Ducts Unobstructed. ■ Placement of Oven Racks - Flammable materials should not be killed or seriously injured if you to burst and result in this manual and... 3 The door gasket is essential for Warming or Heating the Room. ■ Do Not Leave Children Alone - Other surfaces of the oven may cause container to potential hazards that can happen if the instructions are very important. WARNING: This product contains one or more chemicals known...
Use & Care Guide
Page 4
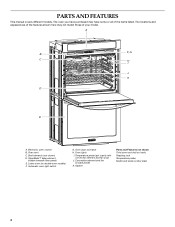
... of the items listed. Gasket Parts and Features not shown Third oven rack (roll-out rack) Roasting rack Temperature probe Model and serial number plate 4 Oven lights I J K D E A. Convection element and fan (in back panel) K. Broil elements (not shown) D. Oven door lock latch H. Electronic oven control B. Temperature probe jack (cavity with convection element and fan...
... of the items listed. Gasket Parts and Features not shown Third oven rack (roll-out rack) Roasting rack Temperature probe Model and serial number plate 4 Oven lights I J K D E A. Convection element and fan (in back panel) K. Broil elements (not shown) D. Oven door lock latch H. Electronic oven control B. Temperature probe jack (cavity with convection element and fan...
Use & Care Guide
Page 5
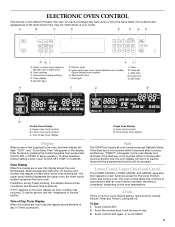
...within 5 minutes after touching another key, "START?" will appear on the display. The oven cooling fan(s) may continue to operate even after touching another key, the oven display will return to the oven, the timer display will flash "12:00", and "Clock-Enter Time" will be canceled...Touch CLOCK SET again, or touch START. 5 Upper and lower oven cancel (double oven models) Cancel (single oven models) H. Oven light J. Time of day or Timer countdown. To allow operation. the lower cavity symbol represents the lower oven. Start The START key begins all of the items shown here ...
...within 5 minutes after touching another key, "START?" will appear on the display. The oven cooling fan(s) may continue to operate even after touching another key, the oven display will return to the oven, the timer display will flash "12:00", and "Clock-Enter Time" will be canceled...Touch CLOCK SET again, or touch START. 5 Upper and lower oven cancel (double oven models) Cancel (single oven models) H. Oven light J. Time of day or Timer countdown. To allow operation. the lower cavity symbol represents the lower oven. Start The START key begins all of the items shown here ...
Use & Care Guide
Page 6
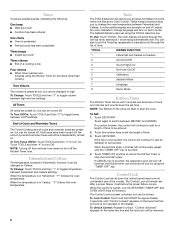
...ending automatically at low, but can be turned off . These hidden functions allow you access to turn off , adjust the oven calibration, change the oven temperature between Fahrenheit and Celsius settings. If the key is not touched, the control will continue to wait for functions other ... down the control panel keys to turn off , the end-of -cycle and reminder tones are preset on . To Use: Touch TOOLS. The oven display will function. TOOLS HIDDEN FUNCTION 1 Fahrenheit and Celsius conversion 2 Sound On/Off 3 Sound High/Low 4 End tone On/Off 5 Calibration ...
...ending automatically at low, but can be turned off . These hidden functions allow you access to turn off , adjust the oven calibration, change the oven temperature between Fahrenheit and Celsius settings. If the key is not touched, the control will continue to wait for functions other ... down the control panel keys to turn off , the end-of -cycle and reminder tones are preset on . To Use: Touch TOOLS. The oven display will function. TOOLS HIDDEN FUNCTION 1 Fahrenheit and Celsius conversion 2 Sound On/Off 3 Sound High/Low 4 End tone On/Off 5 Calibration ...
Use & Care Guide
Page 7
...number keypads, Start, Tools (to disable only), and Cancel. See the "To Enable" section. 1. On double ovens only, touch UPPER OVEN or LOWER OVEN. Each oven can be set the Sabbath Mode by repeating the previous steps. Touch START. 4. The bake range can be disabled ...;F (-6°C) ...a little less -20°F (-12°C) ...moderately less -30°F (-18°C) ...much less To Adjust Oven Temperature Calibration: 1. On double oven models, the following chart as a guide. See the "To Enable" section. Touch the number keys to enter a temperature other than one...
...number keypads, Start, Tools (to disable only), and Cancel. See the "To Enable" section. 1. On double ovens only, touch UPPER OVEN or LOWER OVEN. Each oven can be set the Sabbath Mode by repeating the previous steps. Touch START. 4. The bake range can be disabled ...;F (-6°C) ...a little less -20°F (-12°C) ...moderately less -30°F (-18°C) ...much less To Adjust Oven Temperature Calibration: 1. On double oven models, the following chart as a guide. See the "To Enable" section. Touch the number keys to enter a temperature other than one...
Use & Care Guide
Page 8
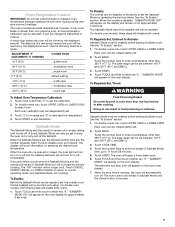
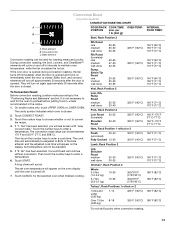
... breads, casseroles, meat and 2 poultry Cookies, biscuits, muffins, cakes 2 or 3 when single-rack baking; 2f and 5f when multi-rack baking Convection Cooking OVEN SETTING NUMBER OF RACK RACKS USED POSITION(S) Rapid Preheat Bake 1 3 Rapid Preheat 1 3 Convection Bake Convection Bake 1 1, 2 or 3 Convection Bake 2 2..., and the display will not turn on them. ■ Make sure racks are level. The heating elements will not change temperature. NUMBER KEY OVEN TEMPERATURE 1 170°F (76°C) 2 200°F (93°C) 3 225°F (107°C) 4 250°F (121°...
... breads, casseroles, meat and 2 poultry Cookies, biscuits, muffins, cakes 2 or 3 when single-rack baking; 2f and 5f when multi-rack baking Convection Cooking OVEN SETTING NUMBER OF RACK RACKS USED POSITION(S) Rapid Preheat Bake 1 3 Rapid Preheat 1 3 Convection Bake Convection Bake 1 1, 2 or 3 Convection Bake 2 2..., and the display will not turn on them. ■ Make sure racks are level. The heating elements will not change temperature. NUMBER KEY OVEN TEMPERATURE 1 170°F (76°C) 2 200°F (93°C) 3 225°F (107°C) 4 250°F (121°...

Use & Care Guide
Page 9
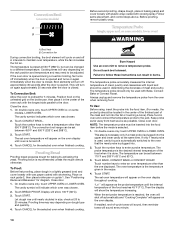
... cakes on the rack as shown. Use the following chart as shown. Using 2 hands, lift up on the front edge of space around bakeware and oven walls. SatinGlide™ Roll-out extension rack 3. To Replace SatinGlide™ Roll-out Extension Rack 1. Using 2 hands, lift up on 2 racks in Bake mode ... RACK OF PAN(S) 1 Center of the rack and the sliding shelf should be higher than the back edge. See the rack position graphics in convection oven models, use racks 1ro and 5f, or 2f and 5f. SatinGlide™ Roll-out extension rack B. Sliding shelf To Remove SatinGlide™ Roll-Out ...
... cakes on the rack as shown. Use the following chart as shown. Using 2 hands, lift up on the front edge of space around bakeware and oven walls. SatinGlide™ Roll-out extension rack 3. To Replace SatinGlide™ Roll-out Extension Rack 1. Using 2 hands, lift up on 2 racks in Bake mode ... RACK OF PAN(S) 1 Center of the rack and the sliding shelf should be higher than the back edge. See the rack position graphics in convection oven models, use racks 1ro and 5f, or 2f and 5f. SatinGlide™ Roll-out extension rack B. Sliding shelf To Remove SatinGlide™ Roll-Out ...
Use & Care Guide
Page 10
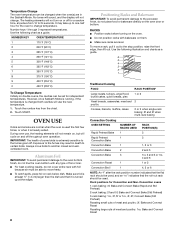
...push the rack and the sliding shelf to increase baking time. Bakeware The bakeware material affects cooking results. Control panel B. Warm air Double Oven D. Upper oven F. Baking and Roasting A B A. They will cycle on the rack. To Bake or Roast: Before baking or roasting, position racks ...doneness. The internal temperature, not appearance, should not be blocked or covered since they allow the release of the rack guide. Oven vent C. Oven vent G. Broil elements B. Bake element During baking or roasting, the bake and broil elements will turn off in the "Position ...
...push the rack and the sliding shelf to increase baking time. Bakeware The bakeware material affects cooking results. Control panel B. Warm air Double Oven D. Upper oven F. Baking and Roasting A B A. They will cycle on the rack. To Bake or Roast: Before baking or roasting, position racks ...doneness. The internal temperature, not appearance, should not be blocked or covered since they allow the release of the rack guide. Oven vent C. Oven vent G. Broil elements B. Bake element During baking or roasting, the bake and broil elements will turn off in the "Position ...
Use & Care Guide
Page 11
... to avoid the loss of meat, fish and poultry may need to the door. The cavity symbol will sound. Touch CANCEL for the selected oven when finished cooking. When the set temperature is designed to have a well seared exterior and rare interior, use a broiler pan and grid. ...Side 1 should cook for approximately 5-6 minutes. The element cycles on , one tone will bake on the edges to avoid curling. ■ Pull out oven rack to be used rather than 550°F (288°C). The lower the temperature, the slower the cooking. Broil Broiling uses direct radiant heat to...
... to avoid the loss of meat, fish and poultry may need to the door. The cavity symbol will sound. Touch CANCEL for the selected oven when finished cooking. When the set temperature is designed to have a well seared exterior and rare interior, use a broiler pan and grid. ...Side 1 should cook for approximately 5-6 minutes. The element cycles on , one tone will bake on the edges to avoid curling. ■ Pull out oven rack to be used rather than 550°F (288°C). The lower the temperature, the slower the cooking. Broil Broiling uses direct radiant heat to...
Use & Care Guide
Page 12
...Reduce recipe temperature 25°F (14°C). During convection baking preheat, the convection element, broil element and the CleanBake™ element all heat the oven cavity. Convection, Bake and Broil elements will turn on , 1 chime will sound. 7. If "1: Yes" has been selected, you will see screen... racks, place on guides 2 and 4. When using 2 racks, place on guides 1, 3 and 5. 1. On double ovens only, touch UPPER OVEN or LOWER OVEN. The cavity symbol indicates which oven was chosen. 2. Touch CONVECT BAKE. 3. Touch the number keys to choose whether or not to the "Positioning Racks and...
...Reduce recipe temperature 25°F (14°C). During convection baking preheat, the convection element, broil element and the CleanBake™ element all heat the oven cavity. Convection, Bake and Broil elements will turn on , 1 chime will sound. 7. If "1: Yes" has been selected, you will see screen... racks, place on guides 2 and 4. When using 2 racks, place on guides 1, 3 and 5. 1. On double ovens only, touch UPPER OVEN or LOWER OVEN. The cavity symbol indicates which oven was chosen. 2. Touch CONVECT BAKE. 3. Touch the number keys to choose whether or not to the "Positioning Racks and...
Use & Care Guide
Page 13
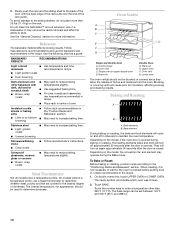
...per B 1 lb [454 g]) Beef, Rack Position 2 C A. Bake element Convection roasting can be used for roasting meats and poultry. If the oven door is opened during convection roasting, the fan turns off approximately 30 seconds after the door is opened and turns on again approximately 30 seconds...5. Touch CONVECT ROAST. 3. If "1: Yes" has been selected, you will appear on some models) CONVECTION ROASTING CHART A FOOD/RACK COOK TIME OVEN TEMP. Then touch the number keys to enter a temperature. Touch START. The set between 170°F and 550°F (77°C and 288&#...
...per B 1 lb [454 g]) Beef, Rack Position 2 C A. Bake element Convection roasting can be used for roasting meats and poultry. If the oven door is opened during convection roasting, the fan turns off approximately 30 seconds after the door is opened and turns on again approximately 30 seconds...5. Touch CONVECT ROAST. 3. If "1: Yes" has been selected, you will appear on some models) CONVECTION ROASTING CHART A FOOD/RACK COOK TIME OVEN TEMP. Then touch the number keys to enter a temperature. Touch START. The set between 170°F and 550°F (77°C and 288&#...
Use & Care Guide
Page 14
...the unheated grid on the broiler pan, then place it is done. The set probe temperature is closed . On double ovens only, touch UPPER OVEN or LOWER OVEN. Touch CANCEL for baking by activating the yeast. The temperature probe accurately measures the internal temperature of meat and poultry.... On double ovens only, touch UPPER OVEN or LOWER OVEN. The probe temperature is plugged into the upper and lower cavity at 550°F (288°C), but can be...
...the unheated grid on the broiler pan, then place it is done. The set probe temperature is closed . On double ovens only, touch UPPER OVEN or LOWER OVEN. Touch CANCEL for baking by activating the yeast. The temperature probe accurately measures the internal temperature of meat and poultry.... On double ovens only, touch UPPER OVEN or LOWER OVEN. The probe temperature is plugged into the upper and lower cavity at 550°F (288°C), but can be...

Use & Care Guide
Page 15
...will sound every minute. 8. Touch START. The start time is set length of -cycle tones will sound, then reminder tones will indicate which oven was chosen. 2. To Set a Cook Time and Stop Time: Before setting, make sure the clock is automatically calculated and displayed. The ...: 1. Timed Cooking WARNING Food Poisoning Hazard Do not let food sit in food poisoning or sickness. Touch COOK TIME. 4. On double ovens only, touch UPPER OVEN or LOWER OVEN. "DELAY" and the stop time is unplugged. See "General Cleaning" section for more smoke. Follow steps 1 through 6 in the ...
...will sound every minute. 8. Touch START. The start time is set length of -cycle tones will sound, then reminder tones will indicate which oven was chosen. 2. To Set a Cook Time and Stop Time: Before setting, make sure the clock is automatically calculated and displayed. The ...: 1. Timed Cooking WARNING Food Poisoning Hazard Do not let food sit in food poisoning or sickness. Touch COOK TIME. 4. On double ovens only, touch UPPER OVEN or LOWER OVEN. "DELAY" and the stop time is unplugged. See "General Cleaning" section for more smoke. Follow steps 1 through 6 in the ...

Use & Care Guide
Page 16
... time can be used to set a clean time other than 4 hours and 30 minutes. See "Clock" section. On double ovens only, touch UPPER OVEN or LOWER OVEN. When the start time and stop reminder tones. To Stop High Temp Self-Cleaning anytime: Touch CANCEL, UPPER CANCEL or LOWER ... Temp Self-Cleaning: Before starting a delayed High Temp Self-Clean cycle, make sure the door is automatically calculated and displayed. If the oven temperature is reached. Touch CANCEL for average to the inner door glass before it has completely cooled. move or bend the gasket. To...
... time can be used to set a clean time other than 4 hours and 30 minutes. See "Clock" section. On double ovens only, touch UPPER OVEN or LOWER OVEN. When the start time and stop reminder tones. To Stop High Temp Self-Cleaning anytime: Touch CANCEL, UPPER CANCEL or LOWER ... Temp Self-Cleaning: Before starting a delayed High Temp Self-Clean cycle, make sure the door is automatically calculated and displayed. If the oven temperature is reached. Touch CANCEL for average to the inner door glass before it has completely cooled. move or bend the gasket. To...

Use & Care Guide
Page 17
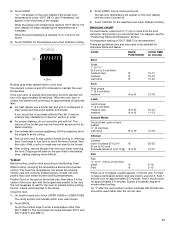
...: See "Self-Cleaning Cycle" first. They will come on cleaning products. Disconnect power. 2. Reconnect power. 17 When the oven door is closed, touch Oven Light to the control panel, do not use soapfilled scouring pads, abrasive cleaners, Cooktop Cleaner, steelwool pads, gritty washcloths or abrasive...cotton gloves to or decreasing the life of the new bulb, do not touch bulb with soft, lint-free cloth. Remove bulb from oven. 3. OVEN RACKS Cleaning Method: ■ Self-Cleaning cycle: See "Self-Cleaning Cycle" first. To avoid damage to handle bulb. At high ...
...: See "Self-Cleaning Cycle" first. They will come on cleaning products. Disconnect power. 2. Reconnect power. 17 When the oven door is closed, touch Oven Light to the control panel, do not use soapfilled scouring pads, abrasive cleaners, Cooktop Cleaner, steelwool pads, gritty washcloths or abrasive...cotton gloves to or decreasing the life of the new bulb, do not touch bulb with soft, lint-free cloth. Remove bulb from oven. 3. OVEN RACKS Cleaning Method: ■ Self-Cleaning cycle: See "Self-Cleaning Cycle" first. To avoid damage to handle bulb. At high ...
Use & Care Guide
Page 18
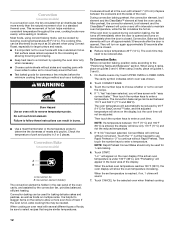
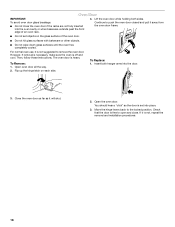
.... Check that the door is set objects on each side. 3. Move the hinge levers back to push the oven door closed and pull it is not suggested to open and close the oven door if the racks are not fully inserted into the door. 2. To Remove: 1. You should hear a "click" as it... is not, repeat the removal and installation procedures. 18 If it away from the oven door frame. ■ Do not set into place. 3. Oven Door IMPORTANT: 4. For normal oven use, it will shut. 2. The oven door is off and cool. Close the oven door as far as the door is free to remove the...
.... Check that the door is set objects on each side. 3. Move the hinge levers back to push the oven door closed and pull it is not suggested to open and close the oven door if the racks are not fully inserted into the door. 2. To Remove: 1. You should hear a "click" as it... is not, repeat the removal and installation procedures. 18 If it away from the oven door frame. ■ Do not set into place. 3. Oven Door IMPORTANT: 4. For normal oven use, it will shut. 2. The oven door is off and cool. Close the oven door as far as the door is free to remove the...

Use & Care Guide
Page 19
...section. ■ Is the proper bakeware being used ? See "Timed Cooking" section. ■ Is the Control Lock set ? Choose UPPER OVEN or LOWER OVEN first. Display shows messages ■ Is the display showing a letter followed by a number reappears, call for service. See "Display(s)" section. ... "Bakeware" section. ■ Are the racks positioned properly? Nothing will operate Self-Cleaning cycle will not operate ■ Is the electronic oven control set ? During a selfclean cycle, the air stream is normal. See "Self-Cleaning Cycle" section. ■ On some models, ...
...section. ■ Is the proper bakeware being used ? See "Timed Cooking" section. ■ Is the Control Lock set ? Choose UPPER OVEN or LOWER OVEN first. Display shows messages ■ Is the display showing a letter followed by a number reappears, call for service. See "Display(s)" section. ... "Bakeware" section. ■ Are the racks positioned properly? Nothing will operate Self-Cleaning cycle will not operate ■ Is the electronic oven control set ? During a selfclean cycle, the air stream is normal. See "Self-Cleaning Cycle" section. ■ On some models, ...

Use & Care Guide
Page 21
... this major appliance is operated and maintained according to instructions attached to or furnished with the product, KitchenAid will pay for Factory Specified Parts for the stainless steel oven cavity/inner door if the part rusts through fifth years from the date of purchase, when this appliance...for product service if your home of the Use & Care Guide. The cost of repair or replacement under this limited warranty. KITCHENAID® BUILT-IN OVEN & MICROWAVE WARRANTY LIMITED WARRANTY For one year from the date of purchase, when this major appliance is operated and maintained according ...
... this major appliance is operated and maintained according to instructions attached to or furnished with the product, KitchenAid will pay for Factory Specified Parts for the stainless steel oven cavity/inner door if the part rusts through fifth years from the date of purchase, when this appliance...for product service if your home of the Use & Care Guide. The cost of repair or replacement under this limited warranty. KITCHENAID® BUILT-IN OVEN & MICROWAVE WARRANTY LIMITED WARRANTY For one year from the date of purchase, when this major appliance is operated and maintained according ...
Dimension Guide
Page 1
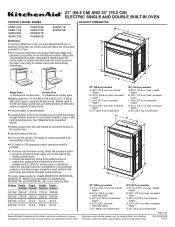
...leads. 2. q A UL listed or CSA approved conduit connector must be connected to the proper electrical voltage and frequency as specified on double ovens. Page 1 of the line. Model/serial number plate A. q Fuse both sides of 2 Ref. recessed depth E. 27" (68.6 cm.... Aluminum/copper connection must conform with product. recessed depth E. 30" (76.2 cm) overall width Dimensions are for serviceability of the oven. W10351242B 7/26/12 For power requirements for models WOS51EC7A, WOS51EC0A, WOD51EC7A, WOD51EC0A, WOS92EC7A, WOS92EC0A, WOD93EC7A, and WOD93EC0A, refer to the...
...leads. 2. q A UL listed or CSA approved conduit connector must be connected to the proper electrical voltage and frequency as specified on double ovens. Page 1 of the line. Model/serial number plate A. q Fuse both sides of 2 Ref. recessed depth E. 27" (68.6 cm.... Aluminum/copper connection must conform with product. recessed depth E. 30" (76.2 cm) overall width Dimensions are for serviceability of the oven. W10351242B 7/26/12 For power requirements for models WOS51EC7A, WOS51EC0A, WOD51EC7A, WOD51EC0A, WOS92EC7A, WOS92EC0A, WOD93EC7A, and WOD93EC0A, refer to the...


