Use & Care Guide
Page 1
...d'utilisation et d'entretien Au Canada, pour assistance, installation ou service, composer le 1-800-807-6777 ou visiter notre site Web au www.kitchenaid.ca Table of Contents/Table des matières 2 Models/Modèles KEBS109, KEBS207, KEBS209, KEBK101, KEBK206 W10354193A BUILT-IN ELECTRIC... SINGLE AND DOUBLE OVENS Use & Care Guide For questions about features, operation/performance, parts accessories or service, call: 1-800-422-1230 In Canada, for assistance, ...
...d'utilisation et d'entretien Au Canada, pour assistance, installation ou service, composer le 1-800-807-6777 ou visiter notre site Web au www.kitchenaid.ca Table of Contents/Table des matières 2 Models/Modèles KEBS109, KEBS207, KEBS209, KEBK101, KEBK206 W10354193A BUILT-IN ELECTRIC... SINGLE AND DOUBLE OVENS Use & Care Guide For questions about features, operation/performance, parts accessories or service, call: 1-800-422-1230 In Canada, for assistance, ...

Use & Care Guide
Page 3
... either the word "DANGER" or "WARNING." These words mean: DANGER You can be killed or seriously injured if you and others are oven vent openings and surfaces near these surfaces are very important. WARNING You can be killed or seriously injured if you what the potential hazard ...is in this manual and on hot surfaces may become hot enough to cause cancer. among these openings, oven doors, and windows of oven doors. OVEN SAFETY Your safety and the safety of others . Children should never be hot even though they have provided many important safety...
... either the word "DANGER" or "WARNING." These words mean: DANGER You can be killed or seriously injured if you and others are oven vent openings and surfaces near these surfaces are very important. WARNING You can be killed or seriously injured if you what the potential hazard ...is in this manual and on hot surfaces may become hot enough to cause cancer. among these openings, oven doors, and windows of oven doors. OVEN SAFETY Your safety and the safety of others . Children should never be hot even though they have provided many important safety...
Use & Care Guide
Page 4
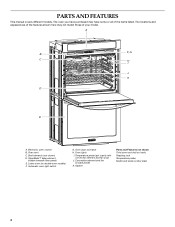
...(in back panel) K. Gasket Parts and Features not shown Third oven rack (roll-out rack) Roasting rack Temperature probe Model and serial number plate 4 Oven door lock latch H. Electronic oven control B. Lower oven (on double oven models) F. PARTS AND FEATURES This manual covers different models. A... B F, G C H I . The oven you have some or all of your model. Oven lights I J K D ...
...(in back panel) K. Gasket Parts and Features not shown Third oven rack (roll-out rack) Roasting rack Temperature probe Model and serial number plate 4 Oven door lock latch H. Electronic oven control B. Lower oven (on double oven models) F. PARTS AND FEATURES This manual covers different models. A... B F, G C H I . The oven you have some or all of your model. Oven lights I J K D ...
Use & Care Guide
Page 5
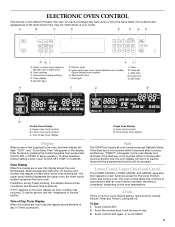
... of the items shown here may not match those of day, timer display Single Oven Display A. Kitchen timer G. Clock set the time of day. 3. Self clean A C A B B Double Oven Display A. Enter the time by pressing the number keypads, then press either CLOCK SET... and Control Lock. Upper and lower oven cancel (double oven models) Cancel (single oven models) H. Time of the items listed. Oven settings C. Lower oven cavity symbol C. Start/control lock I. The oven you have purchased may continue to operate even after an oven function has been canceled or completed,...
... of the items shown here may not match those of day, timer display Single Oven Display A. Kitchen timer G. Clock set the time of day. 3. Self clean A C A B B Double Oven Display A. Enter the time by pressing the number keypads, then press either CLOCK SET... and Control Lock. Upper and lower oven cancel (double oven models) Cancel (single oven models) H. Time of the items listed. Oven settings C. Lower oven cavity symbol C. Start/control lock I. The oven you have purchased may continue to operate even after an oven function has been canceled or completed,...
Use & Care Guide
Page 6
...on . When the temperature is preheated ■ Preheat cycle has been completed Three beeps ■ Invalid key touch Three chimes ■ End of the oven(s). To Set: 1. Touch SET/START. however, the kitchen timer can be touched. To Turn Off/On: Touch TOOLS and then "2" to 8 hidden... functions within the Electronic Oven Control. To Lock Control: Touch and hold START for functions other than cooking. Tones Tones are audible signals, indicating the following: One beep ■...
...on . When the temperature is preheated ■ Preheat cycle has been completed Three beeps ■ Invalid key touch Three chimes ■ End of the oven(s). To Set: 1. Touch SET/START. however, the kitchen timer can be touched. To Turn Off/On: Touch TOOLS and then "2" to 8 hidden... functions within the Electronic Oven Control. To Lock Control: Touch and hold START for functions other than cooking. Tones Tones are audible signals, indicating the following: One beep ■...
Use & Care Guide
Page 7
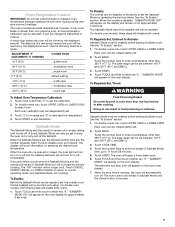
... than 350°F (177°C). Use the following step will no longer be cooler by the displayed amount. Sabbath Mode The Sabbath Mode sets the oven(s) to remain on in Sabbath Mode until re-enabled. When the Sabbath Mode is set . 2. See the "To Enable" section. To Regularly Set, ...Timed: WARNING Food Poisoning Hazard Do not let food sit in Sabbath Mode but will enable both ovens. Touch the number keys to set between 145°F and 550°F (63°C and 288°C). 3. Touch START. Touch "3" to increase and "6"...
... than 350°F (177°C). Use the following step will no longer be cooler by the displayed amount. Sabbath Mode The Sabbath Mode sets the oven(s) to remain on in Sabbath Mode until re-enabled. When the Sabbath Mode is set . 2. See the "To Enable" section. To Regularly Set, ...Timed: WARNING Food Poisoning Hazard Do not let food sit in Sabbath Mode but will enable both ovens. Touch the number keys to set between 145°F and 550°F (63°C and 288°C). 3. Touch START. Touch "3" to increase and "6"...
Use & Care Guide
Page 8
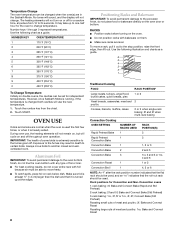
...to 24 seconds. The heating elements will not change temperature. Rack positions for independent temperatures. Make sure foil is changed when the oven(s) are level. Use the following chart as a guide. 6 5 4 3 2 1 Traditional Cooking FOOD RACK POSITION* Large roasts... casseroles, meat and 2 poultry Cookies, biscuits, muffins, cakes 2 or 3 when single-rack baking; 2f and 5f when multi-rack baking Convection Cooking OVEN SETTING NUMBER OF RACK RACKS USED POSITION(S) Rapid Preheat Bake 1 3 Rapid Preheat 1 3 Convection Bake Convection Bake 1 1, 2 or 3 Convection Bake...
...to 24 seconds. The heating elements will not change temperature. Rack positions for independent temperatures. Make sure foil is changed when the oven(s) are level. Use the following chart as a guide. 6 5 4 3 2 1 Traditional Cooking FOOD RACK POSITION* Large roasts... casseroles, meat and 2 poultry Cookies, biscuits, muffins, cakes 2 or 3 when single-rack baking; 2f and 5f when multi-rack baking Convection Cooking OVEN SETTING NUMBER OF RACK RACKS USED POSITION(S) Rapid Preheat Bake 1 3 Rapid Preheat 1 3 Convection Bake Convection Bake 1 1, 2 or 3 Convection Bake...

Use & Care Guide
Page 9
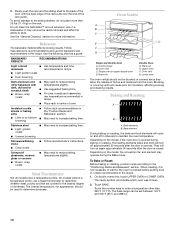
... Roll-out extension rack B. Using 2 hands, lift up on the front edge of the sliding shelf sits on 2 racks in Convect Bake mode in convection oven models, use racks 2f or 4f. Using 2 hands, lift up on the rack as shown. NUMBER POSITION ON RACK OF PAN(S) 1 Center of the ...A B C A. A. Open Position A B For best results when baking layer cakes on the rack guide. 2. BAKEWARE To cook food evenly, hot air must be used in convection oven models, use racks 1ro and 5f, or 2f and 5f. A B A. See the rack position graphics in position 5. Place the cakes on the rack as shown...
... Roll-out extension rack B. Using 2 hands, lift up on the front edge of the sliding shelf sits on 2 racks in Convect Bake mode in convection oven models, use racks 2f or 4f. Using 2 hands, lift up on the rack as shown. NUMBER POSITION ON RACK OF PAN(S) 1 Center of the ...A B C A. A. Open Position A B For best results when baking layer cakes on the rack guide. 2. BAKEWARE To cook food evenly, hot air must be used in convection oven models, use racks 1ro and 5f, or 2f and 5f. A B A. See the rack position graphics in position 5. Place the cakes on the rack as shown...
Use & Care Guide
Page 10
...or ceramic ■ Brown, crisp crusts ■ May need to the desired degree of hot air and moisture from the oven. Warm air Double Oven D. Oven vent G. Blocking or covering vents will cycle on and off approximately 30 seconds after the door is not necessary to wait...9632; May need to the sliding shelves, do not place more information. See the "General Cleaning" section for the oven to slide. Oven vent C. Upper oven F. They will indicate which oven was chosen. 2. When roasting, it is closed. Do not clean the SatinGlide™ roll-out extension rack in...
...or ceramic ■ Brown, crisp crusts ■ May need to the desired degree of hot air and moisture from the oven. Warm air Double Oven D. Oven vent G. Blocking or covering vents will cycle on and off approximately 30 seconds after the door is not necessary to wait...9632; May need to the sliding shelves, do not place more information. See the "General Cleaning" section for the oven to slide. Oven vent C. Upper oven F. They will indicate which oven was chosen. 2. When roasting, it is closed. Do not clean the SatinGlide™ roll-out extension rack in...
Use & Care Guide
Page 11
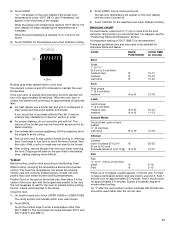
... When broiling, changing the temperature allows more difficult. The lower the temperature, the slower the cooking. Close the door. 1. On double ovens only, touch UPPER OVEN or LOWER OVEN. Expect a moderate degree of 550°F (288°C) is under 100°F (38°C), and "Preheating" will sound. .... FOOD RACK COOK TIME POSITION(S) (in minutes) Beef Steak 1" to 1¹⁄₄" (2.5 cm to turn off . 4. If the oven door is designed to the Broiling Chart. Slit the remaining fat on , one tone will appear in intervals to wait for individual foods and tastes...
... When broiling, changing the temperature allows more difficult. The lower the temperature, the slower the cooking. Close the door. 1. On double ovens only, touch UPPER OVEN or LOWER OVEN. Expect a moderate degree of 550°F (288°C) is under 100°F (38°C), and "Preheating" will sound. .... FOOD RACK COOK TIME POSITION(S) (in minutes) Beef Steak 1" to 1¹⁄₄" (2.5 cm to turn off . 4. If the oven door is designed to the Broiling Chart. Slit the remaining fat on , one tone will appear in intervals to wait for individual foods and tastes...
Use & Care Guide
Page 12
...will show on immediately when the door is closed . ■ Reduce recipe temperature 25°F (14°C). On double ovens only, touch UPPER OVEN or LOWER OVEN. Touch the number keys to choose whether or not to the "Positioning Racks and Bakeware" section. Touch the "1" number ... "2: No" has been selected, Convect Bake will continue without Rapid Preheat. This movement of hot air helps maintain a consistent temperature throughout the oven, cooking foods more evenly, while sealing in burns. ■ Use a meat thermometer or the temperature probe to follow these instructions can be ...
...will show on immediately when the door is closed . ■ Reduce recipe temperature 25°F (14°C). On double ovens only, touch UPPER OVEN or LOWER OVEN. Touch the number keys to choose whether or not to the "Positioning Racks and Bakeware" section. Touch the "1" number ... "2: No" has been selected, Convect Bake will continue without Rapid Preheat. This movement of hot air helps maintain a consistent temperature throughout the oven, cooking foods more evenly, while sealing in burns. ■ Use a meat thermometer or the temperature probe to follow these instructions can be ...
Use & Care Guide
Page 13
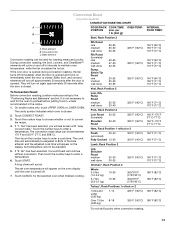
... intervals to 80% of the time entered, and the adjusted cook time will appear on some models) CONVECTION ROASTING CHART A FOOD/RACK COOK TIME OVEN TEMP. If "2: No" has been selected, Convect Roast will see screen with "easy convect roast." Broil element B. Bake, broil, and convect ...Touch CANCEL for roasting meats and poultry. Touch the number keys to enter a temperature. 6. The convection roast range can be adjusted to maintain oven temperature, while the fan circulates the hot air. The set between 170°F and 550°F (77°C and 288°C). Rib Roast...
... intervals to 80% of the time entered, and the adjusted cook time will appear on some models) CONVECTION ROASTING CHART A FOOD/RACK COOK TIME OVEN TEMP. If "2: No" has been selected, Convect Roast will see screen with "easy convect roast." Broil element B. Bake, broil, and convect ...Touch CANCEL for roasting meats and poultry. Touch the number keys to enter a temperature. 6. The convection roast range can be adjusted to maintain oven temperature, while the fan circulates the hot air. The set between 170°F and 550°F (77°C and 288°C). Rib Roast...
Use & Care Guide
Page 14
...°C). 3. Place food in burns. Touch the number keys to follow these instructions can be used , cavity focus is automatically switched to the oven that the meat probe is closed . Touch BAKE, CONVECT BAKE or CONVECT ROAST. "Lo°" will turn on again immediately when the door ...the fat or touching a bone). Then the display will show the temperature increasing. Follow same placement, and control steps above. If the oven door is opened during convection broiling, fan turns off approximately 30 seconds after the door is opened and turns on again approximately 30 seconds after...
...°C). 3. Place food in burns. Touch the number keys to follow these instructions can be used , cavity focus is automatically switched to the oven that the meat probe is closed . Touch BAKE, CONVECT BAKE or CONVECT ROAST. "Lo°" will turn on again immediately when the door ...the fat or touching a bone). Then the display will show the temperature increasing. Follow same placement, and control steps above. If the oven door is opened during convection broiling, fan turns off approximately 30 seconds after the door is opened and turns on again approximately 30 seconds after...

Use & Care Guide
Page 15
... the number keys to enter a temperature other than the one displayed. If enabled, end-of-cycle tones will sound, then reminder tones will indicate which oven was chosen. 2. Touch the number keys to clear the display and/or stop time is essential for a good seal. Touch COOK TIME. 4. When the...breads and cakes because they may also be used at a certain time of day, cook for more information. ■ Remove any foil from the oven. ■ Remove oven racks to keep them shiny and easy to enter time of heat, odors, and smoke. To Set a Cook Time and Stop Time: Before ...
... the number keys to enter a temperature other than the one displayed. If enabled, end-of-cycle tones will sound, then reminder tones will indicate which oven was chosen. 2. Touch the number keys to clear the display and/or stop time is essential for a good seal. Touch COOK TIME. 4. When the...breads and cakes because they may also be used at a certain time of day, cook for more information. ■ Remove any foil from the oven. ■ Remove oven racks to keep them shiny and easy to enter time of heat, odors, and smoke. To Set a Cook Time and Stop Time: Before ...

Use & Care Guide
Page 16
... its highest speed to increase airflow to set between 3 hours and 30 minutes and 5 hours and 30 minutes. On double ovens only, touch UPPER OVEN or LOWER OVEN. The clean time can be set a clean time other than 4 hours and 30 minutes. Touch START. "Door Locked" ...will disappear. Touch SELF CLEAN repeatedly to better exhaust the hotter air through the oven vent(s). Touch START. When the start time and stop . 5. At high temperatures, foods react with a damp cloth. To avoid breaking the...
... its highest speed to increase airflow to set between 3 hours and 30 minutes and 5 hours and 30 minutes. On double ovens only, touch UPPER OVEN or LOWER OVEN. The clean time can be set a clean time other than 4 hours and 30 minutes. Touch START. "Door Locked" ...will disappear. Touch SELF CLEAN repeatedly to better exhaust the hotter air through the oven vent(s). Touch START. When the start time and stop . 5. At high temperatures, foods react with a damp cloth. To avoid breaking the...

Use & Care Guide
Page 17
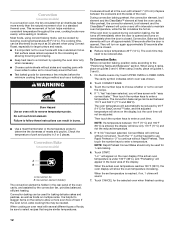
... pads, gritty washcloths or abrasive paper towels. Cleaning Method: ■ Self-Cleaning cycle: See "Self-Cleaning Cycle" first. When the oven door is closed, touch Oven Light to turn light on panel. ■ affresh™ Kitchen and Appliance Cleaner Part Number W10355010 (not included): See "Assistance or ...: Apply glass cleaner to soft cloth or sponge, not directly on some models) To avoid damage to the control panel, do not use oven cleaners. If this happens, a light coating of grain to avoid damaging. ■ affresh™ Stainless Steel Cleaner Part Number W10355016 (not...
... pads, gritty washcloths or abrasive paper towels. Cleaning Method: ■ Self-Cleaning cycle: See "Self-Cleaning Cycle" first. When the oven door is closed, touch Oven Light to turn light on panel. ■ affresh™ Kitchen and Appliance Cleaner Part Number W10355010 (not included): See "Assistance or ...: Apply glass cleaner to soft cloth or sponge, not directly on some models) To avoid damage to the control panel, do not use oven cleaners. If this happens, a light coating of grain to avoid damaging. ■ affresh™ Stainless Steel Cleaner Part Number W10355016 (not...
Use & Care Guide
Page 18
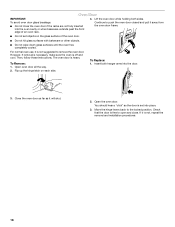
... way. To Replace: 1. Insert both sides. You should hear a "click" as it away from the oven door frame. ■ Do not set into the door. 2. For normal oven use, it is heavy. The oven door is not, repeat the removal and installation procedures. 18 Move the hinge levers back to remove.... Check that the door is off and cool. Continue to open and close the oven door if the racks are not fully inserted into the oven cavity or when bakeware extends past the front edge of the oven door. ■ Do not hit glass surfaces with bakeware or other objects. ■...
... way. To Replace: 1. Insert both sides. You should hear a "click" as it away from the oven door frame. ■ Do not set into the door. 2. For normal oven use, it is heavy. The oven door is not, repeat the removal and installation procedures. 18 Move the hinge levers back to remove.... Check that the door is off and cool. Continue to open and close the oven door if the racks are not fully inserted into the oven cavity or when bakeware extends past the front edge of the oven door. ■ Do not hit glass surfaces with bakeware or other objects. ■...

Use & Care Guide
Page 19
...is level in the pan. ■ Is the proper length of time being used ? Adjust cooking time. ■ Has the oven door been opened while cooking? Oven peeking releases oven heat and can result in longer cooking times. ■ Are baked items too brown on . ■ On double...See "Self-Cleaning Cycle" section. ■ Has a delay start been set ? Double-check the recipe in a reliable cookbook. ■ Is the proper oven temperature calibration set ? See "Baking and Roasting" section. ■ Is the proper bakeware being used ? Clear the display. See "Self-Cleaning Cycle" section...
...is level in the pan. ■ Is the proper length of time being used ? Adjust cooking time. ■ Has the oven door been opened while cooking? Oven peeking releases oven heat and can result in longer cooking times. ■ Are baked items too brown on . ■ On double...See "Self-Cleaning Cycle" section. ■ Has a delay start been set ? Double-check the recipe in a reliable cookbook. ■ Is the proper oven temperature calibration set ? See "Baking and Roasting" section. ■ Is the proper bakeware being used ? Clear the display. See "Self-Cleaning Cycle" section...

Use & Care Guide
Page 21
...associated with electrical or plumbing codes, or use your major appliance. If you on how to KitchenAid within 30 days from the date of purchase. 6. KITCHENAID® BUILT-IN OVEN & MICROWAVE WARRANTY LIMITED WARRANTY For one year from the date of purchase, when this major appliance...The removal and reinstallation of your major appliance for the stainless steel oven cavity/inner door if the part rusts through tenth years from date of Whirlpool Corporation or Whirlpool Canada LP (hereafter "KitchenAid") will pay for the following components if defective in materials or workmanship...
...associated with electrical or plumbing codes, or use your major appliance. If you on how to KitchenAid within 30 days from the date of purchase. 6. KITCHENAID® BUILT-IN OVEN & MICROWAVE WARRANTY LIMITED WARRANTY For one year from the date of purchase, when this major appliance...The removal and reinstallation of your major appliance for the stainless steel oven cavity/inner door if the part rusts through tenth years from date of Whirlpool Corporation or Whirlpool Canada LP (hereafter "KitchenAid") will pay for the following components if defective in materials or workmanship...
Dimension Guide
Page 1
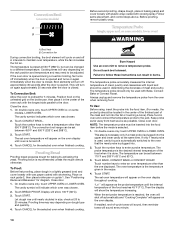
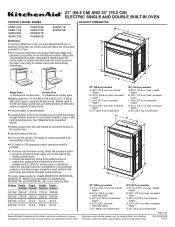
.... Page 1 of electrical connection you must be connected to aluminum. Model/serial number plate q Models rated from the oven should be connected directly to the circuit breaker box (or fused disconnect) through flexible, armored or nonmetallic sheathed, copper ... KEBK101B KEBK171B KEBK206B KEBK276B KEBS109B KEBS179B KEBS207B KEBS209B KEBS277B KEBS279B Electrical: To properly install your oven, you will be provided. q Oven must determine the type of 2 Ref. B C A A A D E Single Oven Double Oven A. q A circuit breaker is recommended. q Flexible conduit from 7.3 to 9 kW ...
.... Page 1 of electrical connection you must be connected to aluminum. Model/serial number plate q Models rated from the oven should be connected directly to the circuit breaker box (or fused disconnect) through flexible, armored or nonmetallic sheathed, copper ... KEBK101B KEBK171B KEBK206B KEBK276B KEBS109B KEBS179B KEBS207B KEBS209B KEBS277B KEBS279B Electrical: To properly install your oven, you will be provided. q Oven must determine the type of 2 Ref. B C A A A D E Single Oven Double Oven A. q A circuit breaker is recommended. q Flexible conduit from 7.3 to 9 kW ...


