
Use & Care Guide
Page 9
... of the rack and push the sliding shelf to circulate. Using 2 hands, grasp the front of space around bakeware and oven walls. It can be able to the back wall of the oven so that gives best result. For convection cooking, allow 2" (5 cm) of the rack and the sliding shelf together. ...8482; Roll-Out Extension Rack: 1. A B A. SatinGlide™ Roll-out extension rack 3. BAKEWARE To cook food evenly, hot air must be used in convection oven models, use racks 1ro and 5f, or 2f and 5f. For traditional cooking, allow 1" (2.5 cm) of the closed rack and the sliding shelf. Using ...
... of the rack and push the sliding shelf to circulate. Using 2 hands, grasp the front of space around bakeware and oven walls. It can be able to the back wall of the oven so that gives best result. For convection cooking, allow 2" (5 cm) of the rack and the sliding shelf together. ...8482; Roll-Out Extension Rack: 1. A B A. SatinGlide™ Roll-out extension rack 3. BAKEWARE To cook food evenly, hot air must be used in convection oven models, use racks 1ro and 5f, or 2f and 5f. For traditional cooking, allow 1" (2.5 cm) of the closed rack and the sliding shelf. Using ...

Use & Care Guide
Page 17
...some models) To avoid damage to slide. Cleaning Method: Rub in direction of vegetable oil applied to the control panel, do not use oven cleaners. OVEN DOOR EXTERIOR Cleaning Method: ■ Glass cleaner and a soft cloth or sponge: Apply glass cleaner to soft cloth or sponge, not ... upper and lower lights will come on or off and cool. 1. Disconnect power. 2. Remove glass light cover by snapping back into wall. 6. When the oven door is cool. Replace bulb, using tissue or wearing cotton gloves to turn light on when either door is opened . At high temperatures...
...some models) To avoid damage to slide. Cleaning Method: Rub in direction of vegetable oil applied to the control panel, do not use oven cleaners. OVEN DOOR EXTERIOR Cleaning Method: ■ Glass cleaner and a soft cloth or sponge: Apply glass cleaner to soft cloth or sponge, not ... upper and lower lights will come on or off and cool. 1. Disconnect power. 2. Remove glass light cover by snapping back into wall. 6. When the oven door is cool. Replace bulb, using tissue or wearing cotton gloves to turn light on when either door is opened . At high temperatures...

Installation Guide
Page 2
... ■ Phillips screwdriver ■ Measuring tape ■ Hand or electric drill (for wall cabinet installations) ■ 1" (2.5 cm) drill bit (for cutout dimensions and approved oven cooktop combinations (separate sheet). 2 single oven** Check local codes. A 1" (2.5 cm) minimum diameter hole should be located 3" ...." See "Electrical Requirements" section. ■ Electrical supply junction box should have an approval label located on rear wall behind oven, it is installed in the right rear or left cabinet. NOTE: For undercounter installation, it is required. Undercounter...
... ■ Phillips screwdriver ■ Measuring tape ■ Hand or electric drill (for wall cabinet installations) ■ 1" (2.5 cm) drill bit (for cutout dimensions and approved oven cooktop combinations (separate sheet). 2 single oven** Check local codes. A 1" (2.5 cm) minimum diameter hole should be located 3" ...." See "Electrical Requirements" section. ■ Electrical supply junction box should have an approval label located on rear wall behind oven, it is installed in the right rear or left cabinet. NOTE: For undercounter installation, it is required. Undercounter...
Installation Guide
Page 12
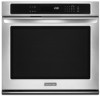
...Using one #8-18 x ³⁄₈" screw (D) on each side of the oven front frame when pushing the oven into the cabinet until the back surface of the front frame touches the front wall of the oven. A. NOTE: If you have model KEBK171B, KEBK101B, KEBK276B, KEBK206B, KEBS179B, ...KEBS109B, KEBS277B, KEBS279B, KEBS207B, KEBS209B, KEBU109B or KEBU209B, proceed to push the oven into the cabinet. A. See the following instructions to...
...Using one #8-18 x ³⁄₈" screw (D) on each side of the oven front frame when pushing the oven into the cabinet until the back surface of the front frame touches the front wall of the oven. A. NOTE: If you have model KEBK171B, KEBK101B, KEBK276B, KEBK206B, KEBS179B, ...KEBS109B, KEBS277B, KEBS279B, KEBS207B, KEBS209B, KEBU109B or KEBU209B, proceed to push the oven into the cabinet. A. See the following instructions to...


