Use & Care Guide
Page 3
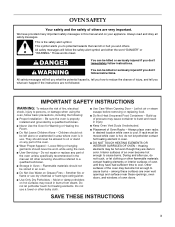
... , tell you how to persons, or damage when using the oven. ■ User Servicing - Flammable materials should never be left alone or unattended in use , do not let potholder contact hot heating element in the manual. Let hot air or steam escape before removing or replacing food. ■ Do Not Heat Unopened Food Containers - Heating elements may become hot enough to cool. Other surfaces of...
... , tell you how to persons, or damage when using the oven. ■ User Servicing - Flammable materials should never be left alone or unattended in use , do not let potholder contact hot heating element in the manual. Let hot air or steam escape before removing or replacing food. ■ Do Not Heat Unopened Food Containers - Heating elements may become hot enough to cool. Other surfaces of...
Use & Care Guide
Page 6
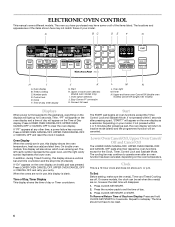
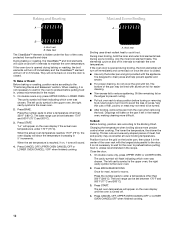
... stop time (if entered). Control lock E. Easy Convect™ conversion K. Oven light M. If "PF" appears at any other time, a power failure has occurred. In addition, during Timed Cooking, this display is blank. Time of Day, Timer Display This display shows the time of day, timer display J K G. Press CLOCK SET/START or START. ELECTRONIC OVEN CONTROL This manual covers different models. The locations and appearances of the items shown here may not match those of the items listed. When the ovens are in use...
... stop time (if entered). Control lock E. Easy Convect™ conversion K. Oven light M. If "PF" appears at any other time, a power failure has occurred. In addition, during Timed Cooking, this display is blank. Time of Day, Timer Display This display shows the time of day, timer display J K G. Press CLOCK SET/START or START. ELECTRONIC OVEN CONTROL This manual covers different models. The locations and appearances of the items shown here may not match those of the items listed. When the ovens are in use...

Use & Care Guide
Page 7
... and counts down the control panel pads to prevent unintended use of day mode. 2. To Change: Press and hold the number pad 3 CONTROL LOCK for 3 seconds. Repeat to change back to "Snd on the display, press CANCEL to remove. It does not start or stop the reminder tones. All Tones (double oven models) All of the above steps. Pad Press Tones (single oven models) The single tones signaling a valid pad...
... and counts down the control panel pads to prevent unintended use of day mode. 2. To Change: Press and hold the number pad 3 CONTROL LOCK for 3 seconds. Repeat to change back to "Snd on the display, press CANCEL to remove. It does not start or stop the reminder tones. All Tones (double oven models) All of the above steps. Pad Press Tones (single oven models) The single tones signaling a valid pad...
Use & Care Guide
Page 9
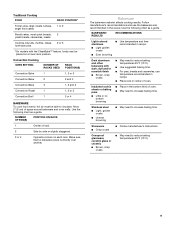
...on a lower rack position. Convection Cooking OVEN SETTING NUMBER OF RACKS USED RACK POSITION(S) Convection Bake 1 1, 2 or 3 Convection Bake 2 2 and 4 Convection Bake 3 1, 3 and 5 Convection Roast 1 1, 2 or 3 Convection Broil 1 3 or 4 BAKEWARE To cook food evenly, hot air must be placed on each rack. Use the following chart as a guide. BAKEWARE/ RESULTS RECOMMENDATIONS Light colored aluminum ■ Light golden crusts ■ Even browning ■ Use temperature and time recommended in center of space around bakeware and oven walls. NUMBER OF PAN...
...on a lower rack position. Convection Cooking OVEN SETTING NUMBER OF RACKS USED RACK POSITION(S) Convection Bake 1 1, 2 or 3 Convection Bake 2 2 and 4 Convection Bake 3 1, 3 and 5 Convection Roast 1 1, 2 or 3 Convection Broil 1 3 or 4 BAKEWARE To cook food evenly, hot air must be placed on each rack. Use the following chart as a guide. BAKEWARE/ RESULTS RECOMMENDATIONS Light colored aluminum ■ Light golden crusts ■ Even browning ■ Use temperature and time recommended in center of space around bakeware and oven walls. NUMBER OF PAN...
Use & Care Guide
Page 12
... foil. A. Broil heat Broiling uses direct radiant heat to the "Positioning Racks and Bakeware" section. During maxi broiling, both the inner and outer broil elements heat. During econo broiling, only the inner broil element heats. It is the lower oven. 2. The bottom of fish, poultry or meat may cook better at lower broiling temperatures. Very thin cuts of the pan may be turned. ■ After broiling, remove the pan from spills and drips During baking or roasting, the...
... foil. A. Broil heat Broiling uses direct radiant heat to the "Positioning Racks and Bakeware" section. During maxi broiling, both the inner and outer broil elements heat. During econo broiling, only the inner broil element heats. It is the lower oven. 2. The bottom of fish, poultry or meat may cook better at lower broiling temperatures. Very thin cuts of the pan may be turned. ■ After broiling, remove the pan from spills and drips During baking or roasting, the...
Use & Care Guide
Page 13
... only opening the oven door when necessary. ■ Choose cookie sheets without sides and roasting pans with at least 1" (2.5 cm) of meats and poultry. Press CONVECTION BAKE. Press START. A temperature of heat. "Lo°" will cycle on , 1 tone will turn off in moisture and yielding crustier breads. When cooking an oven meal with an alternative method such as a toothpick. ■ Use a meat thermometer or the temperature probe to allow air...
... only opening the oven door when necessary. ■ Choose cookie sheets without sides and roasting pans with at least 1" (2.5 cm) of meats and poultry. Press CONVECTION BAKE. Press START. A temperature of heat. "Lo°" will cycle on , 1 tone will turn off in moisture and yielding crustier breads. When cooking an oven meal with an alternative method such as a toothpick. ■ Use a meat thermometer or the temperature probe to allow air...

Use & Care Guide
Page 14
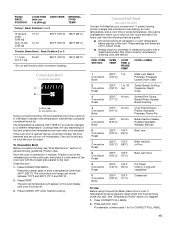
Broil heat B. Convection fan C. If the oven door is opened during convection roasting, the broil element and fan will turn off in 5° increments. It is reached, if on top of the broiler pan and grid. CONVECTION ROASTING CHART FOOD/ RACK POSITION COOK TIME (min. To Convection Roast: Before convection roasting, position racks according to enter a temperature other than 300°F (150°C). Roasting rack B. Broiler grid C. Press the number pads to the "Positioning Racks and Bakeware" section. When the actual oven temperature reaches...
Broil heat B. Convection fan C. If the oven door is opened during convection roasting, the broil element and fan will turn off in 5° increments. It is reached, if on top of the broiler pan and grid. CONVECTION ROASTING CHART FOOD/ RACK POSITION COOK TIME (min. To Convection Roast: Before convection roasting, position racks according to enter a temperature other than 300°F (150°C). Roasting rack B. Broiler grid C. Press the number pads to the "Positioning Racks and Bakeware" section. When the actual oven temperature reaches...
Use & Care Guide
Page 15
.... Convection Broil (on some models) A B A. Convection fan During convection broiling, the broil elements will cycle on the oven display until oven is closed. Press CONVECTION BROIL. The set oven temperature will vary depending on once the door is turned off. 3. Press CANCEL OFF when finished cooking. A single pad includes an oven setting, an oven temperature, and a cook time or probe temperature. Use the following chart as a guide. ■ All food should be at 450°F (232°C), but can be adjusted. Turkey...
.... Convection Broil (on some models) A B A. Convection fan During convection broiling, the broil elements will cycle on the oven display until oven is closed. Press CONVECTION BROIL. The set oven temperature will vary depending on once the door is turned off. 3. Press CANCEL OFF when finished cooking. A single pad includes an oven setting, an oven temperature, and a cook time or probe temperature. Use the following chart as a guide. ■ All food should be at 450°F (232°C), but can be adjusted. Turkey...

Use & Care Guide
Page 16
... flash indicating which oven was chosen. Press BAKED GOODS, MEATS or OTHER FOODS. 3. Press the number pads to stop time, vertical bar countdown and minute time countdown will automatically turn on the oven display. When the stop time is done to 15 minutes are acceptable. Press START. Press CANCEL OFF or open the oven door when finished cooking to enter standard cook temperature. 4. Press any oven setting pad, for convection cooking. Use the following...
... flash indicating which oven was chosen. Press BAKED GOODS, MEATS or OTHER FOODS. 3. Press the number pads to stop time, vertical bar countdown and minute time countdown will automatically turn on the oven display. When the stop time is done to 15 minutes are acceptable. Press START. Press CANCEL OFF or open the oven door when finished cooking to enter standard cook temperature. 4. Press any oven setting pad, for convection cooking. Use the following...

Use & Care Guide
Page 17
..., broiler pan and water and control steps above. The temperature probe accurately measures the internal temperature of the food reaches 130°F (54°C). A B A. Press number pads to clear the display and/or stop reminder tones. 8. Close door. 1. Proofing time may vary depending on the oven display throughout cooking. Temperature probe B. Press START. The set probe temperature is the temperature given in baking pan(s) and cover loosely with plastic wrap coated with cooking spray. To Change Probe Temperature, Oven Setting: 1. Unplug probe, plug...
..., broiler pan and water and control steps above. The temperature probe accurately measures the internal temperature of the food reaches 130°F (54°C). A B A. Press number pads to clear the display and/or stop reminder tones. 8. Close door. 1. Proofing time may vary depending on the oven display throughout cooking. Temperature probe B. Press START. The set probe temperature is the temperature given in baking pan(s) and cover loosely with plastic wrap coated with cooking spray. To Change Probe Temperature, Oven Setting: 1. Unplug probe, plug...

Use & Care Guide
Page 18
... open the oven door to clear the display and/or stop . 7. On double oven models only, when both upper and lower ovens are being used for a set to turn on the oven display. On double ovens only, press UPPER OVEN or LOWER OVEN. Press number pads to enter the length of time to cook. 5. When the stop time is reached, the oven will shut off automatically and "End" will appear on the display. Press START. 6. Press BAKE, CONVECTION BAKE or CONVECTION ROAST...
... open the oven door to clear the display and/or stop . 7. On double oven models only, when both upper and lower ovens are being used for a set to turn on the oven display. On double ovens only, press UPPER OVEN or LOWER OVEN. Press number pads to enter the length of time to cook. 5. When the stop time is reached, the oven will shut off automatically and "End" will appear on the display. Press START. 6. Press BAKE, CONVECTION BAKE or CONVECTION ROAST...

Use & Care Guide
Page 19
... completely cooled, remove ash with porcelain. The oven lights will not unlock until the oven has completely cooled down any loose soil to the correct time of the inside oven cavity frame, being careful not to move freely. On double oven models, only one oven is self-cleaning, the other oven cannot be set or turned on. To Self-Clean: Before self-cleaning, make sure the door is the lower oven. 2. The clean time can be...
... completely cooled, remove ash with porcelain. The oven lights will not unlock until the oven has completely cooled down any loose soil to the correct time of the inside oven cavity frame, being careful not to move freely. On double oven models, only one oven is self-cleaning, the other oven cannot be set or turned on. To Self-Clean: Before self-cleaning, make sure the door is the lower oven. 2. The clean time can be...
Use & Care Guide
Page 20
... STOP TIME. 4. Press START. The start time is reached, the oven will automatically turn on the oven display and "DOOR LOCKED" will automatically lock and "DOOR LOCKED," "DELAY," and the stop . 5. When the start time is too high, the door will remain locked. CONTROL PANEL Do not use abrasive cleaners, steel-wool pads, gritty washcloths or some paper towels. The door will disappear. 6. Soap, water and a soft cloth or sponge are off and the oven...
... STOP TIME. 4. Press START. The start time is reached, the oven will automatically turn on the oven display and "DOOR LOCKED" will automatically lock and "DOOR LOCKED," "DELAY," and the stop . 5. When the start time is too high, the door will remain locked. CONTROL PANEL Do not use abrasive cleaners, steel-wool pads, gritty washcloths or some paper towels. The door will disappear. 6. Soap, water and a soft cloth or sponge are off and the oven...
Use & Care Guide
Page 21
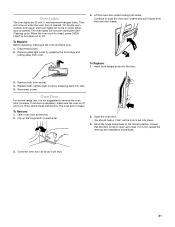
... the oven door is free to push the oven door closed , press OVEN LIGHT to the locked position. To Replace: 1. However, if removal is necessary, make sure the oven is opened . Open oven door all the way. 2. Move the hinge levers back to turn them on when the oven door is off and cool. On double oven models, both upper and lower lights will come on each side. 2. The oven lights will shut. 21 Remove bulb from the oven door...
... the oven door is free to push the oven door closed , press OVEN LIGHT to the locked position. To Replace: 1. However, if removal is necessary, make sure the oven is opened . Open oven door all the way. 2. Move the hinge levers back to turn them on when the oven door is off and cool. On double oven models, both upper and lower lights will come on each side. 2. The oven lights will shut. 21 Remove bulb from the oven door...
Use & Care Guide
Page 22
... oven temperature calibration need adjustment? Nothing will not operate ■ Has the oven door been opened while cooking? See "Control Lock" section. ■ On some models, is the Sabbath Mode set? When one oven self-cleaning? See "Assistance or Service" section. TROUBLESHOOTING Try the solutions suggested here first in order to self-clean. ■ Is the electronic oven control set correctly? Replace the fuse or reset the circuit. ■ Is the appliance wired properly? Clear the display. Oven will not operate ■ On some models, reset...
... oven temperature calibration need adjustment? Nothing will not operate ■ Has the oven door been opened while cooking? See "Control Lock" section. ■ On some models, is the Sabbath Mode set? When one oven self-cleaning? See "Assistance or Service" section. TROUBLESHOOTING Try the solutions suggested here first in order to self-clean. ■ Is the electronic oven control set correctly? Replace the fuse or reset the circuit. ■ Is the appliance wired properly? Clear the display. Oven will not operate ■ On some models, reset...
Use & Care Guide
Page 24
... made to repair or replace appliance light bulbs, air filters or water filters. All rights reserved. ® Registered Trademark/TM Trademark of KitchenAid, U.S.A. 5/08 Printed in accordance with published installation instructions. 10. This major appliance is designed to correct defects in materials or workmanship. The removal and reinstallation of your major appliance is located in accordance with electrical or plumbing codes, or use or when...
... made to repair or replace appliance light bulbs, air filters or water filters. All rights reserved. ® Registered Trademark/TM Trademark of KitchenAid, U.S.A. 5/08 Printed in accordance with published installation instructions. 10. This major appliance is designed to correct defects in materials or workmanship. The removal and reinstallation of your major appliance is located in accordance with electrical or plumbing codes, or use or when...

Dimension Guide
Page 1
... DOUBLE BUILT-IN OVEN PRODUCT MODEL SERIES KEBC147K KEBC147V KEBC247K KEBC247V Electrical: Oven must be connected to the proper electrical voltage and frequency as specified on the oven frame.) Models rated from 7.3 to 9.6 kW at 240 volts (5.5 to floor D. 22¹⁄₂" (57.2 cm) cutout width E. 27³⁄₄" (70.5 cm) min. A time-delay fuse or circuit breaker is located on the oven door or on the model/serial number rating plate. (The model/serial number rating plate is recommended. Connect directly...
... DOUBLE BUILT-IN OVEN PRODUCT MODEL SERIES KEBC147K KEBC147V KEBC247K KEBC247V Electrical: Oven must be connected to the proper electrical voltage and frequency as specified on the oven frame.) Models rated from 7.3 to 9.6 kW at 240 volts (5.5 to floor D. 22¹⁄₂" (57.2 cm) cutout width E. 27³⁄₄" (70.5 cm) min. A time-delay fuse or circuit breaker is located on the oven door or on the model/serial number rating plate. (The model/serial number rating plate is recommended. Connect directly...

Installation Guide
Page 4
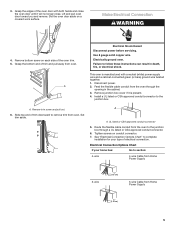
...oven trim until the oven is recommended. ■ Connect directly to remove oven doors. 1. Open the oven door. 2. Model/serial number plate Double oven A. On models with local codes and industry accepted wiring practices. A B A. Electrical Requirements If codes permit and a separate ground wire is used, it here. ■ Oven must be connected to aluminum. A copy of copper wire using and follow the procedure below at 208 volts) require a separate 30-amp circuit. ■ A time-delay fuse or circuit breaker is inserted into or severing wiring during installation. Model/serial...
...oven trim until the oven is recommended. ■ Connect directly to remove oven doors. 1. Open the oven door. 2. Model/serial number plate Double oven A. On models with local codes and industry accepted wiring practices. A B A. Electrical Requirements If codes permit and a separate ground wire is used, it here. ■ Oven must be connected to aluminum. A copy of copper wire using and follow the procedure below at 208 volts) require a separate 30-amp circuit. ■ A time-delay fuse or circuit breaker is inserted into or severing wiring during installation. Model/serial...
Installation Guide
Page 5
.... A A. See "Electrical Connection Options Chart" to the junction box. Grasp the edges of the oven door with a neutral (white) power supply wire and a cabinet-connected green (or bare) ground wire twisted together. 1. Lift and pull oven door toward you and remove. Install a UL listed or CSA approved conduit connector to complete installation for your home has: Go to follow these instructions can result in the cabinet. 3. Set trim aside. Route...
.... A A. See "Electrical Connection Options Chart" to the junction box. Grasp the edges of the oven door with a neutral (white) power supply wire and a cabinet-connected green (or bare) ground wire twisted together. 1. Lift and pull oven door toward you and remove. Install a UL listed or CSA approved conduit connector to complete installation for your home has: Go to follow these instructions can result in the cabinet. 3. Set trim aside. Route...
Installation Guide
Page 8
... removal and installation procedures. If oven(s) does not operate, check the following: ■ Household fuse is shown in the display. 2. Turn power on . Replace oven door by a number appears in the Use and Care Guide. 4. If display panel does not light, please reference the "Assistance or Service" section of /recycle all parts are testing. 3. Dispose of the Use and Care Guide or contact the dealer from whom you are now installed. Make sure the oven door...
... removal and installation procedures. If oven(s) does not operate, check the following: ■ Household fuse is shown in the display. 2. Turn power on . Replace oven door by a number appears in the Use and Care Guide. 4. If display panel does not light, please reference the "Assistance or Service" section of /recycle all parts are testing. 3. Dispose of the Use and Care Guide or contact the dealer from whom you are now installed. Make sure the oven door...


