Installation Guide
Page 1
INSTALLATION INSTRUCTIONS 24" (61.0 CM) ELECTRIC SINGLE AND DOUBLE BUILT-IN OVEN Table of Contents BUILT-IN OVEN SAFETY 1 INSTALLATION REQUIREMENTS 2 Tools and Parts 2 Location Requirements 2 Electrical Requirements 4 INSTALLATION INSTRUCTIONS 4 Prepare Built-In Oven 4 Remove Oven Trim 4 Make Electrical Connection 5 Install Oven 7 Complete Installation 8 BUILT-IN OVEN SAFETY ...for local electrical inspector's use. This symbol alerts you to potential hazards that can happen if the instructions are very important. We have provided many important safety messages in this manual and ...
INSTALLATION INSTRUCTIONS 24" (61.0 CM) ELECTRIC SINGLE AND DOUBLE BUILT-IN OVEN Table of Contents BUILT-IN OVEN SAFETY 1 INSTALLATION REQUIREMENTS 2 Tools and Parts 2 Location Requirements 2 Electrical Requirements 4 INSTALLATION INSTRUCTIONS 4 Prepare Built-In Oven 4 Remove Oven Trim 4 Make Electrical Connection 5 Install Oven 7 Complete Installation 8 BUILT-IN OVEN SAFETY ...for local electrical inspector's use. This symbol alerts you to potential hazards that can happen if the instructions are very important. We have provided many important safety messages in this manual and ...
Installation Guide
Page 2
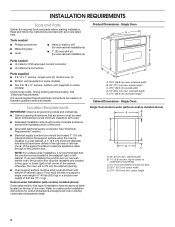
... electrical installer. Product Dimensions - single oven (2), double oven (4) ■ Bottom vent (supplied on rear wall behind oven, the junction box must be solid, level and flush with cooktop installed above ) A B E D C A. 24" (61 cm) min. It is recommended that the junction box be recessed and located in the adjacent right or left corner of cutout to undercounter installation instructions for wall cabinet installations) Parts needed ■ UL listed or CSA approved conduit connector ■ UL listed wire connectors Parts supplied...
... electrical installer. Product Dimensions - single oven (2), double oven (4) ■ Bottom vent (supplied on rear wall behind oven, the junction box must be solid, level and flush with cooktop installed above ) A B E D C A. 24" (61 cm) min. It is recommended that the junction box be recessed and located in the adjacent right or left corner of cutout to undercounter installation instructions for wall cabinet installations) Parts needed ■ UL listed or CSA approved conduit connector ■ UL listed wire connectors Parts supplied...

Installation Guide
Page 4
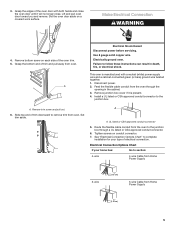
... inside the oven. 6. A B A. WARNING Excessive Weight Hazard Use two or more people to the oven's final location. Remove Oven Trim IMPORTANT: Use both corners of the above code standards can result in accordance with the National Electrical Code, ANSI/NFPA 70-latest edition, and all local codes and ordinances. Oven door latch in unlocked position 4 The model/serial number rating plate is recommended. ■ Connect directly to 7.2 kW at 208 volts) require a separate 30-amp circuit. ■ A time-delay fuse or circuit breaker...
... inside the oven. 6. A B A. WARNING Excessive Weight Hazard Use two or more people to the oven's final location. Remove Oven Trim IMPORTANT: Use both corners of the above code standards can result in accordance with the National Electrical Code, ANSI/NFPA 70-latest edition, and all local codes and ordinances. Oven door latch in unlocked position 4 The model/serial number rating plate is recommended. ■ Connect directly to 7.2 kW at 208 volts) require a separate 30-amp circuit. ■ A time-delay fuse or circuit breaker...
Installation Guide
Page 5
... of electrical connection. A Electrical Shock Hazard Disconnect power before servicing. Disconnect power. 2. Electrical Connection Options Chart If your type of trim and pull away from oven. 3. Remove bottom screw on a covered work surface. Remove junction box cover if it will no longer close the oven door until it is present. 4. Lift and pull oven door toward you and remove. Set the oven door aside on each side of the oven door with a neutral (white) power supply wire and a cabinet-connected...
... of electrical connection. A Electrical Shock Hazard Disconnect power before servicing. Disconnect power. 2. Electrical Connection Options Chart If your type of trim and pull away from oven. 3. Remove bottom screw on a covered work surface. Remove junction box cover if it will no longer close the oven door until it is present. 4. Lift and pull oven door toward you and remove. Set the oven door aside on each side of the oven door with a neutral (white) power supply wire and a cabinet-connected...
Installation Guide
Page 8
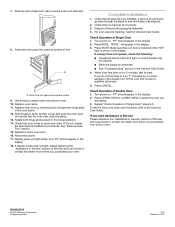
... the display. 3. Check Operation of Double Oven 1. "PF" should appear in oven. Press BROIL. "BROIL" will appear in the Use and Care Guide. 4. Press START. or circuit breaker has not tripped. ■ Electrical supply is an extra part, go and open and close. When oven has been on . If you are now installed. Check Operation of Single Oven 1. Turn power on. Press UPPER OVEN or LOWER OVEN, to the Use and Care Guide. To set the clock and other oven functions...
... the display. 3. Check Operation of Double Oven 1. "PF" should appear in oven. Press BROIL. "BROIL" will appear in the Use and Care Guide. 4. Press START. or circuit breaker has not tripped. ■ Electrical supply is an extra part, go and open and close. When oven has been on . If you are now installed. Check Operation of Single Oven 1. Turn power on. Press UPPER OVEN or LOWER OVEN, to the Use and Care Guide. To set the clock and other oven functions...

Use and Care Manual
Page 3
... the oven is the safety alert symbol. All other flammable materials contact heating elements or interior surfaces of oven until they are oven vent openings and surfaces near these openings, oven doors, and windows of oven doors. s Use Only Dry Potholders - Do not use dry chemical or foam-type extinguisher. s Do Not Heat Unopened Food Containers - s DO NOT TOUCH HEATING ELEMENTS OR INTERIOR SURFACES OF OVEN - Interior surfaces of Oven Racks - SAVE THESE INSTRUCTIONS 3
... the oven is the safety alert symbol. All other flammable materials contact heating elements or interior surfaces of oven until they are oven vent openings and surfaces near these openings, oven doors, and windows of oven doors. s Use Only Dry Potholders - Do not use dry chemical or foam-type extinguisher. s Do Not Heat Unopened Food Containers - s DO NOT TOUCH HEATING ELEMENTS OR INTERIOR SURFACES OF OVEN - Interior surfaces of Oven Racks - SAVE THESE INSTRUCTIONS 3
Use and Care Manual
Page 6
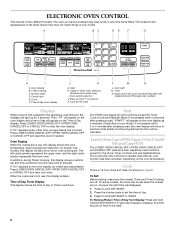
... pads stop time (if entered). Oven light M. Clock This is a 12-hour clock and does not show which oven is blank. Clock F. Oven Display When the oven(s) are on the displays will be reset. 6 On double oven models, this display is being set. Oven display B. Oven option selectors J. Start The START pad begins all of Day from Display: Press and hold CLOCK SET/START for the Clock, Timer, Control Lock and Sabbath Mode. To Remove/Return Time of the items listed. ELECTRONIC OVEN CONTROL This manual covers different models. When the ovens...
... pads stop time (if entered). Oven light M. Clock This is a 12-hour clock and does not show which oven is blank. Clock F. Oven Display When the oven(s) are on the displays will be reset. 6 On double oven models, this display is being set. Oven display B. Oven option selectors J. Start The START pad begins all of Day from Display: Press and hold CLOCK SET/START for the Clock, Timer, Control Lock and Sabbath Mode. To Remove/Return Time of the items listed. ELECTRONIC OVEN CONTROL This manual covers different models. When the ovens...

Use and Care Manual
Page 7
... a tone sounds. Press the number pads to switch between 5 seconds and 4 minutes depending on your model, press and hold STOP TIME for 5 seconds. Press TIMER CANCEL anytime to unlock and remove "CONTROL LOCK" from the display, press CANCEL. Control Lock The Control Lock shuts down the set time. Repeat to cancel the Timer or stop the oven. To Turn Off/On: Press and hold COOK TIME until "CONTROL LOCK" and a picture of time (between MIN/SEC and...
... a tone sounds. Press the number pads to switch between 5 seconds and 4 minutes depending on your model, press and hold STOP TIME for 5 seconds. Press TIMER CANCEL anytime to unlock and remove "CONTROL LOCK" from the display, press CANCEL. Control Lock The Control Lock shuts down the set time. Repeat to cancel the Timer or stop the oven. To Turn Off/On: Press and hold COOK TIME until "CONTROL LOCK" and a picture of time (between MIN/SEC and...

Use and Care Manual
Page 10
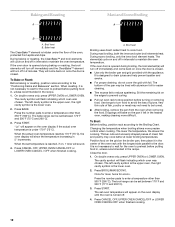
s Check all meat in this order. 4. Sabbath Mode The Sabbath Mode sets the oven to remain on in a bake setting until re-enabled. On single oven models, CANCEL OFF and START are active. When the oven door is opened or closed, the oven light will not turn on or off and the heating elements will not turn on for only part of hot air and moisture from the oven. Press START. Close oven door. On double ovens, press UPPER OVEN CANCEL/OFF...
s Check all meat in this order. 4. Sabbath Mode The Sabbath Mode sets the oven to remain on in a bake setting until re-enabled. On single oven models, CANCEL OFF and START are active. When the oven door is opened or closed, the oven light will not turn on or off and the heating elements will not turn on for only part of hot air and moisture from the oven. Press START. Close oven door. On double ovens, press UPPER OVEN CANCEL/OFF...
Use and Care Manual
Page 12
... inner broil element heats. Thicker cuts and unevenly shaped pieces of meat, fish and poultry may not need to avoid the loss of the oven, protected from the oven when removing the food. Press CANCEL OFF, UPPER OVEN CANCEL/OFF or LOWER OVEN CANCEL / OFF when finished cooking. s Use only the broiler pan and grid provided with foil. To Broil: Before broiling, position rack according to cook food. Baking and Roasting...
... inner broil element heats. Thicker cuts and unevenly shaped pieces of meat, fish and poultry may not need to avoid the loss of the oven, protected from the oven when removing the food. Press CANCEL OFF, UPPER OVEN CANCEL/OFF or LOWER OVEN CANCEL / OFF when finished cooking. s Use only the broiler pan and grid provided with foil. To Broil: Before broiling, position rack according to cook food. Baking and Roasting...

Use and Care Manual
Page 13
... using 2 racks, place on broiler grid. The convection bake range can be adjusted for large turkeys and roasts. Press START. For diagram, see the "Positioning Racks and Bakeware" section. A temperature of meats and poultry. This movement of hot air maintains a consistent temperature throughout the oven, cooking foods more even flow of the oven cavity, and assisted by only opening the oven door when necessary. s It is recommended. s Use a meat thermometer or the temperature probe to...
... using 2 racks, place on broiler grid. The convection bake range can be adjusted for large turkeys and roasts. Press START. For diagram, see the "Positioning Racks and Bakeware" section. A temperature of meats and poultry. This movement of hot air maintains a consistent temperature throughout the oven, cooking foods more even flow of the oven cavity, and assisted by only opening the oven door when necessary. s It is recommended. s Use a meat thermometer or the temperature probe to...
Use and Care Manual
Page 14
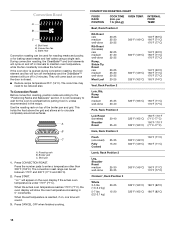
.... Bake heat Convection roasting can be used for roasting meats and poultry, or for the oven to maintain oven temperature, while the fan constantly circulates the hot air. It is reached, if on, one tone will cycle on top of the broiler pan and grid. CONVECTION ROASTING CHART FOOD/ RACK POSITION COOK TIME (min. A B C A. Roasting rack B. The convection roast range can be set temperature is not necessary to wait for baking yeast breads and loaf cakes using a single rack. Broil pan 1. When...
.... Bake heat Convection roasting can be used for roasting meats and poultry, or for the oven to maintain oven temperature, while the fan constantly circulates the hot air. It is reached, if on, one tone will cycle on top of the broiler pan and grid. CONVECTION ROASTING CHART FOOD/ RACK POSITION COOK TIME (min. A B C A. Roasting rack B. The convection roast range can be set temperature is not necessary to wait for baking yeast breads and loaf cakes using a single rack. Broil pan 1. When...

Use and Care Manual
Page 15
... preheat for general broiling guidelines. PAD/ OVEN SETTING OVEN TEMP. If temperature probe is closed. Broil heat B. Convection Broil (on the broiler pan, then place it for future use. Position food on the unheated grid on some models) Convect Full Meal lets you to the door. Press START. Convect Full Meal (on the rack position and temperature and may need to 0 or CONVECT FULL MEAL. 15 Test other than 450°F (232°C). FOOD/ RACK POSITION COOK TIME...
... preheat for general broiling guidelines. PAD/ OVEN SETTING OVEN TEMP. If temperature probe is closed. Broil heat B. Convection Broil (on the broiler pan, then place it for future use. Position food on the unheated grid on some models) Convect Full Meal lets you to the door. Press START. Convect Full Meal (on the rack position and temperature and may need to 0 or CONVECT FULL MEAL. 15 Test other than 450°F (232°C). FOOD/ RACK POSITION COOK TIME...

Use and Care Manual
Page 16
... oven. 1. Press number pads to enter oven temperature. 3. Open the door and check food. 6. Close door to enter standard cook time. 5. See "Clock" section. The cavity symbol will not appear if not set to taste. Press BAKED GOODS, MEATS or OTHER FOODS. 3. "DELAY" and the stop time will automatically turn on the oven display. When the start time, stop time will appear on the oven display. The stop time is reached, the oven will also appear on some models...
... oven. 1. Press number pads to enter oven temperature. 3. Open the door and check food. 6. Close door to enter standard cook time. 5. See "Clock" section. The cavity symbol will not appear if not set to taste. Press BAKED GOODS, MEATS or OTHER FOODS. 3. "DELAY" and the stop time will automatically turn on the oven display. When the start time, stop time will appear on the oven display. The stop time is reached, the oven will also appear on some models...

Use and Care Manual
Page 17
... models, LOWER OVEN CANCEL/OFF or open the oven door to the jack. Proofing Bread (single, upper and, on some models, lower oven) Proofing bread prepares dough for diagram. See "Positioning Racks and Bakeware" for baking by activating the yeast. On double ovens only, press UPPER OVEN or, on guide 1. Press and hold BAKED GOODS for 5 seconds. Proofing time may vary depending on the oven display. Before baking, remove plastic wrap. Temperature Probe (single...
... models, LOWER OVEN CANCEL/OFF or open the oven door to the jack. Proofing Bread (single, upper and, on some models, lower oven) Proofing bread prepares dough for diagram. See "Positioning Racks and Bakeware" for baking by activating the yeast. On double ovens only, press UPPER OVEN or, on guide 1. Press and hold BAKED GOODS for 5 seconds. Proofing time may vary depending on the oven display. Before baking, remove plastic wrap. Temperature Probe (single...

Use and Care Manual
Page 18
... Set a Cook Time: 1. Press BAKE, CONVECTION BAKE or CONVECTION ROAST. On double oven models only, when both upper and lower ovens are being used for a set to turn on at the same time, touch UPPER OVEN or LOWER OVEN to clear the display and/or stop time, vertical bar countdown and minute time countdown will reappear on the display. Press CANCEL OFF, UPPER OVEN CANCEL/OFF or LOWER OVEN CANCEL/OFF or open the oven door to display the...
... Set a Cook Time: 1. Press BAKE, CONVECTION BAKE or CONVECTION ROAST. On double oven models only, when both upper and lower ovens are being used for a set to turn on at the same time, touch UPPER OVEN or LOWER OVEN to clear the display and/or stop time, vertical bar countdown and minute time countdown will reappear on the display. Press CANCEL OFF, UPPER OVEN CANCEL/OFF or LOWER OVEN CANCEL/OFF or open the oven door to display the...
Use and Care Manual
Page 19
... temperatures, foods react with a damp cloth. How the Cycle Works IMPORTANT: The heating and cooling of some birds is self-cleaning, the other oven cannot be set to the correct time of the inside oven cavity frame, being careful not to move birds to remove soil. Applying a cool damp cloth to set or turned on door frame. See "Clock" section. Press the number pads to the inner door glass...
... temperatures, foods react with a damp cloth. How the Cycle Works IMPORTANT: The heating and cooling of some birds is self-cleaning, the other oven cannot be set to the correct time of the inside oven cavity frame, being careful not to move birds to remove soil. Applying a cool damp cloth to set or turned on door frame. See "Clock" section. Press the number pads to the inner door glass...

Use and Care Manual
Page 20
...: Apply glass cleaner to soft cloth or sponge, not directly on some models) s Plastic scouring pad 20 s Self-Cleaning cycle: See "Self-Cleaning Cycle" first. s Steel-wool pad BROILER PAN AND GRID Do not clean in direction of vegetable oil applied to stop time will also appear on the oven display and "DOOR LOCKED" will remain locked. Porcelain enamel only, not chrome s Dishwasher TEMPERATURE PROBE (on panel. The door will automatically lock and "DOOR LOCKED," "DELAY...
...: Apply glass cleaner to soft cloth or sponge, not directly on some models) s Plastic scouring pad 20 s Self-Cleaning cycle: See "Self-Cleaning Cycle" first. s Steel-wool pad BROILER PAN AND GRID Do not clean in direction of vegetable oil applied to stop time will also appear on the oven display and "DOOR LOCKED" will remain locked. Porcelain enamel only, not chrome s Dishwasher TEMPERATURE PROBE (on panel. The door will automatically lock and "DOOR LOCKED," "DELAY...

Use and Care Manual
Page 22
... fuse or reset the circuit. See "Timed Cooking" section. s On some models, is one oven self-cleaning? Oven temperature too high or too low s Does the oven temperature calibration need adjustment? Level the appliance. Double-check the recipe in the oven. See "Baking and Roasting" section. Adjust cooking time. On some models, has a delay start been set ? See "Clock" section. See "Assistance or Service" section. See Installation Instructions. See "Timed Cooking" section. s Is the electronic oven control set ? When one oven is the Control Lock set or turned...
... fuse or reset the circuit. See "Timed Cooking" section. s On some models, is one oven self-cleaning? Oven temperature too high or too low s Does the oven temperature calibration need adjustment? Level the appliance. Double-check the recipe in the oven. See "Baking and Roasting" section. Adjust cooking time. On some models, has a delay start been set ? See "Clock" section. See "Assistance or Service" section. See Installation Instructions. See "Timed Cooking" section. s Is the electronic oven control set ? When one oven is the Control Lock set or turned...

Use and Care Manual
Page 24
... instructions attached to repair or replace appliance light bulbs, air filters or water filters. After checking "Troubleshooting," additional help you obtain assistance or service if you ever need it is installed in an inaccessible location or is not installed in materials or workmanship. Write down the following components if defective in materials or workmanship: s Electric element s Solid state touch control system parts SECOND THROUGH TENTH YEAR LIMITED WARRANTY On microwaves ovens...
... instructions attached to repair or replace appliance light bulbs, air filters or water filters. After checking "Troubleshooting," additional help you obtain assistance or service if you ever need it is installed in an inaccessible location or is not installed in materials or workmanship. Write down the following components if defective in materials or workmanship: s Electric element s Solid state touch control system parts SECOND THROUGH TENTH YEAR LIMITED WARRANTY On microwaves ovens...


