

Installation Guide
Page 2
Always read and obey all electrical and plumbing national and local codes and ordinances. Do not push down on some models 15 Custom Panel Dimensions 15 Install Custom Panel 15 Choose Attachment Option 17 Prepare Water Supply Line 18 Move Dishwasher Close to Cabinet Opening 18 Connect to Water Supply 21 Connect to Drain...
Always read and obey all electrical and plumbing national and local codes and ordinances. Do not push down on some models 15 Custom Panel Dimensions 15 Install Custom Panel 15 Choose Attachment Option 17 Prepare Water Supply Line 18 Move Dishwasher Close to Cabinet Opening 18 Connect to Water Supply 21 Connect to Drain...
Installation Guide
Page 3
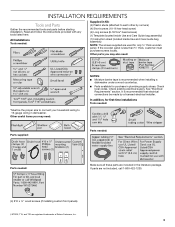
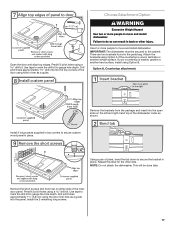
... you may also need : NOTES: ■ Moisture barrier tape is recommended when installing a dishwasher under a wood countertop. ■ Parts available for only ³⁄₄" thick wooden panel. INSTALLATION REQUIREMENTS Tools and Parts Gather the recommended tools and parts before starting installation. It is less than ³⁄₄" thick, customer must purchase screws...
... you may also need : NOTES: ■ Moisture barrier tape is recommended when installing a dishwasher under a wood countertop. ■ Parts available for only ³⁄₄" thick wooden panel. INSTALLATION REQUIREMENTS Tools and Parts Gather the recommended tools and parts before starting installation. It is less than ³⁄₄" thick, customer must purchase screws...
Installation Guide
Page 11
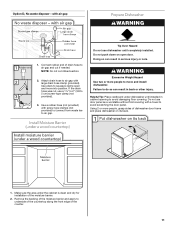
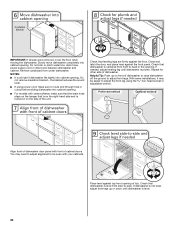
...with air gap Prepare Dishwasher WARNING 1. Make sure the area under the cabinet is clean and dry for installation of dishwasher door frame and place dishwasher on open and move and install dishwasher. NOTE: Do not cut if needed. Doing so can result in serious injury or cuts. ...Do not use a 1¹⁄₂" to 2" (3.8 to move into position. If the drain hose was cut, use door panel as a worktable without first covering ...
...with air gap Prepare Dishwasher WARNING 1. Make sure the area under the cabinet is clean and dry for installation of dishwasher door frame and place dishwasher on open and move and install dishwasher. NOTE: Do not cut if needed. Doing so can result in serious injury or cuts. ...Do not use a 1¹⁄₂" to 2" (3.8 to move into position. If the drain hose was cut, use door panel as a worktable without first covering ...
Installation Guide
Page 12
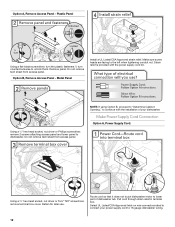
... dishwasher motor to the left when tightening conduit nut. Remove panel. Do not remove tech sheet from access panel. Option B, Remove Access Panel - Retain for later use. Plastic Panel Using a flat-blade screwdriver, turn the plastic fasteners ¹⁄₄ turn counterclockwise to dishwasher. Metal Panel Install a UL Listed/CSA Approved strain relief. Do not remove...
... dishwasher motor to the left when tightening conduit nut. Remove panel. Do not remove tech sheet from access panel. Option B, Remove Access Panel - Retain for later use. Plastic Panel Using a flat-blade screwdriver, turn the plastic fasteners ¹⁄₄ turn counterclockwise to dishwasher. Metal Panel Install a UL Listed/CSA Approved strain relief. Do not remove...
Installation Guide
Page 15
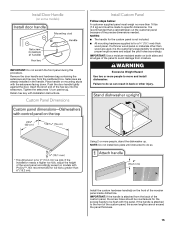
...some models) IMPORTANT: Do not scratch the front panel during this procedure. Custom Panel Dimensions Install Custom Panel Follow steps below: A customer supplied panel must be made to move and install dishwasher. Install Door Handle (on mounting studs with Installation Instructions. Tighten the setscrews ¹⁄₄ ...turn past snug. It is recommended that a cabinetmaker cut the customer panel because of the hex key into the setscrews. NOTE: Do not install kick plate until instructed to do so. Remove the door handle and hardware bag containing...
...some models) IMPORTANT: Do not scratch the front panel during this procedure. Custom Panel Dimensions Install Custom Panel Follow steps below: A customer supplied panel must be made to move and install dishwasher. Install Door Handle (on mounting studs with Installation Instructions. Tighten the setscrews ¹⁄₄ ...turn past snug. It is recommended that a cabinetmaker cut the customer panel because of the hex key into the setscrews. NOTE: Do not install kick plate until instructed to do so. Remove the door handle and hardware bag containing...
Installation Guide
Page 17
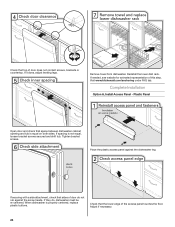
... using the door liner hole as a guide into the panel. NOTE: Do not attach the dishwasher. Install the 2 remaining long screws. 17 Failure to the cabinet. Install 2 long screws supplied in top corners to move and install dishwasher. WARNING Excessive Weight Hazard Use two or more people... to secure custom wood panel in liner as shown. Repeat this step for the other injury. Drill pilot...
... using the door liner hole as a guide into the panel. NOTE: Do not attach the dishwasher. Install the 2 remaining long screws. 17 Failure to the cabinet. Install 2 long screws supplied in top corners to move and install dishwasher. WARNING Excessive Weight Hazard Use two or more people... to secure custom wood panel in liner as shown. Repeat this step for the other injury. Drill pilot...
Installation Guide
Page 20
... in the opening. Check that leveling legs are firmly against the floor. Repeat for other side of dishwasher door panel with your cabinets. Remove cardboard from side-to adjust front legs. With some installations, it may need to adjust alignment to be easier to adjust the front leg using power cord, make...
... in the opening. Check that leveling legs are firmly against the floor. Repeat for other side of dishwasher door panel with your cabinets. Remove cardboard from side-to adjust front legs. With some installations, it may need to adjust alignment to be easier to adjust the front leg using power cord, make...
Installation Guide
Page 24
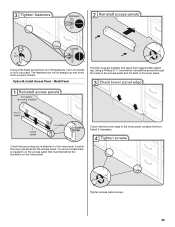
Complete Installation Option A, Install Access Panel - Place the plastic access panel against the screw heads. Check that the lower edge of door do , dishwasher must be re-centered. Adjust if necessary. 24 If it does, adjust leveling legs. Remove towel from dishwasher. Plastic Panel Open door and ... Tighten bracket screws. If securing with a side attachment, check that sides of the access panel touches the floor. If they do not rub against the dishwasher leg. Visit www.kitchenaid.com/anchoring under FAQ tab. When dishwasher is equal on both sides. Reinstall the lower ...
Complete Installation Option A, Install Access Panel - Place the plastic access panel against the screw heads. Check that the lower edge of door do , dishwasher must be re-centered. Adjust if necessary. 24 If it does, adjust leveling legs. Remove towel from dishwasher. Plastic Panel Open door and ... Tighten bracket screws. If securing with a side attachment, check that sides of the access panel touches the floor. If they do not rub against the dishwasher leg. Visit www.kitchenaid.com/anchoring under FAQ tab. When dishwasher is equal on both sides. Reinstall the lower ...
Installation Guide
Page 25
... the slots in the lower panel. Position the lower panel behind the insulation on the access panel that the lower edge of the lower panel contacts the floor. Adjust if necessary. Tighten access panel screws. 25 Option B, Install Access Panel - Check that grounding clip is insulation on the lower panel. Metal Panel Hold the 2 panels together and place them against...
... the slots in the lower panel. Position the lower panel behind the insulation on the access panel that the lower edge of the lower panel contacts the floor. Adjust if necessary. Tighten access panel screws. 25 Option B, Install Access Panel - Check that grounding clip is insulation on the lower panel. Metal Panel Hold the 2 panels together and place them against...


