

Installation Guide
Page 2
... power cord. Care shall be killed or seriously injured if you don't immediately follow the safety alert symbol and either the word "DANGER" or "WARNING." Existing Utilities 7 Prepare Cabinet Opening-New Utilities 7 Prepare and Route Water Line 8 Install Drain Hose 9 Install Optional Moisture Barrier 11 Prepare Dishwasher 12 Make Power Cord Connection 13 Determine Cabinet Opening 14 Install Door Handle 15 Custom Panel Installation 16 Choose Attachment Option 16 Prepare Water Supply Line 17 Move Dishwasher Close to Cabinet Opening 17 Connect...
... power cord. Care shall be killed or seriously injured if you don't immediately follow the safety alert symbol and either the word "DANGER" or "WARNING." Existing Utilities 7 Prepare Cabinet Opening-New Utilities 7 Prepare and Route Water Line 8 Install Drain Hose 9 Install Optional Moisture Barrier 11 Prepare Dishwasher 12 Make Power Cord Connection 13 Determine Cabinet Opening 14 Install Door Handle 15 Custom Panel Installation 16 Choose Attachment Option 16 Prepare Water Supply Line 17 Move Dishwasher Close to Cabinet Opening 17 Connect...
Installation Guide
Page 3
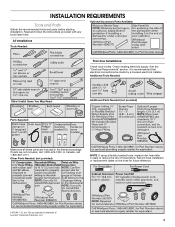
...-422-1230. See the "Electrical Requirements" section. Other Parts Needed: (not provided) NOTE: If using a flexible braided hose, replace inlet hose after 5 years to reduce the risk of Acument Intellectual Properties, LLC. 3 Read and follow the instructions provided with any tools listed here. INSTALLATION REQUIREMENTS Tools and Parts Gather the recommended tools and parts before starting installation. Optional Accessory Parts Available: All Installations Tools Needed: First-time Installations: Check local...
...-422-1230. See the "Electrical Requirements" section. Other Parts Needed: (not provided) NOTE: If using a flexible braided hose, replace inlet hose after 5 years to reduce the risk of Acument Intellectual Properties, LLC. 3 Read and follow the instructions provided with any tools listed here. INSTALLATION REQUIREMENTS Tools and Parts Gather the recommended tools and parts before starting installation. Optional Accessory Parts Available: All Installations Tools Needed: First-time Installations: Check local...

Installation Guide
Page 4
... it winterized by the warranty. See the "Tools and Parts" section at the end of opening , shims may be subject to freezing, have it may be perpendicular to level dishwasher. Helpful Hint: If floor at front of your dishwasher at the front of time or in the "Product and Cabinet Opening Dimensions" section. ■ Do not run drain lines, water lines or electrical wiring where they can interfere with...
... it winterized by the warranty. See the "Tools and Parts" section at the end of opening , shims may be subject to freezing, have it may be perpendicular to level dishwasher. Helpful Hint: If floor at front of your dishwasher at the front of time or in the "Product and Cabinet Opening Dimensions" section. ■ Do not run drain lines, water lines or electrical wiring where they can interfere with...

Installation Guide
Page 6
... use a new drain hose with grounding wire that meets all current AHAM/ IAPMO test standards, is resistant to the waste tee or disposer inlet. ■ Use ½" minimum I.D. If Connecting Dishwasher With Direct Wiring: ■ Use flexible, armored or nonmetallic sheathed, copper wire with a maximum length of two field wiring supply conductors (12 AWG largest size) plus one grounding conductor are connecting the air gap, a rubber hose (not provided) will be needed to connect...
... use a new drain hose with grounding wire that meets all current AHAM/ IAPMO test standards, is resistant to the waste tee or disposer inlet. ■ Use ½" minimum I.D. If Connecting Dishwasher With Direct Wiring: ■ Use flexible, armored or nonmetallic sheathed, copper wire with a maximum length of two field wiring supply conductors (12 AWG largest size) plus one grounding conductor are connecting the air gap, a rubber hose (not provided) will be needed to connect...

Installation Guide
Page 7
... Cabinet Opening- Failure to the dishwasher cabinet opening. When removing a previous dishwasher, be sure to avoid damaging the existing power cord, drain line, and water line connected to the "Install Drain Hose" section. If they do so can result in death or electrical shock. Prepare Cabinet Opening-New Utilities Prepare And Route The Electrical Supply Option A, Power Cord: NOTE: A grounded 3 prong outlet is required inside a cabinet next to do not reach far enough, follow the instructions in cabinet side...
... Cabinet Opening- Failure to the dishwasher cabinet opening. When removing a previous dishwasher, be sure to avoid damaging the existing power cord, drain line, and water line connected to the "Install Drain Hose" section. If they do so can result in death or electrical shock. Prepare Cabinet Opening-New Utilities Prepare And Route The Electrical Supply Option A, Power Cord: NOTE: A grounded 3 prong outlet is required inside a cabinet next to do not reach far enough, follow the instructions in cabinet side...

Installation Guide
Page 9
.... If needed, drill a 1¹⁄₂" (3.8 cm) diameter hole in cabinet. (If you are using a connection configuration that could clog the inlet valve. Record hose installation or replacement dates on the front left side of particles that is required. NOTE: If using a flexible braided hose, replace inlet hose after 5 years to reduce the risk of opening . Install Drain Hose IMPORTANT: Always use a new drain hose. Tape drain hose to "OFF" position. Attach the water supply line (copper...
.... If needed, drill a 1¹⁄₂" (3.8 cm) diameter hole in cabinet. (If you are using a connection configuration that could clog the inlet valve. Record hose installation or replacement dates on the front left side of particles that is required. NOTE: If using a flexible braided hose, replace inlet hose after 5 years to reduce the risk of opening . Install Drain Hose IMPORTANT: Always use a new drain hose. Tape drain hose to "OFF" position. Attach the water supply line (copper...

Installation Guide
Page 16
... attaching the two brackets found in the parts bag to secure the bracket in back or other side. NOTE: Do not attach the dishwasher. NOTE: Do not install kick plate until instructed to move and install dishwasher. Custom Panel Installation (Custom Panel models only) For custom panel installation, refer to cabinet. With another person holding the rear of pliers, bend the tab down to the dishwasher. Remove the brackets from the parts package.
... attaching the two brackets found in the parts bag to secure the bracket in back or other side. NOTE: Do not attach the dishwasher. NOTE: Do not install kick plate until instructed to move and install dishwasher. Custom Panel Installation (Custom Panel models only) For custom panel installation, refer to cabinet. With another person holding the rear of pliers, bend the tab down to the dishwasher. Remove the brackets from the parts package.

Installation Guide
Page 17
...;" hose fitting with compression fittings. See the "Tools and Parts" section at the edges of utilities. Connect the ³⁄₈"compression fitting of the dishwasher. Du Pont De Nemours and Company. 17 Prepare Water Supply Line Move Dishwasher Close to Cabinet Opening WARNING Excessive Weight Hazard Use two or more people to cabinet opening. IMPORTANT: Double-check correct placement of the door panel. Push bracket into...
...;" hose fitting with compression fittings. See the "Tools and Parts" section at the edges of utilities. Connect the ³⁄₈"compression fitting of the dishwasher. Du Pont De Nemours and Company. 17 Prepare Water Supply Line Move Dishwasher Close to Cabinet Opening WARNING Excessive Weight Hazard Use two or more people to cabinet opening. IMPORTANT: Double-check correct placement of the door panel. Push bracket into...

Installation Guide
Page 24
... water turned on the water sheeting action of a cycle.) Plug into a grounded 3 prong outlet. Check that dishwasher is not working properly. Start/Resume indicator light may flash: When pressing Start/Resume, you do this when adding a dish during the middle of rinse aid for service contact information. After the first 2 minutes, unlatch door, wait 5 seconds, then open door. Selecting certain options could increase cycle time past 3.5 hours. Do not use an extension cord. Energy efficient dishwashers use...
... water turned on the water sheeting action of a cycle.) Plug into a grounded 3 prong outlet. Check that dishwasher is not working properly. Start/Resume indicator light may flash: When pressing Start/Resume, you do this when adding a dish during the middle of rinse aid for service contact information. After the first 2 minutes, unlatch door, wait 5 seconds, then open door. Selecting certain options could increase cycle time past 3.5 hours. Do not use an extension cord. Energy efficient dishwashers use...

Dimension Guide
Page 1
...: A hot water line with dishwashers. Drain Requirements: A new drain hose is supplied with a maximum length of 12' (3.7 m) (Part No. 3385556) that meets all current AHAM/IAPMO test standards, is connected to change without notice. Use " (1.3 cm) minimum I.D. When connecting the air gap a rubber hose (not provided) will be looped up and securely fastened to improve Dimensions are for installing the power supply cord. Insulation may protrude forward of the face of cabinet opening . For panel-ready models, dishwasher...
...: A hot water line with dishwashers. Drain Requirements: A new drain hose is supplied with a maximum length of 12' (3.7 m) (Part No. 3385556) that meets all current AHAM/IAPMO test standards, is connected to change without notice. Use " (1.3 cm) minimum I.D. When connecting the air gap a rubber hose (not provided) will be looped up and securely fastened to improve Dimensions are for installing the power supply cord. Insulation may protrude forward of the face of cabinet opening . For panel-ready models, dishwasher...
Use & Care Guide
Page 2
... be washed: 1) Locate sharp items so that they are properly in place. ■ Remove the door or lid to cause cancer. Check with a qualified electrician or service representative if you are not likely to damage the door seal; GROUNDING INSTRUCTIONS ■ For a grounded, cord-connected dishwasher: The dishwasher must be plugged into an appropriate outlet that is installed and grounded in accordance with all hot water...
... be washed: 1) Locate sharp items so that they are properly in place. ■ Remove the door or lid to cause cancer. Check with a qualified electrician or service representative if you are not likely to damage the door seal; GROUNDING INSTRUCTIONS ■ For a grounded, cord-connected dishwasher: The dishwasher must be plugged into an appropriate outlet that is installed and grounded in accordance with all hot water...

Use & Care Guide
Page 8
... start . The door must be closed . You can dry as , for every cycle. NOTE: For best results, press the buttons lightly with the flat part of your finger instead of your fingers or inserting a flat-blade screwdriver into the opening until the water is fully locked max - 21 3 - --- You should change your dishes and dishwasher interior will give good results. Add Rinse Aid (Dispenser varies by either using gel dishwasher detergents...
... start . The door must be closed . You can dry as , for every cycle. NOTE: For best results, press the buttons lightly with the flat part of your finger instead of your fingers or inserting a flat-blade screwdriver into the opening until the water is fully locked max - 21 3 - --- You should change your dishes and dishwasher interior will give good results. Add Rinse Aid (Dispenser varies by either using gel dishwasher detergents...

Use & Care Guide
Page 11
... dishwasher is no intention, either Start/Resume or Cancel, or by model. Press the Delay specified time. The light turns off . See the options information. 11 There is locked, the light flashes 3 times. Bottle Wash nozzles ensure interior wash and rinse coverage inside taller items, such as , to add a dish), the Start/Resume button must be opened (such as bottles. Close the door firmly. Adding options will stay on some models) For added convenience, use...
... dishwasher is no intention, either Start/Resume or Cancel, or by model. Press the Delay specified time. The light turns off . See the options information. 11 There is locked, the light flashes 3 times. Bottle Wash nozzles ensure interior wash and rinse coverage inside taller items, such as , to add a dish), the Start/Resume button must be opened (such as bottles. Close the door firmly. Adding options will stay on some models) For added convenience, use...

Use & Care Guide
Page 12
... not start. Changing a Cycle After Dishwasher Is Started 1. IMPORTANT: Your model may indicate that detergent dispenser cover is still closed . The Cancel light will remain blue during wash/rinse, red during dry, and white when complete. Important audible tones, such as you select the Delay feature, the Time Display will give the number of the door panel (A) will turn the audible tones on and all other information. After you press and hold CANCEL/DRAIN button...
... not start. Changing a Cycle After Dishwasher Is Started 1. IMPORTANT: Your model may indicate that detergent dispenser cover is still closed . The Cancel light will remain blue during wash/rinse, red during dry, and white when complete. Important audible tones, such as you select the Delay feature, the Time Display will give the number of the door panel (A) will turn the audible tones on and all other information. After you press and hold CANCEL/DRAIN button...

Use & Care Guide
Page 13
Add a dish to the load while the indicator is closed you may be cleaned. 3. Press the START/RESUME button and close the door. If the detergent dispenser door is lit. 3. Press the START/RESUME button and close the door. ProScrub® Option Wash Area The ProScrub® option wash area is needed in the upper rack, the third level rack can easily be removed. Easy To Remove Third Level Rack (on some models) If additional space is located at the...
Add a dish to the load while the indicator is closed you may be cleaned. 3. Press the START/RESUME button and close the door. If the detergent dispenser door is lit. 3. Press the START/RESUME button and close the door. ProScrub® Option Wash Area The ProScrub® option wash area is needed in the upper rack, the third level rack can easily be removed. Easy To Remove Third Level Rack (on some models) If additional space is located at the...

Use & Care Guide
Page 17
..., the dishwasher will delay longer while heating cooler water. ■ Some options will add time to achieve good cleaning. See "Blinking Lights" in the drain or disposer. PROBLEM SOLUTION DISHWASHER DOES NOT RUN NOTE: It is normal for the dishwasher to ensure door is closed and latched. Adjust loading as cookie sheets, cutting boards, or large containers, etc., that the Overfill Protection Float is free from opening and closing the door before starting the cycle. See "Parts and...
..., the dishwasher will delay longer while heating cooler water. ■ Some options will add time to achieve good cleaning. See "Blinking Lights" in the drain or disposer. PROBLEM SOLUTION DISHWASHER DOES NOT RUN NOTE: It is normal for the dishwasher to ensure door is closed and latched. Adjust loading as cookie sheets, cutting boards, or large containers, etc., that the Overfill Protection Float is free from opening and closing the door before starting the cycle. See "Parts and...

Use & Care Guide
Page 18
... some models) for your water heater to be draining properly, see "Dishwasher Use" section). The dishwasher may be used daily, you can run , or use detergent. FOOD SOILS REMAIN ON DISHES Be sure the dishwasher is needed for tougher loads. SANITIZED LIGHT BLINKING If the sanitized light is blinking, the load is needed . See specific loading instructions within this error occurs, the controls will lock out and not allow another cycle to 120ºF (49°C). Call for service. The...
... some models) for your water heater to be draining properly, see "Dishwasher Use" section). The dishwasher may be used daily, you can run , or use detergent. FOOD SOILS REMAIN ON DISHES Be sure the dishwasher is needed for tougher loads. SANITIZED LIGHT BLINKING If the sanitized light is blinking, the load is needed . See specific loading instructions within this error occurs, the controls will lock out and not allow another cycle to 120ºF (49°C). Call for service. The...

Use & Care Guide
Page 19
... clean. 19 PROBLEM CLOUDY OR SPOTTED DISHWARE (AND HARD WATER SOLUTION) ETCHING (PERMANENT CLOUDINESS) LEAKING WATER TUB IS DISCOLORED SOLUTION NOTES: ■ Liquid rinse aid is necessary for 5 minutes. Confirm that is too hot, from the dispenser, be used to hard water. Be sure the incoming water temperature is permanently damaged. To remove spotting, run a vinegar rinse through the dishwasher. ■ Wash and rinse the affected dishware and load...
... clean. 19 PROBLEM CLOUDY OR SPOTTED DISHWARE (AND HARD WATER SOLUTION) ETCHING (PERMANENT CLOUDINESS) LEAKING WATER TUB IS DISCOLORED SOLUTION NOTES: ■ Liquid rinse aid is necessary for 5 minutes. Confirm that is too hot, from the dispenser, be used to hard water. Be sure the incoming water temperature is permanently damaged. To remove spotting, run a vinegar rinse through the dishwasher. ■ Wash and rinse the affected dishware and load...

Use & Care Guide
Page 20
... major appliance is installed, operated and maintained according to instructions attached to : KitchenAid Customer eXperience Center In the U.S.A., call 1-800-422-1230. light bulbs, batteries, air or water filters, SECOND THROUGH FIFTH YEAR LIMITED WARRANTY etc.). (CERTAIN COMPONENT PARTS ONLY - attached to or furnished with the product, KitchenAid will pay for the following components to LIFETIME LIMITED WARRANTY (STAINLESS STEEL TUB AND INNER DOOR LINER ONLY) 9. Cosmetic...
... major appliance is installed, operated and maintained according to instructions attached to : KitchenAid Customer eXperience Center In the U.S.A., call 1-800-422-1230. light bulbs, batteries, air or water filters, SECOND THROUGH FIFTH YEAR LIMITED WARRANTY etc.). (CERTAIN COMPONENT PARTS ONLY - attached to or furnished with the product, KitchenAid will pay for the following components to LIFETIME LIMITED WARRANTY (STAINLESS STEEL TUB AND INNER DOOR LINER ONLY) 9. Cosmetic...

Warranty Information
Page 1
... years from the date of the product. house wiring, fuses or water inlet hoses). light bulbs, batteries, air or water filters, SECOND THROUGH FIFTH YEAR LIMITED WARRANTY etc.). (CERTAIN COMPONENT PARTS ONLY - For the lifetime of the product from the date of household electrical or plumbing (i.e. trim, decorative panels, flooring, cabinetry, islands, countertops, drywall, etc.) that comes with the product, KitchenAid will pay for the following components...
... years from the date of the product. house wiring, fuses or water inlet hoses). light bulbs, batteries, air or water filters, SECOND THROUGH FIFTH YEAR LIMITED WARRANTY etc.). (CERTAIN COMPONENT PARTS ONLY - For the lifetime of the product from the date of household electrical or plumbing (i.e. trim, decorative panels, flooring, cabinetry, islands, countertops, drywall, etc.) that comes with the product, KitchenAid will pay for the following components...


