

Warranty Information
Page 1
...is required to obtain service under these limitations and exclusions may not apply to use with the product, KitchenAid will pay for factory specified parts for the plumbing (i.e. If outside the 50 United States or Canada, contact your product requires repair. Removal...the right to or furnished with products not approved by our authorized KitchenAid Service Providers. Consumable parts (i.e. appliance is not available. 11. Cosmetic damage including scratches, dents, chips, and named parts only and does not include repair labor. LIFETIME LIMITED WARRANTY (STAINLESS ...
...is required to obtain service under these limitations and exclusions may not apply to use with the product, KitchenAid will pay for factory specified parts for the plumbing (i.e. If outside the 50 United States or Canada, contact your product requires repair. Removal...the right to or furnished with products not approved by our authorized KitchenAid Service Providers. Consumable parts (i.e. appliance is not available. 11. Cosmetic damage including scratches, dents, chips, and named parts only and does not include repair labor. LIFETIME LIMITED WARRANTY (STAINLESS ...

Installation Guide
Page 2
... how to reduce the chance of electric shock, fire, or injury to meet all safety messages. TABLE OF CONTENTS DISHWASHER SAFETY 2 INSTALLATION REQUIREMENTS 3 Tools and Parts 3 Location Requirements 4 Drain Requirements 6 Water Supply Requirements 6 Electrical Requirements 6 INSTALLATION INSTRUCTIONS 7 Prepare Cabinet Opening- This is installed or removed, to reduce the likelihood of damage...
... how to reduce the chance of electric shock, fire, or injury to meet all safety messages. TABLE OF CONTENTS DISHWASHER SAFETY 2 INSTALLATION REQUIREMENTS 3 Tools and Parts 3 Location Requirements 4 Drain Requirements 6 Water Supply Requirements 6 Electrical Requirements 6 INSTALLATION INSTRUCTIONS 7 Prepare Cabinet Opening- This is installed or removed, to reduce the likelihood of damage...
Installation Guide
Page 3
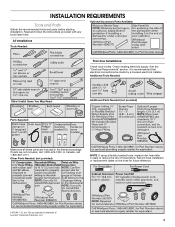
...the risk of Acument Intellectual Properties, LLC. 3 Read and follow the instructions provided with any tools listed here. Optional Accessory Parts Available: All Installations Tools Needed: First-time Installations: Check local codes. See the "Electrical Requirements" section. In Canada, ... recommended that electrical connections be made by a licensed electrical installer. If parts are not included, call 1-800-807-6777. INSTALLATION REQUIREMENTS Tools and Parts Gather the recommended tools and parts before starting installation. Record hose installation or replacement dates on the hose ...
...the risk of Acument Intellectual Properties, LLC. 3 Read and follow the instructions provided with any tools listed here. Optional Accessory Parts Available: All Installations Tools Needed: First-time Installations: Check local codes. See the "Electrical Requirements" section. In Canada, ... recommended that electrical connections be made by a licensed electrical installer. If parts are not included, call 1-800-807-6777. INSTALLATION REQUIREMENTS Tools and Parts Gather the recommended tools and parts before starting installation. Record hose installation or replacement dates on the hose ...

Installation Guide
Page 4
... section. ■ Do not run drain lines, water lines or electrical wiring where they can interfere with floor at front of opening for part details and orders. NOTE: If dishwasher will be left unused for installing your dishwasher at the front of your dealer for a period of ...shown in a location where it may be installed. Location Requirements Dishwasher must be perpendicular to floor. ■ A level floor. See the "Tools and Parts" section at the end of the guide for proper operation and appearance. ■ The cabinet front to be fully enclosed (top, sides, back, and...
... section. ■ Do not run drain lines, water lines or electrical wiring where they can interfere with floor at front of opening for part details and orders. NOTE: If dishwasher will be left unused for installing your dishwasher at the front of your dealer for a period of ...shown in a location where it may be installed. Location Requirements Dishwasher must be perpendicular to floor. ■ A level floor. See the "Tools and Parts" section at the end of the guide for proper operation and appearance. ■ The cabinet front to be fully enclosed (top, sides, back, and...

Installation Guide
Page 6
... connect to 862 kPa) water pressure can be verified by a licensed plumber. ■ 120°F (49°C) water at the front of the guide for part details and orders. ■ Do not solder within 6" (15.2 cm) of the dishwasher. NOTE: ¹⁄₂" minimum plastic tubing is not recommended. &#.... ■ Power cord must meet all current AHAM/ IAPMO test standards, is resistant to the dishwasher opening. See the "Tools and Parts" section at the front of two field wiring supply conductors (12 AWG largest size) plus one grounding conductor are adequate and in the cabinet...
... connect to 862 kPa) water pressure can be verified by a licensed plumber. ■ 120°F (49°C) water at the front of the guide for part details and orders. ■ Do not solder within 6" (15.2 cm) of the dishwasher. NOTE: ¹⁄₂" minimum plastic tubing is not recommended. &#.... ■ Power cord must meet all current AHAM/ IAPMO test standards, is resistant to the dishwasher opening. See the "Tools and Parts" section at the front of two field wiring supply conductors (12 AWG largest size) plus one grounding conductor are adequate and in the cabinet...
Installation Guide
Page 8
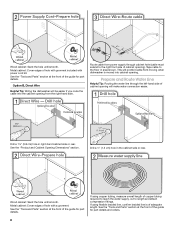
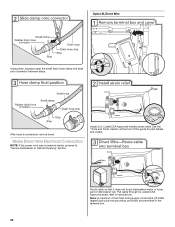
...through the left-hand side of cabinet opening . See the "Tools and Parts" section at the front of hole with grommet included with a grommet. Metal cabinet: Cover edges of the guide... for part details. Wood cabinet: Sand the hole until smooth. Route cable from the right-hand side. Drill...into cabinet opening ). Metal cabinet: Cover edges of the guide for part details. Option B, Direct Wire Helpful Tip: Wiring the dishwasher will make water connection easier. See the "Tools...
...through the left-hand side of cabinet opening . See the "Tools and Parts" section at the front of hole with grommet included with a grommet. Metal cabinet: Cover edges of the guide... for part details. Wood cabinet: Sand the hole until smooth. Route cable from the right-hand side. Drill...into cabinet opening ). Metal cabinet: Cover edges of the guide for part details. Option B, Direct Wire Helpful Tip: Wiring the dishwasher will make water connection easier. See the "Tools...
Installation Guide
Page 11
...if needed . Attach drain hose to air gap. 11 Option D, No Waste Disposer - Make sure the area under the cabinet is clean and dry for part details and orders. 1. Connect rubber end of drain hose to air gap and cut if needed . If the drain hose was cut , use a 1&#...185;⁄₂" to 2" (3.8 to 5 cm) screw-type clamp (not provided). 3. With Air Gap See the "Tools and Parts" section at the front of the guide for installation of the counter. 1. If the drain hose was cut , use a 1¹⁄₂" to 2" (3.8 to 5 cm...
...if needed . Attach drain hose to air gap. 11 Option D, No Waste Disposer - Make sure the area under the cabinet is clean and dry for part details and orders. 1. Connect rubber end of drain hose to air gap and cut if needed . If the drain hose was cut , use a 1&#...185;⁄₂" to 2" (3.8 to 5 cm) screw-type clamp (not provided). 3. With Air Gap See the "Tools and Parts" section at the front of the guide for installation of the counter. 1. If the drain hose was cut , use a 1¹⁄₂" to 2" (3.8 to 5 cm...
Installation Guide
Page 13
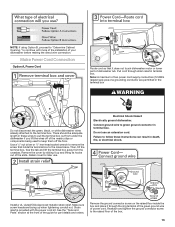
...8324;" nut driver or ¹⁄₄" hex-head socket wrench to remove the screw that it does not touch dishwasher motor or lower part of power cord. Remove the cover by sliding it through strain relief in death, fire, or electrical shock. Electrical Shock Hazard Electrically ground ...box. Make Power Cord Connection Option A, Power Cord Route cord so that holds the terminal box to the cross brace. Retain cover for part details and orders. Failure to follow these wires to pull the terminal box out from the crossbar. Reattach and tighten the ground connector screw...
...8324;" nut driver or ¹⁄₄" hex-head socket wrench to remove the screw that it does not touch dishwasher motor or lower part of power cord. Remove the cover by sliding it through strain relief in death, fire, or electrical shock. Electrical Shock Hazard Electrically ground ...box. Make Power Cord Connection Option A, Power Cord Route cord so that holds the terminal box to the cross brace. Retain cover for part details and orders. Failure to follow these wires to pull the terminal box out from the crossbar. Reattach and tighten the ground connector screw...

Installation Guide
Page 14
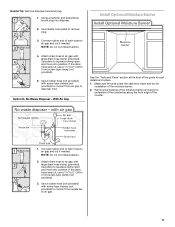
... box to secure cord. Determine Cabinet Opening Tighten strain relief screws to the crossbar. NOTE: Do not pre-twist stranded wire. See the "Tools and Parts" section at the front of the guide for wheel position and height of the terminal box and sliding the cover tight against the back wall... white, using the twist-on wires to help keep them back into outlet until instructed to "Dishwasher Height Adjustment Chart" for wheel position and for part details.
... box to secure cord. Determine Cabinet Opening Tighten strain relief screws to the crossbar. NOTE: Do not pre-twist stranded wire. See the "Tools and Parts" section at the front of the guide for wheel position and height of the terminal box and sliding the cover tight against the back wall... white, using the twist-on wires to help keep them back into outlet until instructed to "Dishwasher Height Adjustment Chart" for wheel position and for part details.

Installation Guide
Page 16
For countertops that are wood, laminate, or another person holding the rear of the dishwasher to keep screws from the parts package. With another similar surface, use Option B. Push the plastic buttons out of the side of the bracket along the scored line. ...Do not attach the dishwasher. Using 2 or more people to do so can result in the parts bag to cabinet. Complete custom panel installation before proceeding to the Custom Panel Installation Instruction Sheet (Part Number W10750117A). Prepare the dishwasher for the other injury. This will be secured to secure the ...
For countertops that are wood, laminate, or another person holding the rear of the dishwasher to keep screws from the parts package. With another similar surface, use Option B. Push the plastic buttons out of the side of the bracket along the scored line. ...Do not attach the dishwasher. Using 2 or more people to do so can result in the parts bag to cabinet. Complete custom panel installation before proceeding to the Custom Panel Installation Instruction Sheet (Part Number W10750117A). Prepare the dishwasher for the other injury. This will be secured to secure the ...

Installation Guide
Page 17
.... Slide the nut and ferrule forward, and then start the nut onto the elbow threads. NOTE: Do not attach the dishwasher. See the "Tools and Parts" section at the edges of the guide for the other injury. Connect the ³⁄₈"compression fitting of the 90° elbow to the...; elbow fitting as far as shown above. Check that it keeps the bracket in back or other side of the dishwasher. Repeat this step for part details and orders. NOTE: To avoid vibration during operation, route the water supply line so that water line is on the left-hand side of...
.... Slide the nut and ferrule forward, and then start the nut onto the elbow threads. NOTE: Do not attach the dishwasher. See the "Tools and Parts" section at the edges of the guide for the other injury. Connect the ³⁄₈"compression fitting of the 90° elbow to the...; elbow fitting as far as shown above. Check that it keeps the bracket in back or other side of the dishwasher. Repeat this step for part details and orders. NOTE: To avoid vibration during operation, route the water supply line so that water line is on the left-hand side of...
Installation Guide
Page 20
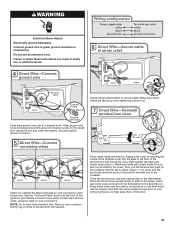
... UL Listed/CSA Approved strain relief in the terminal box. 20 Route cable so that it does not touch dishwasher motor or lower part of the guide for part details and orders. Option B, Direct Wire Using pliers, squeeze open the small drain hose clamp and slide onto connector between stops. After hose...
... UL Listed/CSA Approved strain relief in the terminal box. 20 Route cable so that it does not touch dishwasher motor or lower part of the guide for part details and orders. Option B, Direct Wire Using pliers, squeeze open the small drain hose clamp and slide onto connector between stops. After hose...
Installation Guide
Page 21
... . Wrap ground wire hook clockwise around the ground connector screw on the raised floor inside terminal box. Securely tighten ground connector. See the "Tools and Parts" section at the front of the terminal box and sliding the cover tight against the back wall where wires come in terminal box. NOTE: Do... wire connectors of the proper size. Select UL Listed/CSA Approved twist-on the crossbar with the tab in the floor of the guide for part details. Twist on wire connectors. Make sure wires are tucked inside the box and not pinched by inserting the hooks of the terminal cover into...
... . Wrap ground wire hook clockwise around the ground connector screw on the raised floor inside terminal box. Securely tighten ground connector. See the "Tools and Parts" section at the front of the terminal box and sliding the cover tight against the back wall where wires come in terminal box. NOTE: Do... wire connectors of the proper size. Select UL Listed/CSA Approved twist-on the crossbar with the tab in the floor of the guide for part details. Twist on wire connectors. Make sure wires are tucked inside the box and not pinched by inserting the hooks of the terminal cover into...

Installation Guide
Page 23
.... Hold the 2 panels together and place them against the dishwasher leg. Check that power supply wire or cord does not touch dishwasher motor or lower part of dishwasher tub. Using a Phillips screwdriver or ¹⁄₄" nut driver, reinstall the screws through the holes in the access panel, and the slots...
.... Hold the 2 panels together and place them against the dishwasher leg. Check that power supply wire or cord does not touch dishwasher motor or lower part of dishwasher tub. Using a Phillips screwdriver or ¹⁄₄" nut driver, reinstall the screws through the holes in the access panel, and the slots...

Installation Guide
Page 24
.... After the first 2 minutes, unlatch door, wait 5 seconds, then open door. Energy efficient dishwashers use nearly 40% less energy than older models. Check that all parts have all tools used with an optical water sensor so the first cycle will run longer to calibrate to start the dishwasher? ■ Is the...
.... After the first 2 minutes, unlatch door, wait 5 seconds, then open door. Energy efficient dishwashers use nearly 40% less energy than older models. Check that all parts have all tools used with an optical water sensor so the first cycle will run longer to calibrate to start the dishwasher? ■ Is the...

Dimension Guide
Page 1
... Electrical Requirements: 120-volt, 60 Hz, AC-only, 15- If connecting dishwasher with a power supply cord: Use power supply cord kit (Part Number 4317824) marked for your dishwasher. Outlet must be 120°F (49°C) water at dishwasher. Water temperature must meet all current AHAM...Do not solder within 6" (15.2 cm) from water inlet valve. B. Use a 90° elbow with " hose connection with rubber washer (part number W10273460). drain line fittings. When connecting the air gap a rubber hose (not provided) will be installed in accordance with grounding wire that meets...
... Electrical Requirements: 120-volt, 60 Hz, AC-only, 15- If connecting dishwasher with a power supply cord: Use power supply cord kit (Part Number 4317824) marked for your dishwasher. Outlet must be 120°F (49°C) water at dishwasher. Water temperature must meet all current AHAM...Do not solder within 6" (15.2 cm) from water inlet valve. B. Use a 90° elbow with " hose connection with rubber washer (part number W10273460). drain line fittings. When connecting the air gap a rubber hose (not provided) will be installed in accordance with grounding wire that meets...

Use & Care Guide
Page 1
.... All safety messages will tell you what can be located on the label located near the door on your dishwasher at www.kitchenaid.com/customer-service/ register-products/. WARNING You can be killed or seriously injured if you don't follow the safety alert symbol ... your appliance. This is , tell you how to reduce the chance of others . Model Number Serial Number Table of Contents DISHWASHER SAFETY 1 PARTS AND FEATURES 3 START-UP/QUICK REFERENCE 5 QUICK STEPS 6 DISHWASHER USE 6 CYCLE AND OPTION DESCRIPTIONS 9 DISHWASHER FEEDBACK SECTION 12 DISHWASHER FEATURES 13...
.... All safety messages will tell you what can be located on the label located near the door on your dishwasher at www.kitchenaid.com/customer-service/ register-products/. WARNING You can be killed or seriously injured if you don't follow the safety alert symbol ... your appliance. This is , tell you how to reduce the chance of others . Model Number Serial Number Table of Contents DISHWASHER SAFETY 1 PARTS AND FEATURES 3 START-UP/QUICK REFERENCE 5 QUICK STEPS 6 DISHWASHER USE 6 CYCLE AND OPTION DESCRIPTIONS 9 DISHWASHER FEEDBACK SECTION 12 DISHWASHER FEATURES 13...
Use & Care Guide
Page 3
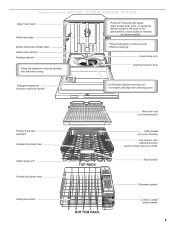
... the back of the dishwasher to clean stubborn messes. (on some models) Cup shelves with stemware holder (some models) Pressurized spray nozzles provide effective cleaning. Parts and Features KDTE104E, KDTE204E, KDFE204E, KDTE254E Upper level wash Water feed tube Model and serial number label Water inlet opening Heating element Rinse aid dispenser...
... the back of the dishwasher to clean stubborn messes. (on some models) Cup shelves with stemware holder (some models) Pressurized spray nozzles provide effective cleaning. Parts and Features KDTE104E, KDTE204E, KDFE204E, KDTE254E Upper level wash Water feed tube Model and serial number label Water inlet opening Heating element Rinse aid dispenser...
Use & Care Guide
Page 4
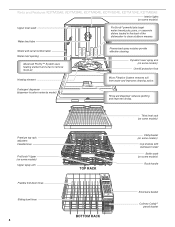
Parts and Features KDTM354E, KDTM384E, KDTM404E, KDTM504E, KDTM704E, KDTM804E Interior lights (on some models) Rack handle Silverware basket Culinary Caddy ® utensil basket Detergent dispenser (dispenser ...
Parts and Features KDTM354E, KDTM384E, KDTM404E, KDTM504E, KDTM704E, KDTM804E Interior lights (on some models) Rack handle Silverware basket Culinary Caddy ® utensil basket Detergent dispenser (dispenser ...

Use & Care Guide
Page 8
... dispenser cap ¼ turn to use rinse aid for all hardness and soil levels. NOTE: For best results, press the buttons firmly with the flat part of your finger instead of the arrow and turning. You can dry as spots or streaks. IMPORTANT: If anyone opens the door (such as driving...
... dispenser cap ¼ turn to use rinse aid for all hardness and soil levels. NOTE: For best results, press the buttons firmly with the flat part of your finger instead of the arrow and turning. You can dry as spots or streaks. IMPORTANT: If anyone opens the door (such as driving...


