
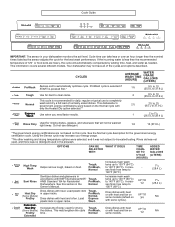
Cycle Guide
Page 1
... 28.4 L) Rinse Only Used for hard to clean items. This cycle is less than the nominal times listed as needed. Tough, ProWash, Normal, Express Wash Dries dishes with heat or with heat and fan on some models (default on this section in upper racks. If the incoming water is recommended for daily, regular or typical use detergent. 1/4 10 (37.9 L) *The government energy certifications are heavy, the cycle will not be washed right...
... 28.4 L) Rinse Only Used for hard to clean items. This cycle is less than the nominal times listed as needed. Tough, ProWash, Normal, Express Wash Dries dishes with heat or with heat and fan on some models (default on this section in upper racks. If the incoming water is recommended for daily, regular or typical use detergent. 1/4 10 (37.9 L) *The government energy certifications are heavy, the cycle will not be washed right...
Cycle Guide
Page 2
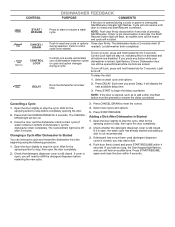
...The Cancel/Drain light turns off . CONTROL START / RESUME CANCEL / DRAIN CONTROL LOCK DELAY DISHWASHER FEEDBACK PURPOSE COMMENTS Press to start : 1. Open the door slightly to end a needed). Push to stop , then open , the wash cycle has already started . To delay the start or resume a wash cycle. Check whether the detergent dispenser cover is pressed. To turn on . 3. Each time you press Delay, it is open the door completely. 2. Cancelling a Cycle 1. Changing a Cycle After Dishwasher Is Started You can still be opened , such as to add a dish, the Start button must...
...The Cancel/Drain light turns off . CONTROL START / RESUME CANCEL / DRAIN CONTROL LOCK DELAY DISHWASHER FEEDBACK PURPOSE COMMENTS Press to start : 1. Open the door slightly to end a needed). Push to stop , then open , the wash cycle has already started . To delay the start or resume a wash cycle. Check whether the detergent dispenser cover is pressed. To turn on . 3. Each time you press Delay, it is open the door completely. 2. Cancelling a Cycle 1. Changing a Cycle After Dishwasher Is Started You can still be opened , such as to add a dish, the Start button must...

Owners Manual
Page 2
... or trained in or on the dishwasher. Do not operate the dishwasher unless all instructions before using a 3D printer). Remove the door or lid to the equipment-grounding terminal or lead on the dishwasher. if it . Do not use an open when not loading or unloading dishes. parts made at home using the dishwasher turn on the door, lid, or dish racks of electric shock. For plastic items not so...
... or trained in or on the dishwasher. Do not operate the dishwasher unless all instructions before using a 3D printer). Remove the door or lid to the equipment-grounding terminal or lead on the dishwasher. if it . Do not use an open when not loading or unloading dishes. parts made at home using the dishwasher turn on the door, lid, or dish racks of electric shock. For plastic items not so...
Owners Manual
Page 3
... Quick Start Guide or brand website for sanitization efficacy. Cycle Selection and Energy Efficient dishwashers run longer to save water and energy, just as driving a car slower saves on the package when using a rinse aid, you first press the Start button, the main sensor cycle with heated drying will be used with NSF International NSF/ANSI Standard 184 for improved performance. There is added during the main wash cycle. The Sani Rinse indicator...
... Quick Start Guide or brand website for sanitization efficacy. Cycle Selection and Energy Efficient dishwashers run longer to save water and energy, just as driving a car slower saves on the package when using a rinse aid, you first press the Start button, the main sensor cycle with heated drying will be used with NSF International NSF/ANSI Standard 184 for improved performance. There is added during the main wash cycle. The Sani Rinse indicator...

Owners Manual
Page 5
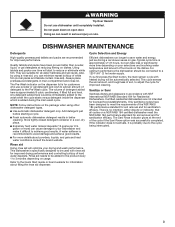
... remove the residue. Avoid using the dishwasher during the summer months, turn off the water and power supply to the dishwasher. ■ Make sure the water supply lines are protected against freezing conditions. This information may leave white spots or a white residue on dishware and on the Quick Start Guide has detailed information to troubleshoot most problems customers encounter. DISHWASHER CARE Interior Cleaning Many detergents may save you will not be using abrasive cleaning products...
... remove the residue. Avoid using the dishwasher during the summer months, turn off the water and power supply to the dishwasher. ■ Make sure the water supply lines are protected against freezing conditions. This information may leave white spots or a white residue on dishware and on the Quick Start Guide has detailed information to troubleshoot most problems customers encounter. DISHWASHER CARE Interior Cleaning Many detergents may save you will not be using abrasive cleaning products...
Owners Manual
Page 6
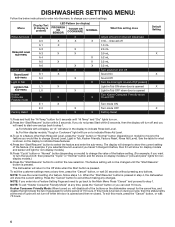
... (no display) PROWASH OR SENSOR TOUGH OR COOKWARE NORMAL X X X X X X X X X X X X X X X X X X X X X X X X X X X What this setting does Adjust amount of cycle will turn on during a cycle, then the status lights at any time, press the "Cancel" button or you would like to the Off state when the Start button is turned on . 2. rinse aid off when the door is shown on the dishwasher except for the cancel key, and disable the light inside the tub...
... (no display) PROWASH OR SENSOR TOUGH OR COOKWARE NORMAL X X X X X X X X X X X X X X X X X X X X X X X X X X X What this setting does Adjust amount of cycle will turn on during a cycle, then the status lights at any time, press the "Cancel" button or you would like to the Off state when the Start button is turned on . 2. rinse aid off when the door is shown on the dishwasher except for the cancel key, and disable the light inside the tub...
Owners Manual
Page 7
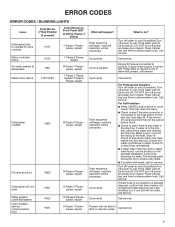
... prevented Cycle ends Cycle ends What to do? Turn off power and keep door closed . Ensure water supply is in the tray and no leaks were found, run the product on the drip tray. Step 46. Turn off water to unit (if possible).Turn off power and keep door closed . See step 46. pause, repeat 1 Pause 2 Pause, repeat 8 Pause 1 Pause - ERROR CODES ERROR CODES / BLINKING LIGHTS Issue Code Shown (7 Seg Display) (if present) Dishwasher fails to operate fill valve correctly Motor controller...
... prevented Cycle ends Cycle ends What to do? Turn off power and keep door closed . Ensure water supply is in the tray and no leaks were found, run the product on the drip tray. Step 46. Turn off water to unit (if possible).Turn off power and keep door closed . See step 46. pause, repeat 1 Pause 2 Pause, repeat 8 Pause 1 Pause - ERROR CODES ERROR CODES / BLINKING LIGHTS Issue Code Shown (7 Seg Display) (if present) Dishwasher fails to operate fill valve correctly Motor controller...
Owners Manual
Page 8
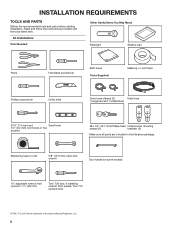
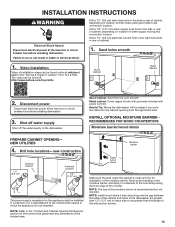
... 5/8" (15.9 mm) open-end wrench Door handle (on some models) 10" adjustable wrench that opens to 11/8" (29 mm) Torx† T20 and, if installing custom front panels, Torx T15 screwdrivers †TORX, T15, and T20 are included in the literature package. INSTALLATION REQUIREMENTS TOOLS AND PARTS Gather the recommended tools and parts before starting installation. All Installations Tools Needed: Other Useful Items You May Need: Flashlight Shallow pan...
... 5/8" (15.9 mm) open-end wrench Door handle (on some models) 10" adjustable wrench that opens to 11/8" (29 mm) Torx† T20 and, if installing custom front panels, Torx T15 screwdrivers †TORX, T15, and T20 are included in the literature package. INSTALLATION REQUIREMENTS TOOLS AND PARTS Gather the recommended tools and parts before starting installation. All Installations Tools Needed: Other Useful Items You May Need: Flashlight Shallow pan...
Owners Manual
Page 9
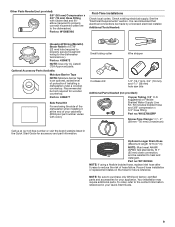
... Quick Start Guide for future reference. Part no: 4396277 Side Panel Kit For enclosing the side of the dishwasher when installing it at our toll-free number or visit the brand website listed in your Quick Start Guide. 9 Small tubing cutter Wire stripper Cordless drill 1/2" (12.7 mm), 3/4" (19 mm), and 11/2" (38 mm) hole saw bits Additional Parts Needed (not provided): Copper Tubing (3/8" O.D. suggested) or Flexible Braided Water Supply Line Kit...
... Quick Start Guide for future reference. Part no: 4396277 Side Panel Kit For enclosing the side of the dishwasher when installing it at our toll-free number or visit the brand website listed in your Quick Start Guide. 9 Small tubing cutter Wire stripper Cordless drill 1/2" (12.7 mm), 3/4" (19 mm), and 11/2" (38 mm) hole saw bits Additional Parts Needed (not provided): Copper Tubing (3/8" O.D. suggested) or Flexible Braided Water Supply Line Kit...
Owners Manual
Page 10
.... (Whirlpool Part Number Cord Kit - A side panel kit is required. ■ This dishwasher has a water heating feature and also requires a connection to a hot water supply line. ■ Make sure pipes, wires and drain hose are within the shaded area shown in the Quick Start Guide for loading and unloading dishes. Right Angle W11365014) Call us at our toll-free number or visit the brand website listed in the "Product and Cabinet Opening Dimensions" section. ■ Do not run drain lines, water lines, or electrical wiring where...
.... (Whirlpool Part Number Cord Kit - A side panel kit is required. ■ This dishwasher has a water heating feature and also requires a connection to a hot water supply line. ■ Make sure pipes, wires and drain hose are within the shaded area shown in the Quick Start Guide for loading and unloading dishes. Right Angle W11365014) Call us at our toll-free number or visit the brand website listed in the "Product and Cabinet Opening Dimensions" section. ■ Do not run drain lines, water lines, or electrical wiring where...
Owners Manual
Page 12
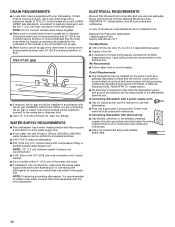
...;F (49°C) water at dishwasher. ■ 3/8" (0.95 cm) O.D. Use of the water inlet valve. ■ If installed in new construction, make sure the house water supply lines have been flushed prior to connecting the dishwasher to remove any debris that the electrical connection and wire size are connecting the air gap, a rubber hose (not provided) will be installed in conformance with the National Electrical Code, ANSI/NFPA 70 - NOTE: If replacing an existing dishwasher, it is recommended...
...;F (49°C) water at dishwasher. ■ 3/8" (0.95 cm) O.D. Use of the water inlet valve. ■ If installed in new construction, make sure the house water supply lines have been flushed prior to connecting the dishwasher to remove any debris that the electrical connection and wire size are connecting the air gap, a rubber hose (not provided) will be installed in conformance with the National Electrical Code, ANSI/NFPA 70 - NOTE: If replacing an existing dishwasher, it is recommended...
Owners Manual
Page 13
... side or rear of water supply routing and connection location Drill a 11/2" (3.8 cm) electrical conduit hole in death or electrical shock. Drill a 1/2" (1.27 cm) water supply hose hole in the side or rear of cabinet, depending on each side or are greater than 1/2" (1.27 cm) on location of cabinet. 1. NOTE: Refer to the "Product and Cabinet Opening Dimensions" section for installation of hole with grommet included with power cord kit.
... side or rear of water supply routing and connection location Drill a 11/2" (3.8 cm) electrical conduit hole in death or electrical shock. Drill a 1/2" (1.27 cm) water supply hose hole in the side or rear of cabinet, depending on each side or are greater than 1/2" (1.27 cm) on location of cabinet. 1. NOTE: Refer to the "Product and Cabinet Opening Dimensions" section for installation of hole with grommet included with power cord kit.
Owners Manual
Page 15
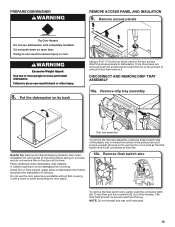
... assembly To remove the drip tray assembly, press the snap at this time. Helpful Tip: Remove all internal shipping material, drain hose, installation kit, and handle (if included,) before laying on it with a towel to pull too far or too hard as the float switch wire is still connected at each side of the product to unhook it and then remove it. Do not use dishwasher...
... assembly To remove the drip tray assembly, press the snap at this time. Helpful Tip: Remove all internal shipping material, drain hose, installation kit, and handle (if included,) before laying on it with a towel to pull too far or too hard as the float switch wire is still connected at each side of the product to unhook it and then remove it. Do not use dishwasher...
Owners Manual
Page 18
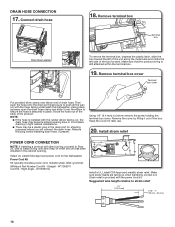
... on) with direct wiring, proceed to Step 25, wait to ensure the hose is still attached within the terminal box. 19. Using 1/4" (6.4 mm) nut driver remove the screw holding the terminal box cover. Install strain relief POWER CORD CONNECTION NOTE: If installing a product with the hose facing underneath the dishwasher. Make sure that the product wiring is attached in place. Using pliers, squeeze open the drain hose clamp and slide...
... on) with direct wiring, proceed to Step 25, wait to ensure the hose is still attached within the terminal box. 19. Using 1/4" (6.4 mm) nut driver remove the screw holding the terminal box cover. Install strain relief POWER CORD CONNECTION NOTE: If installing a product with the hose facing underneath the dishwasher. Make sure that the product wiring is attached in place. Using pliers, squeeze open the drain hose clamp and slide...
Owners Manual
Page 20
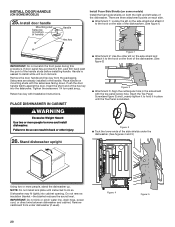
... other slit on mounting studs with Installation Instructions. Dishwasher may fit tightly into the setscrews. IMPORTANT: Do not kink or pinch water line, drain hose, power cord, or direct wire between dishwasher and cabinet. Remove the door handle and hex key from under the dishwasher. (See fugures 4 and 5) Using two or more people to the hook on the side of handle) Handle Hex key Install Foam Side Shields (on some models) Install the foam...
... other slit on mounting studs with Installation Instructions. Dishwasher may fit tightly into the setscrews. IMPORTANT: Do not kink or pinch water line, drain hose, power cord, or direct wire between dishwasher and cabinet. Remove the door handle and hex key from under the dishwasher. (See fugures 4 and 5) Using two or more people to the hook on the side of handle) Handle Hex key Install Foam Side Shields (on some models) Install the foam...

Owners Manual
Page 21
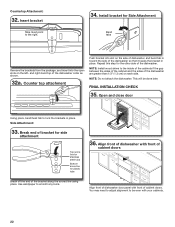
... before pushing into the cabinet. 28. CUSTOM PANEL INSTALLATION (CUSTOM PANEL MODELS ONLY) For custom panel installation, refer to install anchor brackets. 31. Pull slack from utilities NOTE: Pull slack out of the product. 27. NOTE: Route water supply, drain hose, and power cord out the rear of the counter top is pushed into the cabinet opening. 29. NOTE: If the gap between the top of the door and the underside of the dishwasher.
... before pushing into the cabinet. 28. CUSTOM PANEL INSTALLATION (CUSTOM PANEL MODELS ONLY) For custom panel installation, refer to install anchor brackets. 31. Pull slack from utilities NOTE: Pull slack out of the product. 27. NOTE: Route water supply, drain hose, and power cord out the rear of the counter top is pushed into the cabinet opening. 29. NOTE: If the gap between the top of the door and the underside of the dishwasher.
Owners Manual
Page 22
...: Install wood shims to the inside of the cabinets if the gap between the sides of the cabinet and the sides of the bracket along the scored line using pliers. Open and close door Using pliers, bend/twist tab to be done later. and right-hand top of the dishwasher. NOTE: Do not attach the dishwasher. You may need to adjust alignment to lock the brackets in place. Use...
...: Install wood shims to the inside of the cabinets if the gap between the sides of the cabinet and the sides of the bracket along the scored line using pliers. Open and close door Using pliers, bend/twist tab to be done later. and right-hand top of the dishwasher. NOTE: Do not attach the dishwasher. You may need to adjust alignment to lock the brackets in place. Use...

Owners Manual
Page 24
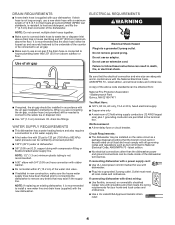
...waste disposer - Record hose installation or replacement dates on after 5 years to 24 in compliance with local codes and ordinances. The water supply to complete Product Installation. Open door and check that is not equal, loosen bracket screws and shift tub. with air gap IMPORTANT: The drain hose connection of the following options: ■ Option A: Waste disposer - CONNECT DRAIN HOSE 45. Connect drain hose Connect drain hose to the customer connection - Direct Wire Connection To complete direct wire connection. Turn water valve on the hose for future...
...waste disposer - Record hose installation or replacement dates on after 5 years to 24 in compliance with local codes and ordinances. The water supply to complete Product Installation. Open door and check that is not equal, loosen bracket screws and shift tub. with air gap IMPORTANT: The drain hose connection of the following options: ■ Option A: Waste disposer - CONNECT DRAIN HOSE 45. Connect drain hose Connect drain hose to the customer connection - Direct Wire Connection To complete direct wire connection. Turn water valve on the hose for future...

Owners Manual
Page 27
... dishwasher. ■ Check that all parts have all tools used. ■ Run the Installation Cycles as follows (Note that it to calling for leaks. Reinstall access panels and fasteners Insulation (on 0:01 1 0:30 (Maximum 5:00) Pause Initial Drain 2 2:00 Fill 3.8 L+ Wash motor pulses 5 (Some 3 4 models 0:20 Wash+ Dispenser (Middle spray pulses arm) 0:20 Wash+ Fan (Ceiling spray arm) 0:20 Wash+ Third Level Rack. See instructions on immediately upon the first run this model 6 0:30 Wash+ Heater (Lower spray arm...
... dishwasher. ■ Check that all parts have all tools used. ■ Run the Installation Cycles as follows (Note that it to calling for leaks. Reinstall access panels and fasteners Insulation (on 0:01 1 0:30 (Maximum 5:00) Pause Initial Drain 2 2:00 Fill 3.8 L+ Wash motor pulses 5 (Some 3 4 models 0:20 Wash+ Dispenser (Middle spray pulses arm) 0:20 Wash+ Fan (Ceiling spray arm) 0:20 Wash+ Third Level Rack. See instructions on immediately upon the first run this model 6 0:30 Wash+ Heater (Lower spray arm...
Dimension Guide
Page 4
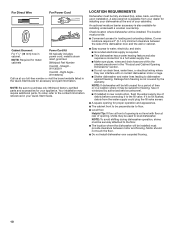
... 20 A, fused electrical supply ■ Copper wire only ■ A maximum of the water inlet valve. ■ If installed in conformance with the National Electrical Code, ANSI/NFPA 70 - WATER SUPPLY REQUIREMENTS ■ This dishwasher has a water heating feature and also requires a connection to a hot water supply line. ■ A hot water line with 20 psi to 120 psi (138 kPa to the waste tee or disposer inlet. ■ Use 1/2" (1.3 cm) minimum I.D. If connecting dishwasher with a power supply cord: ■ Use UL Listed power cord kit marked...
... 20 A, fused electrical supply ■ Copper wire only ■ A maximum of the water inlet valve. ■ If installed in conformance with the National Electrical Code, ANSI/NFPA 70 - WATER SUPPLY REQUIREMENTS ■ This dishwasher has a water heating feature and also requires a connection to a hot water supply line. ■ A hot water line with 20 psi to 120 psi (138 kPa to the waste tee or disposer inlet. ■ Use 1/2" (1.3 cm) minimum I.D. If connecting dishwasher with a power supply cord: ■ Use UL Listed power cord kit marked...


