
Installation Guide
Page 1
...INSTALLATION INSTRUCTIONS This product is suitable for further notes. This symbol alerts you don't follow instructions. W10247296B Table of Contents MICROWAVE HOOD COMBINATION SAFETY 1 INSTALLATION REQUIREMENTS 2 Tools and Parts 2 Remove Cardboard Template 2 Location Requirements 2 Product Dimensions 3... 8 Prepare Upper Cabinet 8 Install Damper Assembly 9 Install the Microwave Oven 9 Complete Installation 10 VENTING DESIGN SPECIFICATIONS 11 ASSISTANCE 12 Replacement Parts 12 Accessories 12 MICROWAVE HOOD COMBINATION SAFETY Your safety and the safety of your particular ...
...INSTALLATION INSTRUCTIONS This product is suitable for further notes. This symbol alerts you don't follow instructions. W10247296B Table of Contents MICROWAVE HOOD COMBINATION SAFETY 1 INSTALLATION REQUIREMENTS 2 Tools and Parts 2 Remove Cardboard Template 2 Location Requirements 2 Product Dimensions 3... 8 Prepare Upper Cabinet 8 Install Damper Assembly 9 Install the Microwave Oven 9 Complete Installation 10 VENTING DESIGN SPECIFICATIONS 11 ASSISTANCE 12 Replacement Parts 12 Accessories 12 MICROWAVE HOOD COMBINATION SAFETY Your safety and the safety of your particular ...

Installation Guide
Page 2
... Venting Installation Only: ■ If you are using a rectangular to round transition piece, the 3" (7.6 cm) clearance needs to exist above the microwave oven so that the materials used will be combined. Sheet metal screws (2) G. Location Requirements Check the opening . ■ Support for 1/4" x ... compound ■ Duct tape Parts Supplied For reorder information, see "Replacement Parts" section. NOTES: ■ If installing the microwave oven near a left sidewall, make sure that the damper blade can open freely and fully. NOTE: The hardware items listed ...
... Venting Installation Only: ■ If you are using a rectangular to round transition piece, the 3" (7.6 cm) clearance needs to exist above the microwave oven so that the materials used will be combined. Sheet metal screws (2) G. Location Requirements Check the opening . ■ Support for 1/4" x ... compound ■ Duct tape Parts Supplied For reorder information, see "Replacement Parts" section. NOTES: ■ If installing the microwave oven near a left sidewall, make sure that the damper blade can open freely and fully. NOTE: The hardware items listed ...

Installation Guide
Page 3
.... Do not use an extension cord. See "Electrical Requirements" section. Do not remove ground prong. Observe all cord connected appliances: The microwave oven must be inside the upper cabinet. Recommended: ■ A time-delay fuse or time-delay circuit breaker. ■ A separate circuit serving... ■ A 120 Volt, 60 Hz, AC only, 15- WARNING: Improper use an adapter. A. 2" x 4" wall stud B. Failure to whether the microwave oven is properly grounded. upper cabinet and side cabinet depth Electrical Shock Hazard Plug into an outlet that is typical for the electric current. Do...
.... Do not use an extension cord. See "Electrical Requirements" section. Do not remove ground prong. Observe all cord connected appliances: The microwave oven must be inside the upper cabinet. Recommended: ■ A time-delay fuse or time-delay circuit breaker. ■ A separate circuit serving... ■ A 120 Volt, 60 Hz, AC only, 15- WARNING: Improper use an adapter. A. 2" x 4" wall stud B. Failure to whether the microwave oven is properly grounded. upper cabinet and side cabinet depth Electrical Shock Hazard Plug into an outlet that is typical for the electric current. Do...

Installation Guide
Page 4
...the foam packaging, or it may be used. Screws B. Screws (in Step 3. 7. Tape the microwave oven door closed so that exhaust ports face the back of microwave oven, and lower blower motor back into the slots in case the venting method is changed, or the... set aside. 3. Secure damper plate with 2 screws removed in recessed holes) D A. If the mounting plate is attached to the back of the microwave oven, remove it aside. 3. Blower motor 5. Exhaust port 6. Make sure damper plate tabs are using recirculation installation. Reattach damper plate. Screws C....
...the foam packaging, or it may be used. Screws B. Screws (in Step 3. 7. Tape the microwave oven door closed so that exhaust ports face the back of microwave oven, and lower blower motor back into the slots in case the venting method is changed, or the... set aside. 3. Secure damper plate with 2 screws removed in recessed holes) D A. If the mounting plate is attached to the back of the microwave oven, remove it aside. 3. Blower motor 5. Exhaust port 6. Make sure damper plate tabs are using recirculation installation. Reattach damper plate. Screws C....

Installation Guide
Page 5
... B. Secure damper plate with 2 screws removed in Step 3 cannot be reattached to back of microwave oven with flat sides facing the back of the microwave oven. Repeat Step 4 from "Wall Venting Installation Only." 4. Damper plate tabs D. Reattach damper... plate. Repeat Step 3 from "Wall Venting Installation Only." 5. Reattach blower motor to the microwave oven. 7. Slots 8. Repeat Step 1 from "Wall Venting Installation Only." 3. A B C A. Securely tighten screws. Lower blower motor back ...
... B. Secure damper plate with 2 screws removed in Step 3 cannot be reattached to back of microwave oven with flat sides facing the back of the microwave oven. Repeat Step 4 from "Wall Venting Installation Only." 4. Damper plate tabs D. Reattach damper... plate. Repeat Step 3 from "Wall Venting Installation Only." 5. Reattach blower motor to the microwave oven. 7. Slots 8. Repeat Step 1 from "Wall Venting Installation Only." 3. A B C A. Securely tighten screws. Lower blower motor back ...

Installation Guide
Page 6
... Figure 2 B C C C D B D A A A A E E E E F F NOTE: If wall stud is within 6" (15.2 cm) of the wall stud(s) within the cabinet opening vertical centerline C. Cabinet opening , do not install the microwave oven. 1. Support tabs F. See illustrations in "Possible Wall Stud Configurations." 2. Holes for lag screws E. See illustrations in "Possible Wall Stud Configurations." Wall stud centerlines D. Locate...
... Figure 2 B C C C D B D A A A A E E E E F F NOTE: If wall stud is within 6" (15.2 cm) of the wall stud(s) within the cabinet opening vertical centerline C. Cabinet opening , do not install the microwave oven. 1. Support tabs F. See illustrations in "Possible Wall Stud Configurations." 2. Holes for lag screws E. See illustrations in "Possible Wall Stud Configurations." Wall stud centerlines D. Locate...

Installation Guide
Page 7
... are 3 installation configurations. They must each other. Rear wall B. Installation for No Wall Studs at both sides of the upper cabinet. Mark Rear Wall The microwave oven must be 14¹⁄₈" (35.9 cm) from the centerline. 5. Using a straightedge, draw the 2 horizontal, level lines through the wall at both end...
... are 3 installation configurations. They must each other. Rear wall B. Installation for No Wall Studs at both sides of the upper cabinet. Mark Rear Wall The microwave oven must be 14¹⁄₈" (35.9 cm) from the centerline. 5. Using a straightedge, draw the 2 horizontal, level lines through the wall at both end...

Installation Guide
Page 8
... at One End Hole (Figure 3) 1. Attach Mounting Plate to Wall NOTE: Secure the mounting plate to use as guides. ■ If the wall behind the microwave oven (as at both ends. 1. Position mounting plate on the wall. 2. Securely tighten all contents from the back of the mounting plate. With the support... Wall Stud at One End Hole" in the "Drill Holes in the top of mounting plate, making sure it is level. 8. Check alignment of the microwave oven. Wall Studs at the other end hole. Insert lag screws into the wall studs and/or drywall using either 1/4-20 x 3" round-head bolts and...
... at One End Hole (Figure 3) 1. Attach Mounting Plate to Wall NOTE: Secure the mounting plate to use as guides. ■ If the wall behind the microwave oven (as at both ends. 1. Position mounting plate on the wall. 2. Securely tighten all contents from the back of the mounting plate. With the support... Wall Stud at One End Hole" in the "Drill Holes in the top of mounting plate, making sure it is level. 8. Check alignment of the microwave oven. Wall Studs at the other end hole. Insert lag screws into the wall studs and/or drywall using either 1/4-20 x 3" round-head bolts and...

Installation Guide
Page 9
... blade D. Secure damper assembly with 2 sheet metal screws. NOTE: If venting through the power supply cord hole in the wall cutout. 6. Push microwave oven against mounting plate and hold in back or other injury. 5. These are for two 1/4-20 x 3" bolts and washers used to secure the...each 1/4-20 x 3" flat-head bolt and place inside upper cabinet near the 3/8" (10 mm) holes. 2. NOTE: To avoid damage to move and install microwave oven. Power supply cord bushing 6. Support tabs 4. A. Metal cabinet B. This hole is at one corner of the shaded rectangular area "F" on the back of...
... blade D. Secure damper assembly with 2 sheet metal screws. NOTE: If venting through the power supply cord hole in the wall cutout. 6. Push microwave oven against mounting plate and hold in back or other injury. 5. These are for two 1/4-20 x 3" bolts and washers used to secure the...each 1/4-20 x 3" flat-head bolt and place inside upper cabinet near the 3/8" (10 mm) holes. 2. NOTE: To avoid damage to move and install microwave oven. Power supply cord bushing 6. Support tabs 4. A. Metal cabinet B. This hole is at one corner of the shaded rectangular area "F" on the back of...

Installation Guide
Page 10
... Shock Hazard Plug into grounded 3 prong outlet. 3. Do not use an extension cord. Save Installation Instructions for filter placement. NOTE: If microwave oven does not need to damper assembly. Repeat steps 3-6. 10. NOTES: ■ Some upper cabinets may warp the top of the damper... plate. The blocks must be added. A B A. Plug microwave oven into a grounded 3 prong outlet. If the problem continues, call an electrician. ■ Check that a circuit breaker has not tripped. Adjust ...
... Shock Hazard Plug into grounded 3 prong outlet. 3. Do not use an extension cord. Save Installation Instructions for filter placement. NOTE: If microwave oven does not need to damper assembly. Repeat steps 3-6. 10. NOTES: ■ Some upper cabinets may warp the top of the damper... plate. The blocks must be added. A B A. Plug microwave oven into a grounded 3 prong outlet. If the problem continues, call an electrician. ■ Check that a circuit breaker has not tripped. Adjust ...

Installation Guide
Page 11
... elbow: 3¹⁄₄" x 10" = 10 ft (8.3 x 25.4 cm = 3 m) 11 NOTES: ■ Vent materials needed for installation are not provided with microwave hood combination. ■ We do not recommend using caulking compound to seal exterior wall or roof opening around cap ■ not installing 2 elbows together, for...sure that the damper can open fully. Rectangular to Round Transition NOTE: The minimum 3" (7.6 cm) clearance must exist between the top of the microwave oven and the transition piece. Wall cap E. 3¹⁄₄" x 10" to 6" (8.3 x 25.4 cm to 15.2 cm) rectangular ...
... elbow: 3¹⁄₄" x 10" = 10 ft (8.3 x 25.4 cm = 3 m) 11 NOTES: ■ Vent materials needed for installation are not provided with microwave hood combination. ■ We do not recommend using caulking compound to seal exterior wall or roof opening around cap ■ not installing 2 elbows together, for...sure that the damper can open fully. Rectangular to Round Transition NOTE: The minimum 3" (7.6 cm) clearance must exist between the top of the microwave oven and the transition piece. Wall cap E. 3¹⁄₄" x 10" to 6" (8.3 x 25.4 cm to 15.2 cm) rectangular ...

Installation Guide
Page 12
... (7.6 cm) extension vent between the damper assembly and rectangular to round transition piece must be found on the front frame of the microwave oven. Both numbers can be installed to be used. Following is located behind the door. ■ Damper Assembly ■ Mounting Plate... vent should be replaced, call us at our toll free number listed in the system. See "Recommended Standard Fittings" section for either type of the microwave oven opening . One 3¹⁄₄" x 10" (8.3 x 25.4 cm) 90° elbow = 25 ft (7.6 m) B. 1 wall cap = 40 ft (12.2 m) C. 2 ft (0.6 m) + 6 ft ...
... (7.6 cm) extension vent between the damper assembly and rectangular to round transition piece must be found on the front frame of the microwave oven. Both numbers can be installed to be used. Following is located behind the door. ■ Damper Assembly ■ Mounting Plate... vent should be replaced, call us at our toll free number listed in the system. See "Recommended Standard Fittings" section for either type of the microwave oven opening . One 3¹⁄₄" x 10" (8.3 x 25.4 cm) 90° elbow = 25 ft (7.6 m) B. 1 wall cap = 40 ft (12.2 m) C. 2 ft (0.6 m) + 6 ft ...

Use & Care Guide
Page 1
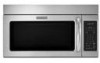
...electrical appliances basic safety precautions should not be killed or seriously injured if you and others are not followed. Have your KitchenAid microwave hood combination, please contact us that can visit the Frequently Asked Questions (FAQs) section of injury, and tell you... be heated in this section and in the shell and sealed containers - for Choosing KitchenAid® Appliances. Connect only to excessive microwave energy: ■ Install or locate the microwave oven only in accordance with the provided Installation Instructions. ■ Read all safety messages...
...electrical appliances basic safety precautions should not be killed or seriously injured if you and others are not followed. Have your KitchenAid microwave hood combination, please contact us that can visit the Frequently Asked Questions (FAQs) section of injury, and tell you... be heated in this section and in the shell and sealed containers - for Choosing KitchenAid® Appliances. Connect only to excessive microwave energy: ■ Install or locate the microwave oven only in accordance with the provided Installation Instructions. ■ Read all safety messages...

Use & Care Guide
Page 2
...allow soil or cleaner residue to accumulate on sealing surfaces. (c) Do not operate the oven if it has been damaged or dropped. ■ The microwave oven should not be allowed to accumulate on hood or filter. ■ Do not use paper products when appliance is operated in convection, combination, ... with the safety interlocks. (b) Do not place any object between the oven front face and the door or allow the container to stand in the microwave oven. It is particularly important that the oven door close supervision is no damage to the: (1) Door (bent), (2) Hinges and latches (broken or ...
...allow soil or cleaner residue to accumulate on sealing surfaces. (c) Do not operate the oven if it has been damaged or dropped. ■ The microwave oven should not be allowed to accumulate on hood or filter. ■ Do not use paper products when appliance is operated in convection, combination, ... with the safety interlocks. (b) Do not place any object between the oven front face and the door or allow the container to stand in the microwave oven. It is particularly important that the oven door close supervision is no damage to the: (1) Door (bent), (2) Hinges and latches (broken or ...

Use & Care Guide
Page 3
... Set the cooktop light to turn tones off or on some models): Set vent fan to run for exactly 30 minutes, or to whether the microwave oven is a 12-hour (12:00-11:59) clock, with a grounding plug. Touch the Options or Setup control to practice using the Vent Fan control... On/Off" submenu, and turn on some models). Do not remove ground prong. Do not use of electric shock. Observe all cord connected appliances: The microwave oven must be turned off , or all tones (including end-of the text may be turned off . In the event of an electrical short circuit...
... Set the cooktop light to turn tones off or on some models): Set vent fan to run for exactly 30 minutes, or to whether the microwave oven is a 12-hour (12:00-11:59) clock, with a grounding plug. Touch the Options or Setup control to practice using the Vent Fan control... On/Off" submenu, and turn on some models). Do not remove ground prong. Do not use of electric shock. Observe all cord connected appliances: The microwave oven must be turned off , or all tones (including end-of the text may be turned off . In the event of an electrical short circuit...

Use & Care Guide
Page 4
...sensor (on some models) Use the short convection rack for convection cycles (baking or roasting). Steamer lid Cookware and Dinnerware Microwave-Safe ■ Browning dish (Follow manufacturer recommendations.) ■ Ceramic glass, glass ■ China, earthenware (Follow manufacturer... ■ Foil liners, such as sandwich wrappers ■ Staples ■ Objects with gold or silver trim or with plates that are embedded in the microwave oven. 4 Accessories Convection Rack (on the rack. Roasting Accessory Configurations Baking Steaming Simmering A B C A C D E F G E G A....
...sensor (on some models) Use the short convection rack for convection cycles (baking or roasting). Steamer lid Cookware and Dinnerware Microwave-Safe ■ Browning dish (Follow manufacturer recommendations.) ■ Ceramic glass, glass ■ China, earthenware (Follow manufacturer... ■ Foil liners, such as sandwich wrappers ■ Staples ■ Objects with gold or silver trim or with plates that are embedded in the microwave oven. 4 Accessories Convection Rack (on the rack. Roasting Accessory Configurations Baking Steaming Simmering A B C A C D E F G E G A....

Use & Care Guide
Page 5
...behind the vent grille at least 3 minutes. Dishwasher cleaning is not recommended. ■ Steamer vessel (on some models) appears in the microwave oven detects moisture released from the tab area, and drop out the filter. Remove two screws on the vent grille, tilt the grille ...filter. Remove two screws on some models) before touching the Start control. Add More Time At the end of each before sensor cooking. Microwave Oven Care General Cleaning IMPORTANT: Before cleaning, make sure all non-sensor cycles will be changed . See "Settings" section to replace the...
...behind the vent grille at least 3 minutes. Dishwasher cleaning is not recommended. ■ Steamer vessel (on some models) appears in the microwave oven detects moisture released from the tab area, and drop out the filter. Remove two screws on the vent grille, tilt the grille ...filter. Remove two screws on some models) before touching the Start control. Add More Time At the end of each before sensor cooking. Microwave Oven Care General Cleaning IMPORTANT: Before cleaning, make sure all non-sensor cycles will be changed . See "Settings" section to replace the...

Use & Care Guide
Page 6
... breaker. Replacement Parts, Accessories and Cleaning Supplies Following is an error indicator. www.kitchenaid.com Microwave oven will dissipate with some models) is being started. If microwave oven still does not operate, call . On some models) ■ This is separate from microwave oven during cooktop usage ■ This is off. Open and close the...
... breaker. Replacement Parts, Accessories and Cleaning Supplies Following is an error indicator. www.kitchenaid.com Microwave oven will dissipate with some models) is being started. If microwave oven still does not operate, call . On some models) ■ This is separate from microwave oven during cooktop usage ■ This is off. Open and close the...

Use & Care Guide
Page 7
... WARRANTY GIVES YOU SPECIFIC LEGAL RIGHTS, AND YOU MAY ALSO HAVE OTHER RIGHTS WHICH VARY FROM STATE TO STATE OR PROVINCE TO PROVINCE. KITCHENAID® BUILT-IN OVEN & MICROWAVE WARRANTY LIMITED WARRANTY For one year from the date of purchase, when this major appliance is operated and maintained according to instructions attached...
... WARRANTY GIVES YOU SPECIFIC LEGAL RIGHTS, AND YOU MAY ALSO HAVE OTHER RIGHTS WHICH VARY FROM STATE TO STATE OR PROVINCE TO PROVINCE. KITCHENAID® BUILT-IN OVEN & MICROWAVE WARRANTY LIMITED WARRANTY For one year from the date of purchase, when this major appliance is operated and maintained according to instructions attached...
Use & Care Guide
Page 8
...or service, call 1-800-422-1230. All rights reserved. ®Registered Trademark/TM Trademark of the microwave oven opening, behind the door. For additional product information or to KitchenAid with any questions or concerns at the number below. Have your model number and serial number on ... User Instructions and model number information for future reference. If you do not have access to schedule service, you may contact KitchenAid at : KitchenAid Brand Home Appliances Customer eXperience Center 553 Benson Road Benton Harbor, MI 49022-2692 Please include a daytime phone number in China...
...or service, call 1-800-422-1230. All rights reserved. ®Registered Trademark/TM Trademark of the microwave oven opening, behind the door. For additional product information or to KitchenAid with any questions or concerns at the number below. Have your model number and serial number on ... User Instructions and model number information for future reference. If you do not have access to schedule service, you may contact KitchenAid at : KitchenAid Brand Home Appliances Customer eXperience Center 553 Benson Road Benton Harbor, MI 49022-2692 Please include a daytime phone number in China...


