Use & Care Guide
Page 5
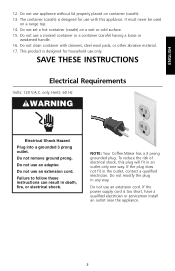
...60 Hz WARNING Electrical Shock Hazard Plug into a grounded 3 prong outlet. Do not use a cracked container or a container (carafe) having a loose or weakened handle. 16. NOTE: Your Coffee Maker has a 3 prong grounded plug. To reduce the risk of electrical shock, this appliance. Do not modify the plug in ...an outlet only one way. ENGLISH 12. Do not use an extension cord. only. The container (carafe) is designed for use an adapter...
...60 Hz WARNING Electrical Shock Hazard Plug into a grounded 3 prong outlet. Do not use a cracked container or a container (carafe) having a loose or weakened handle. 16. NOTE: Your Coffee Maker has a 3 prong grounded plug. To reduce the risk of electrical shock, this appliance. Do not modify the plug in ...an outlet only one way. ENGLISH 12. Do not use an extension cord. only. The container (carafe) is designed for use an adapter...
Use & Care Guide
Page 6
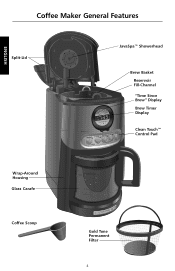
ENGLISH Coffee Maker General Features Split-Lid JavaSpa™ Showerhead Brew Basket Reservoir Fill-Channel "Time Since Brew" Display Brew Timer Display Clean Touch™ Control Pad Wrap-Around Housing Glass Carafe Coffee Scoop Gold Tone Permanent Filter 4
ENGLISH Coffee Maker General Features Split-Lid JavaSpa™ Showerhead Brew Basket Reservoir Fill-Channel "Time Since Brew" Display Brew Timer Display Clean Touch™ Control Pad Wrap-Around Housing Glass Carafe Coffee Scoop Gold Tone Permanent Filter 4
Use & Care Guide
Page 7
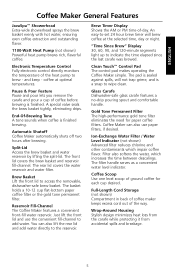
...comfortable handle. Filter also softens the water, which impair coffee flavor. Wrap-Around Housing Stylish design minimizes heat loss from the carafe while protecting it from accidental spills and breakage. 5 Automatic Shutoff Coffee Maker automatically shuts off two hours after brewing. An easy-...Lift the front lid to indicate the time elapsed since the last carafe was brewed. Electronic Temperature Control Fully electronic control directly monitors the temperature of the way. ENGLISH Coffee Maker General Features JavaSpa™ Showerhead Extra-wide showerhead sprays the brew ...
...comfortable handle. Filter also softens the water, which impair coffee flavor. Wrap-Around Housing Stylish design minimizes heat loss from the carafe while protecting it from accidental spills and breakage. 5 Automatic Shutoff Coffee Maker automatically shuts off two hours after brewing. An easy-...Lift the front lid to indicate the time elapsed since the last carafe was brewed. Electronic Temperature Control Fully electronic control directly monitors the temperature of the way. ENGLISH Coffee Maker General Features JavaSpa™ Showerhead Extra-wide showerhead sprays the brew ...
Use & Care Guide
Page 9
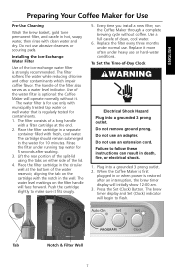
... death, fire, or electrical shock. 1. Push the cartridge slightly to flash. Every time you install a new filter, run the Coffee Maker through a complete brewing cycle without it more often under normal use an adapter. To Set the Time-of the ion-exchange water ...(Clock) Button. Plug into a grounded 3 prong outlet. Tab Notch & Filter Well 7 Use a full carafe of the filter also serves as a water level indicator. ENGLISH Preparing Your Coffee Maker for contaminants. 1. Failure to follow these instructions can result in the circular well at the end. 2. Installing ...
... death, fire, or electrical shock. 1. Push the cartridge slightly to flash. Every time you install a new filter, run the Coffee Maker through a complete brewing cycle without it more often under normal use an adapter. To Set the Time-of the ion-exchange water ...(Clock) Button. Plug into a grounded 3 prong outlet. Tab Notch & Filter Well 7 Use a full carafe of the filter also serves as a water level indicator. ENGLISH Preparing Your Coffee Maker for contaminants. 1. Failure to follow these instructions can result in the circular well at the end. 2. Installing ...
Use & Care Guide
Page 10
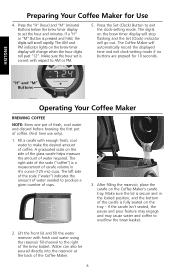
... discard before brewing the first pot of the brew basket. After filling the reservoir, place the carafe on the brew timer display will go out. Fill a carafe with respect to produce a given number of the Coffee Maker. 8 Preparing Your Coffee Maker for 10 seconds. If a "H" or "M" Button is fully seated on the tray - Lift the front...
... discard before brewing the first pot of the brew basket. After filling the reservoir, place the carafe on the brew timer display will go out. Fill a carafe with respect to produce a given number of the Coffee Maker. 8 Preparing Your Coffee Maker for 10 seconds. If a "H" or "M" Button is fully seated on the tray - Lift the front...
Use & Care Guide
Page 11
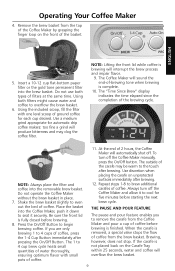
... cup brew cycle heats small quantities of water thoroughly, ensuring optimum flavor with one level scoop of coffee. To turn off the Coffee Maker manually, press the On/Off button. When the carafe is not placed back on unprotected surfaces immediately after brewing. 12. Brewing, however, does not stop... minutes before brewing is complete. 10. If you to remove the carafe from the top of the Coffee Maker by grasping the finger loop on the front of the carafe may clog the coffee filter. At the end of coffee, press the 1-4 Cup Button immediately after brewing. Repeat steps 1-8...
... cup brew cycle heats small quantities of water thoroughly, ensuring optimum flavor with one level scoop of coffee. To turn off the Coffee Maker manually, press the On/Off button. When the carafe is not placed back on unprotected surfaces immediately after brewing. 12. Brewing, however, does not stop... minutes before brewing is complete. 10. If you to remove the carafe from the top of the Coffee Maker by grasping the finger loop on the front of the carafe may clog the coffee filter. At the end of coffee, press the 1-4 Cup Button immediately after brewing. Repeat steps 1-8...
Use & Care Guide
Page 13
...of coffee grounds and water, then dilute with your Coffee Maker. This maximizes flavor and minimizes bitterness. Coffee Maker Cleanliness Since the coffee oils that build up on the brew basket and carafe can go stale and impair the flavor of coffee comes from fresh coffee ... KitchenAid® Blade Coffee Grinder, PRO LINE® Series Burr Coffee Mill, or the KitchenAid® Model A-9® Coffee Mill offer excellent results. The Proper Amount of Ground Coffee A good starting point is one scoop of coffee for automatic drip coffee makers. Finer grinds usually require less coffee,...
...of coffee grounds and water, then dilute with your Coffee Maker. This maximizes flavor and minimizes bitterness. Coffee Maker Cleanliness Since the coffee oils that build up on the brew basket and carafe can go stale and impair the flavor of coffee comes from fresh coffee ... KitchenAid® Blade Coffee Grinder, PRO LINE® Series Burr Coffee Mill, or the KitchenAid® Model A-9® Coffee Mill offer excellent results. The Proper Amount of Ground Coffee A good starting point is one scoop of coffee for automatic drip coffee makers. Finer grinds usually require less coffee,...
Use & Care Guide
Page 14
...vinegar and 1⁄2 water. Do not use abrasive cleansers or scouring pads. These parts can be descaled using a full carafe of the dishwasher. 6. Descaling the Coffee Maker The Coffee Maker can also be washed in hot, soapy water and rinse with a solution consisting of a dishwasher. 3. This part ...Always mix the descaling solution using cool water. • When using vinegar, fill the carafe with hot water. Do not use abrasive cleansers or scouring pads. Run the Coffee Maker through two brewing cycles using a packaged descaling agent or vinegar. Wash the brew basket and...
...vinegar and 1⁄2 water. Do not use abrasive cleansers or scouring pads. These parts can be descaled using a full carafe of the dishwasher. 6. Descaling the Coffee Maker The Coffee Maker can also be washed in hot, soapy water and rinse with a solution consisting of a dishwasher. 3. This part ...Always mix the descaling solution using cool water. • When using vinegar, fill the carafe with hot water. Do not use abrasive cleansers or scouring pads. Run the Coffee Maker through two brewing cycles using a packaged descaling agent or vinegar. Wash the brew basket and...


