Use & Care Guide
Page 3
... Cleaning the Coffee Maker 12 Descaling the Coffee Maker 12 Troubleshooting ...13 WARRANTY AND SERVICE INFORMATION KitchenAid® Coffee Maker Warranty 14 Hassle-Free Replacement Warranty - 50 United States and District of -Day Clock 7 Operating Your Coffee Maker 8 Brewing Coffee...8 The Pause...Inside Front Cover Coffee Maker Safety...2 Important Safeguards ...2 Electrical Requirements 3 FEATURES AND OPERATION Coffee Maker General Features 4 Display and Control Pad Features 6 Preparing Your Coffee Maker for Use 7 Pre-Use Cleaning ...7 Installing the Ion-Exchange Water Filter 7 To Set...
... Cleaning the Coffee Maker 12 Descaling the Coffee Maker 12 Troubleshooting ...13 WARRANTY AND SERVICE INFORMATION KitchenAid® Coffee Maker Warranty 14 Hassle-Free Replacement Warranty - 50 United States and District of -Day Clock 7 Operating Your Coffee Maker 8 Brewing Coffee...8 The Pause...Inside Front Cover Coffee Maker Safety...2 Important Safeguards ...2 Electrical Requirements 3 FEATURES AND OPERATION Coffee Maker General Features 4 Display and Control Pad Features 6 Preparing Your Coffee Maker for Use 7 Pre-Use Cleaning ...7 Installing the Ion-Exchange Water Filter 7 To Set...
Use & Care Guide
Page 6
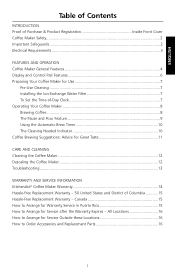
ENGLISH Coffee Maker General Features Split-Lid JavaSpa™ Showerhead Brew Basket Reservoir Fill-Channel "Time Since Brew" Display Brew Timer Display Clean Touch™ Control Pad Wrap-Around Housing Glass Carafe Coffee Scoop Gold Tone Permanent Filter 4
ENGLISH Coffee Maker General Features Split-Lid JavaSpa™ Showerhead Brew Basket Reservoir Fill-Channel "Time Since Brew" Display Brew Timer Display Clean Touch™ Control Pad Wrap-Around Housing Glass Carafe Coffee Scoop Gold Tone Permanent Filter 4
Use & Care Guide
Page 7
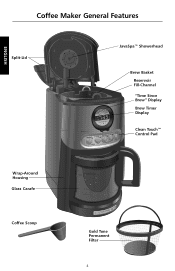
... paper coffee filter or the gold tone permanent filter. and keep - Split-Lid Access the brew basket and water reservoir by lifting the split-lid. The pad is finished. Gold Tone Permanent Filter The high-performance gold tone filter eliminates the need for each cup desired. The filter handle serves as a convenient water level indicator. Automatic Shutoff Coffee Maker...
... paper coffee filter or the gold tone permanent filter. and keep - Split-Lid Access the brew basket and water reservoir by lifting the split-lid. The pad is finished. Gold Tone Permanent Filter The high-performance gold tone filter eliminates the need for each cup desired. The filter handle serves as a convenient water level indicator. Automatic Shutoff Coffee Maker...
Use & Care Guide
Page 9
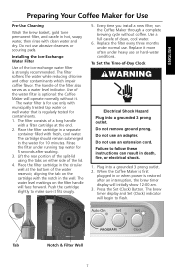
... Press the Set (Clock) Button. The water level markings on either side of the filter also serves as a water level indicator. Every time you install a new filter, run the Coffee Maker through a complete brewing cycle without it more often under heavy use an adapter. ENGLISH Preparing... Your Coffee Maker for contaminants. 1. Do not use abrasive cleansers or scouring pads. Installing the Ion-Exchange Water Filter Use of the water filter is strongly recommended. The cartridge should remain submerged in a separate ...
... Press the Set (Clock) Button. The water level markings on either side of the filter also serves as a water level indicator. Every time you install a new filter, run the Coffee Maker through a complete brewing cycle without it more often under heavy use an adapter. ENGLISH Preparing... Your Coffee Maker for contaminants. 1. Do not use abrasive cleansers or scouring pads. Installing the Ion-Exchange Water Filter Use of the water filter is strongly recommended. The cartridge should remain submerged in a separate ...
Use & Care Guide
Page 11
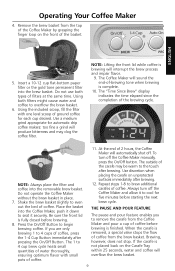
... to brew additional carafes of coffee. The outside of the Coffee Maker by grasping the finger loop on unprotected surfaces immediately after brewing. 12. Remove the brew basket from the top of the carafe may clog the coffee filter. Use discretion when placing the carafe on the front of coffee, press the 1-4 Cup Button immediately after brewing...
... to brew additional carafes of coffee. The outside of the Coffee Maker by grasping the finger loop on unprotected surfaces immediately after brewing. 12. Remove the brew basket from the top of the carafe may clog the coffee filter. Use discretion when placing the carafe on the front of coffee, press the 1-4 Cup Button immediately after brewing...
Use & Care Guide
Page 13
Grinders like the KitchenAid® Blade Coffee Grinder, PRO LINE® Series Burr Coffee Mill, or the KitchenAid® Model A-9® Coffee Mill offer excellent results. Coffee Maker Cleanliness Since the coffee oils that are cleaned daily in a cool, dry place. The Proper Amount of Ground Coffee A good starting point is opened. Finer grinds usually require less coffee, but it 's important that...
Grinders like the KitchenAid® Blade Coffee Grinder, PRO LINE® Series Burr Coffee Mill, or the KitchenAid® Model A-9® Coffee Mill offer excellent results. Coffee Maker Cleanliness Since the coffee oils that are cleaned daily in a cool, dry place. The Proper Amount of Ground Coffee A good starting point is opened. Finer grinds usually require less coffee, but it 's important that...
Use & Care Guide
Page 14
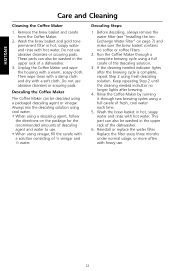
...; When using a full carafe of the descaling solution. 3. Unplug the Coffee Maker and wipe the housing with a soft cloth. If the cleaning needed indicator no coffee or coffee filters. 2. Then wipe clean with a damp cloth and dry with a warm, soapy cloth. Descaling Steps: 1. Run the Coffee Maker through two brewing cycles using vinegar, fill the carafe with...
...; When using a full carafe of the descaling solution. 3. Unplug the Coffee Maker and wipe the housing with a soft cloth. If the cleaning needed indicator no coffee or coffee filters. 2. Then wipe clean with a damp cloth and dry with a warm, soapy cloth. Descaling Steps: 1. Run the Coffee Maker through two brewing cycles using vinegar, fill the carafe with...

