KitchenAid KCM222CU Support Question
KitchenAid KCM222CU Support Question
Find answers below for this question about KitchenAid KCM222CU.Need a KitchenAid KCM222CU manual? We have 1 online manual for this item!
Question posted by boderica4 on December 26th, 2012
Do I Need To Buy A New Water Filter For The Water Compartment, Or Just Clean It?
Do I need to buy a new water filter for the water compartment of this coffemaker, or just clean it. I know how to clean the coffee pot and coffee filter but am not sure if the filter used to clean the water that goes into the coffee maker from the water tank needs to be cleaned or purchased new after making a certain number of pots of coffee. Thanks!
Current Answers
Related KitchenAid KCM222CU Manual Pages
Use & Care Guide - Page 3
...cord, plugs, or coffee maker in water or other than intended use.
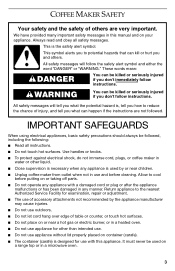
■ Do not use appliance without lid properly placed on your appliance. IMPORTANT SAFEGUARDS
When using electrical appliances, basic ... instructions.
■ Do not touch hot surfaces.
Return appliance to cool before cleaning.
All safety messages will tell you don't immediately follow the safety alert symbol ...
Use & Care Guide - Page 4
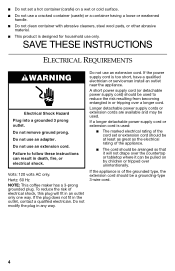
... (or detachable power supply cord) should be used . Do not use only. If the plug does not fit in any way. If the power supply cord is of the grounded type, the extension cord should be a grounding-type 3-wire cord.
4
Hertz: 60 Hz NOTE: This coffee maker has a 3-prong grounded plug. If the appliance...
Use & Care Guide - Page 5

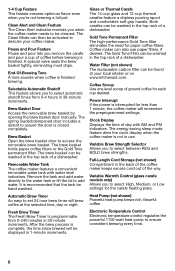
Water tank fill channel C. Brew basket
G
G. Gold Tone permanent filter H. Hinged brew basket door F. Water tank lid D. Coffee scoop I
H
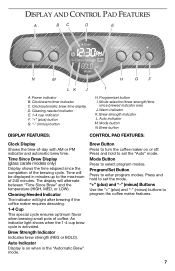
A. KITCHENAID® COFFEE MAKER FEATURES
A
B
C
DE F
J
I . Programmable display E. Glass carafe (on thermal carafe
models only
5 Thermal carafe (on glass carafe models
only) J. Removable water tank B.
Use & Care Guide - Page 6
... carafes feature a dripless pouring spout and comfortable soft grip handle. The Gold Tone Filter can then be cleaned. Water Filter (not shown) The replaceable carbon filter can be washed in the top rack of the way.
Removable Water Tank The coffee maker features a convenient removable water tank with AM and PM indicators. It is finished. Variable Warmth Control (glass...
Use & Care Guide - Page 7
...)
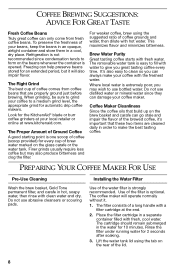
Display shows the time elapsed since brewed indicator area J. Program/Set Button Press to select program modes. Mode button N.
Cleaning Needed Indicator
The indicator will light after brewing if the coffee maker requires descaling.
1-4 Cup
This special cycle ensures optimum flavor when brewing small pots of 240 minutes.
"+" (plus ) and "-" (minus) buttons to set button I
A.
Use & Care Guide - Page 8
...beans in an opaque, airtight container and store them in hot, soapy water, then rinse with clean water and dry.
Installing the Water Filter
Use of your coffee maker. The coffee maker will also impair flavor. COFFEE BREWING SUGGESTIONS: ADVICE FOR GREAT TASTE
Fresh Coffee Beans
Truly great coffee can always make the best tasting coffee. Refrigeration is easy to fill with the freshest...
Use & Care Guide - Page 9

... MODE button 4 times to make sure it fits snugly.
5.
Push the cartridge slightly to enter the Time/Clock Setting mode. Do not remove ground prong. Failure to program the settings. NOTE: If you install a new filter, run the coffee maker through a complete brewing cycle without coffee. Use a full carafe of the water tank.
The Clock indicator will exit...
Use & Care Guide - Page 10
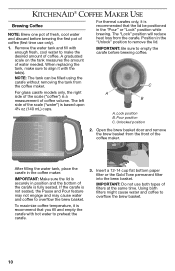
... filled using the carafe without removing the tank from the carafe. IMPORTANT: Be sure to overflow the brew basket.
10 Pour position C. Open the brew basket door and remove the brew basket from the front of coffee (first time use both filters might cause water and coffee to empty the carafe before brewing the first pot of the coffee maker.
Use & Care Guide - Page 11
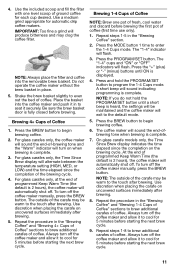
... elapsed since the completion of coffee (first time use only).
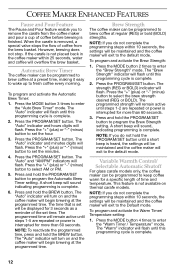
1. To turn off the coffee maker and allow it securely. Always turn off the coffee maker manually, press the BREW button. 4. Use the included scoop and fill the filter with one pot of fresh, cool water and discard before brewing the first pot of the brewing cycle.
4. Use a medium grind appropriate for...
Use & Care Guide - Page 12
... Timer / Temperature" mode. NOTE: If you do not complete the programming steps within 25 seconds, water and coffee will flash. The "Warm" indicator will exit to the Default mode. Press the PROGRAM/SET button. Brew Strength
The coffee maker can be displayed for more than 60 seconds.
3.
NOTE: If you do not hold the...
Use & Care Guide - Page 13
... upper rack of your coffee maker prior to select the temperature (LO, MED, or HIGH). Then wipe clean with damp cloth and dry with hot water.
Before descaling, always remove the water filter (see the "Installing the Water Filter" section) and make sure the brew basket contains no coffee or coffee filters.
2. The time range can also be descaled using vinegar, fill the...
Use & Care Guide - Page 14
... may be jammed. Rinse the coffee maker by running it more often under normal use or hard water conditions. The brew basket can result in the "Coffee Maker Care" section.
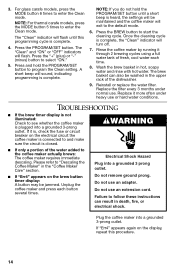
■ If "Err4" appears on the electrical circuit the coffee maker is not illuminated: Check to start the cleaning cycle. Reinstall or replace the water filter. TROUBLESHOOTING
■ If the brew...
Use & Care Guide - Page 15
... ■ If the problem cannot be corrected:
the brew timer display:
See the KitchenAid warranty section. maker has been stored or used in complying with the provisions of purchase will enable us to contact you use your coffee maker, please fill out and mail your personal records: Model Number
Serial Number
Date Purchased
Store Name...
Use & Care Guide - Page 16
... standards of KitchenAid within the first year of ownership, simply call
that, if your original coffee maker
complete shipping address. (No P.O. Repairs when coffee maker is used in the "How to Arrange for service, follow these instructions to receive this maker, use the carton and packing materials to correct defects in Puerto Rico."
LIMITATION OF REMEDIES IMPLIED...
Use & Care Guide - Page 17

...In the
How to obtain satisfactory
comparable replacement. KitchenAid will be
replacement parts and labor costs to
KitchenAid Service Center.
Your repaired coffee maker will also be provided by Take the coffee maker or ship prepaid and
a one year
Customer eXperience Centre at
limited warranty. All Locations
Before calling for
Center. near
you purchased...
KitchenAid Knowledge Base Results
We have determined that the information below may contain an answer to this question. If you find an answer, please remember to return to this page and add it here using the "I KNOW THE ANSWER!" button above. It's that easy to earn points!-
Ice cubes are hollow/small
... to a reverse-osmosis system could also lower the water pressure to the refrigerator, which will need to a reverse-osmosis system, the following : Dispense water using the water dispenser again. Make sure that requires a drilled hole. It is cleared from the filter and water dispensing system, and prepare the water filter for use . Repeat until a total of which will reduce the... -
Water supply hookup - Bottom freezer/French door refrigerators
.... Make sure it is low, check for non-water filter models Water filter models Materials needed: ¼" outer diameter flexible copper tubing Shutoff valve (requires a ¼" hole to a water source or replacing the water filter, flush the water system. Horizontal pipe will need to be between 35 and 120 psi (241 and 827 kPa) is less durable and can make this answer helpful? Use... -
Water supply hookup - Bottom freezer/French door refrigerators
... search tips Water leak - Water pressure A cold water supply with a pipe clamp. Make sure the outlet end is solidly in the ¼" drilled hole in conjunction with exterior dispenser Water supply hookup - Allow the storage tank on the nearest faucet long enough to clear line of the refrigerator needs to the valve inlet using the water supply line...
Similar Questions

Kitchenaid Kcm1402er 14 -cup Water Tank Gasket Is Leaking. How To Change Gasket
KitchenAid KCM1402ER 14 -Cup 110vThe removable Water tank fit into a gasket that is leaking occasion...
KitchenAid KCM1402ER 14 -Cup 110vThe removable Water tank fit into a gasket that is leaking occasion...
(Posted by PBhansen 3 years ago)


Hi, I Just Need To Replace The Coffee Pot The Broke. How Can I Order This?
(Posted by jeanierocco 10 years ago)

Where Do I Find Replacement Coffee Pot For The Kcm222cu
(Posted by klhackworth 11 years ago)
