Use & Care Guide
Page 3
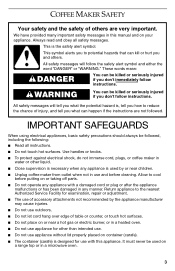
.... This is used on your appliance. Use handles or knobs. ■ To protect against electrical shock, do not immerse cord, plugs, or coffee maker in a microwave oven. 3 All safety messages will follow the safety alert symbol and either the word "DANGER" or "WARNING." Return appliance to...intended use. ■ Do not use with a damaged cord or plug or after the appliance malfunctions or has been damaged in this appliance. COFFEE MAKER SAFETY Your safety and the safety of others . These words mean: DANGER You can be followed, including the following: ■ Read all...
.... This is used on your appliance. Use handles or knobs. ■ To protect against electrical shock, do not immerse cord, plugs, or coffee maker in a microwave oven. 3 All safety messages will follow the safety alert symbol and either the word "DANGER" or "WARNING." Return appliance to...intended use. ■ Do not use with a damaged cord or plug or after the appliance malfunctions or has been damaged in this appliance. COFFEE MAKER SAFETY Your safety and the safety of others . These words mean: DANGER You can be followed, including the following: ■ Read all...
Use & Care Guide
Page 4
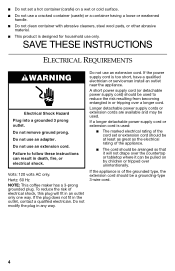
... or extension cords are available and may be arranged so that it will fit in an outlet only one way. Hertz: 60 Hz NOTE: This coffee maker has a 3-prong grounded plug. If the plug does not fit in any way. A short power supply cord (or detachable power supply cord) should be used...
... or extension cords are available and may be arranged so that it will fit in an outlet only one way. Hertz: 60 Hz NOTE: This coffee maker has a 3-prong grounded plug. If the plug does not fit in any way. A short power supply cord (or detachable power supply cord) should be used...

Use & Care Guide
Page 5
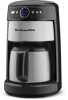
Water tank lid D. Gold Tone permanent filter H. Hinged brew basket door F. Thermal carafe (on glass carafe models only) J. Programmable display E. Glass carafe (on thermal carafe models only 5 Brew basket G G. KITCHENAID® COFFEE MAKER FEATURES A B C DE F J I . Removable water tank B. Water tank fill channel C. Coffee scoop I H A.
Water tank lid D. Gold Tone permanent filter H. Hinged brew basket door F. Thermal carafe (on glass carafe models only) J. Programmable display E. Glass carafe (on thermal carafe models only 5 Brew basket G G. KITCHENAID® COFFEE MAKER FEATURES A B C DE F J I . Removable water tank B. Water tank fill channel C. Coffee scoop I H A.
Use & Care Guide
Page 6
...Cup Feature This feature ensures optimum flavor even when you remove the carafe and pour a cup of ground coffee for less than 1 minute, the coffee maker will brew coffee at your coffee maker. Brew Basket Door Access the removable brew basket by opening the brew basket door manually. The spring loaded/... plate. Electronic Temperature Control Electronic temperature control regulates the powerful 1100-watt heat pump to descale your local retailer or on www.kitchenaid.com. Water Filter (not shown) The replaceable carbon filter can be washed in the top rack of the way. The Clean...
...Cup Feature This feature ensures optimum flavor even when you remove the carafe and pour a cup of ground coffee for less than 1 minute, the coffee maker will brew coffee at your coffee maker. Brew Basket Door Access the removable brew basket by opening the brew basket door manually. The spring loaded/... plate. Electronic Temperature Control Electronic temperature control regulates the powerful 1100-watt heat pump to descale your local retailer or on www.kitchenaid.com. Water Filter (not shown) The replaceable carbon filter can be washed in the top rack of the way. The Clean...
Use & Care Guide
Page 7
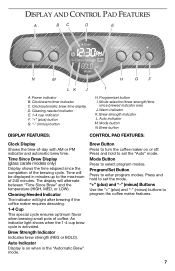
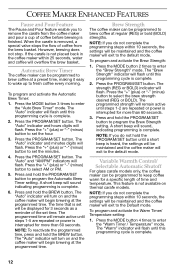
... 1-4 cup indicator F. Clock/automatic brew time display D. Program/set button I A. Brew Button Press to turn the coffee maker on when in minutes up to program the coffee maker features. 7 Brew Strength Indicator Indicates brew strength (REG or BOLD). Mode Button Press to enter program modes. Auto indicator..., or LOW). Brew button DISPLAY FEATURES: CONTROL PAD FEATURES: Clock Display Shows the time-of coffee. The display will light after brewing if the coffee maker requires descaling. 1-4 Cup This special cycle ensures optimum flavor when brewing small pots of -day with...
... 1-4 cup indicator F. Clock/automatic brew time display D. Program/set button I A. Brew Button Press to turn the coffee maker on when in minutes up to program the coffee maker features. 7 Brew Strength Indicator Indicates brew strength (REG or BOLD). Mode Button Press to enter program modes. Auto indicator..., or LOW). Brew button DISPLAY FEATURES: CONTROL PAD FEATURES: Clock Display Shows the time-of coffee. The display will light after brewing if the coffee maker requires descaling. 1-4 Cup This special cycle ensures optimum flavor when brewing small pots of -day with...
Use & Care Guide
Page 8
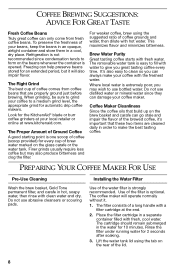
... easy to grind your local retailer or online at www.kitchenaid.com. The cartridge should remain submerged in a cool, dry place. Brew Water Purity Great tasting coffee starts with fresh, cool water. Coffee Maker Cleanliness Since the coffee oils that build up on the glass carafe or the ...starting point is not recommended since they can always make the best tasting coffee. The coffee maker will also impair flavor. Refrigeration is one scoop of coffee (scoop provided) for the KitchenAid® blade or burr coffee grinders at the end. 2. Look for every cup of brew water ...
... easy to grind your local retailer or online at www.kitchenaid.com. The cartridge should remain submerged in a cool, dry place. Brew Water Purity Great tasting coffee starts with fresh, cool water. Coffee Maker Cleanliness Since the coffee oils that build up on the glass carafe or the ...starting point is not recommended since they can always make the best tasting coffee. The coffee maker will also impair flavor. Refrigeration is one scoop of coffee (scoop provided) for the KitchenAid® blade or burr coffee grinders at the end. 2. Look for every cup of brew water ...

Use & Care Guide
Page 9
.../Set button until a short beep is heard, the settings will be maintained and the coffee maker will exit to select AM or PM. 10. Plug into a grounded 3 prong outlet. When the coffee maker is first plugged in or when power is restored after an interruption, the brew timer ...A short beep will flash for the minutes adjustment. 7. Press the PROGRAM/SET button. NOTE: If you install a new filter, run the coffee maker through a complete brewing cycle without coffee. Do not use an extension cord. Do not use an adapter. Press the "+" (plus ) or "-" (minus) buttons to increase or...
.../Set button until a short beep is heard, the settings will be maintained and the coffee maker will exit to select AM or PM. 10. Plug into a grounded 3 prong outlet. When the coffee maker is first plugged in or when power is restored after an interruption, the brew timer ...A short beep will flash for the minutes adjustment. 7. Press the PROGRAM/SET button. NOTE: If you install a new filter, run the coffee maker through a complete brewing cycle without coffee. Do not use an extension cord. Do not use an adapter. Press the "+" (plus ) or "-" (minus) buttons to increase or...
Use & Care Guide
Page 10
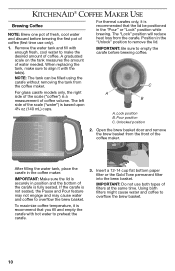
... remove the lid. Lock position B. Unlocked position 2. IMPORTANT: Do not use only). 1. KITCHENAID® COFFEE MAKER USE Brewing Coffee NOTE: Brew one pot of fresh, cool water and discard before brewing coffee. C For glass carafe models only, the right side of the scale ("coffee") is based upon 4³⁄₄ oz (140 mL) cups. To maximize...
... remove the lid. Lock position B. Unlocked position 2. IMPORTANT: Do not use only). 1. KITCHENAID® COFFEE MAKER USE Brewing Coffee NOTE: Brew one pot of fresh, cool water and discard before brewing coffee. C For glass carafe models only, the right side of the scale ("coffee") is based upon 4³⁄₄ oz (140 mL) cups. To maximize...
Use & Care Guide
Page 11
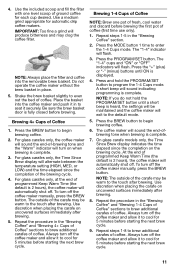
... turn on uncovered surfaces immediately after brewing. 8. NOTE: Always place the filter and coffee into the coffee maker and push it to the default mode. 5. For glass carafes only, the coffee maker will alternate between the temperature setting (HIGH, MED, or LOW) and the time elapsed...plus) or "-" (minus) buttons until a short beep is complete. 7. At the end of the carafe may clog the coffee filter. Always turn off the coffee maker manually, press the BREW button. Press the BREW button to brew additional carafes of programmed Keep Warm Time (the default is complete...
... turn on uncovered surfaces immediately after brewing. 8. NOTE: Always place the filter and coffee into the coffee maker and push it to the default mode. 5. For glass carafes only, the coffee maker will alternate between the temperature setting (HIGH, MED, or LOW) and the time elapsed...plus) or "-" (minus) buttons until a short beep is complete. 7. At the end of the carafe may clog the coffee filter. Always turn off the coffee maker manually, press the BREW button. Press the BREW button to brew additional carafes of programmed Keep Warm Time (the default is complete...
Use & Care Guide
Page 12
... brewing does not stop. Press and hold the BREW button. A short beep will sound indicating programming is not available on and the coffee maker will exit to brew coffee at the programmed time. The strength (REG or BOLD) indicator will flash. Press the "+" (plus ) or "-" (minus) button ... for more than 60 seconds. 3. The "Auto" indicator will flash until a short beep is removed, a special valve stops the flow of coffee from the coffee maker and pour a cup of time and temperature. The "Warm" indicator will flash until steps 1-2 are repeated or power is complete. 2. To...
... brewing does not stop. Press and hold the BREW button. A short beep will sound indicating programming is not available on and the coffee maker will exit to brew coffee at the programmed time. The strength (REG or BOLD) indicator will flash. Press the "+" (plus ) or "-" (minus) button ... for more than 60 seconds. 3. The "Auto" indicator will flash until a short beep is removed, a special valve stops the flow of coffee from the coffee maker and pour a cup of time and temperature. The "Warm" indicator will flash until steps 1-2 are repeated or power is complete. 2. To...
Use & Care Guide
Page 13
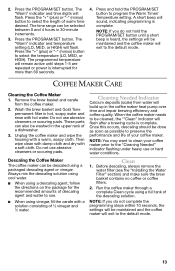
...fill the carafe with a warm, soapy cloth. COFFEE MAKER CARE Cleaning the Coffee Maker 1. These parts can be washed in 30-minute increments. 3. Cleaning Needed Indicator Calcium deposits (scale) from the coffee maker. 2. Run the coffee maker through a complete Clean cycle using a packaged descaling...PROGRAM/SET button. NOTE: You may want to clean your coffee maker. Unplug the coffee maker and wipe the housing with a solution consisting of the descaling solution. Descaling the Coffee Maker The coffee maker can also be descaled using a full tank of ¹⁄...
...fill the carafe with a warm, soapy cloth. COFFEE MAKER CARE Cleaning the Coffee Maker 1. These parts can be washed in 30-minute increments. 3. Cleaning Needed Indicator Calcium deposits (scale) from the coffee maker. 2. Run the coffee maker through a complete Clean cycle using a packaged descaling...PROGRAM/SET button. NOTE: You may want to clean your coffee maker. Unplug the coffee maker and wipe the housing with a solution consisting of the descaling solution. Descaling the Coffee Maker The coffee maker can also be descaled using a full tank of ¹⁄...
Use & Care Guide
Page 14
...into a grounded 3-prong outlet. Do not use an adapter. Press the "+" (plus) or "-" (minus) button to the coffee maker actually brews: The coffee maker requires immediate descaling. NOTE: If you do not hold the PROGRAM/SET button to and make sure the circuit is closed. Press... to follow these instructions can also be jammed. Replace the filter every 3 months under heavy use . Plug the coffee maker into a grounded 3 prong outlet. Unplug the coffee maker and press each time. 8. Once the cleaning cycle is plugged into a grounded 3-prong outlet. The "Clean" indicator...
...into a grounded 3-prong outlet. Do not use an adapter. Press the "+" (plus) or "-" (minus) button to the coffee maker actually brews: The coffee maker requires immediate descaling. NOTE: If you do not hold the PROGRAM/SET button to and make sure the circuit is closed. Press... to follow these instructions can also be jammed. Replace the filter every 3 months under heavy use . Plug the coffee maker into a grounded 3 prong outlet. Unplug the coffee maker and press each time. 8. Once the cleaning cycle is plugged into a grounded 3-prong outlet. The "Clean" indicator...
Use & Care Guide
Page 15
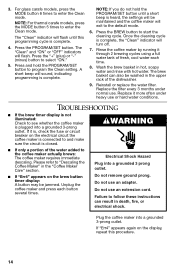
... "Err3" appear on ■ If the problem cannot be corrected: the brew timer display: See the KitchenAid warranty section. Press the POWER/BREW button to Do not return the coffee maker to normal room temperature before doing this. If the error code reappears, there is a problem with the unit... event of a product safety notification and assist us in complying with the provisions of in a cool environment, warm the coffee maker to the reset the coffee maker. PROOF OF PURCHASE AND PRODUCT REGISTRATION Always keep a copy of the sales receipt showing the date of purchase of your ...
... "Err3" appear on ■ If the problem cannot be corrected: the brew timer display: See the KitchenAid warranty section. Press the POWER/BREW button to Do not return the coffee maker to normal room temperature before doing this. If the error code reappears, there is a problem with the unit... event of a product safety notification and assist us in complying with the provisions of in a cool environment, warm the coffee maker to the reset the coffee maker. PROOF OF PURCHASE AND PRODUCT REGISTRATION Always keep a copy of the sales receipt showing the date of purchase of your ...
Use & Care Guide
Page 16
...so confident the quality of our products If your KitchenAid® coffee maker should fail within the first year of ownership, simply call that, if your original coffee maker complete shipping address. (No P.O. pack up your coffee maker. Give the consultant your arrange to have other ..., SO THE ABOVE LIMITATIONS OR EXCLUSIONS MAY NOT APPLY TO YOU. DISCLAIMER OF IMPLIED WARRANTIES; Repairs when coffee maker is used in Puerto Rico." KITCHENAID® COFFEE MAKER WARRANTY Length of Warranty: 50 United States, the District of Columbia, Canada, and Puerto Rico: One-...
...so confident the quality of our products If your KitchenAid® coffee maker should fail within the first year of ownership, simply call that, if your original coffee maker complete shipping address. (No P.O. pack up your coffee maker. Give the consultant your arrange to have other ..., SO THE ABOVE LIMITATIONS OR EXCLUSIONS MAY NOT APPLY TO YOU. DISCLAIMER OF IMPLIED WARRANTIES; Repairs when coffee maker is used in Puerto Rico." KITCHENAID® COFFEE MAKER WARRANTY Length of Warranty: 50 United States, the District of Columbia, Canada, and Puerto Rico: One-...

Use & Care Guide
Page 17
...807-6777. Or write to : Customer Satisfaction Center KitchenAid Portable Appliances P.O. Please follow these Locations Consult your coffee maker in materials and workmanship. In the How to obtain service. Your repaired coffee maker will also be provided by our one -year limited ...1-800-541-6390 Monday through Friday, 8 a.m. Your replacement coffee ownership, KitchenAid Canada will replace maker will pay for your coffee maker with a copy of the the KitchenAid® brand that, if your KitchenAid® coffee maker should fail within the first year of Columbia, and Puerto ...
...807-6777. Or write to : Customer Satisfaction Center KitchenAid Portable Appliances P.O. Please follow these Locations Consult your coffee maker in materials and workmanship. In the How to obtain service. Your repaired coffee maker will also be provided by our one -year limited ...1-800-541-6390 Monday through Friday, 8 a.m. Your replacement coffee ownership, KitchenAid Canada will replace maker will pay for your coffee maker with a copy of the the KitchenAid® brand that, if your KitchenAid® coffee maker should fail within the first year of Columbia, and Puerto ...


