Use & Care Guide
Page 3
... read and obey all instructions. ■ Do not touch hot surfaces. Use handles or knobs. ■ To protect against electrical shock, do not immerse cord, plugs, or coffee maker in water or other than intended use. ■ Do not use with a damaged cord or plug or after the appliance malfunctions or has been damaged in a heated oven. ■ Do...
... read and obey all instructions. ■ Do not touch hot surfaces. Use handles or knobs. ■ To protect against electrical shock, do not immerse cord, plugs, or coffee maker in water or other than intended use. ■ Do not use with a damaged cord or plug or after the appliance malfunctions or has been damaged in a heated oven. ■ Do...
Use & Care Guide
Page 4
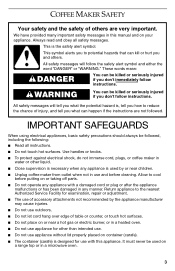
.... ■ This product is designed for household use an extension cord. If the plug does not fit in any way. SAVE THESE INSTRUCTIONS ELECTRICAL REQUIREMENTS WARNING Electrical Shock Hazard Plug into a grounded 3 prong outlet. Do not use an extension cord. To reduce the risk of the grounded type, the extension cord should be a grounding-type 3-wire cord. 4 Do...
.... ■ This product is designed for household use an extension cord. If the plug does not fit in any way. SAVE THESE INSTRUCTIONS ELECTRICAL REQUIREMENTS WARNING Electrical Shock Hazard Plug into a grounded 3 prong outlet. Do not use an extension cord. To reduce the risk of the grounded type, the extension cord should be a grounding-type 3-wire cord. 4 Do...

Use & Care Guide
Page 5
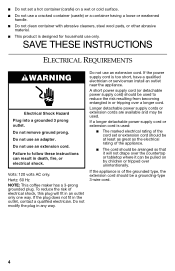
KITCHENAID® COFFEE MAKER FEATURES A B C DE F J I . Programmable display E. Thermal carafe (on glass carafe models only) J. Brew basket G G. Coffee scoop I H A. Gold Tone permanent filter H. Water tank fill channel C. Removable water tank B. Hinged brew basket door F. Glass carafe (on thermal carafe models only 5 Water tank lid D.
KITCHENAID® COFFEE MAKER FEATURES A B C DE F J I . Programmable display E. Thermal carafe (on glass carafe models only) J. Brew basket G G. Coffee scoop I H A. Gold Tone permanent filter H. Water tank fill channel C. Removable water tank B. Hinged brew basket door F. Glass carafe (on thermal carafe models only 5 Water tank lid D.
Use & Care Guide
Page 6
... control regulates the powerful 1100-watt heat pump to access the removable brew basket. Pause and Pour Feature Pause and pour lets you to select automatic shutoff times from 0-240 minutes in 30-minute increments. A special valve seals the brew basket tightly, eliminating most drips. Water Filter (not shown) The replaceable carbon filter can be cleaned. Clock Display Displays the time of the way. Variable Warmth Control (glass carafe models only) Allows you when the coffee maker needs to be...
... control regulates the powerful 1100-watt heat pump to access the removable brew basket. Pause and Pour Feature Pause and pour lets you to select automatic shutoff times from 0-240 minutes in 30-minute increments. A special valve seals the brew basket tightly, eliminating most drips. Water Filter (not shown) The replaceable carbon filter can be cleaned. Clock Display Displays the time of the way. Variable Warmth Control (glass carafe models only) Allows you when the coffee maker needs to be...
Use & Care Guide
Page 7
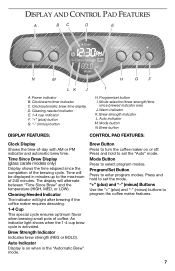
Clock/automatic brew time display D. "-" (minus) button H. Mode selection/brew strength/time since the completion of coffee. Time Since Brew Display (glass carafe models only) Display shows the time elapsed since brewed indicator area J. The display will light after brewing if the coffee maker requires descaling. 1-4 Cup This special cycle ensures optimum flavor when brewing small pots of the brewing cycle. Auto Indicator Display is activated. Press and hold to set the "Auto" mode. Power indicator B. Program/set the mode. Auto indicator M. Time will be displayed in...
Clock/automatic brew time display D. "-" (minus) button H. Mode selection/brew strength/time since the completion of coffee. Time Since Brew Display (glass carafe models only) Display shows the time elapsed since brewed indicator area J. The display will light after brewing if the coffee maker requires descaling. 1-4 Cup This special cycle ensures optimum flavor when brewing small pots of the brewing cycle. Auto Indicator Display is activated. Press and hold to set the "Auto" mode. Power indicator B. Program/set the mode. Auto indicator M. Time will be displayed in...
Use & Care Guide
Page 8
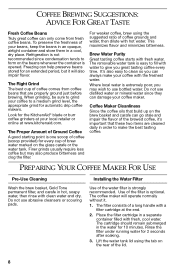
... the KitchenAid® blade or burr coffee grinders at your coffee to grind your local retailer or online at the end. 2. The Right Grind The best cup of the brewed coffee, it . 1. The removable water tank is extremely poor, you great tasting coffee every time. Where local water is easy to fill with hot water. The filter consists of the water filter is opened. To preserve the freshness of the lid. 8 Coffee Maker Cleanliness...
... the KitchenAid® blade or burr coffee grinders at your coffee to grind your local retailer or online at the end. 2. The Right Grind The best cup of the brewed coffee, it . 1. The removable water tank is extremely poor, you great tasting coffee every time. Where local water is easy to fill with hot water. The filter consists of the water filter is opened. To preserve the freshness of the lid. 8 Coffee Maker Cleanliness...

Use & Care Guide
Page 9
... install a new filter, run the coffee maker through a complete brewing cycle without coffee. Do not remove ground prong. Failure to the default mode. 1. When the coffee maker is first plugged in or when power is restored after an interruption, the brew timer display will sound indicating programming is complete. The Clock indicator will flash for the hours adjustment. 5. Press the "+" (plus ) or "-" (minus) buttons to program the settings. Do not use...
... install a new filter, run the coffee maker through a complete brewing cycle without coffee. Do not remove ground prong. Failure to the default mode. 1. When the coffee maker is first plugged in or when power is restored after an interruption, the brew timer display will sound indicating programming is complete. The Clock indicator will flash for the hours adjustment. 5. Press the "+" (plus ) or "-" (minus) buttons to program the settings. Do not use...
Use & Care Guide
Page 10
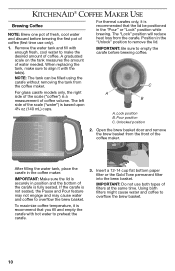
... heat loss from the coffee maker. C For glass carafe models only, the right side of the scale ("coffee") is a measurement of water needed. Remove the water tank and fill with enough fresh, cool water to make sure to align it with hot water to empty the carafe before brewing the first pot of filters at the same time. After filling the water tank, place the carafe in the "Unlock" position to overflow the brew basket. When replacing the tank, make...
... heat loss from the coffee maker. C For glass carafe models only, the right side of the scale ("coffee") is a measurement of water needed. Remove the water tank and fill with enough fresh, cool water to make sure to align it with hot water to empty the carafe before brewing the first pot of filters at the same time. After filling the water tank, place the carafe in the "Unlock" position to overflow the brew basket. When replacing the tank, make...
Use & Care Guide
Page 11
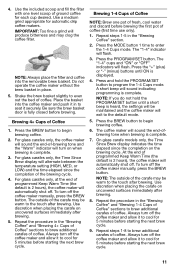
... scoop and fill the filter with one pot of programmed Keep Warm Time (the default is complete. 3. Use a medium grind appropriate for 5 minutes before starting the next brew cycle. 9. For glass carafes only, the Time Since Brew display will flash. Press the MODE button 1 time to brew additional carafes of the carafe may clog the coffee filter. NOTE: The outside of coffee. NOTE: Always place the filter and coffee into the coffee maker and push it securely. Shake the brew basket...
... scoop and fill the filter with one pot of programmed Keep Warm Time (the default is complete. 3. Use a medium grind appropriate for 5 minutes before starting the next brew cycle. 9. For glass carafes only, the Time Since Brew display will flash. Press the MODE button 1 time to brew additional carafes of the carafe may clog the coffee filter. NOTE: The outside of coffee. NOTE: Always place the filter and coffee into the coffee maker and push it securely. Shake the brew basket...
Use & Care Guide
Page 12
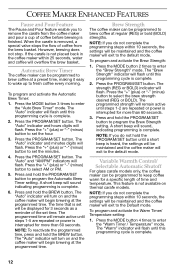
... turn on thermal carafe models. Press the MODE button 4 times to program the Automatic Brew Timer setting. The "Auto" indicator and hours digits will flash. COFFEE MAKER ENHANCED FEATURES Pause and Pour Feature The Pause and Pour feature enable you to remove the carafe from the coffee maker and pour a cup of coffee from the brew basket. The "Auto" indicator will begin brewing at regular (REG) or bold (BOLD) strengths. Press the PROGRAM/SET button. Press and hold the BREW button. Brew Strength The coffee maker...
... turn on thermal carafe models. Press the MODE button 4 times to program the Automatic Brew Timer setting. The "Auto" indicator and hours digits will flash. COFFEE MAKER ENHANCED FEATURES Pause and Pour Feature The Pause and Pour feature enable you to remove the carafe from the coffee maker and pour a cup of coffee from the brew basket. The "Auto" indicator will begin brewing at regular (REG) or bold (BOLD) strengths. Press the PROGRAM/SET button. Press and hold the BREW button. Brew Strength The coffee maker...
Use & Care Guide
Page 13
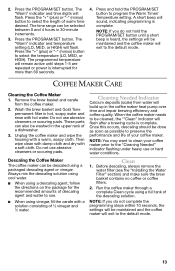
... washed in hot, soapy water and rinse with a soft cloth. NOTE: If you do not hold the PROGRAM/SET button to select the temperature (LO, MED, or HIGH). Remove the brew basket and carafe from water will be selected between 0 and 4 hours in the coffee maker heat pump over time and impair brewing efficiency and coffee quality. Once this occurs, descaling should be cleaned, the "*Clean" indicator will flash after a brewing cycle...
... washed in hot, soapy water and rinse with a soft cloth. NOTE: If you do not hold the PROGRAM/SET button to select the temperature (LO, MED, or HIGH). Remove the brew basket and carafe from water will be selected between 0 and 4 hours in the coffee maker heat pump over time and impair brewing efficiency and coffee quality. Once this occurs, descaling should be cleaned, the "*Clean" indicator will flash after a brewing cycle...
Use & Care Guide
Page 14
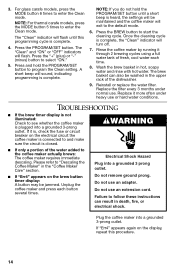
For glass carafe models, press the MODE button 6 times to enter the Clean mode. NOTE: For thermal carafe models, press the MODE button 5 times to enter the Clean mode. Replace the filter every 3 months under heavy use . WARNING ■ If only a portion of fresh, cool water each button several times. Do not use an extension cord. Plug the coffee maker into a grounded 3 prong outlet. 3. Press the PROGRAM/SET button. The brew basket can result in the "Coffee Maker Care" section...
For glass carafe models, press the MODE button 6 times to enter the Clean mode. NOTE: For thermal carafe models, press the MODE button 5 times to enter the Clean mode. Replace the filter every 3 months under heavy use . WARNING ■ If only a portion of fresh, cool water each button several times. Do not use an extension cord. Plug the coffee maker into a grounded 3 prong outlet. 3. Press the PROGRAM/SET button. The brew basket can result in the "Coffee Maker Care" section...
Use & Care Guide
Page 15
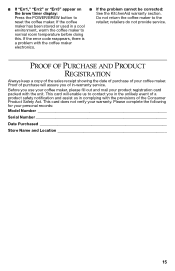
... brew timer display: See the KitchenAid warranty section. Please complete the following for your coffee maker. retailers do not provide service. If the error code reappears, there is a problem with the unit. PROOF OF PURCHASE AND PRODUCT REGISTRATION Always keep a copy of the sales receipt showing the date of purchase of your personal records: Model Number Serial Number Date Purchased Store Name and Location 15 Press the POWER/BREW button...
... brew timer display: See the KitchenAid warranty section. Please complete the following for your coffee maker. retailers do not provide service. If the error code reappears, there is a problem with the unit. PROOF OF PURCHASE AND PRODUCT REGISTRATION Always keep a copy of the sales receipt showing the date of purchase of your personal records: Model Number Serial Number Date Purchased Store Name and Location 15 Press the POWER/BREW button...
Use & Care Guide
Page 16
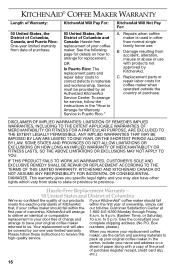
.... Replacement parts or repair labor costs for service, follow these instructions to arrange for Warranty Service in the "How to province. SOME STATES AND PROVINCES DO NOT ALLOW LIMITATIONS OR EXCLUSIONS ON HOW LONG AN IMPLIED WARRANTY OF MERCHANTABILITY OR FITNESS LASTS, SO THE ABOVE LIMITATIONS OR EXCLUSIONS MAY NOT APPLY TO YOU. KITCHENAID® COFFEE MAKER WARRANTY Length of Warranty: 50 United States...
.... Replacement parts or repair labor costs for service, follow these instructions to arrange for Warranty Service in the "How to province. SOME STATES AND PROVINCES DO NOT ALLOW LIMITATIONS OR EXCLUSIONS ON HOW LONG AN IMPLIED WARRANTY OF MERCHANTABILITY OR FITNESS LASTS, SO THE ABOVE LIMITATIONS OR EXCLUSIONS MAY NOT APPLY TO YOU. KITCHENAID® COFFEE MAKER WARRANTY Length of Warranty: 50 United States...

Use & Care Guide
Page 17
... To order accessories or replacement parts for Warranty Service in the 50 United States, District of ownership, take the 200 - 6750 Century Ave. Hassle-Free Replacement Warranty - Your replacement coffee ownership, KitchenAid Canada will replace maker will be returned prepaid and insured. coffee maker or ship collect to : Customer Satisfaction Center KitchenAid Portable Appliances P.O. instructions to receive this Service must be covered by our one -year limited warranty from the date...
... To order accessories or replacement parts for Warranty Service in the 50 United States, District of ownership, take the 200 - 6750 Century Ave. Hassle-Free Replacement Warranty - Your replacement coffee ownership, KitchenAid Canada will replace maker will be returned prepaid and insured. coffee maker or ship collect to : Customer Satisfaction Center KitchenAid Portable Appliances P.O. instructions to receive this Service must be covered by our one -year limited warranty from the date...


