Use & Care Guide
Page 3
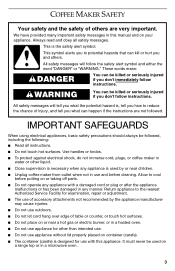
...before putting on or taking off parts. ■ Do not operate any appliance with this manual and on or near children. ■ Unplug coffee maker from outlet when not in use with a damaged cord or plug or after the appliance malfunctions or has been damaged in this appliance. Use... handles or knobs. ■ To protect against electrical shock, do not immerse cord, plugs, or coffee maker in water or other liquid. ■ Close supervision is necessary when any manner. We have provided many important safety messages in any appliance is...
...before putting on or taking off parts. ■ Do not operate any appliance with this manual and on or near children. ■ Unplug coffee maker from outlet when not in use with a damaged cord or plug or after the appliance malfunctions or has been damaged in this appliance. Use... handles or knobs. ■ To protect against electrical shock, do not immerse cord, plugs, or coffee maker in water or other liquid. ■ Close supervision is necessary when any manner. We have provided many important safety messages in any appliance is...
Use & Care Guide
Page 4
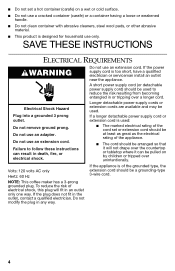
... detachable power supply cords or extension cords are available and may be used to follow these instructions can be a grounding-type 3-wire cord. NOTE: This coffee maker has a 3-prong grounded plug. Do not remove ground prong. ■ Do not set or extension cord should be at least as great as the electrical...
... detachable power supply cords or extension cords are available and may be used to follow these instructions can be a grounding-type 3-wire cord. NOTE: This coffee maker has a 3-prong grounded plug. Do not remove ground prong. ■ Do not set or extension cord should be at least as great as the electrical...
Use & Care Guide
Page 5
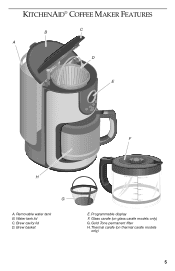
Glass carafe (on thermal carafe models only) 5 Water tank lid C. Gold Tone permanent filter H. Brew cavity lid D. KITCHENAID® COFFEE MAKER FEATURES B C A D E F H G A. Programmable display F. Removable water tank B. Brew basket E. Thermal carafe (on glass carafe models only) G.
Glass carafe (on thermal carafe models only) 5 Water tank lid C. Gold Tone permanent filter H. Brew cavity lid D. KITCHENAID® COFFEE MAKER FEATURES B C A D E F H G A. Programmable display F. Removable water tank B. Brew basket E. Thermal carafe (on glass carafe models only) G.
Use & Care Guide
Page 6
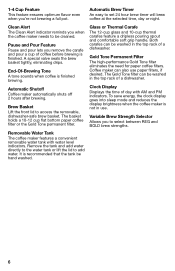
...clock display goes into sleep mode and reduces the display brightness when the coffee maker is finished. Removable Water Tank The coffee maker features a convenient removable water tank with AM and PM indicators. Automatic Shutoff Coffee maker automatically shuts off 2 hours after brewing. Brew Basket Lift the front ...selected time, day or night. Gold Tone Permanent Filter The high-performance Gold Tone filter eliminates the need for paper coffee filters. Coffee maker can be hand washed. 6 Variable Brew Strength Selector Allows you 're not brewing a full pot. Glass or ...
...clock display goes into sleep mode and reduces the display brightness when the coffee maker is finished. Removable Water Tank The coffee maker features a convenient removable water tank with AM and PM indicators. Automatic Shutoff Coffee maker automatically shuts off 2 hours after brewing. Brew Basket Lift the front ...selected time, day or night. Gold Tone Permanent Filter The high-performance Gold Tone filter eliminates the need for paper coffee filters. Coffee maker can be hand washed. 6 Variable Brew Strength Selector Allows you 're not brewing a full pot. Glass or ...
Use & Care Guide
Page 7
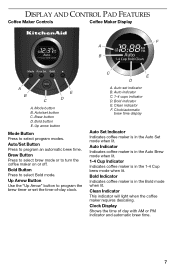
...indicator F. Brew Button Press to select brew mode or to select program modes. Auto indicator C. 1-4 cups indicator D. Auto Indicator Indicates coffee maker is in the Auto Brew mode when lit. 1-4 Cup Indicator Indicates coffee maker is in the Auto Set mode when lit. Up arrow button Mode Button Press to turn the...select Bold mode. Auto set button C. Clock Display Shows the time of -day clock. Clock/automatic brew time display Auto Set Indicator Indicates coffee maker is in the Bold mode when lit. Up Arrow Button Use the "Up Arrow" button to program the brew timer or set the time...
...indicator F. Brew Button Press to select brew mode or to select program modes. Auto indicator C. 1-4 cups indicator D. Auto Indicator Indicates coffee maker is in the Auto Brew mode when lit. 1-4 Cup Indicator Indicates coffee maker is in the Auto Set mode when lit. Up arrow button Mode Button Press to turn the...select Bold mode. Auto set button C. Clock Display Shows the time of -day clock. Clock/automatic brew time display Auto Set Indicator Indicates coffee maker is in the Bold mode when lit. Up Arrow Button Use the "Up Arrow" button to program the brew timer or set the time...
Use & Care Guide
Page 8
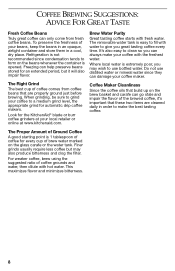
... retailer or online at www.kitchenaid.com. Coffee Maker Cleanliness Since the coffee oils that build up on the beans whenever the container is 1 tablespoon of coffee for an extended period, but may wish to a medium grind level, the appropriate grind for the KitchenAid® blade or burr coffee grinders at your coffee maker. The Proper Amount of Ground...
... retailer or online at www.kitchenaid.com. Coffee Maker Cleanliness Since the coffee oils that build up on the beans whenever the container is 1 tablespoon of coffee for an extended period, but may wish to a medium grind level, the appropriate grind for the KitchenAid® blade or burr coffee grinders at your coffee maker. The Proper Amount of Ground...
Use & Care Guide
Page 9
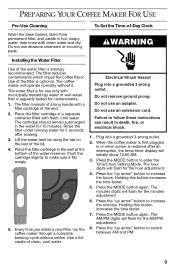
...filter consists of the lid. 4. Rinse the filter under running water for 10 minutes. Every time you install a new filter, run the coffee maker through a complete brewing cycle without it fits snugly. 5. Lift the water tank lid using the tab on the rear of a long handle ... bottom of the filter is optional. Press the "up arrow" button to make sure it . The AM/PM digits will operate normally without coffee. The coffee maker will flash for contaminants. 1. The cartridge should remain submerged in death, fire, or electrical shock. 1. Plug into a grounded 3 prong outlet...
...filter consists of the lid. 4. Rinse the filter under running water for 10 minutes. Every time you install a new filter, run the coffee maker through a complete brewing cycle without it fits snugly. 5. Lift the water tank lid using the tab on the rear of a long handle ... bottom of the filter is optional. Press the "up arrow" button to make sure it . The AM/PM digits will operate normally without coffee. The coffee maker will flash for contaminants. 1. The cartridge should remain submerged in death, fire, or electrical shock. 1. Plug into a grounded 3 prong outlet...
Use & Care Guide
Page 10
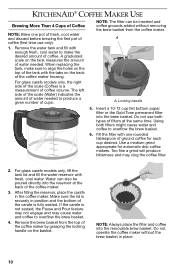
... the brew basket. 6. For glass carafe models only, the right side of the scale (Coffee) is fully seated. Locking handle 5. KITCHENAID® COFFEE MAKER USE Brewing More Than 4 Cups of Coffee NOTE: Brew one rounded tablespoon of ground coffee for automatic drip coffee makers. For glass carafe models only, lift the tank lid and fill the water reservoir...
... the brew basket. 6. For glass carafe models only, the right side of the scale (Coffee) is fully seated. Locking handle 5. KITCHENAID® COFFEE MAKER USE Brewing More Than 4 Cups of Coffee NOTE: Brew one rounded tablespoon of ground coffee for automatic drip coffee makers. For glass carafe models only, lift the tank lid and fill the water reservoir...
Use & Care Guide
Page 11
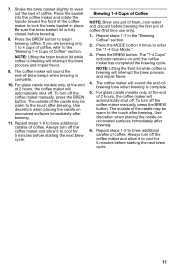
... pot of -brew beeps when brewing is brewing will sound the end-of coffee (first time use only). 1. Always turn off the coffee maker manually, press the BREW button. Place the basket into the coffee maker and rotate the handle toward the front of the carafe may be warm to... "1-4 Cup Mode." 3. Repeat steps 1-7 in place. Use discretion when placing the carafe on uncovered surfaces immediately after brewing. Always turn off the coffee maker manually, press the BREW button. If you are brewing only 1 to 4 cups of fresh, cool water and discard before starting the next brew ...
... pot of -brew beeps when brewing is brewing will sound the end-of coffee (first time use only). 1. Always turn off the coffee maker manually, press the BREW button. Place the basket into the coffee maker and rotate the handle toward the front of the carafe may be warm to... "1-4 Cup Mode." 3. Repeat steps 1-7 in place. Use discretion when placing the carafe on uncovered surfaces immediately after brewing. Always turn off the coffee maker manually, press the BREW button. If you are brewing only 1 to 4 cups of fresh, cool water and discard before starting the next brew ...

Use & Care Guide
Page 12
... off . Immediate Brew 1. If desired, press the BREW button after the brew cycle is complete to remove the carafe from the coffee maker and pour a cup of coffee from the brew basket. The Brew button light will turn on. However, brewing does not stop. Press the AUTO SET button to... turn on and the brew button will turn off . NOTE: Once "Bold" is selected, it is automatically turned on during the brew cycle. 2. COFFEE MAKER ENHANCED FEATURES Pause and Pour Feature The "Pause and Pour" feature enables you to turn on and stay on during the Auto Brew programming cycle. 2....
... off . Immediate Brew 1. If desired, press the BREW button after the brew cycle is complete to remove the carafe from the coffee maker and pour a cup of coffee from the brew basket. The Brew button light will turn on. However, brewing does not stop. Press the AUTO SET button to... turn on and the brew button will turn off . NOTE: Once "Bold" is selected, it is automatically turned on during the brew cycle. 2. COFFEE MAKER ENHANCED FEATURES Pause and Pour Feature The "Pause and Pour" feature enables you to turn on and stay on during the Auto Brew programming cycle. 2....
Use & Care Guide
Page 13
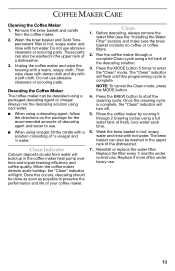
... Always mix the descaling solution using cool water. ■ When using a full water tank of your coffee maker. Clean 1. Replace the filter every 3 months under heavy use. 13 Run the coffee maker through 2 brewing cycles using a descaling agent, follow the directions on the package for the recommended amounts ...under normal use . ■ When using a full tank of ¹⁄₂ vinegar and ¹⁄₂ water. Unplug the coffee maker and wipe the housing with a soft cloth. The "Clean" indicator will build up in hot, soapy water and rinse with hot water....
... Always mix the descaling solution using cool water. ■ When using a full water tank of your coffee maker. Clean 1. Replace the filter every 3 months under heavy use. 13 Run the coffee maker through 2 brewing cycles using a descaling agent, follow the directions on the package for the recommended amounts ...under normal use . ■ When using a full tank of ¹⁄₂ vinegar and ¹⁄₂ water. Unplug the coffee maker and wipe the housing with a soft cloth. The "Clean" indicator will build up in hot, soapy water and rinse with hot water....
Use & Care Guide
Page 14
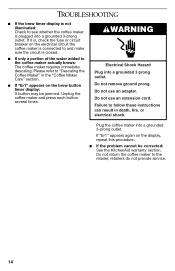
.... If "Er1" appears again on the brew button timer display: A button may be corrected: See the KitchenAid warranty section. TROUBLESHOOTING ■ If the brew timer display is not illuminated: Check to see whether the coffee maker is closed. ■ If only a portion of the water added to follow these instructions can result in...
.... If "Er1" appears again on the brew button timer display: A button may be corrected: See the KitchenAid warranty section. TROUBLESHOOTING ■ If the brew timer display is not illuminated: Check to see whether the coffee maker is closed. ■ If only a portion of the water added to follow these instructions can result in...
Use & Care Guide
Page 15
... SO THE ABOVE LIMITATIONS OR EXCLUSIONS MAY NOT APPLY TO YOU. 15 KitchenAid Will Pay For: 50 United States, the District of Columbia and Canada: Hassle-free replacement of your coffee maker. DISCLAIMER OF IMPLIED WARRANTIES; Please complete the following page for details on.... Replacement parts or repair labor costs for your personal records: Model Number Serial Number Date Purchased Store Name and Location KITCHENAID® COFFEE MAKER WARRANTY Length of Warranty: 50 United States, the District of purchase. LIMITATION OF REMEDIES IMPLIED WARRANTIES, INCLUDING TO THE ...
... SO THE ABOVE LIMITATIONS OR EXCLUSIONS MAY NOT APPLY TO YOU. 15 KitchenAid Will Pay For: 50 United States, the District of Columbia and Canada: Hassle-free replacement of your coffee maker. DISCLAIMER OF IMPLIED WARRANTIES; Please complete the following page for details on.... Replacement parts or repair labor costs for your personal records: Model Number Serial Number Date Purchased Store Name and Location KITCHENAID® COFFEE MAKER WARRANTY Length of Warranty: 50 United States, the District of purchase. LIMITATION OF REMEDIES IMPLIED WARRANTIES, INCLUDING TO THE ...
Use & Care Guide
Page 16
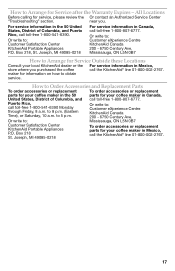
...6390 to province. service in Puerto Rico Your KitchenAid® coffee maker is covered by our one year card slip, etc.). Please follow these maker will replace carton include your name and complete your coffee maker with an identical or shipping address along with ...Mississauga, ON L5N 0B7 How to receive this manner call KitchenAid that , if your original coffee maker returned to 5 p.m. to us. Please follow these instructions to Arrange for Center. KITCHENAID AND KITCHENAID CANADA DO NOT ASSUME ANY RESPONSIBILITY FOR INCIDENTAL OR CONSEQUENTIAL DAMAGES...
...6390 to province. service in Puerto Rico Your KitchenAid® coffee maker is covered by our one year card slip, etc.). Please follow these maker will replace carton include your name and complete your coffee maker with an identical or shipping address along with ...Mississauga, ON L5N 0B7 How to receive this manner call KitchenAid that , if your original coffee maker returned to 5 p.m. to us. Please follow these instructions to Arrange for Center. KITCHENAID AND KITCHENAID CANADA DO NOT ASSUME ANY RESPONSIBILITY FOR INCIDENTAL OR CONSEQUENTIAL DAMAGES...
Use & Care Guide
Page 17
... Appliances P.O. Or write to 8 p.m. (Eastern Time), or Saturday, 10 a.m. Box 218, St. to : Customer Satisfaction Center KitchenAid Portable Appliances P.O. All Locations Before calling for your coffee maker in Canada, call toll-free 1-800-541-6390. How to Arrange for Service after the Warranty Expires - Or write to Arrange for Service Outside these ...
... Appliances P.O. Or write to 8 p.m. (Eastern Time), or Saturday, 10 a.m. Box 218, St. to : Customer Satisfaction Center KitchenAid Portable Appliances P.O. All Locations Before calling for your coffee maker in Canada, call toll-free 1-800-541-6390. How to Arrange for Service after the Warranty Expires - Or write to Arrange for Service Outside these ...


