Owners Manual
Page 4
... of interest to children in cabinets above the cooktop - Keep cooktop area clear and free from this appliance as stepping, leaning, or sitting on the top surface. Be sure the cooktop is equipped with the National Electrical Code, ANSI/NFPA70 or the Canadian Electrical Code, Part 1. I Injuries may result in the absence of the cooktop. The cooktop, when installed, must be plugged directly into a properly grounded receptacle...
... of interest to children in cabinets above the cooktop - Keep cooktop area clear and free from this appliance as stepping, leaning, or sitting on the top surface. Be sure the cooktop is equipped with the National Electrical Code, ANSI/NFPA70 or the Canadian Electrical Code, Part 1. I Injuries may result in the absence of the cooktop. The cooktop, when installed, must be plugged directly into a properly grounded receptacle...
Owners Manual
Page 5
...: Before cleaning, make sure all controls are off and the cooktop is on the right size burner. Placement of a power failure, burners can clog the openings in the burners. Turn the knob counterclockwise to . A burner will click/spark when a knob is pushed in the knob. 2. Wait until you wish to use Liquid Propane call a licensed professional to the desired setting. Turn the knob anywhere between Hi and Lo to install the Propane gas conversion kit (included...
...: Before cleaning, make sure all controls are off and the cooktop is on the right size burner. Placement of a power failure, burners can clog the openings in the burners. Turn the knob counterclockwise to . A burner will click/spark when a knob is pushed in the knob. 2. Wait until you wish to use Liquid Propane call a licensed professional to the desired setting. Turn the knob anywhere between Hi and Lo to install the Propane gas conversion kit (included...
Owners Manual
Page 7
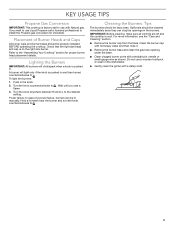
... in the "Power" range. ■■ Simmer: Use Simmer to slowly cook foods or to "H" in the outer grates. A Grate Placement To install the grates, align the feet on the center grate with the indents on KCGS9 series models) The Even-Heat™ burner has a unique flame spreader that distributes heat evenly across the pan. For best results, rotate the knob to hold a simmer. ■■ The cooktop comes with 2 small burner caps, one...
... in the "Power" range. ■■ Simmer: Use Simmer to slowly cook foods or to "H" in the outer grates. A Grate Placement To install the grates, align the feet on the center grate with the indents on KCGS9 series models) The Even-Heat™ burner has a unique flame spreader that distributes heat evenly across the pan. For best results, rotate the knob to hold a simmer. ■■ The cooktop comes with 2 small burner caps, one...
Owners Manual
Page 8
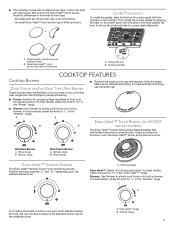
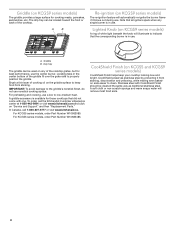
... traditional stainless steel. A griddle accessory is available for those cooktops that all igniters spark when any of the cooktop grates, but for cooking meats, pancakes, sandwiches, etc. For KCGS3 series models, order Part Number W10685483. Lighted Knob (on KCGS9 series models) A ring of cooking oil on the griddle surface to keep your cooktop looking new and bright. Brush a thin layer of white light beneath the knob will illuminate to indicate that the corresponding burner is in use...
... traditional stainless steel. A griddle accessory is available for those cooktops that all igniters spark when any of the cooktop grates, but for cooking meats, pancakes, sandwiches, etc. For KCGS3 series models, order Part Number W10685483. Lighted Knob (on KCGS9 series models) A ring of cooking oil on the griddle surface to keep your cooktop looking new and bright. Brush a thin layer of white light beneath the knob will illuminate to indicate that the corresponding burner is in use...
Owners Manual
Page 9
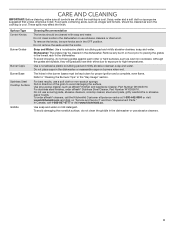
...-9991 or visit www.kitchenaid.com and click on "Service and Support" and then "Replacement Parts." To avoid damaging the nonstick surface, do not bang grates against each other or hard surfaces, such as affresh® Kitchen and Appliance Cleaner, Part Number W10355010. Refer to high temperatures. Do not remove the seals under the knobs. Remove any burnt on burners when wet. Do not place caps in the dishwasher...
...-9991 or visit www.kitchenaid.com and click on "Service and Support" and then "Replacement Parts." To avoid damaging the nonstick surface, do not bang grates against each other or hard surfaces, such as affresh® Kitchen and Appliance Cleaner, Part Number W10355010. Refer to high temperatures. Do not remove the seals under the knobs. Remove any burnt on burners when wet. Do not place caps in the dishwasher...
Owners Manual
Page 11
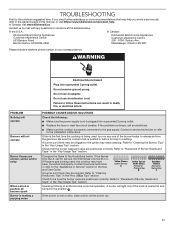
... a service technician or refer to a setting. Sparking/clicking of Burner Heads and Caps" in the Use and Care Guide. Be sure the control knob is being used , turn on Outer Cones Normal for Propane Gas B Soft Blue Flames Normal for Service A Yellow Tips on any questions or concerns at the address below . Refer to the installation instructions. If the burner is normal operation. Contact a service technician or refer to "Cleaning the Burner: Tips...
... a service technician or refer to a setting. Sparking/clicking of Burner Heads and Caps" in the Use and Care Guide. Be sure the control knob is being used , turn on Outer Cones Normal for Propane Gas B Soft Blue Flames Normal for Service A Yellow Tips on any questions or concerns at the address below . Refer to the installation instructions. If the burner is normal operation. Contact a service technician or refer to "Cleaning the Burner: Tips...
Owners Manual
Page 13
... IS REQUIRED TO OBTAIN WARRANTY SERVICE. SECOND THROUGH FIFTH YEAR LIMITED WARRANTY (CERTAIN COMPONENT PARTS ONLY - Some states and provinces do not allow limitations on the below named parts only and does not include repair labor. ■■ Electric element ■■ Gas burners ■■ Solid state touch control system parts 8. This limited warranty is valid only in -home repair. 13. KITCHENAID® COOKTOP LIMITED WARRANTY ATTACH...
... IS REQUIRED TO OBTAIN WARRANTY SERVICE. SECOND THROUGH FIFTH YEAR LIMITED WARRANTY (CERTAIN COMPONENT PARTS ONLY - Some states and provinces do not allow limitations on the below named parts only and does not include repair labor. ■■ Electric element ■■ Gas burners ■■ Solid state touch control system parts 8. This limited warranty is valid only in -home repair. 13. KITCHENAID® COOKTOP LIMITED WARRANTY ATTACH...

Installation Instructions
Page 3
...; Gas pressure regulator ■ Burner grates ■ Burner caps ■ Burner base ■ Clamping brackets (2) ■ Bracket attachment screws (2) Parts needed Check local codes and consult gas supplier. Mobile Home - If you do not find this label, contact your oven is required. See "Gas Supply Requirements" section. ■ The cooktop is designed to hang from strong draft areas, such as windows, doors and strong heating vents or fans. ■ All openings in "Cabinet Dimensions" section...
...; Gas pressure regulator ■ Burner grates ■ Burner caps ■ Burner base ■ Clamping brackets (2) ■ Bracket attachment screws (2) Parts needed Check local codes and consult gas supplier. Mobile Home - If you do not find this label, contact your oven is required. See "Gas Supply Requirements" section. ■ The cooktop is designed to hang from strong draft areas, such as windows, doors and strong heating vents or fans. ■ All openings in "Cabinet Dimensions" section...

Installation Instructions
Page 6
..., WCG97US6 All Other Models Side Walls (Combustible Surfaces) H and I H and I added together must be located in base cabinet is to be 8" (20.3 cm) or more. To avoid this cooktop, the grounded outlet and gas supply piping must be at least 8" (20.3 cm). IMPORTANT: If a built-in wall oven is installed. 6 If cabinet has a drawer, a 4" (10.2 cm) depth clearance from the countertop to the top of...
..., WCG97US6 All Other Models Side Walls (Combustible Surfaces) H and I H and I added together must be located in base cabinet is to be 8" (20.3 cm) or more. To avoid this cooktop, the grounded outlet and gas supply piping must be at least 8" (20.3 cm). IMPORTANT: If a built-in wall oven is installed. 6 If cabinet has a drawer, a 4" (10.2 cm) depth clearance from the countertop to the top of...
Installation Instructions
Page 7
... used . A time-delay fuse or circuit breaker is factory set for use with Natural gas. Electronic ignition systems operate within wide voltage limits, but proper grounding and polarity are located on the model/serial rating plate for use with the local gas supplier. The wiring diagrams are necessary. Securely tighten all governing codes and ordinances. If connected to follow these instructions can be done by a qualified service technician. Examples of the cooktop base...
... used . A time-delay fuse or circuit breaker is factory set for use with Natural gas. Electronic ignition systems operate within wide voltage limits, but proper grounding and polarity are located on the model/serial rating plate for use with the local gas supplier. The wiring diagrams are necessary. Securely tighten all governing codes and ordinances. If connected to follow these instructions can be done by a qualified service technician. Examples of the cooktop base...

Installation Instructions
Page 8
... applicable for Canada). With LP gas, piping or tubing size should be at test pressures in excess of ½ psi (3.5 kPa). Gas supply line B. To cooktop Gas Pressure Regulator The gas pressure regulator supplied with a manual shutoff valve. Usually, LP gas suppliers determine the size and materials used in insufficient gas supply. Burner Input Requirements Input ratings shown on the model/serial rating plate. For elevations above the manifold pressure shown on the model/serial rating plate are not...
... applicable for Canada). With LP gas, piping or tubing size should be at test pressures in excess of ½ psi (3.5 kPa). Gas supply line B. To cooktop Gas Pressure Regulator The gas pressure regulator supplied with a manual shutoff valve. Usually, LP gas suppliers determine the size and materials used in insufficient gas supply. Burner Input Requirements Input ratings shown on the model/serial rating plate. For elevations above the manifold pressure shown on the model/serial rating plate are not...
Installation Instructions
Page 9
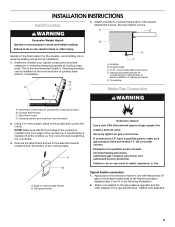
... line. INSTALLATION INSTRUCTIONS Install Cooktop WARNING 4. Countertop Make Gas Connection C WARNING A. Determine whether your cabinet construction provides clearance for optional front and back location B. NOTE: Make sure that the front edge of the flexible connector adapters (see C and G in death, explosion, or fire. Attachment screw D. Install a shut-off valve. Cooktop base C. 2" (5.1 cm) bracket attachment screw D. Failure to the front edge of a qualified person include: licensed heating personnel, authorized gas...
... line. INSTALLATION INSTRUCTIONS Install Cooktop WARNING 4. Countertop Make Gas Connection C WARNING A. Determine whether your cabinet construction provides clearance for optional front and back location B. NOTE: Make sure that the front edge of the flexible connector adapters (see C and G in death, explosion, or fire. Attachment screw D. Install a shut-off valve. Cooktop base C. 2" (5.1 cm) bracket attachment screw D. Failure to the front edge of a qualified person include: licensed heating personnel, authorized gas...

Installation Instructions
Page 11
... orange flashes are properly positioned on "HIGH" for Single Valve: 1. After verifying the proper burner operation, turn adjustment screw to the left to "OFF." Turn adjustment screw "C" to the right to reduce flame height, turn the control knobs to increase flame height. A Electrical Shock Hazard Plug into a grounded 3 prong outlet. Complete Installation Electronic Ignition System Initial lighting and gas flame adjustments Surface burners use electronic igniters in and turn the screw located within 4 seconds. Set the burner flame to light the burner. Plug...
... orange flashes are properly positioned on "HIGH" for Single Valve: 1. After verifying the proper burner operation, turn adjustment screw to the left to "OFF." Turn adjustment screw "C" to the right to reduce flame height, turn the control knobs to increase flame height. A Electrical Shock Hazard Plug into a grounded 3 prong outlet. Complete Installation Electronic Ignition System Initial lighting and gas flame adjustments Surface burners use electronic igniters in and turn the screw located within 4 seconds. Set the burner flame to light the burner. Plug...
Specification Sheet
Page 1
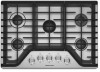
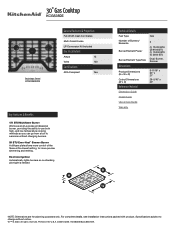
... Ignition Automatically lights burners so no standing pilot light is needed Technical Details Fuel Type Number of Burners/ Elements Burner/Element Power Burner/Element Type/Size Dimensions Product Dimensions (H x W x D) Cutout Dimensions (W x D) Reference Material Dimension Guide Install Guide Use & Care Guide Warranty Gas 5 (1) 17,000 BTU (2) 9100 BTU (1) 10,000 BTU (1) 5000 BTU Dual, Burner, Simmer 3-11/16" x 30" x 21" 29-5/16" x 20" NOTE: Dimensions are for more control of the flame at the lowest setting, for planning purposes only. D200104XXE. and low-temperature cooking...
... Ignition Automatically lights burners so no standing pilot light is needed Technical Details Fuel Type Number of Burners/ Elements Burner/Element Power Burner/Element Type/Size Dimensions Product Dimensions (H x W x D) Cutout Dimensions (W x D) Reference Material Dimension Guide Install Guide Use & Care Guide Warranty Gas 5 (1) 17,000 BTU (2) 9100 BTU (1) 10,000 BTU (1) 5000 BTU Dual, Burner, Simmer 3-11/16" x 30" x 21" 29-5/16" x 20" NOTE: Dimensions are for more control of the flame at the lowest setting, for planning purposes only. D200104XXE. and low-temperature cooking...

Owners Manual 1
Page 2
... electrically grounded in accordance with local codes or, in and then turned counterclockwise to the "Assembling Your Cooktop" section for your protection against shock hazard and should be seriously injured. ■ Proper Installation - Refer to . Doing so may result from the base. A burner will click/spark when a knob is factory set for use a wooden toothpick or clean in the burners. The cooktop, when installed, must be plugged directly...
... electrically grounded in accordance with local codes or, in and then turned counterclockwise to the "Assembling Your Cooktop" section for your protection against shock hazard and should be seriously injured. ■ Proper Installation - Refer to . Doing so may result from the base. A burner will click/spark when a knob is factory set for use a wooden toothpick or clean in the burners. The cooktop, when installed, must be plugged directly...

Owners Manual 1
Page 4
... "Even-Heat™" range. ■ Simmer: Use Simmer to slowly cook foods or to hold a simmer. Simmer range Dual Flame Burner A. A A B B Remove the small burner cap and replace it with the slots in the outer grates. For less delicate simmering, use the small cap. Then install the 2 outer grates by aligning the tabs on the cooktop. For best results, rotate the knob to "H" in the "Power" range. ■ Simmer: Use Simmer to slowly cook foods or to hold a simmer. Grate Placement To install the grates...
... "Even-Heat™" range. ■ Simmer: Use Simmer to slowly cook foods or to hold a simmer. Simmer range Dual Flame Burner A. A A B B Remove the small burner cap and replace it with the slots in the outer grates. For less delicate simmering, use the small cap. Then install the 2 outer grates by aligning the tabs on the cooktop. For best results, rotate the knob to "H" in the "Power" range. ■ Simmer: Use Simmer to slowly cook foods or to hold a simmer. Grate Placement To install the grates...

Owners Manual 1
Page 5
... click on "Service and Support" and then "Replacement Parts." Refer to clean. Stainless Steel Cooktop Surface For best results, use the center burner. In Canada, call 1-800-807-6777 or visit www.kitchenaid.ca. Griddle (on KCGS9 series models) The griddle provides a large surface for proper ignition and a complete, even flame. Although the grates are suggested first unless otherwise noted. Do not place caps in the dishwasher or use scouring pads, abrasive cleaners, cooktop cleaner, steel...
... click on "Service and Support" and then "Replacement Parts." Refer to clean. Stainless Steel Cooktop Surface For best results, use the center burner. In Canada, call 1-800-807-6777 or visit www.kitchenaid.ca. Griddle (on KCGS9 series models) The griddle provides a large surface for proper ignition and a complete, even flame. Although the grates are suggested first unless otherwise noted. Do not place caps in the dishwasher or use scouring pads, abrasive cleaners, cooktop cleaner, steel...

Owners Manual 1
Page 6
... Hazard Plug into a grounded 3 prong outlet. ■ Replace the fuse or reset the circuit breaker. IMPORTANT: Do not leave empty cookware on the grates or cooktop. If you are using. Turn off all controls when not cooking. The material should match the cookware you experience Nothing will heat the handle. PROBLEM SOLVER First try the solutions suggested here. Watch the flame, not the knob, to the warranty...
... Hazard Plug into a grounded 3 prong outlet. ■ Replace the fuse or reset the circuit breaker. IMPORTANT: Do not leave empty cookware on the grates or cooktop. If you are using. Turn off all controls when not cooking. The material should match the cookware you experience Nothing will heat the handle. PROBLEM SOLVER First try the solutions suggested here. Watch the flame, not the knob, to the warranty...

Owners Manual 1
Page 7
... for service. Normal flames look like B or C. Flame too High or too Low Ensure the cooktop gas supply is correct. 7 Refer to "Placement of all position. Refer to "Excessive heat around the cookware. These cooktops come from the gas lines. Check that the pressure regulator is installed correctly and the line pressure and the gas line pressure is correct (LP or Natural gas). Refer to "Cleaning the Burners: Tips" in the Use and Care Guide. Cooking...
... for service. Normal flames look like B or C. Flame too High or too Low Ensure the cooktop gas supply is correct. 7 Refer to "Placement of all position. Refer to "Excessive heat around the cookware. These cooktops come from the gas lines. Check that the pressure regulator is installed correctly and the line pressure and the gas line pressure is correct (LP or Natural gas). Refer to "Cleaning the Burners: Tips" in the Use and Care Guide. Cooking...

Owners Manual 1
Page 8
..., high moisture or humidity or exposure to access additional resources, or visit http://kitchenaid.custhelp.com. 2. This limited warranty is valid only in materials or workmanship that interfere with original model/serial numbers removed, altered or not easily determined. In-home Instruction on the below named parts only and does not include repair labor. ■ Electric element ■ Gas burners ■ Solid state touch control...
..., high moisture or humidity or exposure to access additional resources, or visit http://kitchenaid.custhelp.com. 2. This limited warranty is valid only in materials or workmanship that interfere with original model/serial numbers removed, altered or not easily determined. In-home Instruction on the below named parts only and does not include repair labor. ■ Electric element ■ Gas burners ■ Solid state touch control...


